
WordPress runs a bigger slice of the web than any other tool, powering roughly four in every ten websites you visit. That has been true for years, and in 2026 it is still the platform to reach for when you want a site you fully own, one you can grow into a shop, a membership, a busy blog, or a proper business presence without hitting a ceiling. The trade is simple: a website builder gets you online faster, but WordPress hands you the keys.
This guide walks you through building a real, self-hosted WordPress site from scratch, no coding required. You can get the core of it done in an afternoon. By the end you will have a live site with your own domain, a theme you have customised, the handful of plugins that actually matter, your first pages published, and search engines already crawling you. We will use the block editor and the Site Editor that ship with WordPress today, plus the AI helpers that have become normal in 2026, so nothing here is the fiddly old WordPress your friend complained about in 2018.
Be honest with yourself about the trade first, though. WordPress asks for more setup than a drag-and-drop builder. You pick a host, install the software, choose a theme, and wire up plugins yourself. In return you get full control and ownership: your files, your database, your content, movable to any host on earth whenever you like. If you would rather skip that and click your way to a finished site, the easier routes are the website builders and the newer AI website builders, which trade some control for speed. For everyone who wants to build something they can keep and scale, WordPress is worth the extra hour.
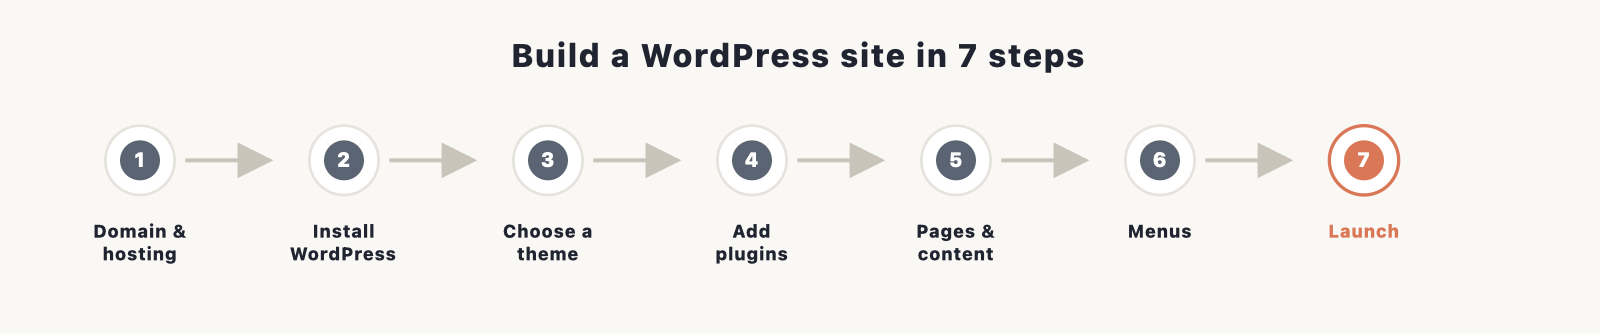
In this guide
- WordPress.org vs WordPress.com
- What you need before you start
- Step 1: Choose your hosting and domain
- Step 2: Install WordPress
- Step 3: Find your way around the dashboard
- Step 4: Choose and set up your theme
- Step 5: Install the essential plugins
- Step 6: Create your pages and content
- Step 7: Set up your menus and navigation
- Step 8: Optimise for SEO and speed
- Step 9: Launch and maintain
- What a WordPress website costs
- Can you build a WordPress site with AI?
- Frequently asked questions
WordPress.org vs WordPress.com
The first thing that trips people up is that there are two WordPresses, and they are not the same product. Getting this right at the start saves you a painful migration later.
WordPress.org is the free, open-source software. You download it, install it on hosting you control, and it becomes yours. This is what people mean by “self-hosted WordPress”. You choose the host, you install any of the 60,000-plus free plugins, you edit anything, and you can move the whole site elsewhere at any point. It costs nothing for the software itself; you pay only for hosting and a domain. This is the version this guide is about, and the one I recommend for anyone building something they intend to keep.
WordPress.com is a hosted service run by Automattic, the company founded by WordPress co-creator Matt Mullenweg. It uses the same underlying software but manages the hosting for you, so setup is simpler and there is nothing to install. The catch is the plans. On the free and cheaper tiers you cannot install your own plugins or themes, and you are stuck with WordPress.com branding and adverts. To install custom plugins, the thing most people eventually want, you need the Business plan, which costs considerably more per year than self-hosting the equivalent site.
The naming clash is the most common source of confusion for newcomers. People sign up on WordPress.com because it is the name they typed into a search box, then spend a fortnight trying to install a plugin the plan will not allow, before discovering the version they wanted was the free download all along. If a tutorial tells you to upload a plugin ZIP file and your dashboard has no such option, that is the tell that you are on managed WordPress.com rather than the self-hosted software.
| Feature | WordPress.org (self-hosted) | WordPress.com (managed) |
|---|---|---|
| Software cost | Free | Free tier available, paid plans for real features |
| Hosting | You choose and pay a host | Included |
| Custom plugins | Any of 60,000+, from day one | Business tier only |
| Custom themes | Unlimited | Business tier only |
| Control and ownership | Full: your files and database | Limited by your plan |
| Move to another host | Yes, any time | Harder, tied to the platform |
| Best for | Anyone serious about growing a site | A quick, low-maintenance personal site |
My rule of thumb: if you are asking which to use, choose WordPress.org. The tiny bit of extra setup pays for itself the first time you want a plugin the managed version will not let you install. The rest of this guide assumes self-hosted WordPress.
What you need before you start
You need surprisingly little to get going. Here is the full list:
- A domain name. This is your web address, such as yourbusiness.com. It costs about $10 to $15 a year, and many hosts throw in the first year free.
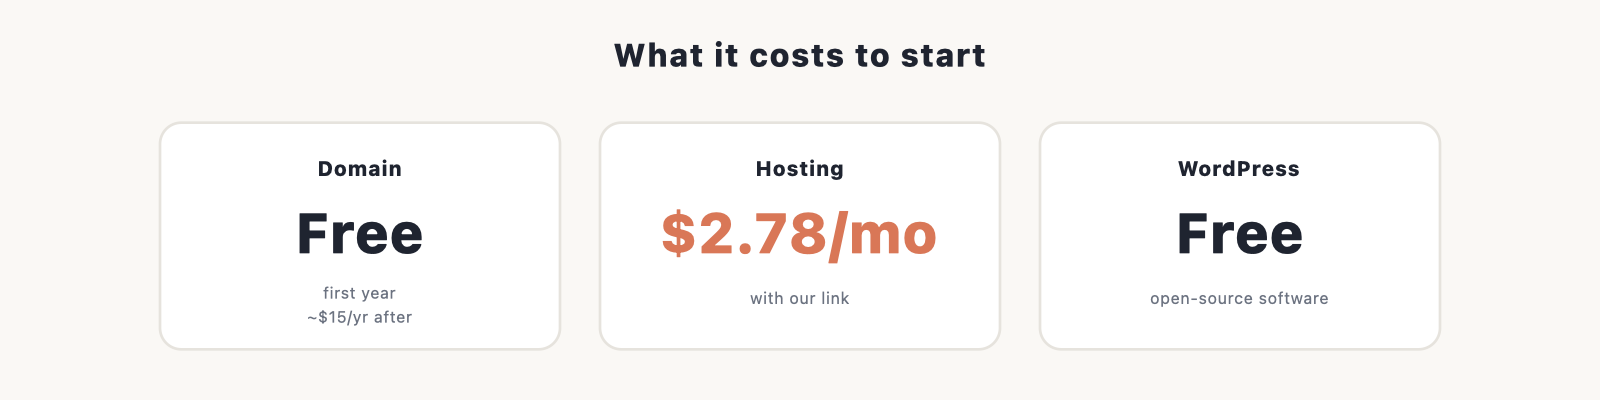
- Web hosting. This is the space on a server where your site lives. Managed WordPress hosting starts at around $2.99 a month on a longer plan.
- About one to two hours. The core setup is quick. Filling in content takes as long as you want it to.
- A rough plan of your pages. Jot down the pages you will need before you start. For most sites that is a home page, an about page, a contact page, and a privacy policy, plus a blog or shop if that suits you. Knowing this up front stops you flailing around later.
It helps to gather a few assets before you sit down, so you are not stopping every five minutes to hunt for them. Have your logo ready as a PNG if you have one, decide on two or three brand colours, collect the photos you want on the home and about pages, and note your business email, phone number, and address if you plan to publish them. No logo yet is no reason to stall; a clean text-only title works fine for launch and you can add artwork later without touching anything else.
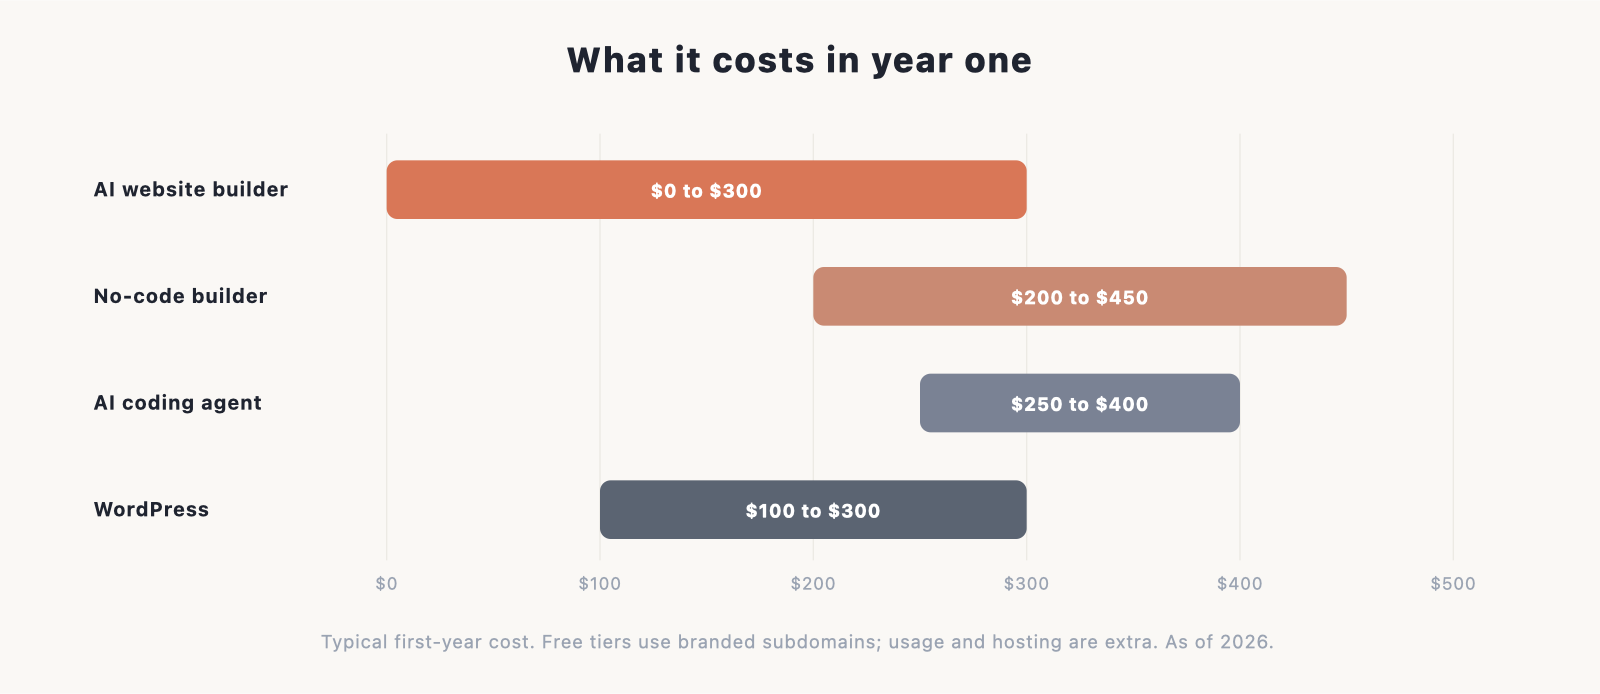
Cost-wise, a straightforward site runs to roughly $100 to $300 in its first year once you add hosting, a domain, and maybe one premium theme or plugin. We break the numbers down properly further down the page, and you can compare against what a website costs across different approaches.
Step 1: Choose your hosting and domain
Hosting is the one decision that affects everything else: your speed, your uptime, how painless setup is, and how much hand-holding you get when something breaks. For a first WordPress site you want managed WordPress hosting, which means the host tunes its servers for WordPress specifically and usually installs the software for you.
I recommend Hostinger for most people building their first site. As of 2026 its managed WordPress plans start at about $2.99 a month on a 48-month term, and that introductory rate renews at roughly $10.99 a month afterwards, so budget for the higher figure at renewal. The starting plan includes a free domain for the first year, a free SSL certificate, and access to an AI website builder that can generate a WordPress starter site for you. That combination makes it the least painful on-ramp I know of.
Bluehost is the solid alternative, starting at about $2.95 a month and renewing around $11.99. It has been an officially recommended WordPress host for years and its one-click setup is beginner-friendly. SiteGround is a third option, from about $2.99 a month renewing near $17.99, pricier on renewal but well regarded for support and speed.
One point worth understanding before you pay: those headline prices almost always require you to commit to the longest term up front, so a “$2.99 a month” plan is in practice a single charge for three or four years at checkout. It works out cheaper than paying monthly, but go in knowing you are prepaying. Watch the checkout screen too, because hosts pre-tick add-ons like domain privacy, site scanners, and email that inflate the total. Untick anything you did not decide you needed; domain privacy is the one usually worth keeping, and many hosts now include it free anyway.
Whichever you pick, register your domain at the same time. If your host offers a free first-year domain, use it. Otherwise a domain runs about $10 to $15 a year. Pick something short, easy to say out loud, and ideally a .com unless a country domain fits your audience better. A common beginner mistake is a clever misspelling or a name stuffed with hyphens and numbers; both are hard to say aloud and hard to type from memory, so keep it plain. Before you commit, search the name to make sure it is not already a well-known brand.
When you compare hosts, these are the things worth checking:
- One-click WordPress install so you are not uploading files by hand.
- Free SSL certificate for the padlock and HTTPS, which is now expected on every site.
- Speed, ideally SSD or NVMe storage, server-level caching, and a data centre near your visitors.
- Support that answers quickly, preferably 24/7 live chat, because you will have a question at some point.
- Free automated backups or at least an easy way to enable them.
Practical tip: before you buy, open the host’s live chat and ask a plain question about their WordPress plans. How fast and how helpfully they reply tells you more about the support you will get at 11pm on a launch night than any marketing page does.
Step 2: Install WordPress
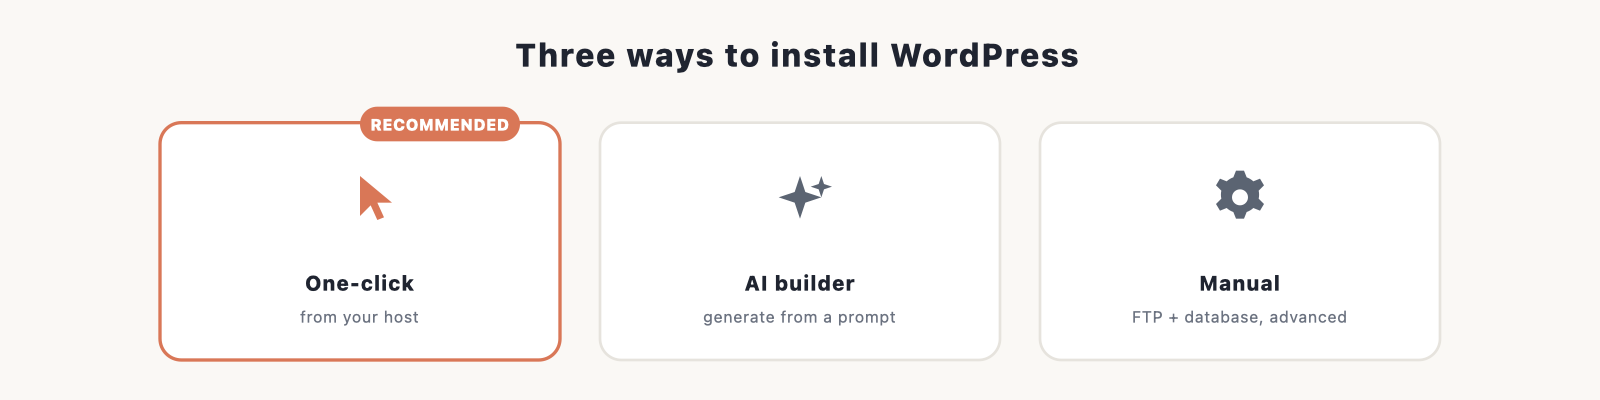
This used to be the scary bit. It is not any more. You have three easy routes, and you only need one.
The one-click install
Most hosts include a one-click WordPress installer in their control panel, often through a tool called Softaculous or a native installer built into the host’s own dashboard. You log in to your hosting account, find the WordPress or “Auto Install” option, choose the domain you want it on, set an admin username and a strong password, and let it run. A minute or two later WordPress is live at your domain. Write the admin login down somewhere safe.
Two choices on that install screen matter more than they look. First, do not use “admin” as your username; it is the first thing automated attacks try, so pick something less obvious. Second, if the installer offers a box for the installation directory, leave it blank so WordPress installs at the root of your domain rather than in a folder like yourdomain.com/wordpress, which beginners set once and then cannot work out how to undo. If you are pointing a brand-new domain at the host, give it an hour or two before you panic; DNS changes take a little while to propagate, and a “site not found” error in the first hour is usually just that.
Hostinger’s guided onboarding
If you signed up with Hostinger, the setup wizard walks you through it after you first log in. It asks what kind of site you are building, installs WordPress, and drops you into the dashboard ready to go. You do not have to hunt for the installer at all. If it offers to install a starter theme or a bundle of plugins along the way, you can accept them to save time, but there is no harm in declining and adding your own later; nothing here is locked in.
The Hostinger AI builder for WordPress
The newest route is to let AI do the first draft. Hostinger’s AI website builder for WordPress asks you a few questions or takes a short prompt describing your site, then generates a full WordPress starter site, pages, layout, placeholder text and images, in about a minute. You still get a normal WordPress install underneath, which you then edit yourself. It is a quick way to skip the blank-page problem. We cover the AI options in more detail near the end.
Whichever route you take, your host should set up SSL and HTTPS automatically, so your site loads with the padlock from the start. If it does not, look for a “Free SSL” or “Let’s Encrypt” toggle in the hosting panel and switch it on. Practical tip: once WordPress is installed, bookmark the login page at yourdomain.com/wp-admin straight away, because that address is the one thing you will need every single time and the one people always forget.
Step 3: Find your way around the dashboard
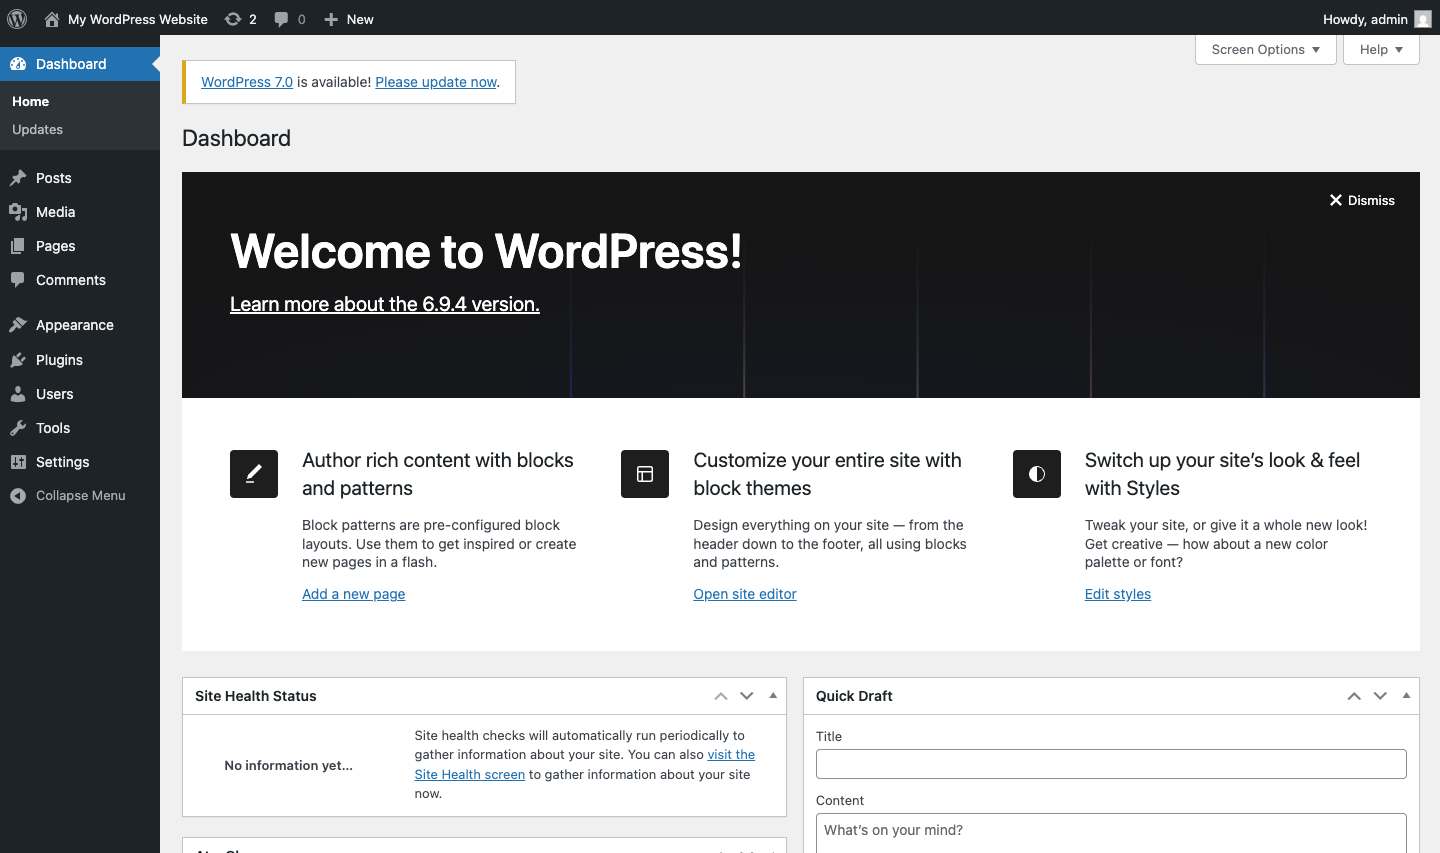
Log in by going to yourdomain.com/wp-admin and entering the username and password you set. You land on the WordPress dashboard, the control centre for everything. It looks busy the first time, but you will use only a handful of menus regularly. Down the left-hand side is a dark vertical menu; that is your main navigation, and hovering over each item slides out its sub-options. Across the top is a slim admin bar that stays with you even on the live site, and its “Visit Site” link is the quickest way to flip between editing and seeing the result.
- Posts are your blog articles and any time-stamped content.
- Pages are your fixed content: home, about, contact, and so on.
- Appearance is where themes live, and where you open the Site Editor to change how the site looks.
- Plugins is where you add and manage the tools that extend WordPress.
- Settings holds the site-wide options, and it is where you should start.
Before you touch anything else, run through these first-run settings. They take five minutes and save headaches later.
- Set your Site Title and tagline. Go to Settings, then General. The title is your site or business name; the tagline is a short one-line description. These show up in search results and browser tabs, so make them count. A common miss here is leaving the default “Just another WordPress site” tagline in place, which then appears in Google; change it or clear it.
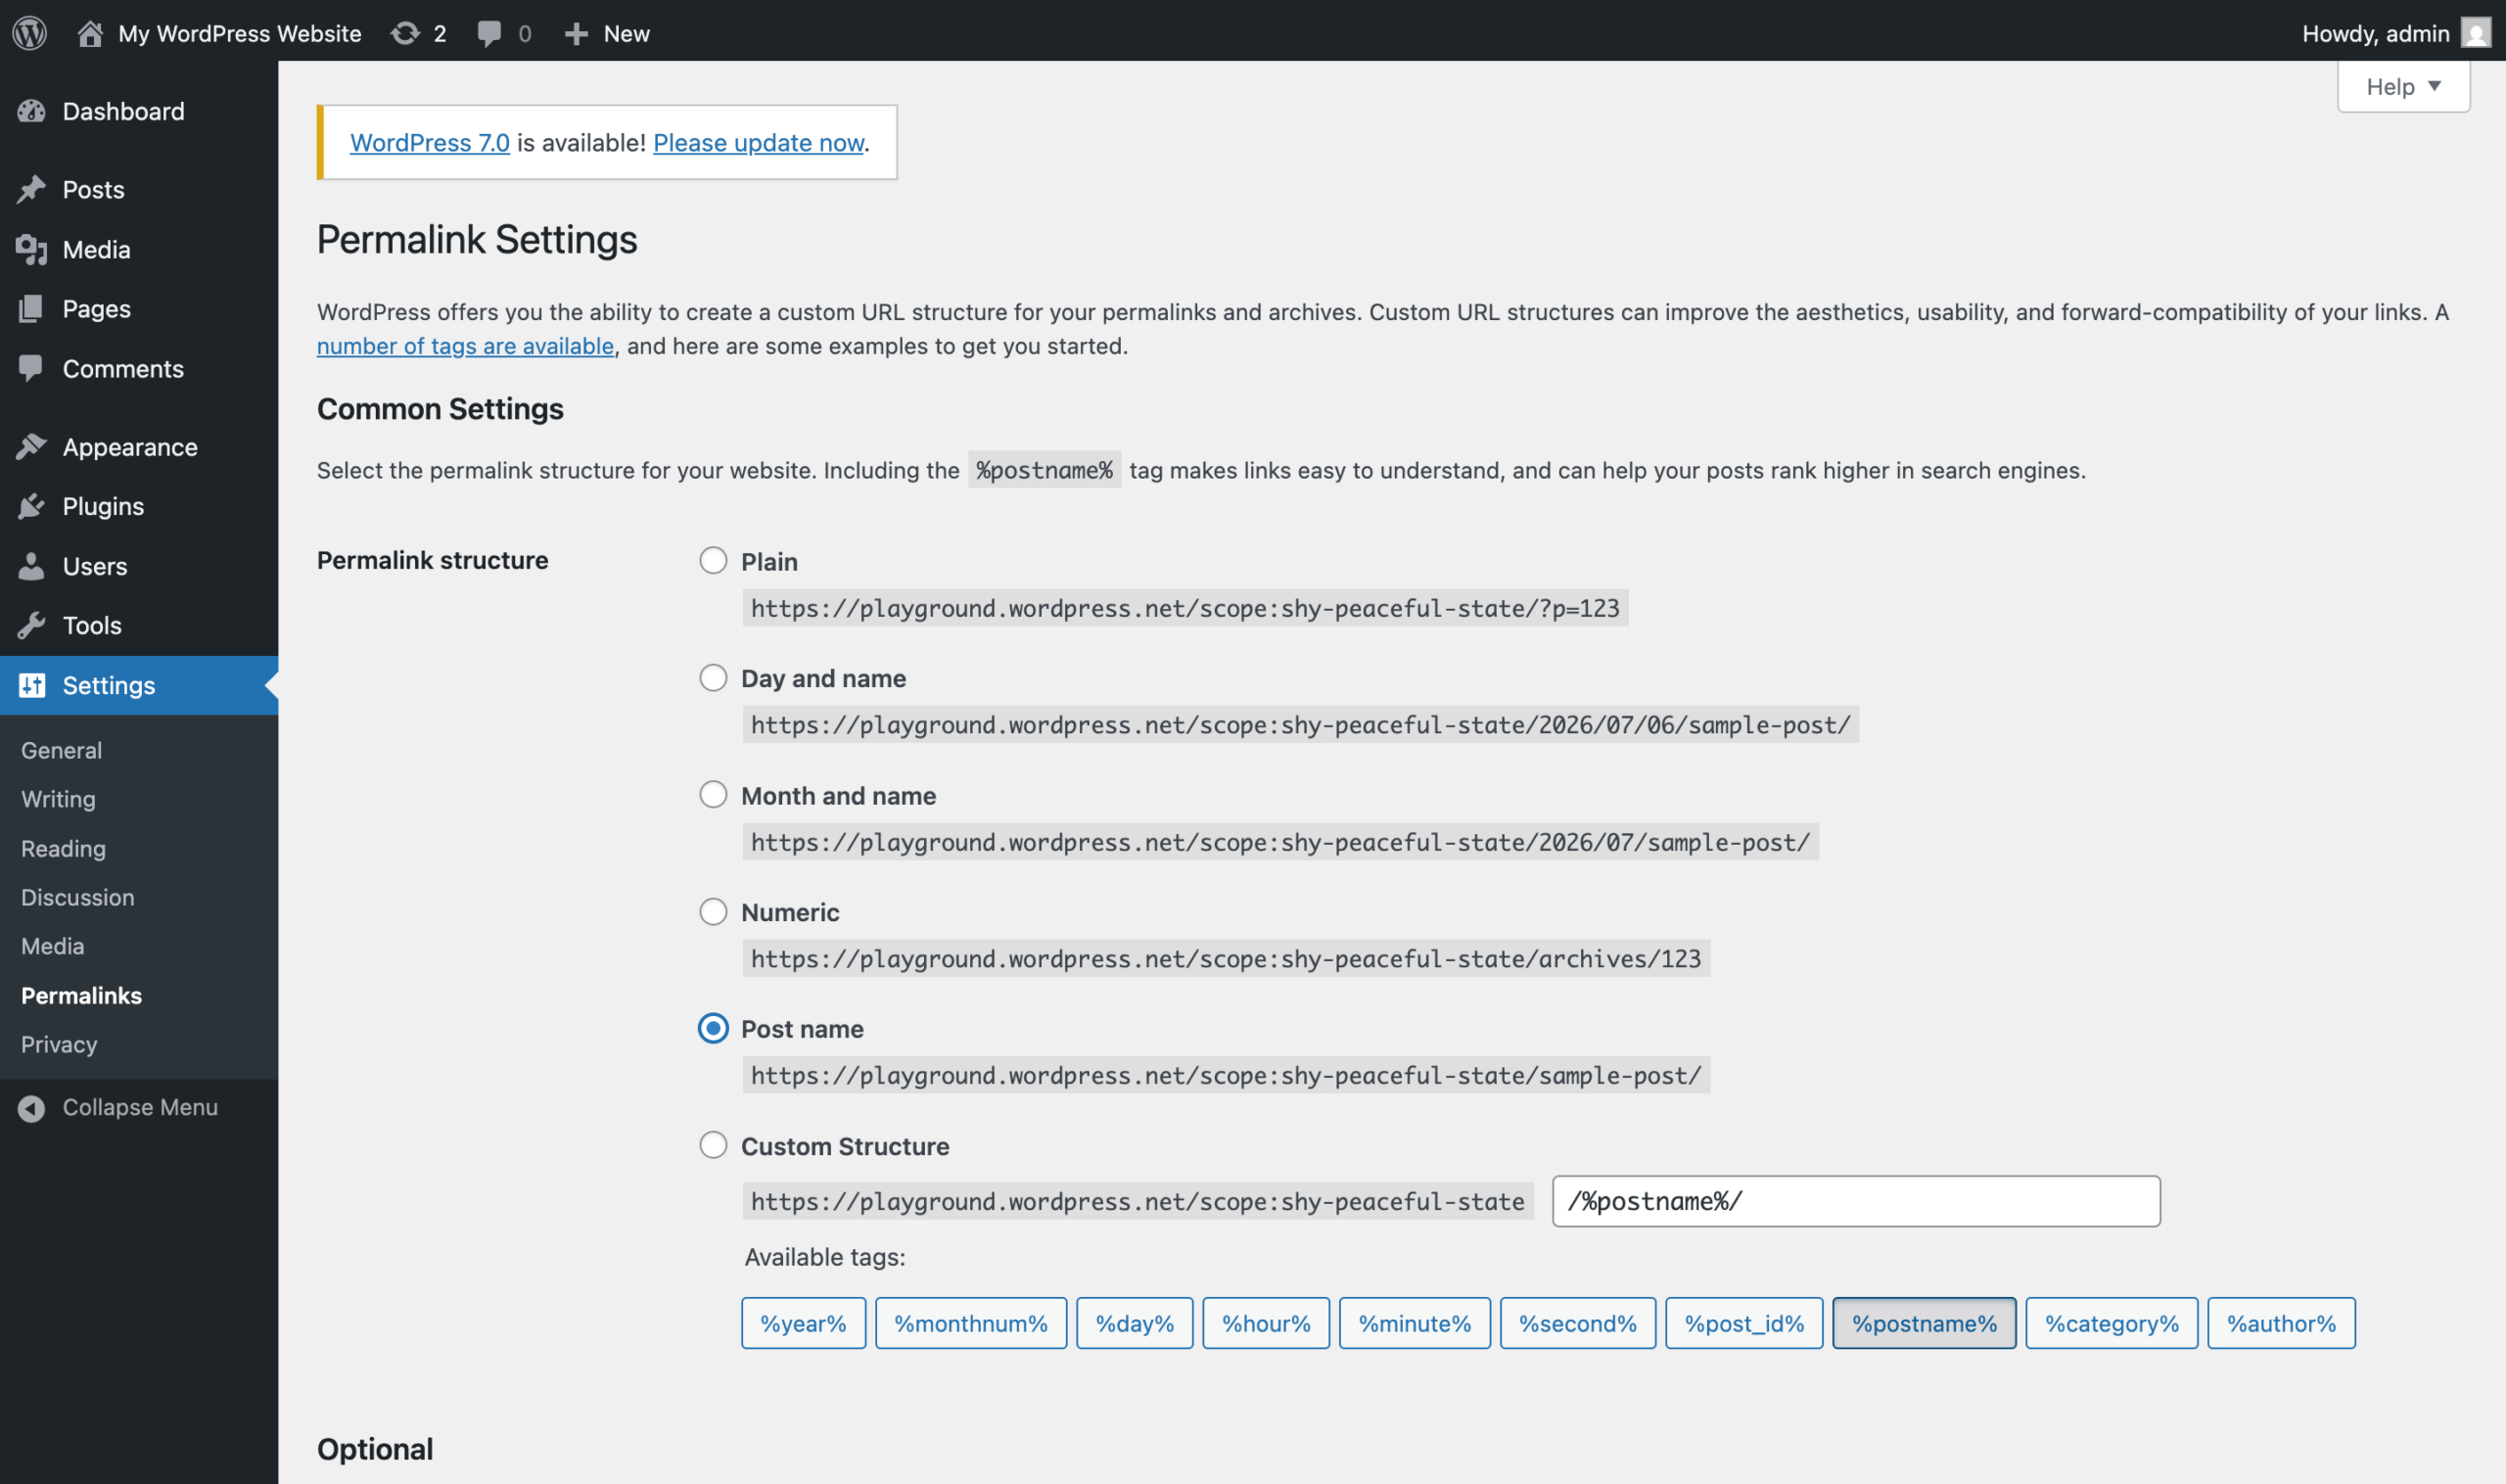
- Fix your permalinks. Go to Settings, then Permalinks, and choose “Post name”. This gives you clean, readable URLs like yourdomain.com/about instead of an ugly string of numbers. Do this early, because changing it after you have published means broken links and lost search rankings for any page that has already been indexed.
- Set your timezone. Back in Settings, then General, set the timezone to your location so scheduled posts and comment times are correct.
Practical tip: while you are in Settings, then Discussion, decide now whether you want comments at all. If your site is a business brochure rather than a blog, turning comments off before you publish saves you from wading through spam later. Remember to delete the sample “Hello world” post and “Sample Page” too, so no placeholder text sits live on a launched site.
Step 4: Choose and set up your theme
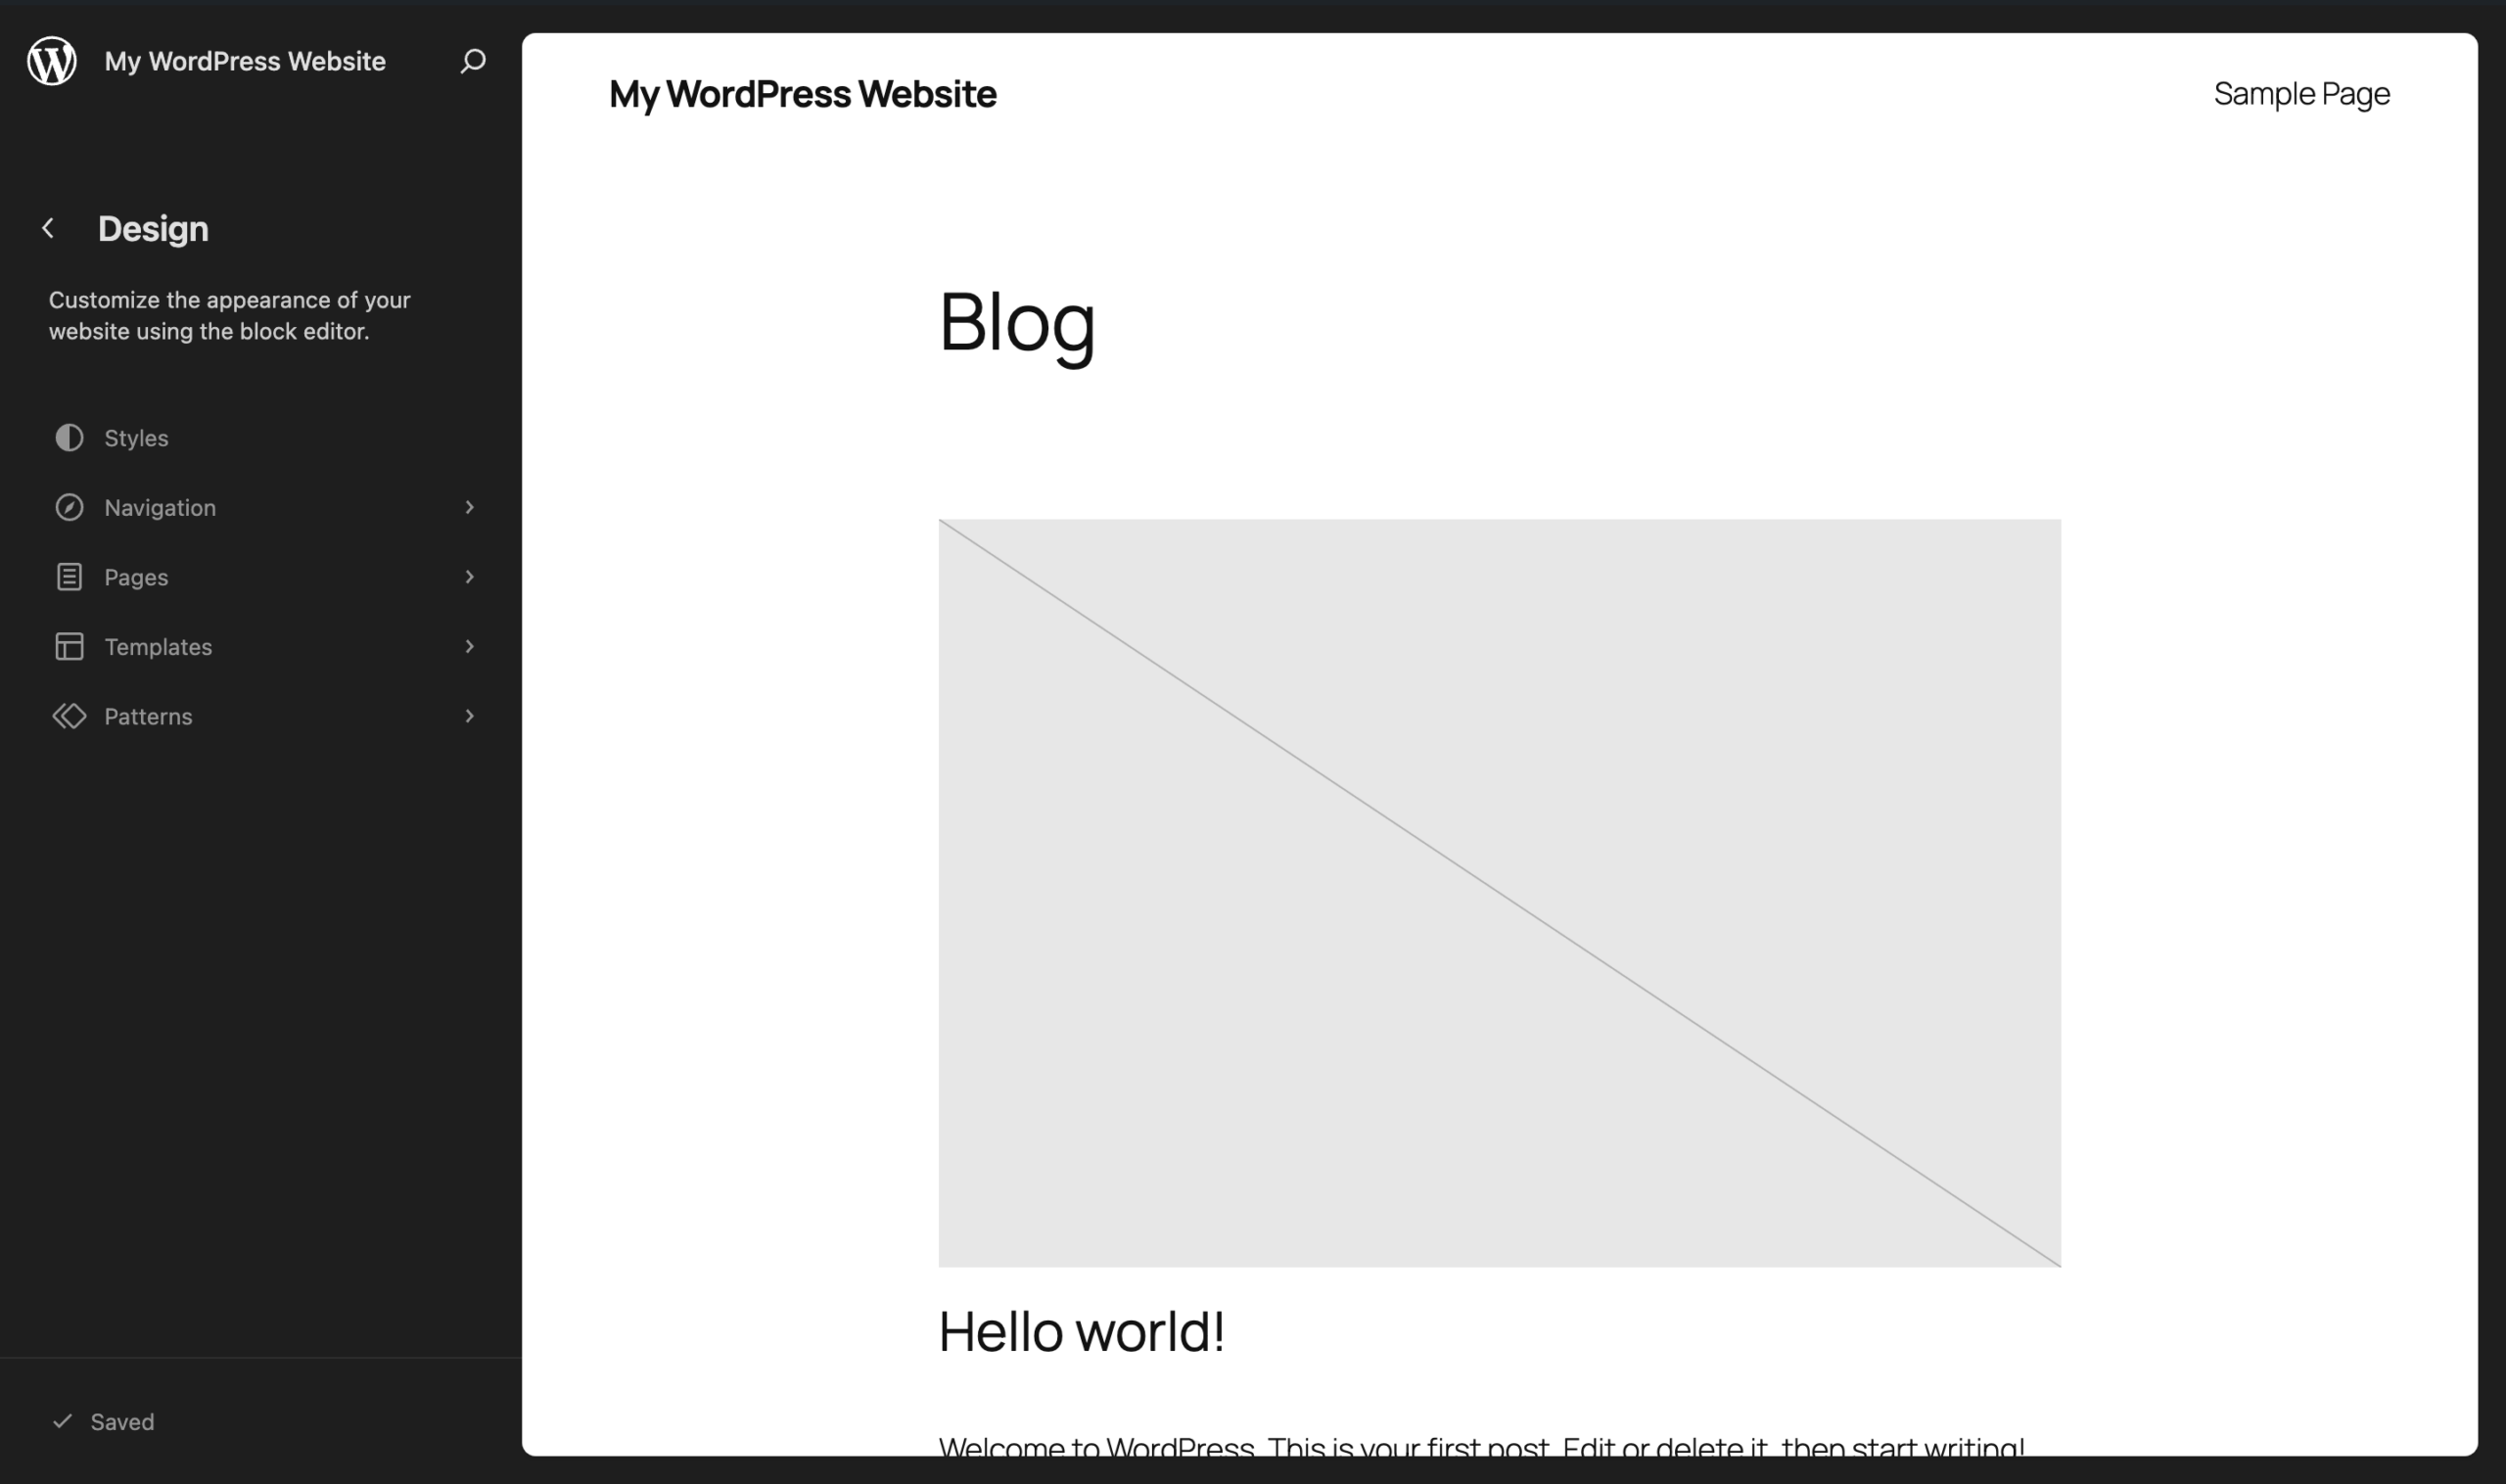
Your theme controls how the site looks: colours, fonts, layout, headers, footers. In 2026 most beginners work with a block theme, which you edit visually in the Site Editor, the feature WordPress calls Full Site Editing. You change the actual design by clicking on it, no code, no separate customiser screen for half the settings.
It is worth understanding how this differs from the old way, because most tutorials online still describe the previous system. For years WordPress split design across two places: a “Customizer” for global bits like colours and the logo, and separate PHP template files that only a developer could touch for the header, footer, and page structure. Block themes collapse all of that into one visual editor, so what used to need a child theme and a code editor is now a matter of clicking the part you want to change and adjusting it in a side panel. If a guide tells you to open Appearance, then Customize, but your theme instead sends you to Appearance, then Editor, you are on a block theme and the newer instructions are the ones to follow.
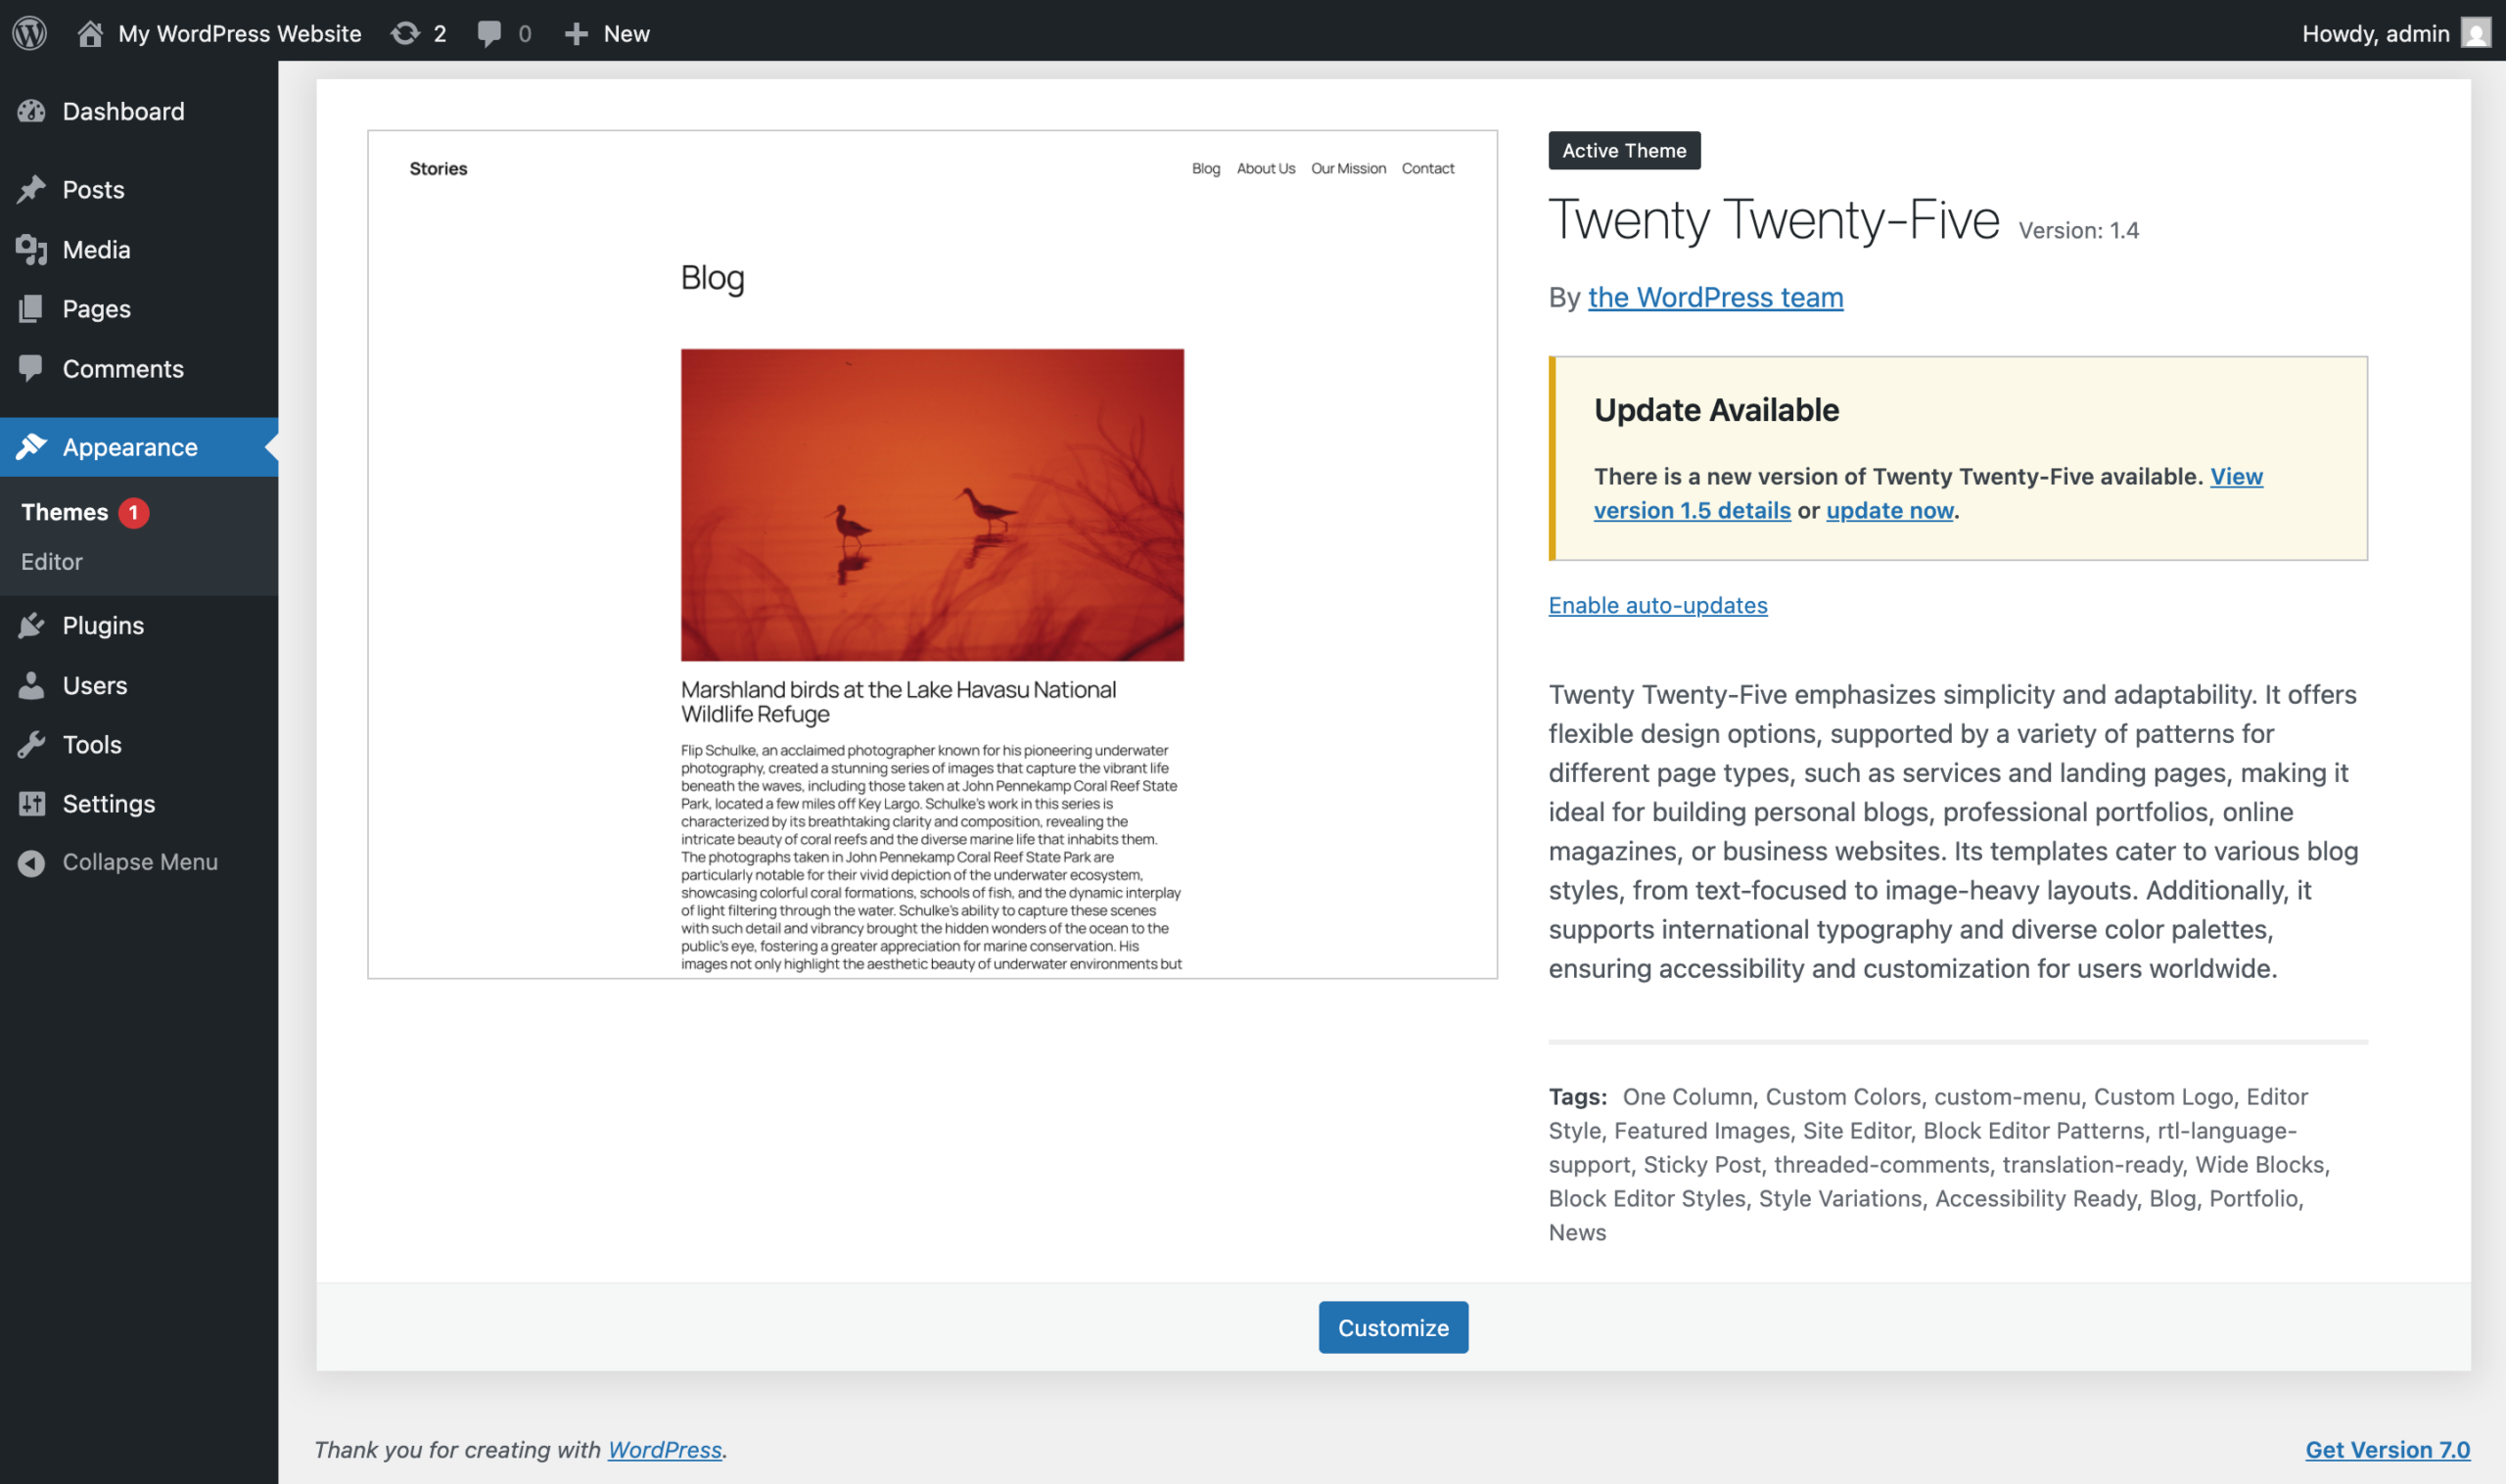
Fresh installs ship with Twenty Twenty-Five, the current default block theme, and it is a perfectly good starting point. If you want more flexibility and a library of ready-made starter templates, these are the popular picks:
- Astra: the most-installed third-party theme, lightweight, with a huge library of starter templates you can import in a click.
- Kadence: flexible and well built, strong for small business and shop sites, with its own block library.
- GeneratePress: about the fastest and cleanest option, favoured by people who care most about performance.
- Blocksy: modern and generous on its free tier, with tidy defaults and good header and footer controls.
Installing and customising a theme
To add one, go to Appearance, then Themes, then “Add New”. Search by name, click “Install”, then “Activate”. Once it is active, open Appearance, then Editor to launch the Site Editor. From there you can change colours and fonts globally through the Styles panel, upload your logo, edit the header and footer, and rearrange the layout of your pages by dragging blocks around. Change something, preview it, save when you are happy. Nothing is permanent until you hit save.
The Styles panel is the one to master, because it sets your look in one place. Open it (the half-shaded circle icon in the top corner of the Site Editor), set your brand colours and heading and body fonts there once, and every page inherits them, which is tidier than styling each page by hand. A frequent beginner trap is switching themes over and over chasing the perfect design; every switch resets your layout choices, so settle on one early and shape it. Another is deleting every spare theme: keep one recent default theme installed alongside your active one, so you have something to switch to if your main theme ever breaks after an update.
Page builders (optional)
If the Site Editor does not give you enough visual control, you can add a page builder as an extra design layer on top. Elementor has a capable free version, with Elementor Pro at about $59 a year for the advanced widgets and theme-building features. Divi is another well-known option at about $89 a year, or $249 for a lifetime licence. These are useful for pixel-precise layouts, but they are not required. Plenty of good sites use nothing beyond a block theme and the Site Editor, and staying lean keeps your site faster.
Step 5: Install the essential plugins
Plugins are how WordPress does everything a website builder bakes in behind the scenes: SEO tools, security, forms, backups, and more. There are more than 60,000 free ones in the official directory, which is both the platform’s superpower and its biggest trap. The mistake beginners make is installing dozens, which slows the site down and invites conflicts. Start with about six, and only add more when you have a real need.
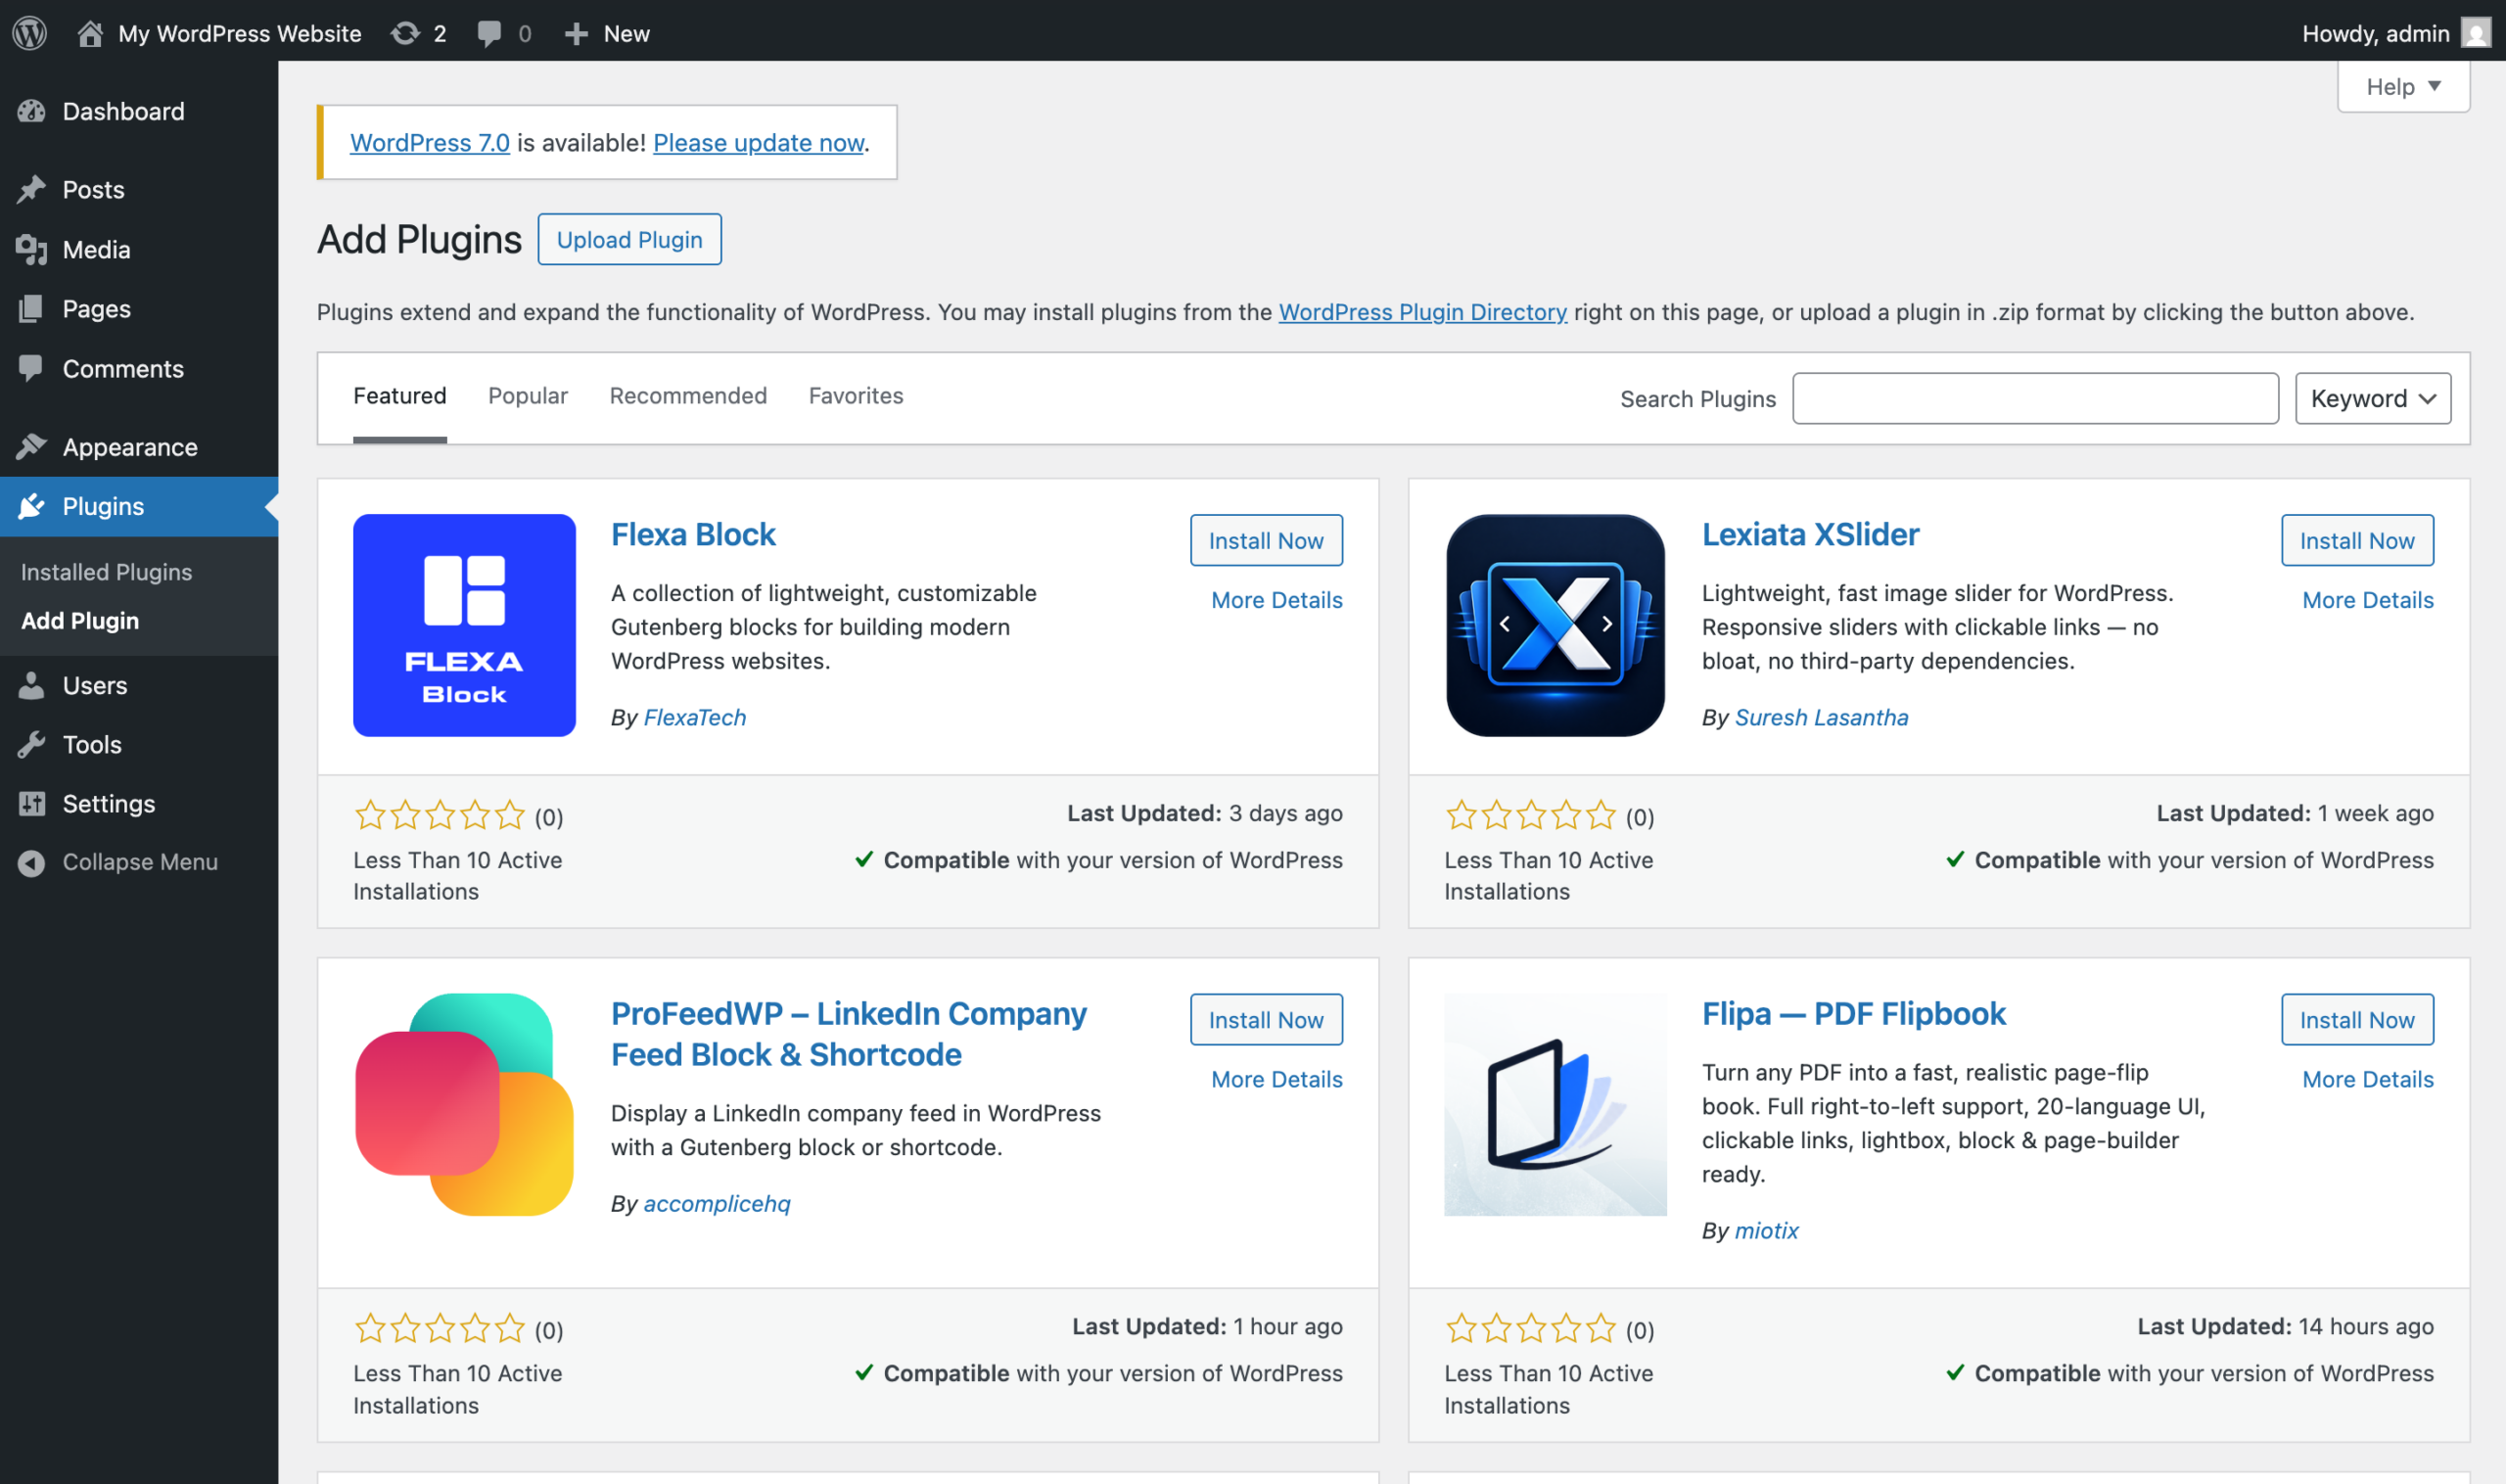
To install any of them, go to Plugins, then “Add New”, search by name, click “Install Now”, then “Activate”. Before you install anything, glance at two numbers on its listing: when it was last updated and how many active installations it has. A plugin last updated two years ago is one to avoid, however good the reviews, because an abandoned plugin is a future security hole.
| Job | Recommended plugin | Notes |
|---|---|---|
| SEO | Rank Math or Yoast | Handles titles, meta descriptions, and your XML sitemap. Pick one, not both. |
| Security | Wordfence or Solid Security | Firewall and login protection against the constant background attacks every site gets. |
| Caching and speed | WP Rocket or LiteSpeed Cache | Serves cached pages so visitors load faster. LiteSpeed is free and excellent on compatible hosts. |
| Backups | UpdraftPlus | Scheduled automatic backups to cloud storage, so a bad update never loses your site. |
| Forms | WPForms | Drag-and-drop contact and enquiry forms, with a free tier that covers the basics. |
| Anti-spam | Akismet | Ships with WordPress; activate it and add a free key to stop comment spam. |
Why each one earns its place: the SEO plugin lets you control how your pages appear in search rather than leaving it to chance. The security plugin blocks the automated login attempts that hit every WordPress site within hours of going live, whether anyone knows it exists or not. The caching plugin stores a ready-made copy of each page so the server does not rebuild it on every visit, which is the biggest single speed win most sites get. Backups are your undo button when an update or a mistake takes the site down. The forms plugin gives visitors a way to reach you without exposing your email to scrapers. And anti-spam keeps your comments and form inbox from filling with junk the day you launch.
That set covers what almost every site needs. Resist the urge to keep adding. Every plugin is code that loads, updates, and occasionally breaks, so keep the list short on purpose. If two plugins do the same job, remove one; running two SEO plugins or two caching plugins at once is a classic cause of a site that suddenly behaves oddly. When you deactivate a plugin you have decided against, delete it rather than leaving it dormant, because deactivated plugins still need updating and can still be exploited.
Step 6: Create your pages and content
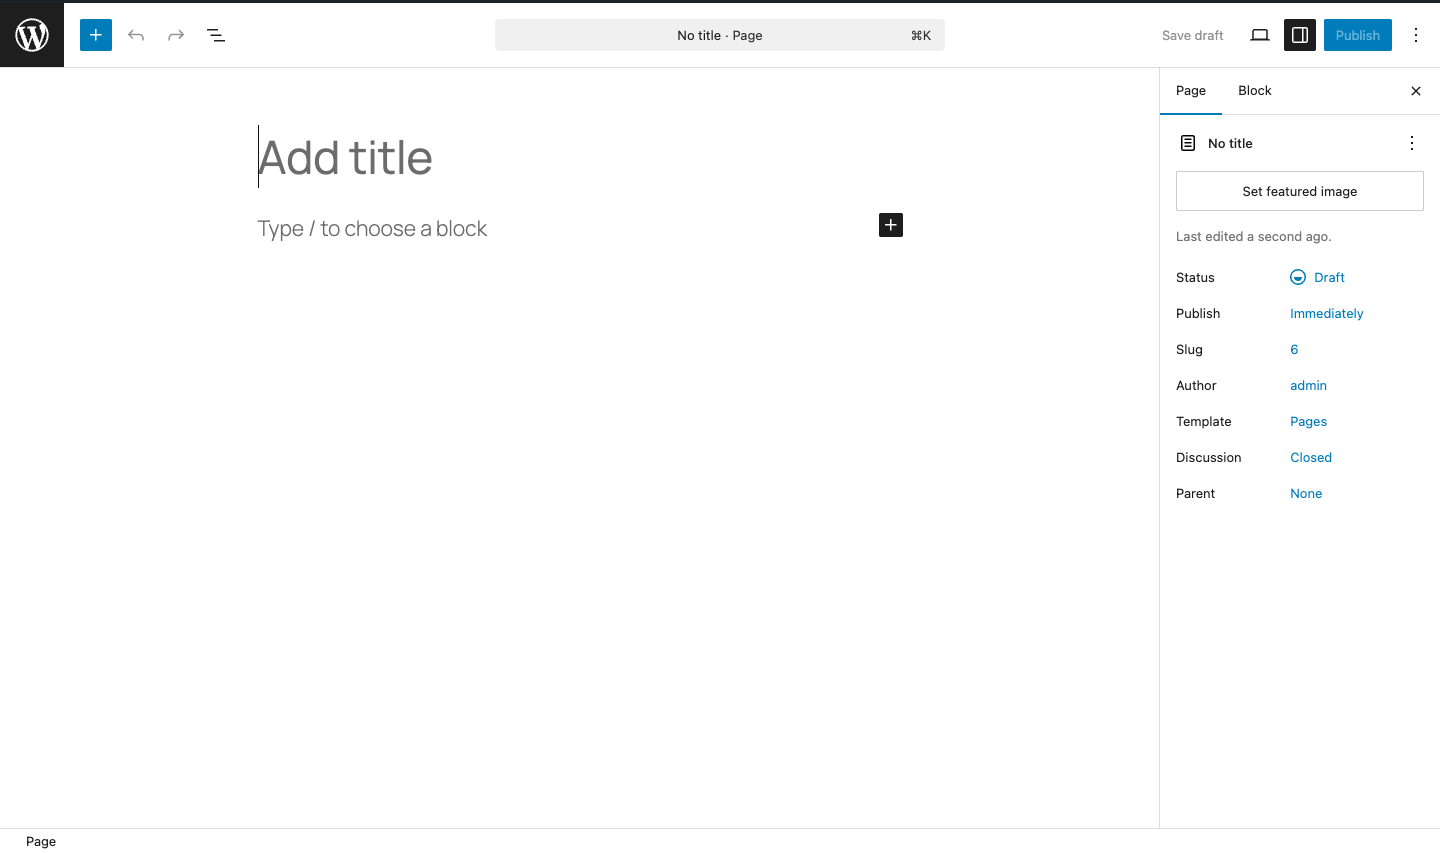
Now the fun part: putting real content on the site. You build everything in the block editor, known as Gutenberg. Each piece of content, a paragraph, a heading, an image, a button, a gallery, is a block you add and arrange. Click the plus icon, choose a block, type or drop in your content, and repeat. It feels a lot like the tidier website builders once you have added a few blocks. A shortcut worth learning on day one: type “/” at the start of an empty line and name the block you want, such as “/image” or “/button”, and the editor inserts it without you reaching for the plus icon.
Most sites need these core pages to start:
- Home: what you do and who you are, with a clear next step for visitors.
- About: your story, your credentials, why someone should trust you.
- Contact: a form (from WPForms) plus an email address, and a phone or address if relevant.
- Privacy Policy: expected on every site now, and required if you collect any visitor data. WordPress can generate a starting template for you under Settings, then Privacy.
To create a page, go to Pages, then “Add New”, give it a title, build it with blocks, and hit “Publish”. Two habits save grief here. Use proper heading blocks rather than just making text big and bold; a single H1 for the page title and H2s for the main sections gives structure that both readers and search engines rely on. And use the “Save draft” and “Preview” buttons freely, so you see the page as a visitor will before you publish it.
Static home page or blog?
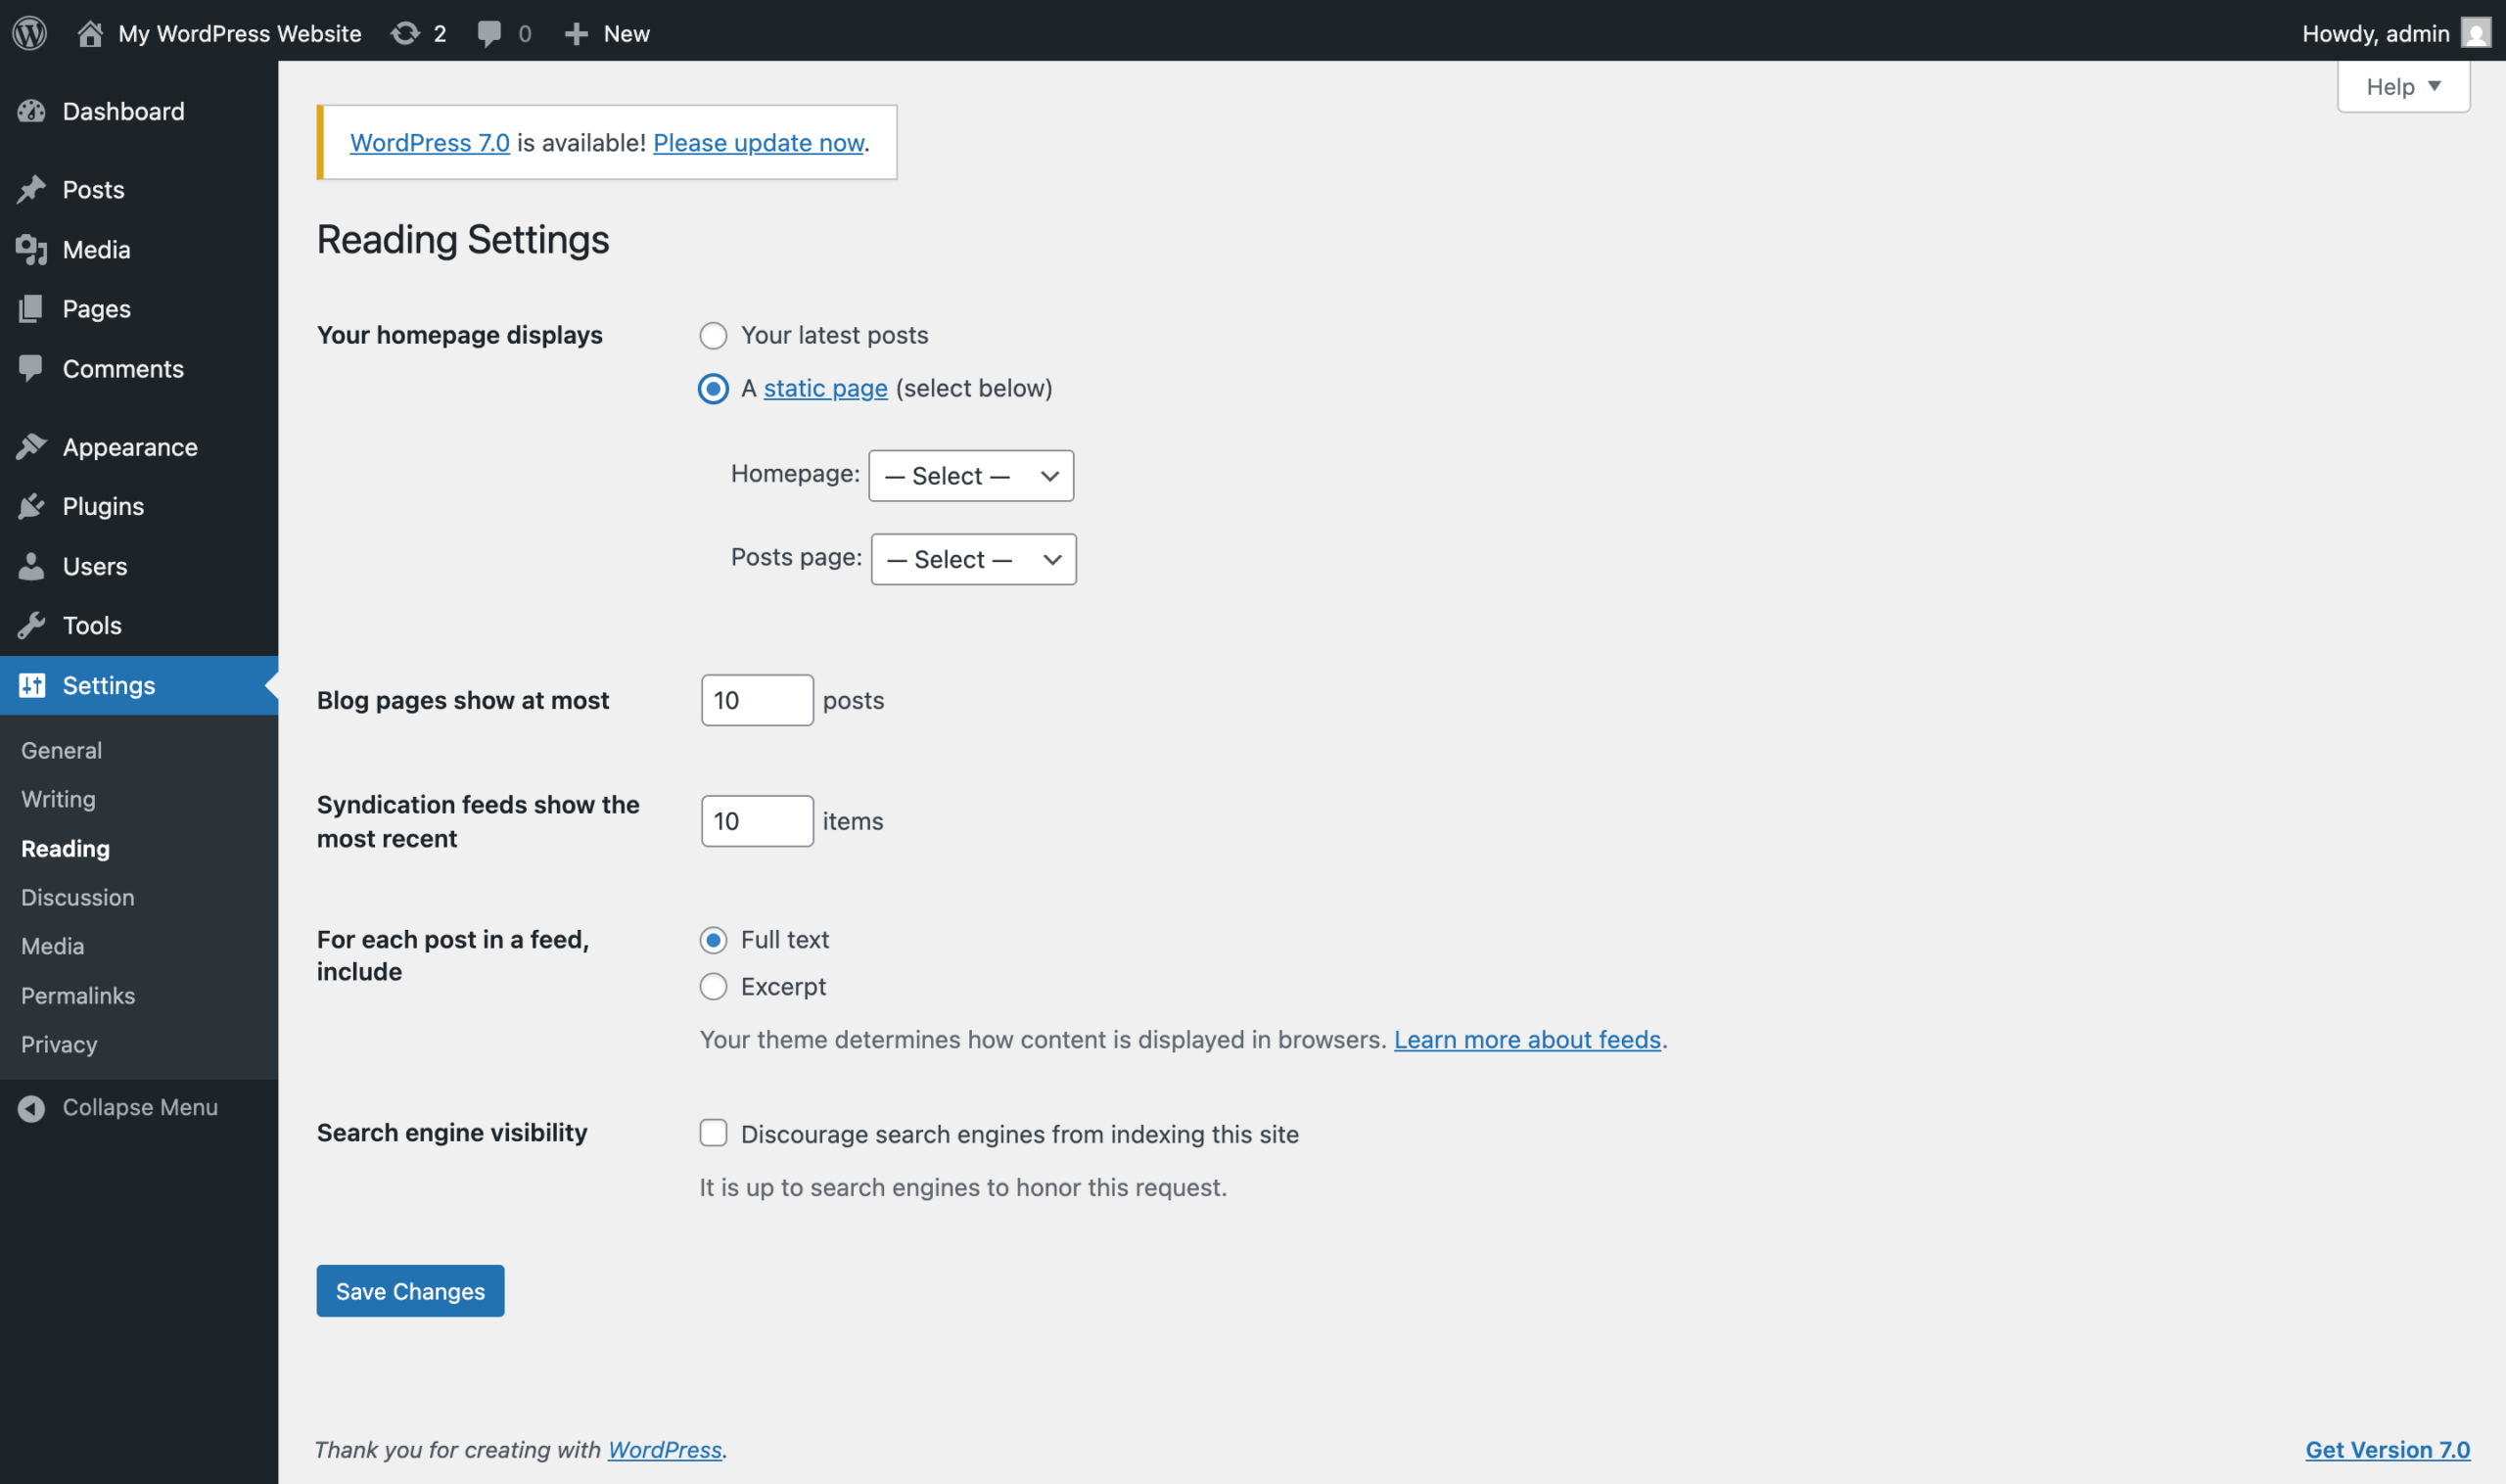
By default WordPress shows your latest posts on the front page, which suits a blog. If you want a fixed home page instead, go to Settings, then Reading, choose “A static page”, and pick which page is your home page and which (if any) holds your posts. This one setting is what separates a blog-first site from a business-first one. It catches out almost every beginner who publishes a polished home page and then cannot understand why the site still shows a list of blog posts at the front; the answer is nearly always this Reading setting.
A word on AI-assisted writing
You can draft content with AI. Rank Math’s Content AI, for instance, works right inside the editor and will draft sections, titles, and descriptions for you. Use it as a starting point, not a finished product. Search engines in 2026 reward first-hand experience and expertise, what Google calls E-E-A-T, so edit every AI draft for accuracy, add your own examples and opinions, and cut anything generic. Publishing raw, unedited AI text is the fastest way to blend into the noise and get ignored by both readers and search engines.
Step 7: Set up your menus and navigation
Your menu is how visitors find their way around, and a cluttered one loses people fast. You build it either through Appearance, then Menus, or, if you are on a block theme, by editing the navigation block directly in the Site Editor. On a block theme the process is: open the Site Editor, click the header, select the Navigation block, and add or reorder items in the list that appears; you add a link by searching for the page name and clicking it, so there are no URLs to paste.
Keep the main header menu to five to seven items. That is enough for the pages people actually want, and few enough that nobody has to scan a wall of links. Typical order for a small site is Home, About, Services or Shop, Blog, and Contact. Anything beyond the essentials belongs in a dropdown submenu or in the footer.
- Put your most important page first and your call to action (Contact, Book, or Buy) last, where the eye lands.
- Use dropdowns to group related pages under a single top-level item rather than listing them all across the top.
- Use the footer for secondary links like your privacy policy, terms, and social profiles.
A mistake to avoid is adding a page to the menu the moment you create it, so the menu balloons as the site grows; decide what belongs in the top navigation and let everything else be reached through links within your pages. Preview the menu on a phone-sized screen before you finish. On mobile it usually collapses into a hamburger icon, and you want the important links still easy to reach. Practical tip: after any menu change, load the live site in a private browser window, because the editor sometimes shows a cached version of the old menu while visitors already see the new one.
Step 8: Optimise for SEO and speed
A site nobody can find is a diary. Two things get you found: search engine optimisation (SEO) and speed. WordPress makes both manageable.
SEO basics
Open your SEO plugin, Rank Math or Yoast, and set your defaults: a title format for pages and posts, and a habit of writing a unique meta description for each important page. These are the title and blurb that show in search results, so treat them as tiny adverts. Both plugins run a short setup wizard the first time you open them, and it is worth following it end to end. In it you tell the plugin whether the site is a business or a personal one, connect it to Google Search Console, and switch on the XML sitemap. The day-to-day work then happens in a box below the editor when you write a page: you set the focus keyword, the search title, and the meta description there, with a live preview of how the result will look on Google.
Your SEO plugin also generates an XML sitemap automatically, usually at yourdomain.com/sitemap.xml or sitemap_index.xml. Next, create a free Google Search Console account, verify your site, and submit that sitemap. Search Console is where you see which queries bring people to you, which pages Google has indexed, and any problems it has found. It is the single most useful free tool for understanding how you are doing in search. One thing to switch off early: both plugins let you decide whether tag and category archive pages are indexed, and on a small site those thin pages are better left out so Google focuses on your real content.
Speed and Core Web Vitals
Google measures real-world loading experience through Core Web Vitals, and a slow site is both a ranking problem and a visitor problem. There are three of these metrics, and it helps to know what each one is telling you. Largest Contentful Paint (LCP) measures how quickly the main content appears; you want it under 2.5 seconds, and oversized images or slow hosting are the usual culprits when it is poor. Cumulative Layout Shift (CLS) measures how much the page jumps around as it loads, which happens when images have no set dimensions or a font swaps in late; keeping it near zero means nothing lurches under the reader’s thumb. Interaction to Next Paint (INP) measures how quickly the page responds to a tap or click, and it is usually heavy scripts, often from too many plugins, that drag it down.
Two easy wins cover most of it: compress your images before or as you upload them, and enable caching through your caching plugin. Serving images in a modern format like WebP and resizing them to the width they will actually display at moves all three metrics in the right direction. Between fast hosting, a lean theme, few plugins, and caching, most beginner sites pass Core Web Vitals without any deep tinkering. Search Console reports your scores under its “Core Web Vitals” section using real visitor data, so check there rather than guessing, and give it a few weeks to gather enough visits.
SEO in the age of answer engines
Something shifted in 2026: a growing share of searches now end with an AI answer rather than a list of blue links. Google’s AI Overviews and other answer engines pull from and cite web pages, and in June 2026 Google added AI search performance reports to Search Console so you can see how often you appear in that surface. There is no secret trick here. The same things that always helped, clear and useful content, sensible structure, and good Core Web Vitals, are what get your pages surfaced and cited by these tools. Write for a real person with a real question, keep the page fast, and you are doing the work that matters.
Step 9: Launch and maintain
Before you tell the world, run this quick launch checklist. Ten minutes here saves an embarrassing week.
- Confirm SSL and HTTPS. Load your site and check for the padlock in the address bar. Every page should be HTTPS, not HTTP.
- Check it on mobile. Open the site on your phone. More than half your visitors will be on one, so this is not optional.
- Test your speed. Run the home page through a speed tool and make sure it loads quickly. Fix any obvious offenders, usually oversized images.
- Add image alt text. Describe each meaningful image in its alt field. This helps accessibility and gives search engines context.
- Turn off search engine blocking. Check Settings, then Reading, and make sure “Discourage search engines” is unticked. Hosts sometimes leave it on during setup, and a site left with it ticked will never appear in Google no matter how good the content is.
- Connect Google Search Console. If you have not already, verify the site and submit your sitemap so you start collecting data from day one.
Ongoing maintenance
A WordPress site is not “set and forget”, but the upkeep is light once it is in a routine.
- Keep everything updated. Update WordPress core, your theme, and your plugins when updates appear. These fix security holes and bugs, and most sites can update automatically for minor releases. Before a big update, take a backup first so you can roll back if something clashes.
- Run automatic backups. With UpdraftPlus scheduled to a cloud location, you can recover from almost any mistake in minutes. Confirm the backups are actually running once a month, and never store them only on the same server as the site, because a server problem would take both down together.
- Keep your security plugin active. Wordfence or Solid Security quietly blocks the constant automated attacks every site attracts. Leave it on and glance at its reports now and then.
Do those three things and your site stays healthy with about fifteen minutes of attention a month.

What a WordPress website costs
WordPress itself is free, but a live site has running costs. Here is the honest breakdown, with every figure as of 2026 and a reminder that promotional rates renew higher.
| Item | Typical cost | Notes |
|---|---|---|
| Hosting | From about $2.99/mo | Introductory rate on a long term; renews at about $10.99/mo |
| Domain | About $10 to $15/yr | Often free for the first year with hosting |
| Premium theme or page builder | $59 to $89/yr (optional) | Elementor Pro $59/yr, Divi $89/yr; free options exist |
| Premium plugins | Varies (optional) | Only if a free version does not do what you need |
Add it up and a simple site costs roughly $100 to $300 in its first year. The low end assumes you stick to a free theme and free plugins and just pay for hosting plus a domain. The higher end assumes a premium theme or page builder and a paid SEO or backup plugin. After year one, budget for the renewal rates, which is why the honest monthly figure to plan around is the $10.99 renewal, not the $2.99 intro. It is worth knowing where the money creeps up later, too: a shop may want a paid payment or booking extension, and some premium plugins are yearly subscriptions rather than one-off fees, so a shop or membership site sits nearer the top of that range than a simple brochure site does. For a fuller comparison across platforms and site types, see our guide to how much a website costs.
Can you build a WordPress site with AI?
Yes, and it has become one of the fastest ways to get past the blank page. Tools like Hostinger’s AI website builder for WordPress and 10Web take a short prompt describing your business or project and generate a complete WordPress site, pages, layout, copy, and images, in about a minute. You then open it in the normal WordPress editor and refine everything by hand.
The important part is what you end up with: a real, self-hosted WordPress site that you own, not a locked platform. The AI just writes the first draft of the design and content. Everything we covered above, themes, plugins, the block editor, SEO, still applies, and you can change or replace anything the AI produced. WordPress 6.9 also introduced an Abilities API and support for the Model Context Protocol, which lets AI tools connect to and act inside your site in more structured ways, a sign of where this is heading.
My advice: if a blank site intimidates you, let the AI builder generate a starting point, then treat it as scaffolding. Rewrite the copy in your own voice, swap the placeholder images for real ones, and check every page. You get the speed of AI and the ownership of WordPress, which is a good combination to start from.
Frequently asked questions
Do I need to know how to code?
No. You can build and run a complete WordPress site without writing a line of code. The block editor, the Site Editor, and plugins cover almost everything through clicking and typing. Coding only becomes relevant if you want to build something highly custom, and even then plenty of tools bridge the gap.
Is WordPress.org or .com better?
For anyone building a site they want to grow and control, WordPress.org (self-hosted) is better. It is free software, lets you install any plugin or theme from the start, and you can move your site to any host. WordPress.com is simpler to start but restricts custom plugins and themes to its Business plan, so most serious sites end up on .org anyway.
How much does a WordPress website cost?
The software is free. A realistic first-year total for a simple site is about $100 to $300, made up of hosting from around $2.99 a month (renewing near $10.99), a domain at about $10 to $15 a year (often free the first year), and optionally a premium theme or page builder at $59 to $89 a year.
How long does it take to build?
You can get the core of a site, hosting, install, theme, essential plugins, and a few pages, done in an afternoon, roughly one to two hours of hands-on work. Filling in all your content, refining the design, and writing blog posts takes longer, but you can launch and improve as you go.
Is WordPress still worth it in 2026 versus a website builder?
It depends on what you value. A website builder is faster and simpler if you want a small site online today and never plan to outgrow it. WordPress asks for a bit more setup but gives you full ownership, unlimited flexibility, and no ceiling on where the site can go. If you are building something you intend to keep and grow, WordPress is still the strongest choice. If you just want quick and easy, compare the best website builders first.
Can I move my WordPress site to another host later?
Yes, and easily. Because a self-hosted WordPress site is just your files and a database, you can move it to any host at any time. Many hosts offer free migration, and plugins like UpdraftPlus or free migration tools can move a whole site for you. This portability is one of the biggest reasons to choose self-hosted WordPress over a closed platform.
Which is better, Rank Math or Yoast?
Both are excellent, and either will serve a beginner site well, so it is not a decision to agonise over. Yoast is the longer-established name, with a clean interface and famously plain-English guidance as you write, which makes it reassuring for a first site. Rank Math packs more into its free tier, including features Yoast reserves for its paid version, plus a built-in Content AI helper. If you want the most out of a free plugin, lean towards Rank Math; if you value a gentle, well-worn interface above all, Yoast is hard to fault. What you must not do is run both at once, because they fight over the same job and produce duplicate tags that confuse search engines. Pick one, and both offer an importer if you ever switch.
Do I need a page builder like Elementor?
For most sites in 2026, no. The Site Editor built into WordPress now handles headers, footers, page layouts, and global styling that once needed a separate builder, so a modern block theme and the native editor cover a typical business or blog site on their own. A page builder like Elementor or Divi earns its place when you want pixel-precise, unusual layouts, but it comes at a cost: page builders add weight to every page, which can drag on your Core Web Vitals, and they lock content into their own format, so removing the builder later leaves a mess of shortcodes behind. Start with the block editor, and only reach for a page builder if you hit a wall you cannot get past with it.
How do I keep my WordPress site secure?
WordPress is secure when it is looked after, and most break-ins exploit neglect rather than any flaw in the software. A handful of habits cover the vast majority of the risk. Keep WordPress core, your theme, and every plugin updated, because outdated code is the most common way in. Use a strong, unique admin password and avoid the username “admin”. Install a security plugin such as Wordfence or Solid Security to add a firewall and block repeated login attempts, and turn on its two-factor authentication if it offers it. Only install themes and plugins from the official directory or reputable paid developers, and delete anything you are not using. Keep automatic backups running to an off-server location, and use a host that provides SSL and keeps its server software current. None of this takes long once it is set up, and together it puts your site well out of reach of the automated attacks that make up almost all of the threat.
Where do I start if I am still deciding how to build?
If you are weighing WordPress against the alternatives, our overview of the different ways to build a website lays out each path side by side, so you can pick the one that fits your project before you commit.