I know, I know… creating a website can be confusing.
Over ten years ago, when I created my first website, I knew absolutely nothing about websites or web development. I kept searching for information and “how-to” guides on Google, but they all required technical skills, and I found them extremely difficult to follow.
Since then, I’ve built and managed more than 50 different websites and learned a ton about web development.
I can confidently say that creating websites can be a very simple process and doesn’t require any coding skills, such as HTML, CSS, or PHP.
In 2025, the whole website creation process can be largely automated. So whether you’re 20 or 80, it doesn’t really matter—you can still create a site.
Here’s my personal website, which I made in less than 30 minutes using a free tool called WordPress. In this guide, I’ll show you how you can do the same. If you’re still hesitating to make a website, I suggest reading my article: “9 reasons to create a website”
P.S. If you ever get stuck while setting up your website, get in touch with us, and I’ll help you out 🙂.
Ready to have your website up and running in the next 30 minutes? Grab a coffee or tea, and let’s get started.
Step 1: Choose the Right Website Type
The first thing you need to do is determine the type of website you want to create.
Is there a specific purpose you want your website to serve?
Websites can serve a variety of functions, from sharing information and blogging to offering services or selling products.
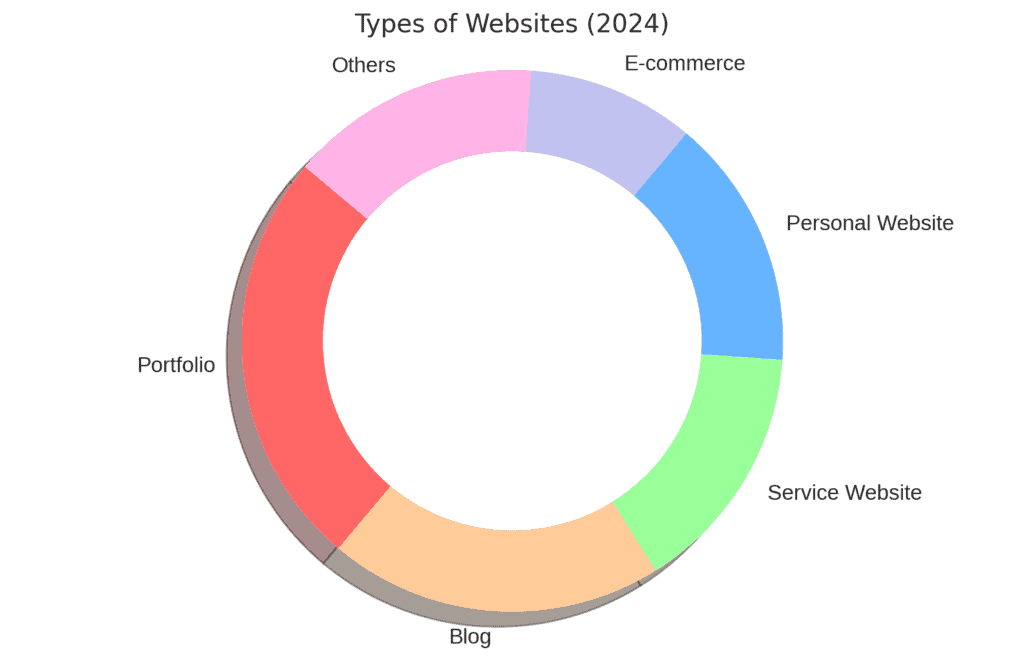
Some of the most popular website types include:
- Personal website
- Portfolio website
- Business/service website
- Blog
- E-commerce
For example, if you’re interested in providing professional services, you might consider creating a portfolio or service-based website. If you’re looking to sell items, an e-commerce site would be the best choice.
When I created my first website, I was passionate about classic cars, so I chose to build a blog to share information and resources.
It doesn’t make sense to create a website that doesn’t align with your goals. It’s much easier to manage and maintain a website that suits your interests and objectives.
It’s even better if you have experience in a particular field or industry because you’ll know exactly what type of website will best serve your needs, whether it’s for offering services, selling products, or sharing knowledge.
Step 2: Select a Website Platform – Free or Paid?
When you’re deciding on a platform to use to build your first website, there are options and services that are free and premium, but it can be confusing.
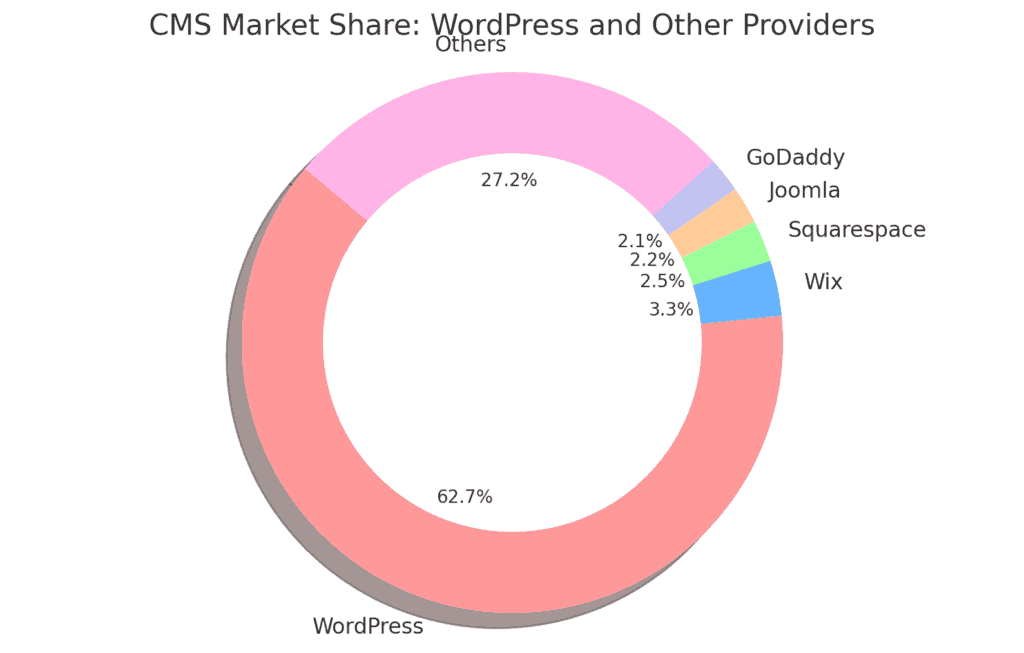
This is especially true in cases where you can sign up for free, but you need to upgrade to premium to launch, for example. That’s why WordPress is the most popular platform for building websites.
In fact, 43.6% of websites on the public-facing world wide web are built using the free WordPress platform. It holds a 61.7% global market share in the content management system (CMS) market, according to data from 2025.
Here’s why I think using WordPress is the best way to start your website:
- You can choose from many different layouts and free themes.
- You can easily create and manage pages, add images, and customize your content.
- You can organize your content with categories and create a custom menu.
- Visitors can interact with your site by leaving comments and sharing your content.
- And much more…
Free is Not Truly Free…
Yes, you can create a free website on platforms like wix.com or canva.com, but they are not entirely free. Here’s why:
- You won’t get your own domain name: You’ll be stuck with a sub-domain. For example, instead of having your own domain like mywebsite.com, it would look like mywebsite.wix.com, which commonly doesn’t seem as polished and professional.
- Limited themes, layouts, and add-ons: Your website can look plain and unappealing. If you want additional themes or plugins to customize your site, you’ll have to pay, and it can get expensive.
- You have no control over your website: Since your site is hosted on another platform, you don’t truly own it. If the platform’s moderators decide that your site doesn’t fit their policies (which happens more often than you’d think), they can delete your site without warning. All your hard work could vanish in seconds.
- You can’t fully monetize your website: If you plan to earn money or sell items through your website, a free platform will severely limit your options.
What Does It Cost to Start a Self-Hosted Website on Your Own Domain?
Not much. You’ll need a domain name, which costs around $10-$20 a year, and web hosting (a service that connects your website to the internet), which starts at about $2-$10 a month (less than a couple of coffee drinks).
The great thing about a self-hosted website is that you’re not locked in. If you decide that operating a website isn’t for you, you can cancel anytime, and many services offer a 30-day money-back guarantee. If you decide you need more resources, you can also upgrade.
Step 3: Pick a Domain, Get Hosting, and Set Up Your Site
If you’ve decided to go with a self-hosted website on your own domain—smart choice. Finding a great domain name can take some time, but it’s worth the effort.
I suggest picking something brandable and easy to remember.
For example, if you’re planning to start an automotive website, choosing a domain like www.classiccars2025.com or www.best-car-website.com might not be the best idea.
Why?
People simply cannot remember long domain names, and when they want to return to your website, they’re likely to forget it.
It’s much better to choose something memorable, such as www.TopGear.com, www.MotorTrend.com, or something similar. Alternatively, you could use your own name as the domain, like www.FirstnameLastname.com.
In short, your domain name should be:
- Catchy
- Easy to remember
- Unique
- Avoid numbers
Where to Get a Domain Name and Website Hosting
I usually suggest people get both their domain and hosting from the same provider. This approach saves you both money and time.
Over the past few years, while creating and managing websites, I’ve discovered that there are very few truly reliable hosting companies.
To be more specific, I’ve used several hosting companies in the past, including a few well-known providers.
However, I wasn’t entirely satisfied with them. Their customer support wasn’t particularly professional, and it often took a long time to get in touch with someone. Sometimes my site would be offline for hours without any professional help.
One of the most reliable web hosting and domain name providers I’ve found—and the one I currently use—is Hostinger (our partner). They also include a free domain name for one year.
Their service is quite affordable compared to others, and they are well-known for their excellent customer support via email and phone, which is available 24/7.
Hostinger is also perfect for beginners as they offer a “One-Click Installation” feature that makes setting up a WordPress website incredibly easy. You simply click a few buttons and your self-hosted website on your own domain is ready:
Of course, you can use any other hosting company, and I’ve included a tutorial on how to install your website manually as well. If you decide to go with a different hosting provider, make sure they offer enough bandwidth and disk space so that you can install WordPress with the minimum requirements. This will help you avoid problems later on.
You have two options to set up your website:
- A. With “One-Click Installation” using Hostinger (free domain included)
- B. Manually to any web host
The One-Click Installation is ideal for beginners or anyone creating their first website. If you’re more experienced with the internet and computers, you might prefer the manual installation tutorial.
Whichever method you choose, you’ll have your website up and running in no time.
A) How to Set Up a Website Using Hostinger (For Beginners)
You can get your domain name and web hosting from Hostinger.
I chose them for this tutorial due to their simple setup and affordable pricing.
I also managed to get a discount for anyone reading this guide. If you visit Hostinger through my site (using this link), the discount should be applied automatically (You will get hosting for $2.78 per month instead of $2.99).
P.S. Make sure you follow the screenshots below in order to get the cheapest plan available.
P.P.S. If you follow the steps below, the entire registration and website setup process should not take more than a few minutes.
Step 1: Choose your web hosting plan
First you need to go to www.Hostinger.com and choose your web hosting plan.
Hostinger offers three main hosting plans. In this guide, we’ve opted for the “Premium” 12-month hosting plan that comes with a one-year free domain.
The Premium plan is a good choice if you’re just starting out and don’t yet have a large volume of inbound website traffic.

Note: If needed, you can always upgrade or downgrade your plan.
2. Choose your hosting length
The next step is to choose your hosting plan duration and complete your registration.
Choose the 12-month plan:
In my case, I opted for the one-year plan at $33.37.
It renews at $9.99, so if you want to avoid the renewal at that rate, you may want to consider choosing a longer-term plan.
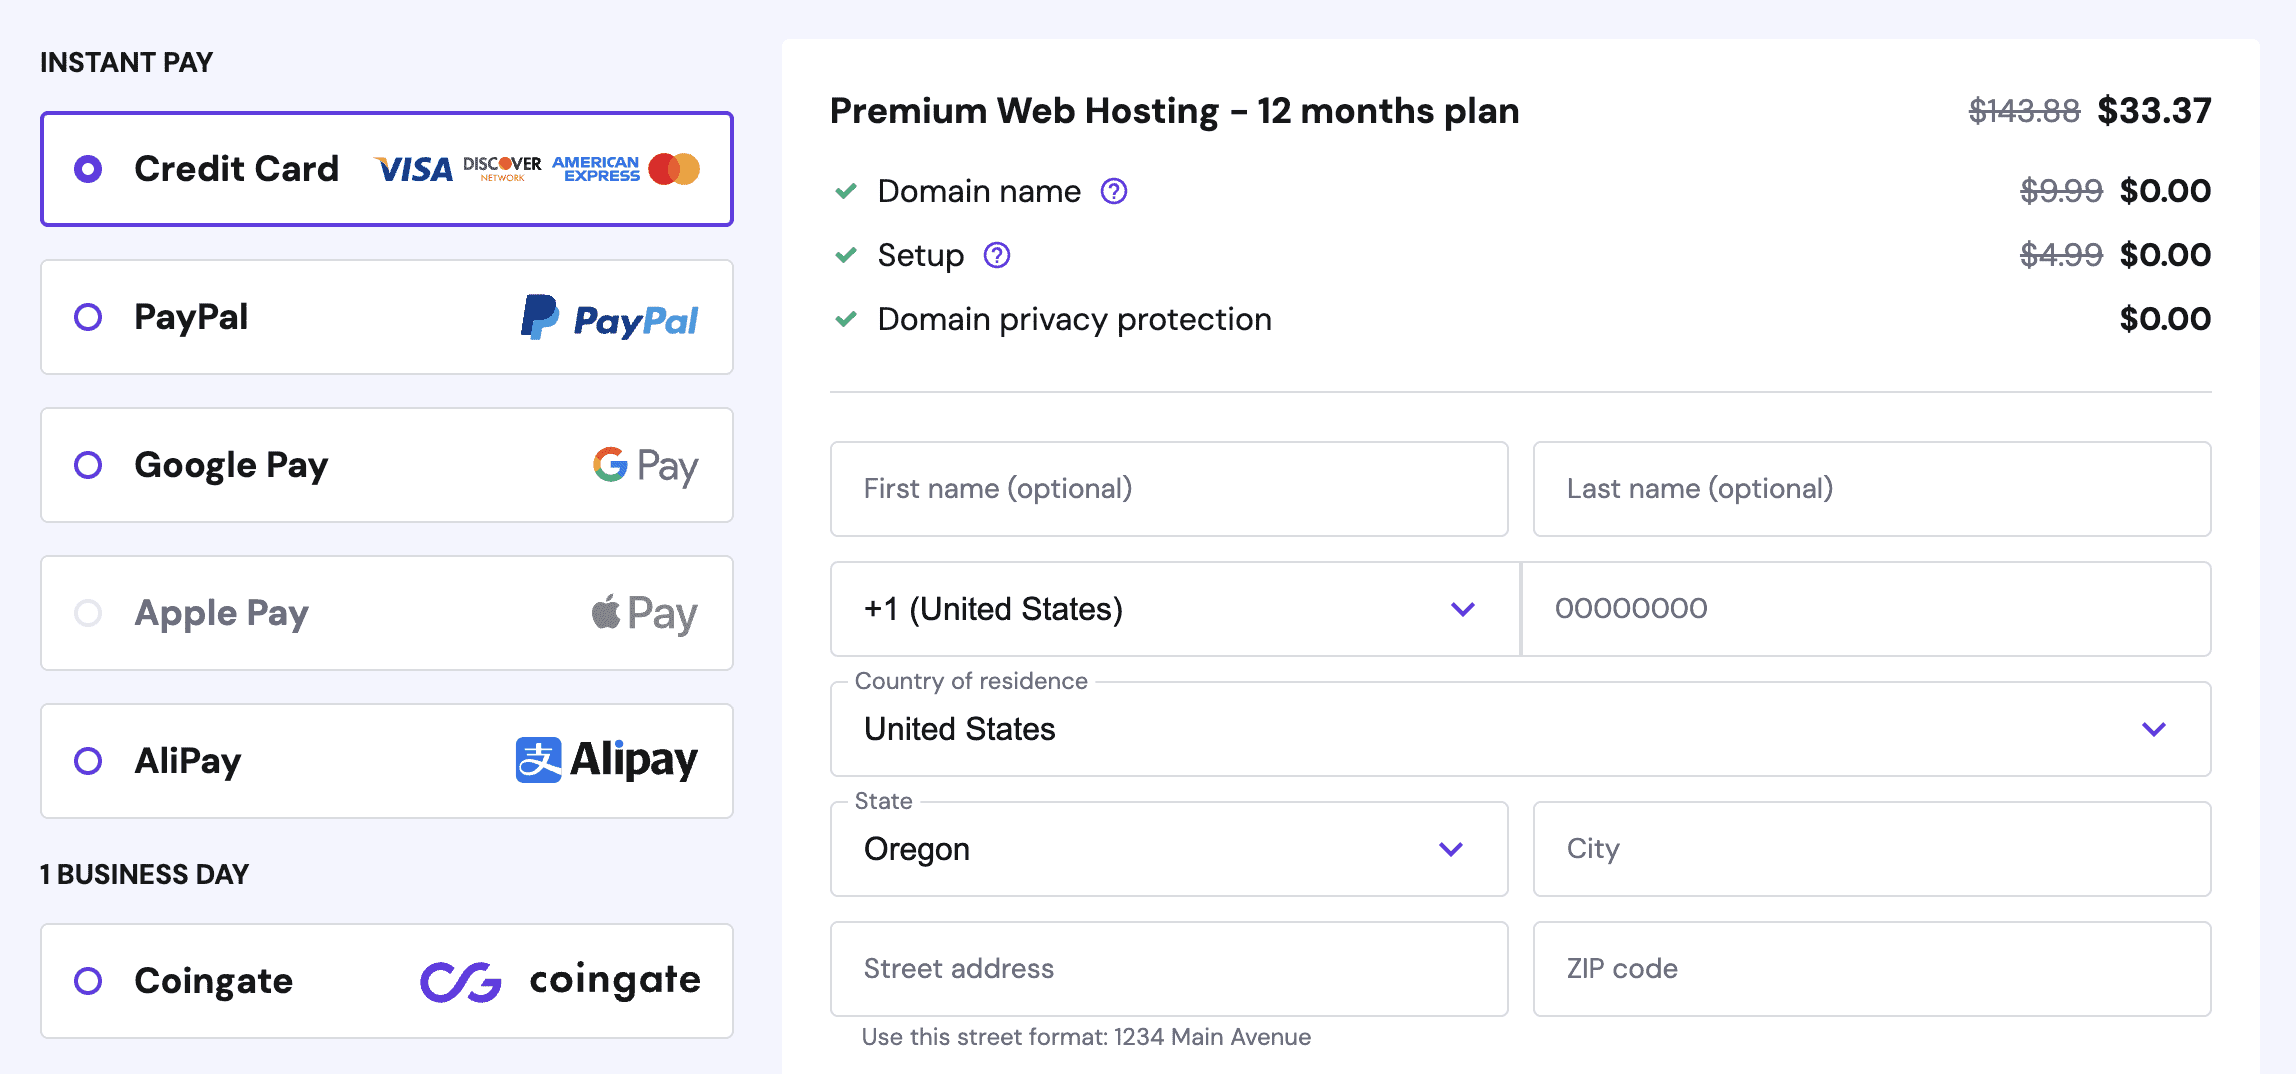
After selecting your plan, you’ll get an overview of your order and the available payment methods.
Next, fill out all the required information, such as your first and last name, address, email, and don’t forget to use our coupon code WEBSITESETUP.
Before you enter your payment information, double-check all the above criteria. If everything is correct, click Submit Secure Payment.
3. Choose a domain name (free)
After completing the purchase, the next stage is to connect your new domain name with Hostinger or register a free domain name (for the first year) directly with them.
You’ll be prompted with three different options to name your website during the hosting setup process. If you’re not sure about the domain name yet, there’s an option to skip this step.

If you already have a domain name—don’t worry, you can still integrate it with Hostinger.
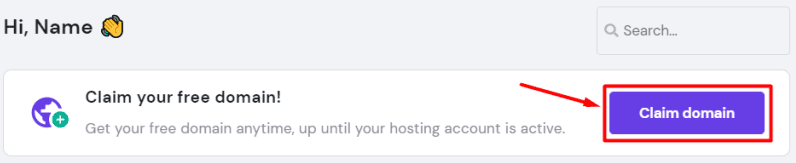
You can otherwise claim your free domain (free for one year). If you skipped the option or missed the chance to claim your free domain, don’t worry—you can access the option later through the members area.
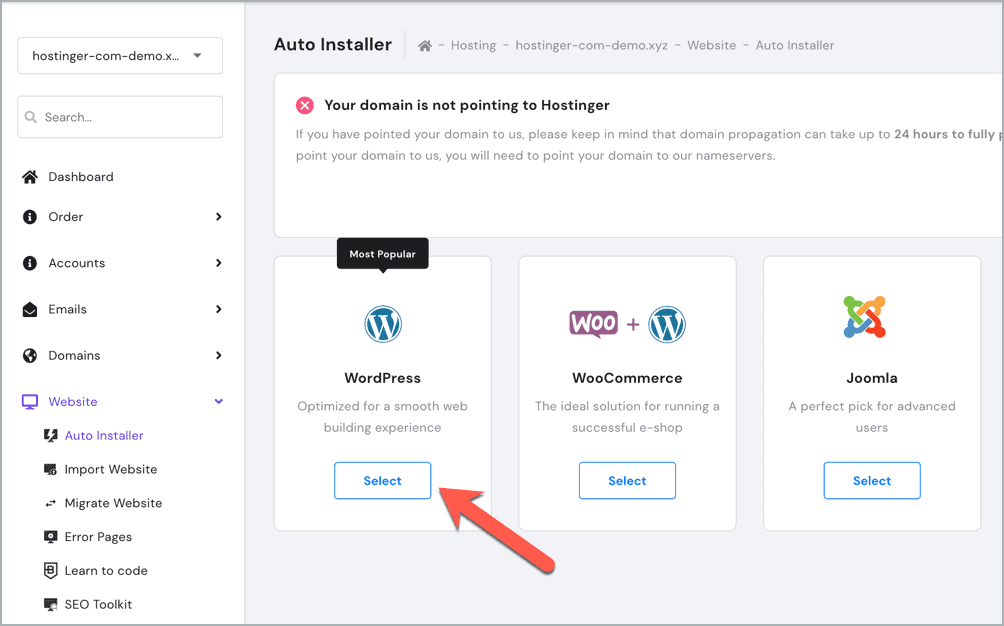
4. Add a WordPess website to your hosting plan (free)
In the Websites section of your hosting dashboard, click the Add Website button for the hosting plan you want to use. Then, select WordPress as your website platform.
5. Create your WordPress login details
Next, you’ll need to set up your WordPress admin credentials:
- Choose your preferred language for the WordPress admin panel.
- Enter an administrator email address.
- Create or generate a strong password for security.
6. Select your website type
Choose the category that best fits your website—whether it’s an online store, blog, portfolio, business site, or something else. This helps personalize the setup process.
Alternatively, you can opt to create a blank site and skip the personalization steps.
That’s it!
P.S. If you found this guide helpful, I’d really appreciate it if you shared it. Your support means a lot!
P.P.S. If you used this guide to create a website, I’d love to see it! Feel free to email us at info@websitesetup.org.
!
B) How to Manually Set Up a Website on Any Web Hosting (Advanced)
This guide is intended for those who are already familiar with hosting. But, it’s especially helpful for anyone who hasn’t used Hostinger or for those who are using another web host that doesn’t offer instant WordPress installations for free.
Step 1: Download WordPress
Start by downloading the latest version of WordPress from the official WordPress.org website. Click on the Get WordPress button to download a ZIP file containing all the necessary WordPress components.
Step 2: Extract the WordPress Files
After downloading, extract the contents of the ZIP file to a folder on your computer. This will create a folder named “wordpress” that holds all the WordPress files and directories.
Step 3: Connect to Your Web Host
To do this, you’ll need an active web hosting subscription that meets the minimum WordPress requirements. Next, open your FTP client (for example, Filezilla) and connect to your web host using your SFTP credentials, which include the hostname, username, and password. These details are typically found in your hosting account’s control panel or welcome email.
Step 4: Upload the WordPress Files
Once connected, navigate to the directory on your server where you want to install WordPress. It’s usually the “public_html” or “www” folder. Drag and drop the contents of the “wordpress” folder from your computer to the remote server. The upload process may take a few minutes depending on your internet connection and file size.
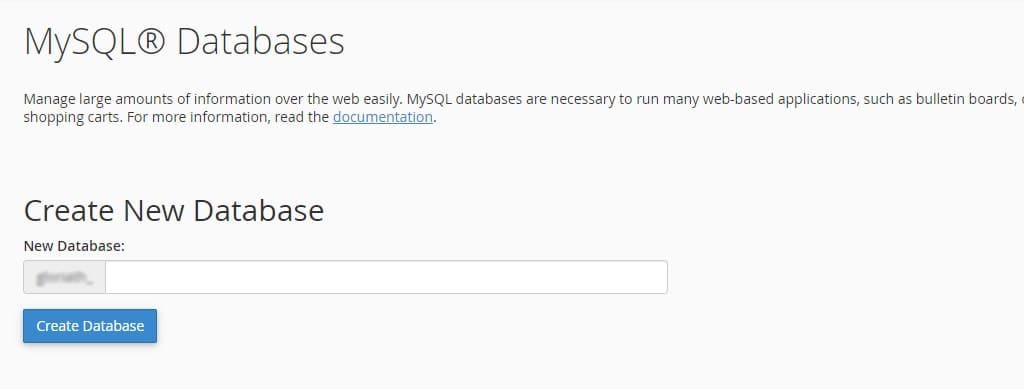
Step 5: Create a MySQL Database
To use WordPress, you’ll need to create a MySQL database. Most hosting providers offer tools like cPanel’s MySQL Database Wizard to simplify this process.
Follow the prompts to create a new database, and note down the database name, username, and password for the next step.
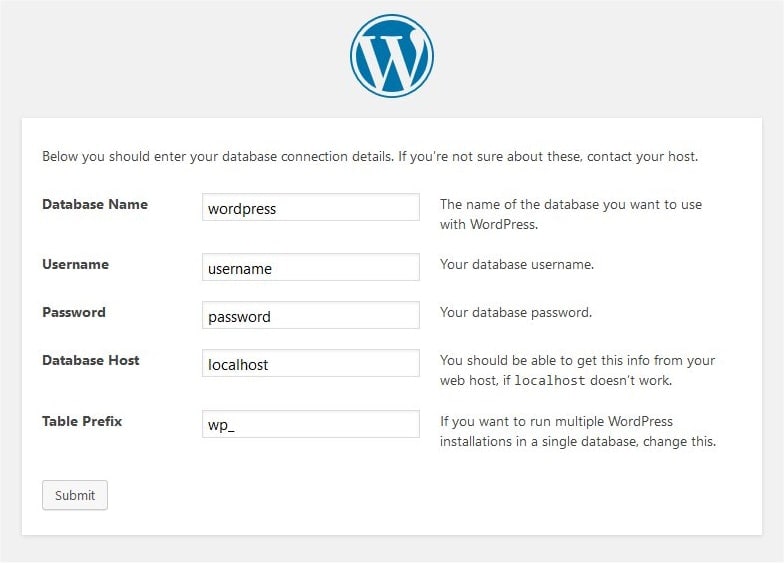
Step 6: Run the WordPress Installer
Once the upload is complete, open your web browser and visit your domain name. This will start the WordPress installation process. When prompted, enter the database name, username, and password that you created earlier. Then, follow the instructions to complete the setup.
Step 7: Finalize the Installation
After entering your database details, click Submit to finish the installation. WordPress will then create the necessary database tables and configure your site.
This process may take a few minutes depending on your hosting account and internet speed.
Once the installation is complete, you’ll see a success message with a link to your new WordPress site. Click the link to visit your site and log in using the credentials you created during the setup.
Choose a Theme, Add Pages and Build Your Website
Congratulations! By now, you should have a fully functional website.
But don’t stop here—there’s still more to do!
Step 1: Login and choose your website theme (design)
Once you set up your WordPress website, you can log in from yourdomain.com/wp-admin/. Be sure to update “yourdomain.com” with the correct details.
After logging in, navigate to your WordPress dashboard and select Appearance from the left-hand menu.
Here, you can tweak your website’s theme, layout, colors, and fonts.
Essentially, every visual change you want to make on your website can be done through the Appearance page.
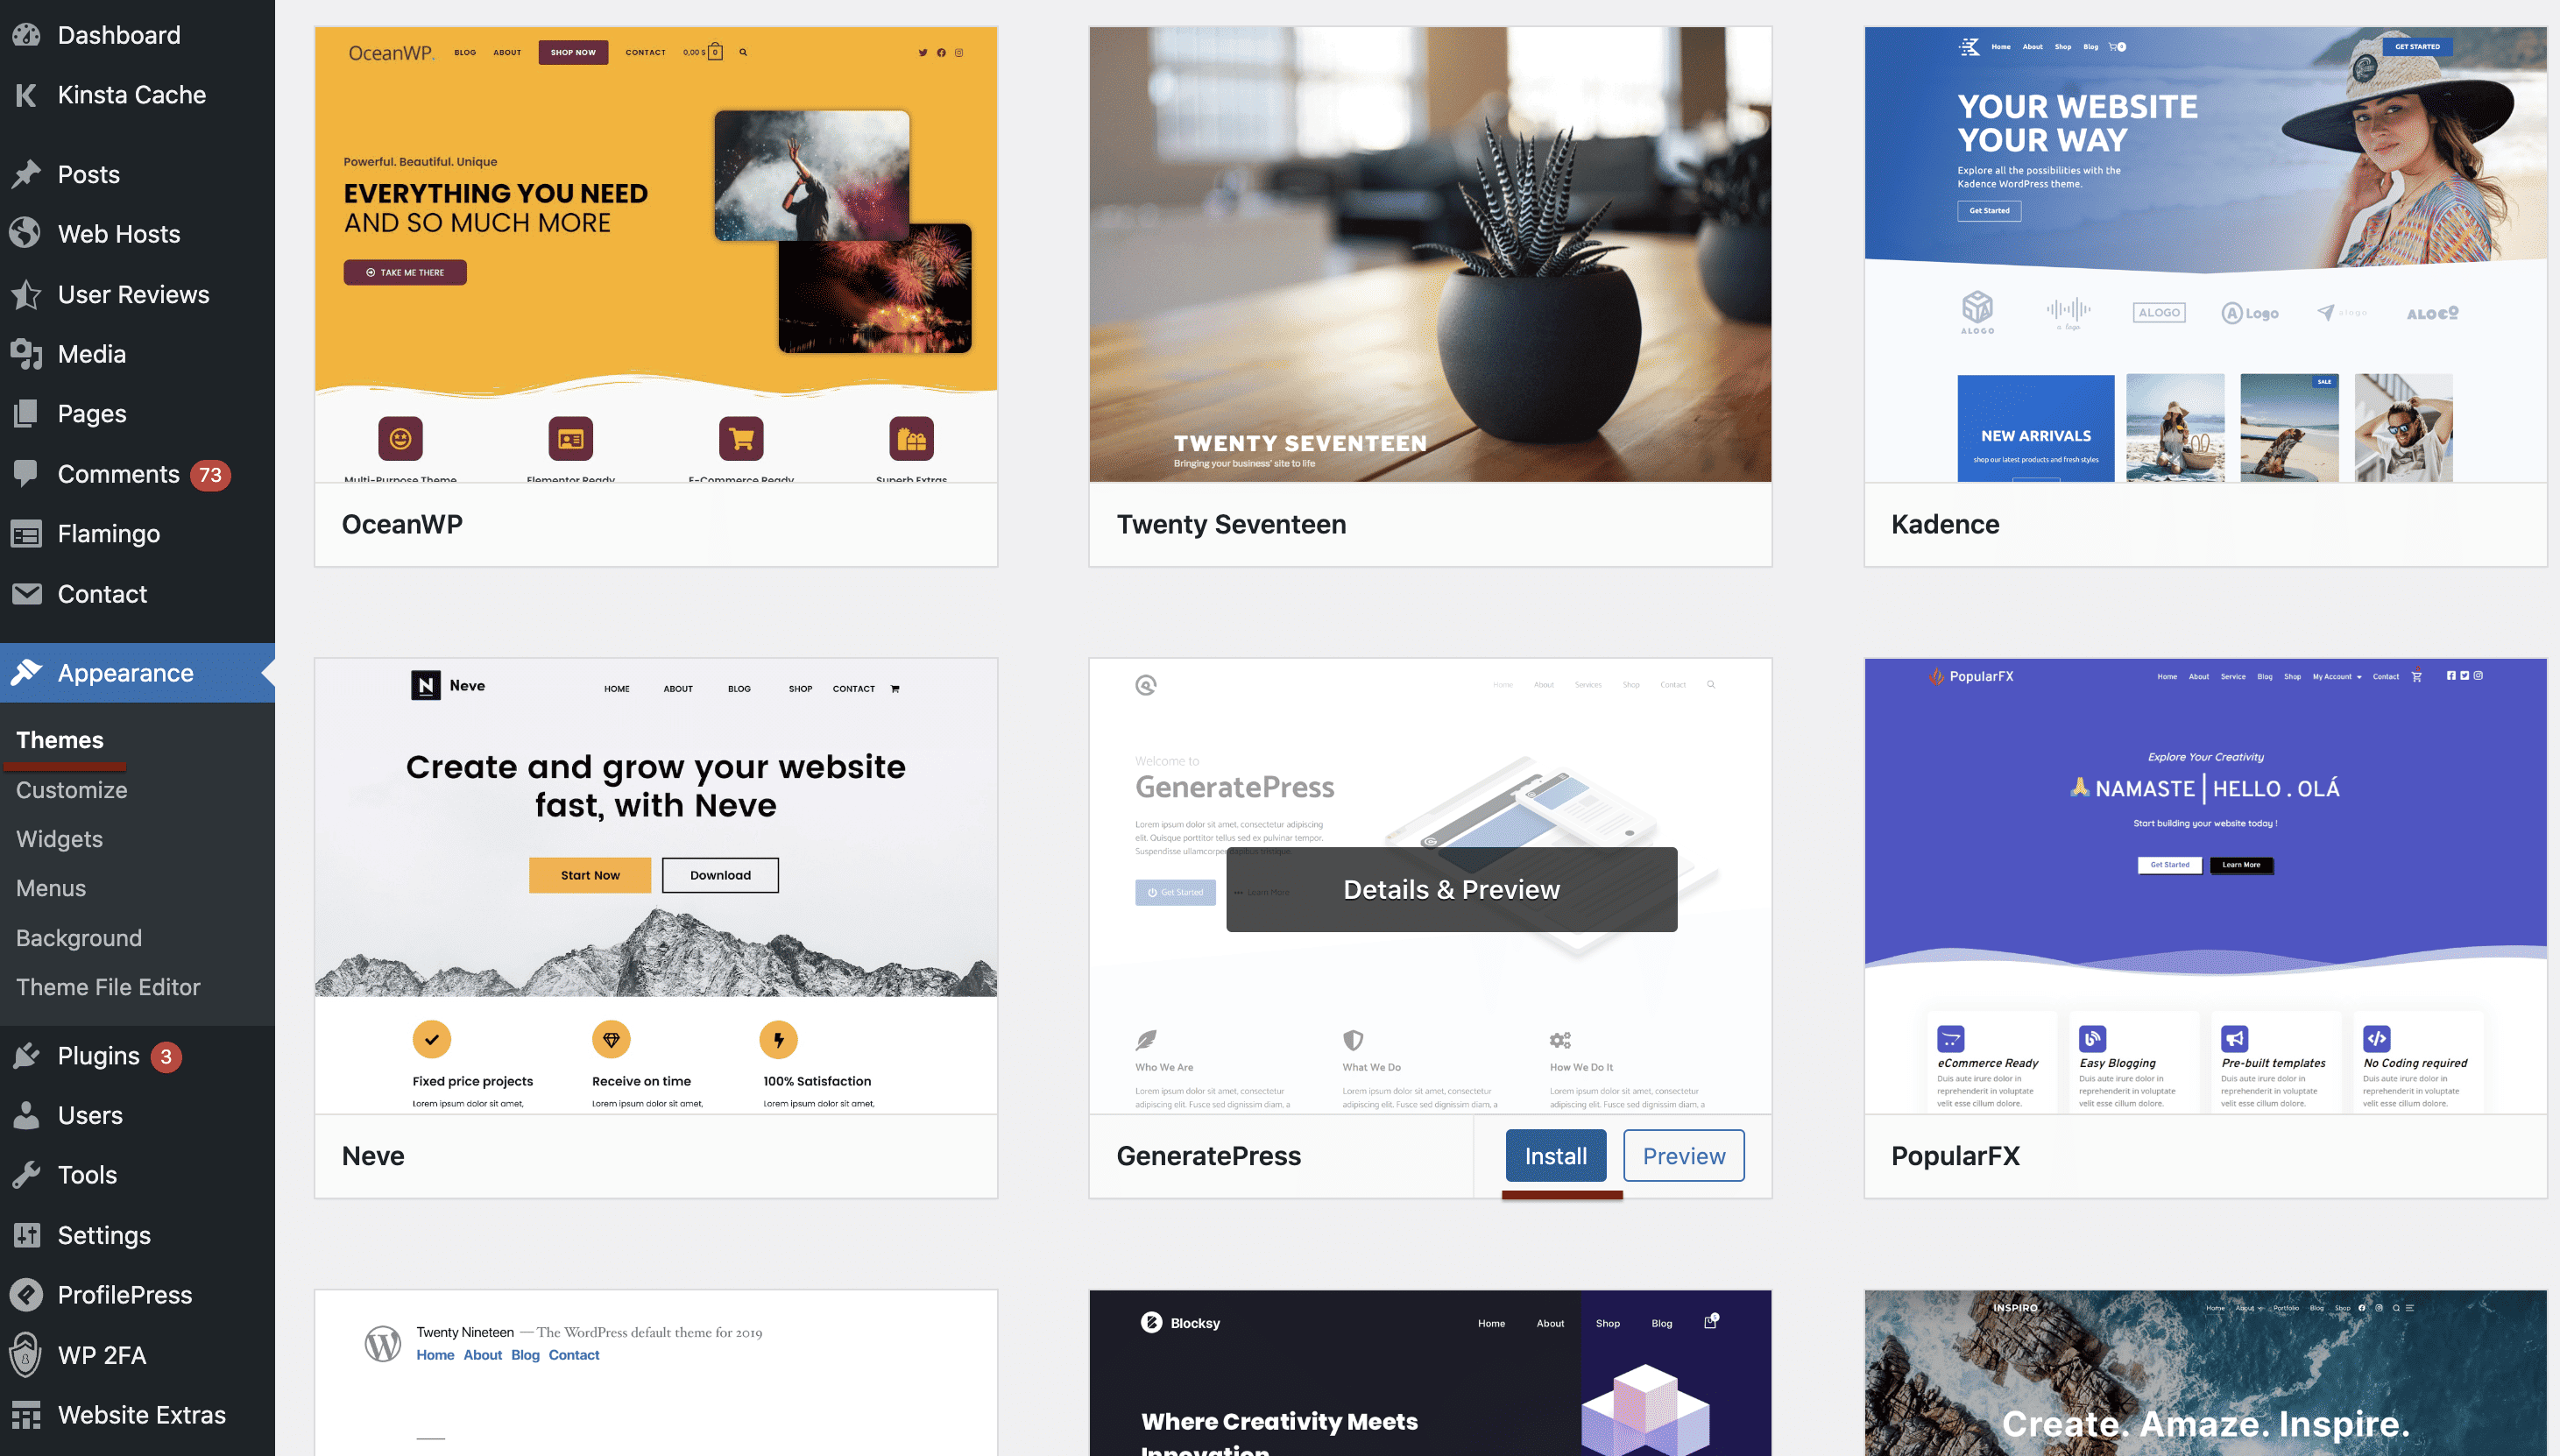
Once you choose the theme best-suited for you, click Install and then Activate. To help you choose, we’ve put together a list of the best free themes on WordPress.
Take your time to find the best theme for your website. Don’t worry if you choose something that you don’t like—you can always change it.
Step 2: Build your website structure
Once you have chosen a template, you need to create a structure and add the most important pages.
These are usually:
- Homepage
- About us
- Contact page — here, you can add your social links (Facebook page, Twitter, etc.)
- Our services/products
- Blog
- Gallery
- Testimonials/reviews
Do some brainstorming to determine which pages you need the most, and start from there. Make sure you include the most important pages in your header as well as your footer so visitors can access them easily site-wide.
If you’re unsure what your website should include, read this article about the 12 critical elements every site needs.
Step 3: Add pages and publish your content
A blank website without any pages or content isn’t interesting so to make the website accessible and compelling, we need to add some pages and blog posts.
To add a page to your WordPress site, navigate the left-hand menu of your admin dashboard. Then, go to Pages, and from there, click the Add New button.
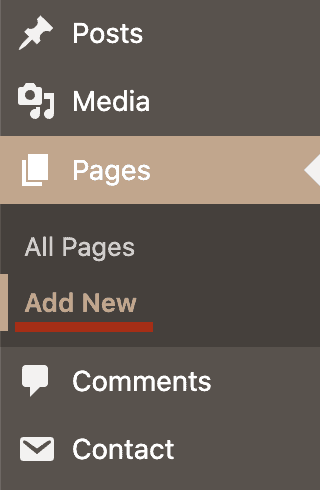
That will take you to the WordPress block editor.
If it’s your first time visiting this page, it will display a quick step-by-step tutorial on how it works and where certain functions are located.
It’s quite straightforward to navigate; everything is block-based, which means if you want to add an element to your page, you can choose the corresponding module or “block” from the menu, then add your content to it.
On the left in the content block section, there are multiple content options to choose from. Each serves a different purpose and adds a different visual element to the page.
Alternatively, the right-hand menu allows you to change some page-wide settings, like the author, the page’s permalink (URL), the featured image, and more.
On the top of the right-hand menu, you can click on the Block tab and customize the settings for each block you’ve selected on the page.
Once you’re happy with the page, you can make it public or private. The former will make the content visible to any visitor, while the latter means that it’s only visible to you from your website dashboard.Keeping your page private is a useful option to use when you’re still working on it.
There’s also an option to preview the changes you’ve made or to schedule a date and time for the page to be published.
Step 4: Organize website structure and navigation
Now that you’ve created the pages, you need to add them to the navigation (menu) bar.
That’s the menu located throughout your website that provides visitors with access to the rest of the content.
In WordPress, you can customize your navigation system by clicking Appearance in the left-hand column followed by Menus. Follow the directions on the page to create a new menu. After you’ve done that, you can start adding and organizing the pages in there.
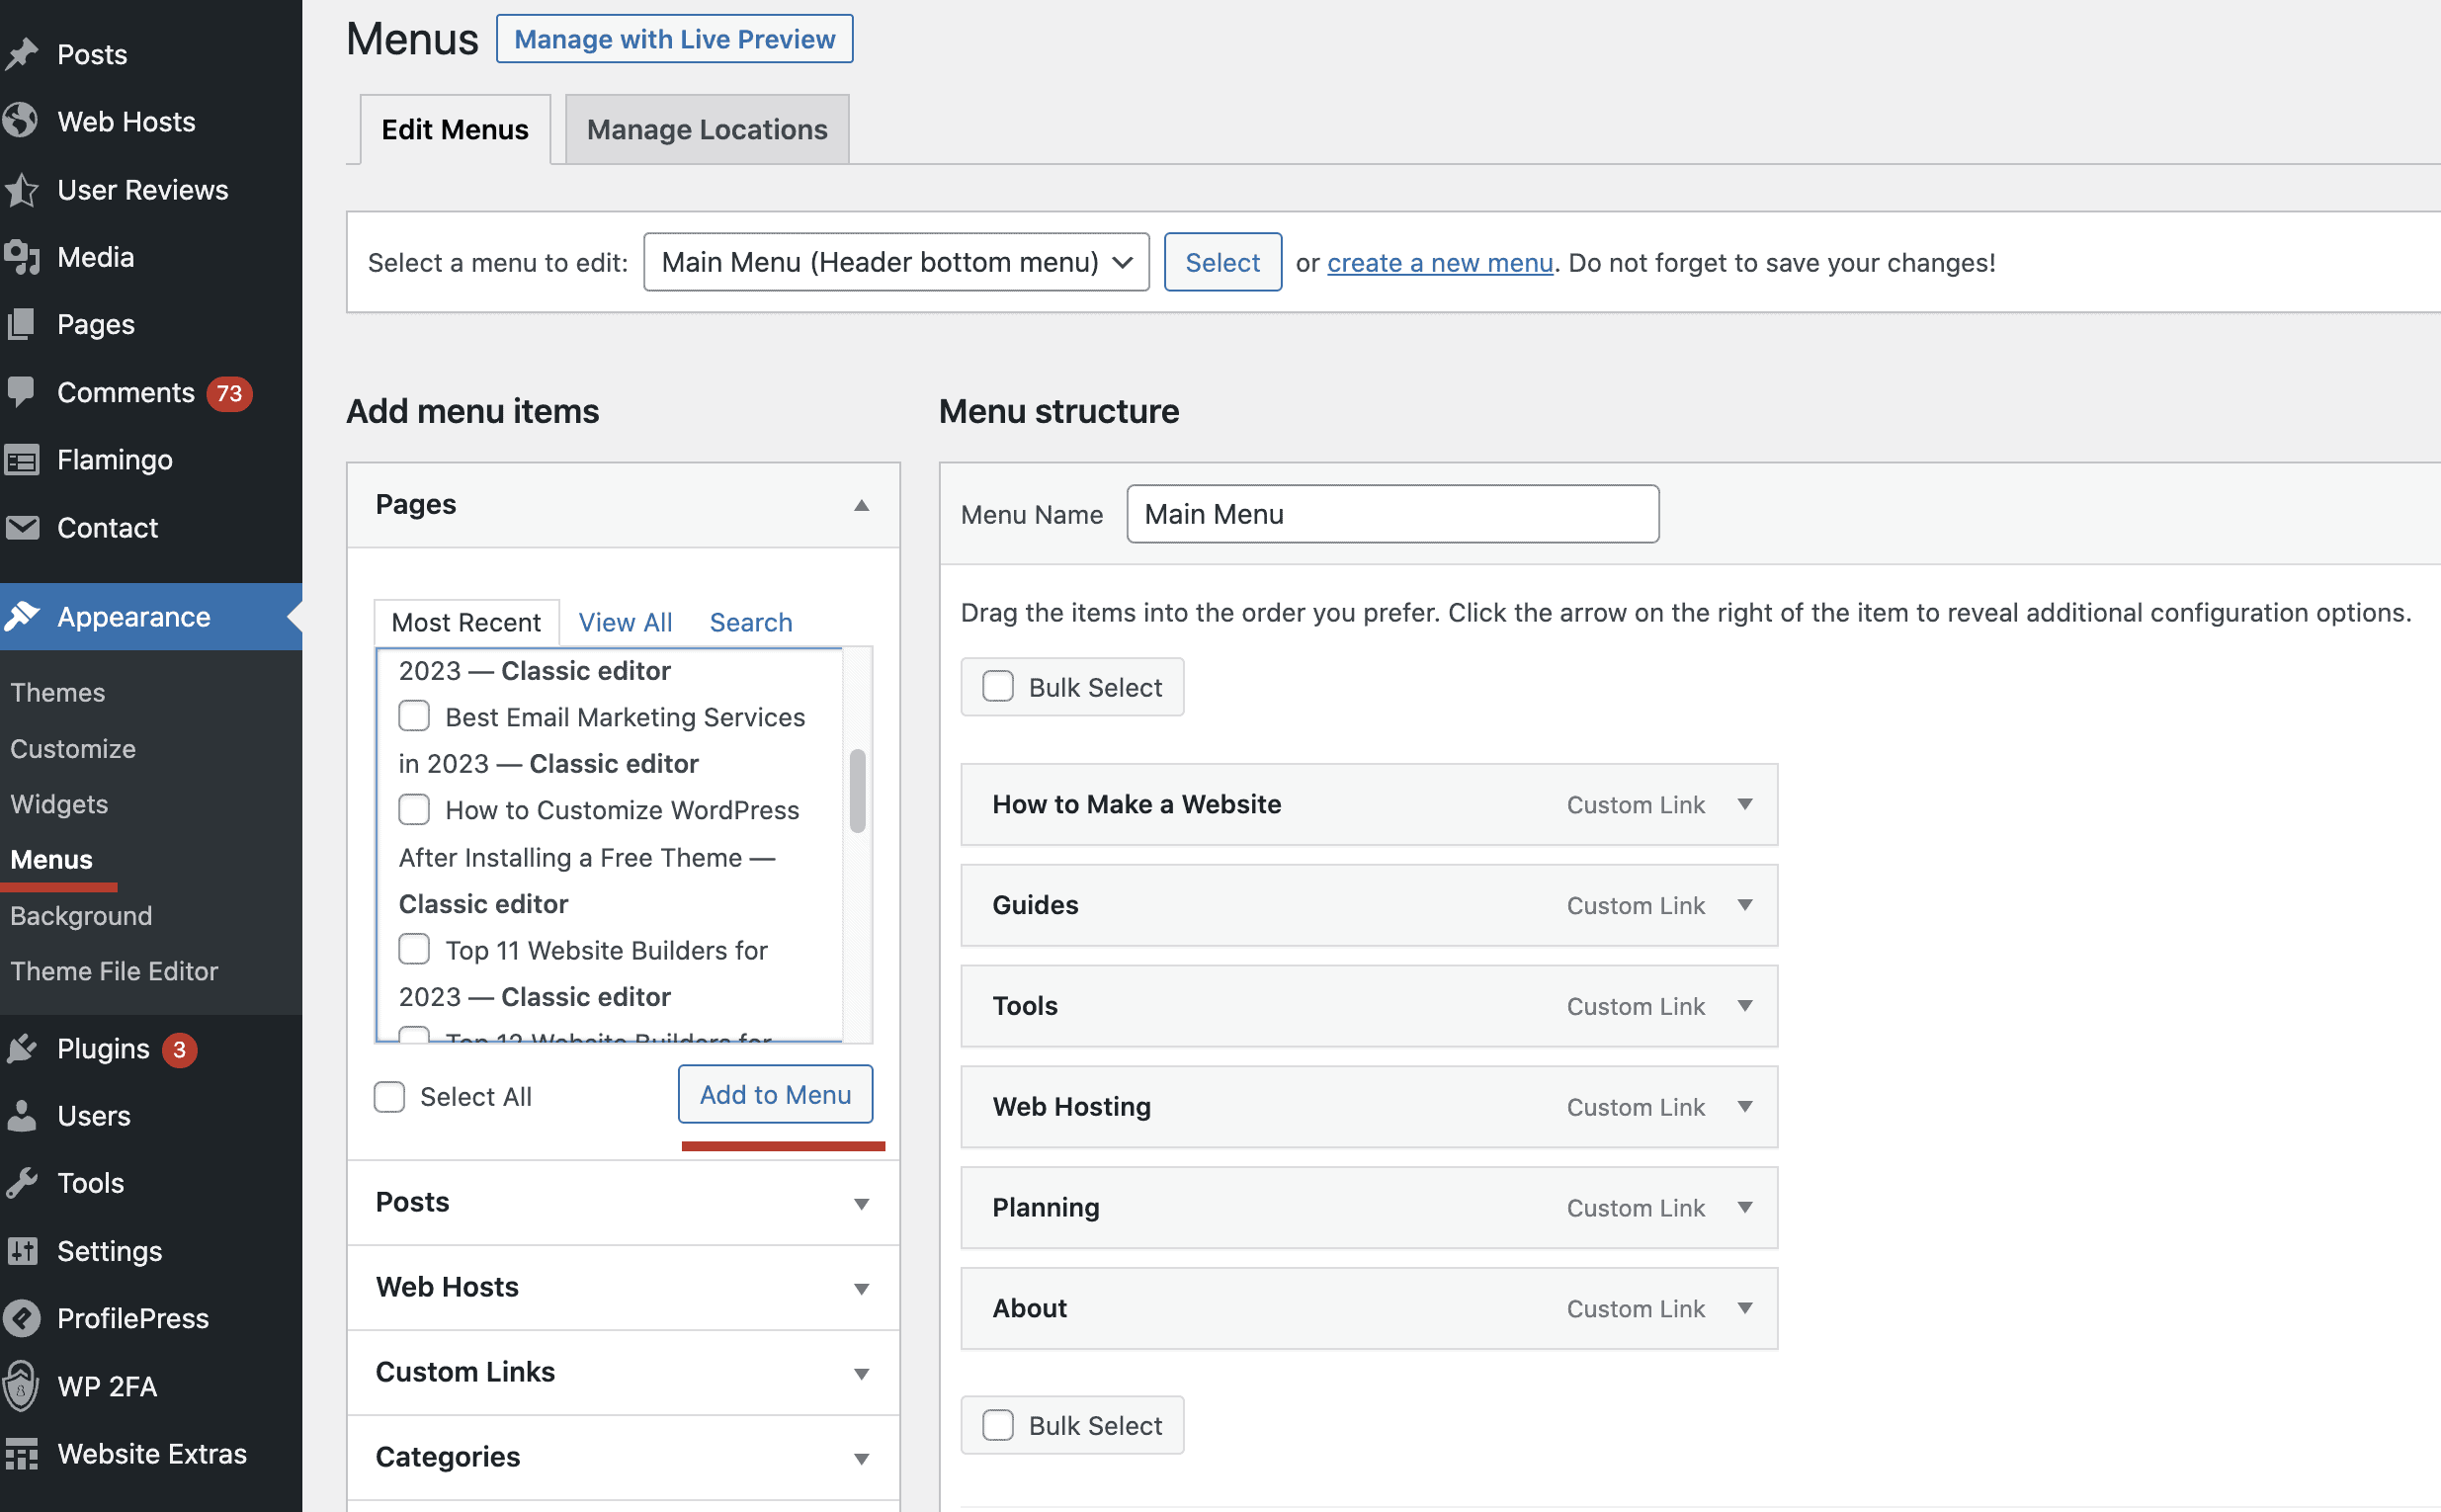
You can also create sub-items, meaning that pages will be revealed when users hover their mouse over them.
Step 5: Upload your logo and favicon
At this point, your website has content and structure, meaning you’re almost across the finish line. To wrap things up, you need to include a logo. You can also add a favicon if you want your logo to appear next to your website’s URL in your browser’s address bar. Both of these can be added through the Site Identity menu.
To access it, go to Appearance in the left-hand menu and click Customize, followed by the Site Identity option. Under the Logo section, click Select Logo and choose your logo file if you already uploaded it to the Media Library. Or, upload it now. Once you’ve done that, your logo will automatically appear on your website.
You can upload your favicon in the Site Identity menu under the Site Icon section.
You can create a favicon by using any of these free favicon generators. They can convert your logo so they fit the correct shape and size specifications.
Congratulations, Your Website is Ready
Well done! At this stage, your website should be up and running smoothly.
One more thing—you might want to connect your website to Google Search Console (GSC). The configuration process for this tool is straightforward and should take roughly 10 minutes.
That’s it!
P.S. If you found this guide helpful, I’d really appreciate it if you shared it. Your support means a lot!
P.P.S. If you used this guide to create a website, I’d love to see it! Feel free to email us at info@websitesetup.org.