Learning how to add Google Analytics (GA) to WordPress is a very important part of running your own website.
The GA software can give you invaluable information about what is and isn’t working on your site and lets you make informed decisions about its future.
In this tutorial, we’re going to answer the most important questions about Google Analytics, including:
Table of contents:
- What is Google Analytics and Why Do You Need It?
- How to Sign Up With Google Analytics
- The Basics of Google Analytics
- How to Add Google Analytics to WordPress Without a Plugin
- How to Install Google Analytics with a WordPress Plugin
- Other Plugin Options
- Google Analytics and WordPress in a Nutshell
- Video Tutorial
Let’s go!
Disclaimer: Google published a new version of Google Analytics, named Google Analytics 4, in October 2020. The update comes with an overhaul of its interface and changes to its tracking code. Since the new version is going to be the standard going forward, we will be using screenshots from inside Google Analytics 4 in this tutorial. However, so far, none of the WordPress plugins mentioned below support the new version of Analytics (not even Google’s own), so we will include instructions for how you can still access the older version as well.
What is Google Analytics and Why Do You Need It?
Before getting into the technical stuff, let’s first talk about the subject matter of this post: Google Analytics. If you’re a complete newbie, you might not even be aware of what it is and why it’s a good idea to connect it to your WordPress website. So, let’s cover that first.
1. Google Analytics Helps You Get to Know Your Audience
Google Analytics is a web analytics suite that helps you understand and analyze your web traffic. Over 50 million websites around the world use it.
The way it works is that you add a piece of JavaScript code to your page (more on that below), which allows Google to track the activities of visitors coming to your site. They will then collect these activities and present them in the form of statistics in your Google Analytics account.
Here’s what you can learn from this information:
- Who is visiting your site? — Geographical and technical information about where your audience is from and the devices they use to access your site. You can also segment your audience into subgroups so you have a better understanding of who you are trying to appeal to.
- What do your visitors do? — Find out which pages they look at, how long they stay on your site, how they navigate from page to page, and more.
- When are they coming by? — Google Analytics also shows you when exactly people come to your site by the hour, day, week, or month.
- How do they find your site? — You get information about whether your audience finds your site in search engines (and which of them), social media, links on other websites, or if they enter your site address directly.
- How do they interact with your content? — Google Analytics lets you understand how people interact with your WordPress site, for example, which links they click on. If you define certain goals (like converting visitors to email subscribers) you can also track that.
2. Use The Information To Optimize Your Website
What can you do with this data? Knowing the above allows you to do many things:
- Adjust your site to serve your audience better — For example, by improving technical aspects of your site or adding a language.
- Optimize traffic sources — Invest more in those that work particularly well or ramp up your efforts on those that don’t.
- Improve your content and content strategy — Give visitors more of what they are interested in and publish it at times they are most likely to be on your site.
- Track marketing campaigns — See if your efforts are working, same for product sales and other kinds of conversions.
- Find your worst-performing pages — This allows you to take steps to make them better.
In short, web analytics allow you to eliminate guesswork and let you make decisions about your site based on facts and hard data instead of a gut feeling or guesswork. In addition, Google Analytics is completely free to use, so it doesn’t contribute to website costs.
Google Analytics and GDPR
In recent years, the European Union has issued new privacy rules called the General Data Protection Regulation or GDPR for short. They are aimed to better protect consumer privacy and apply to anyone operating in Europe, doing business or advertising themselves there, collecting data about European users, or employing people in the EU.
So, basically, almost everyone who has a website.
Since Google Analytics tracks a lot of data, it is naturally affected by the new laws. So, if you are going to use it on your WordPress site, you need to do it in a way that is compliant with the regulations. Thankfully, there are plenty of articles on the topic to help you do so.
Sign Up With Google Analytics
Are you convinced yet? Then let’s go over how to add Google Analytics to your site. First step: create a Google Analytics account.
1. Log in to Google
Before you can connect the web analytics to your site, you first have to sign up for them. You can do that by heading on over to the Google Analytics homepage, where you will first be asked to log into your Google account.
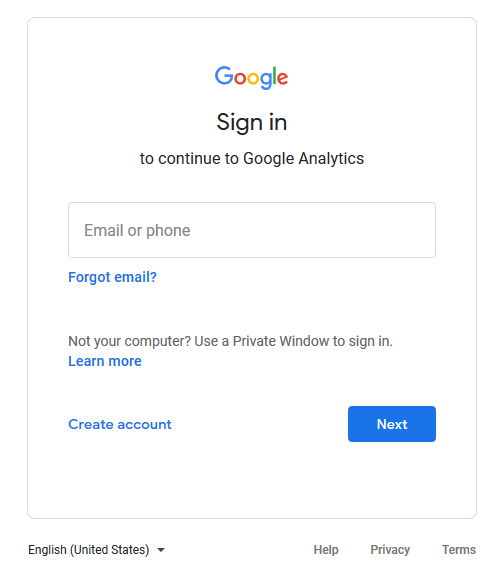
If you already have one, simply use it to log in. If not, click the button to sign up and create a whole new account. Once done with either, you will see the screen below. Hit the big blue button to get started.

2. Create an Analytics Account
In the first screen, you need to add a name for your Google Analytics account and determine the data sharing settings.
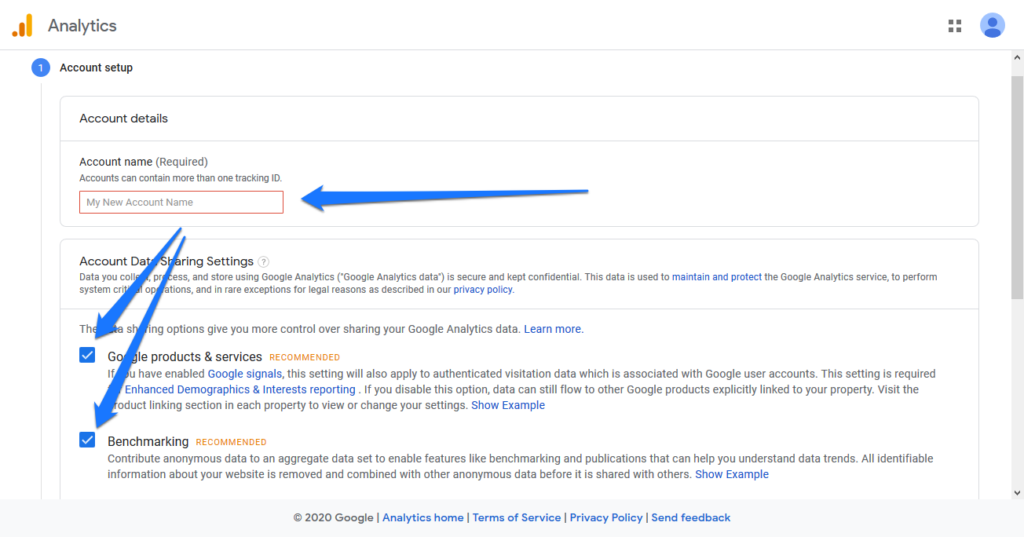
Note that your account can contain several websites for tracking. Consequently, an appropriate account name can be something like Business Websites.
You can disable all the data sharing options. You may want to keep the first one active if you are planning to use the enhanced demographics and interests report.
Hit Next when to proceed.

3. Set up a Property
In this step, you have to create a property. This is simply the website or app you want to track with Google Analytics. As already mentioned, you can have several of those under one account.
If you are planning to connect your WordPress site via a plugin, at this point in time, you need to create a property using the older version of Google Analytics (called “Universal Analytics”).
To do that, click on Show advanced options as shown in the screenshot above. This will open up a new panel where you can toggle to create a Universal Analytics property.
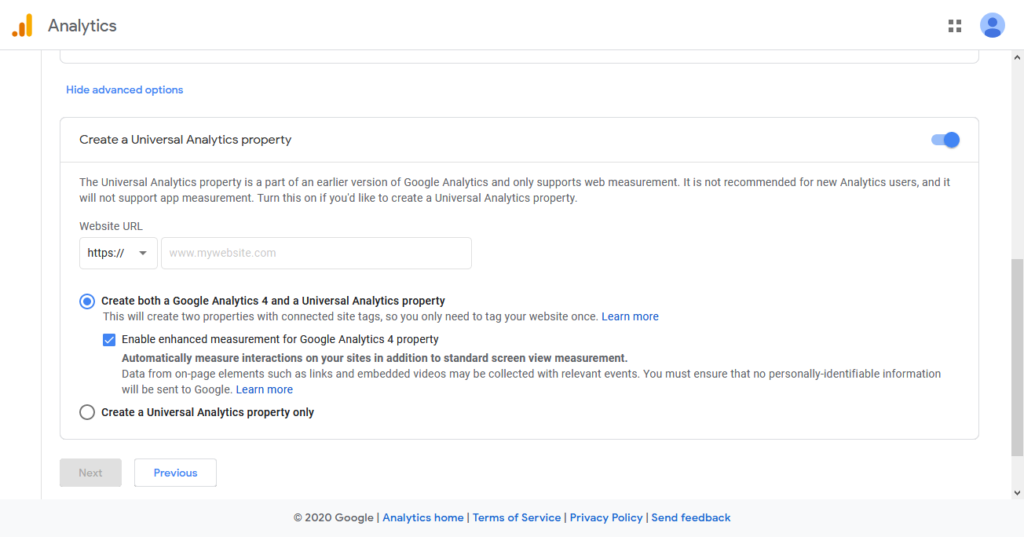
For future applications, it probably makes sense to create both properties for Google Analytics 4 as well as its earlier version, so you can leave that option enabled.
After that, you still need to enter a property name (for example, the name of your website) at the top and the site URL at the bottom. The time zone and currency should be self-explanatory.
Hit Next again.
4. Finish the Setup
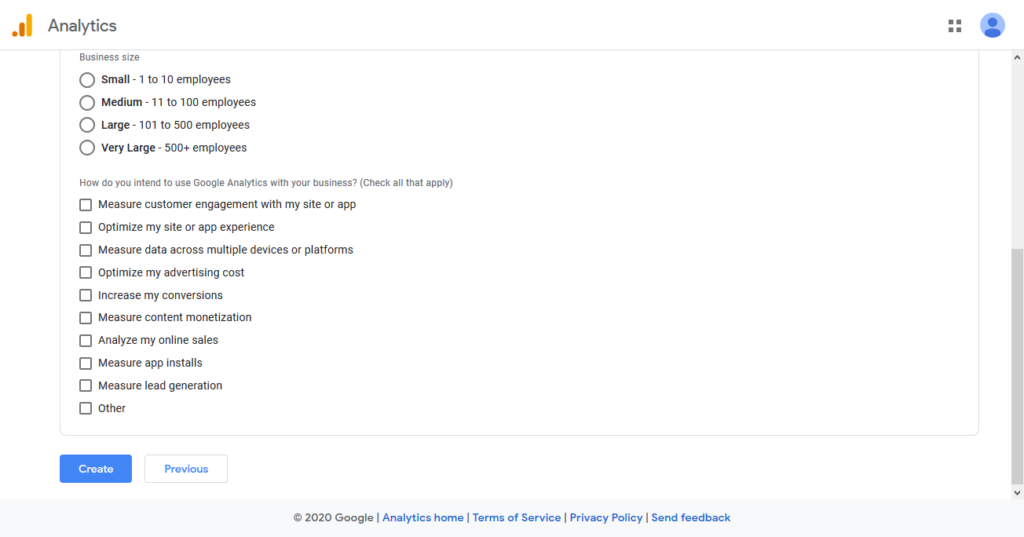
In the final step, Google Analytics will ask you for some more information about your website/business. This is optional and you can skip this section by clicking Create at the bottom. Or, input an industry category, the size of your business, and goals for using Google Analytics. The choice is yours.
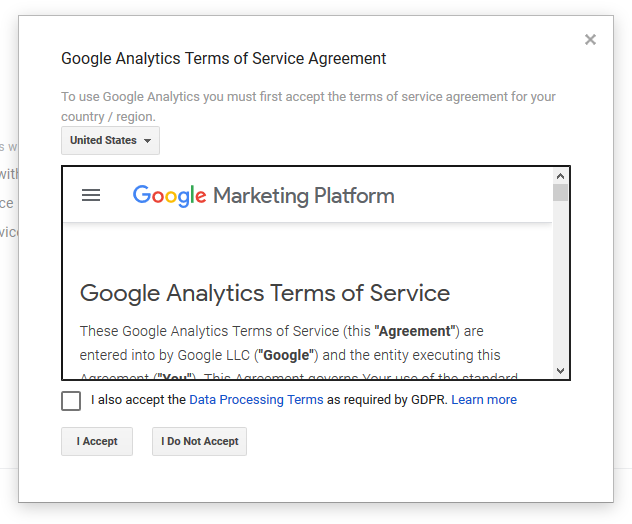
Once you proceed, the page will display the terms of services and data processing terms, which you need to accept.
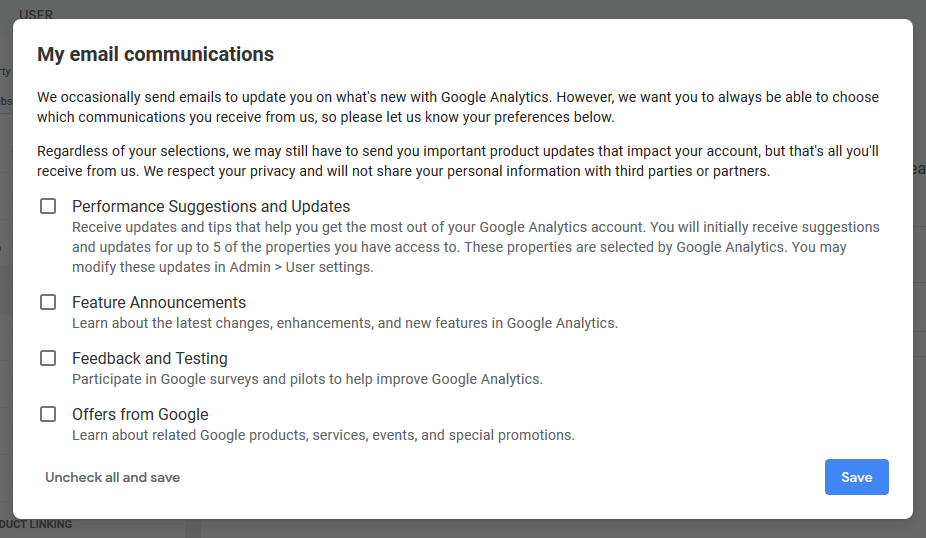
This will take you to your account, where the first step is to configure what email communication you want to receive from Google Analytics (it’s fine to leave it all empty and save).
5. Set Up a Data Stream
After that, it’s time to set up a data stream. This is the term Google Analytics uses for sources of data you want to track. It can either be an iOS or Android app or a web property. These are also the three choices Google Analytics will give you.
(Note that, if you set up both kinds of Google Analytics properties, this step will be done automatically and all you need to do is find your respective ID and tracking code.)
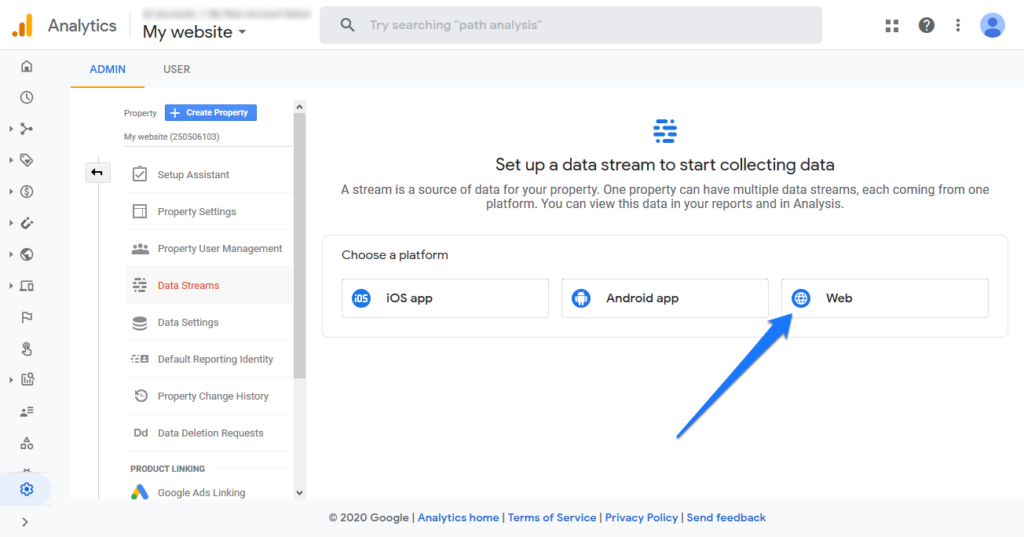
To add Google Analytics to a WordPress website, the natural choice here is Web. When you click it, you will be asked to define the website address and provide a name for the data stream. For the latter, something like Website Usage Data is an option.

Below that, you can configure what kind of data you want Google Analytics to collect. Click on + 3 more to see the additional options or the gear symbol on the right for a detailed description of each and the ability to switch them on and off.
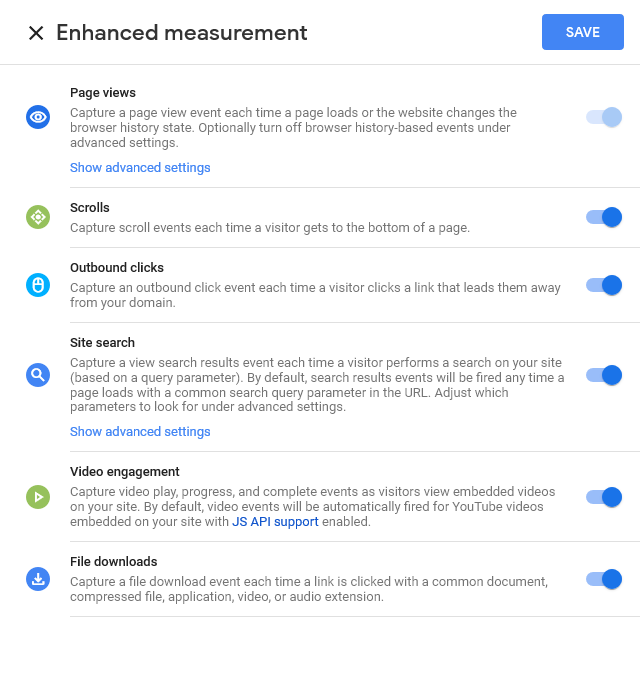
Besides page views, Google Analytics 4 can capture when visitors scroll to the bottom of the screen, clicks on external links, what people search for in the internal site search, video usage, and file downloads.
Unless you have a good reason to change anything here, we recommend you just leave things as they are and click Create stream. You can still change these settings later anyway.
6. Find Your ID and Tracking Code
The following screen is where you find your tracking code and measurement ID.
We will add the tracking code to your WordPress site further below. To do so, you might either need the code or the measurement ID, so it makes sense to leave the browser tab open for the moment.
In case you close it and need to get there later, you can always find your tracking code under Admin > Data Streams and click on the name of your stream.
If you are using Universal Analytics, you find that same information under Admin > Property > Tracking Info > Tracking Code.
Only here you have a tracking ID instead of a measurement ID, which is also present in the code snippet. However, aside from that, everything about connecting Google Analytics to WordPress works the same.
The Basics of Google Analytics
Before we get to how to add the code to your site, let’s take the opportunity to have a quick look around the main Google Analytics interface (Analytics 4, that is). That way, you get a better understanding of the type of information you can find there. Click the Home button to get to the main page.
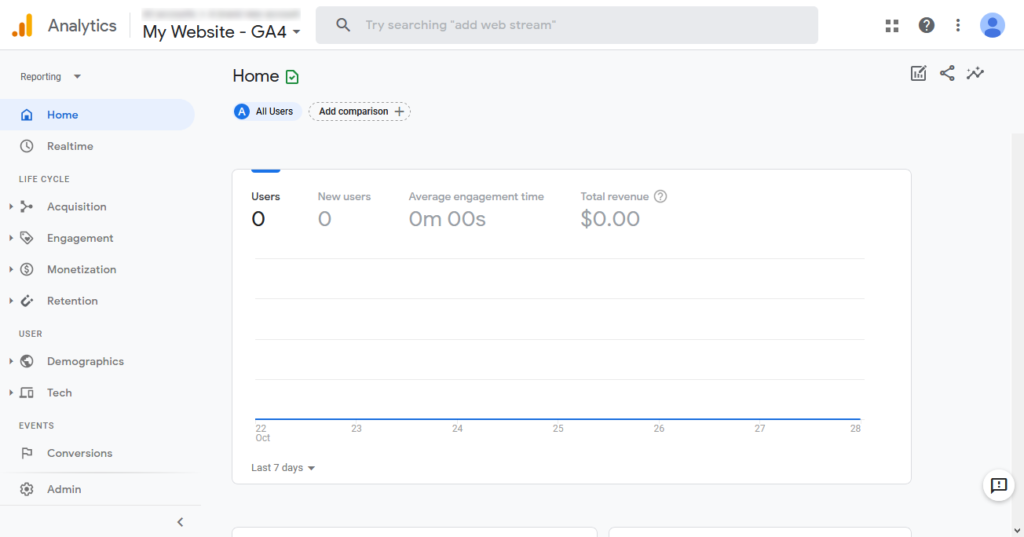
On the right, you will always see the statistics for your website, while on the left you can choose which data to look at. The part where you will spend your most time is Life Cycle. Here’s what kind of information you can find in the different sections:
- Realtime — Shows you what is going on on your site at the moment of observation. How many visitors are currently on it, where they are from, what they are looking at, and more.
- Acquisition — The number of users and new users that come to your site during a certain period of time and which sources send them to you.
- Engagement — How visitors interact with your site: Time they spent on it, how often they return, what pages they visit, and what they do on there.
- Monetization — If you sell products, offer in-app purchases, or run ads, this section can tell you about revenue, what products your visitors buy, ads they look at, and other financial information.
- Retention — Shows you the level of engagement, returns, and lifetime value of different user groups.
- Demographics — Who are the people in your audience? Where are they from? What’s their gender, interests, language, and other demographic information?
- Tech — Information about the technology visitors use to access your website such as type of device, operating system, browser, screen resolution, etc.
- Conversions — If you have set up goals or “conversion events” inside Google Analytics, here’s where you understand how well you are doing in achieving them. This part is very focused on apps though.
- Analysis — Offers ways to display your data in different graphs to help you make more sense of it.
All good so far? Then let’s get down to how to use Google Analytics on your WordPress site now.
Install Google Analytics with a WordPress Plugin
There are a whole bunch of plugins out there to add Google Analytics to WordPress. For this example, we will use Google Site Kit.
It’s an official Google plugin that makes connecting your site to Google Analytics very easy. Plus, it integrates with other Google services, namely Search Console, AdSense, and PageSpeed Insights.
The plugin is also free and displays the most important data right inside the WordPress dashboard. Plus, it has a solid 3.9-star rating with more than 700,000 installs. However, as mentioned in the introduction, it only works with Universal Analytics properties at this time.
Side note: As with every plugin you install on your site, it’s always advisable to consider functionality vs site speed. The more plugins you have, the more they usually impede page loading time. So, if you plan to use any of those listed below, consider running your site through a tool like Google Pagespeed Insights before and after you install it, to make sure it doesn’t drag down the performance too much.
With that out of the way, let’s go!
1. Install the Plugin
Naturally, whenever you want to use a plugin on your WordPress site, the first step is to install it. For that, simply go to Plugins > Add New. Search for it by name.

When you find it in the list, hit Install Now to start downloading it to your site. Activate when it’s done.
2. Start the Setup
When you first activate Google Site Kit, it will display a prompt at the top of the screen.

Here, you need to hit the Start Setup button. This will begin the process of verifying your site by taking you to this page:
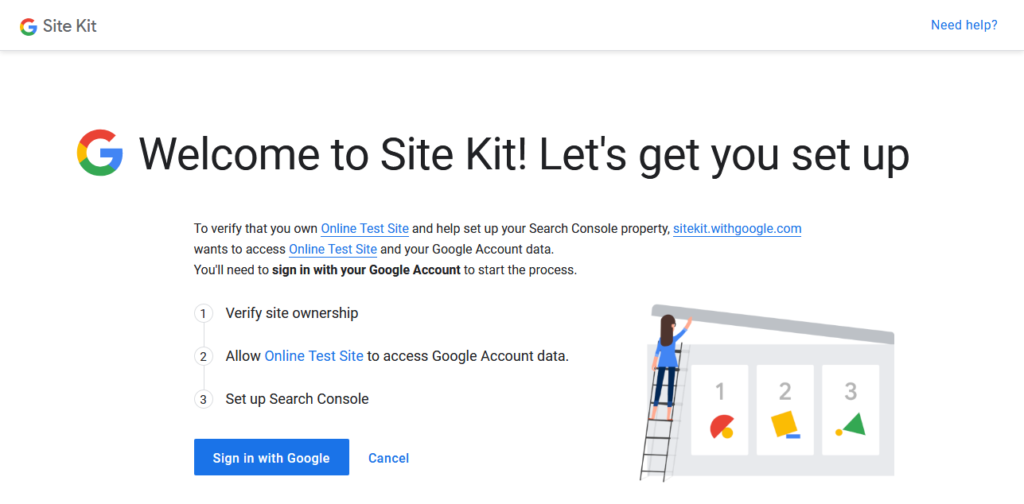
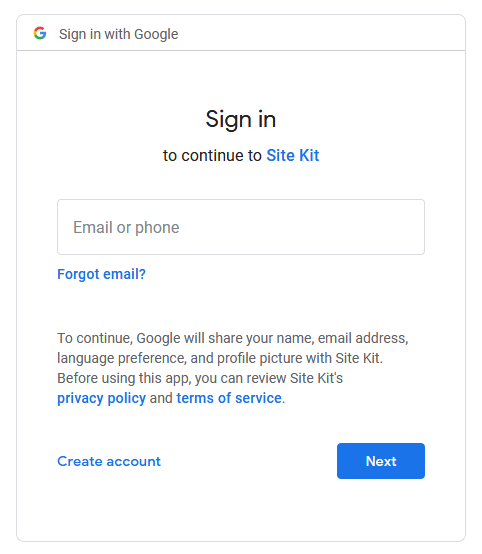
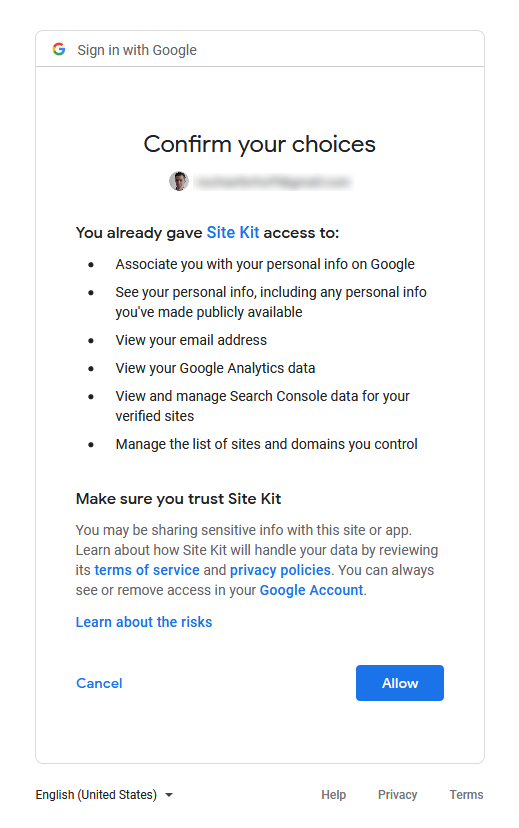
Click Sign in with Google. In the next step, you have to log in to your Google account, or, if you are already logged in, pick the one you want to use.
Of course, it makes sense to choose the one that contains the Google Analytics account you created earlier. Once you make your choice, Google will ask for a bunch of permissions that you need to grant.
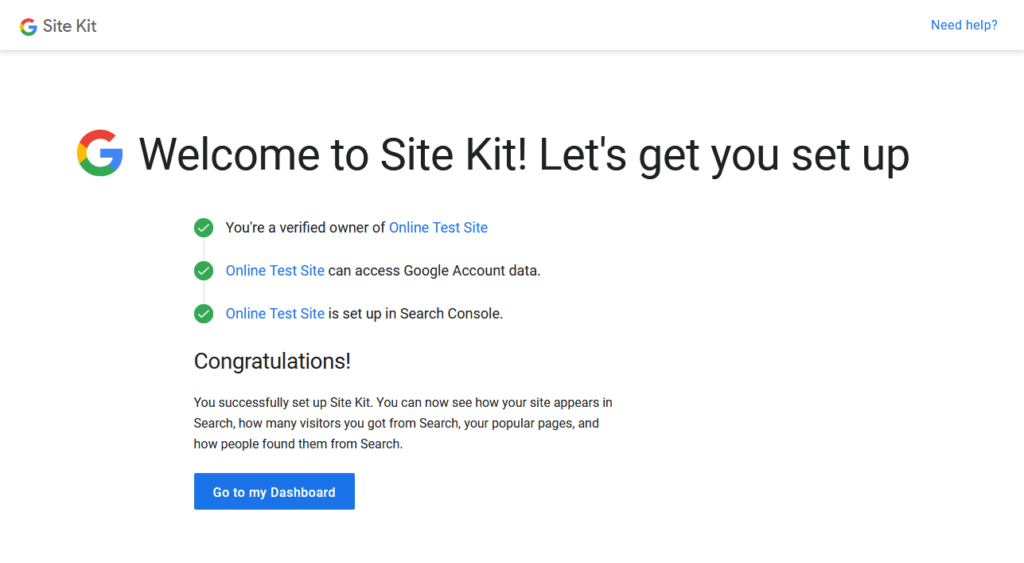
After that, the setup will ask you to verify site ownership, permit access to your Google account data, and add your site to Search Console. Basically, all you have to do is click yourself through the process, it’s very simple.
When done, you can return to your WordPress dashboard with the button that says so.
3. Connect to Google Analytics
Once the setup is finished, your site is connected to Google Search Console and will start collecting data in the back end.
However, this is a tutorial on how to add Google Analytics to your WordPress site, so, of course, we won’t stop there.
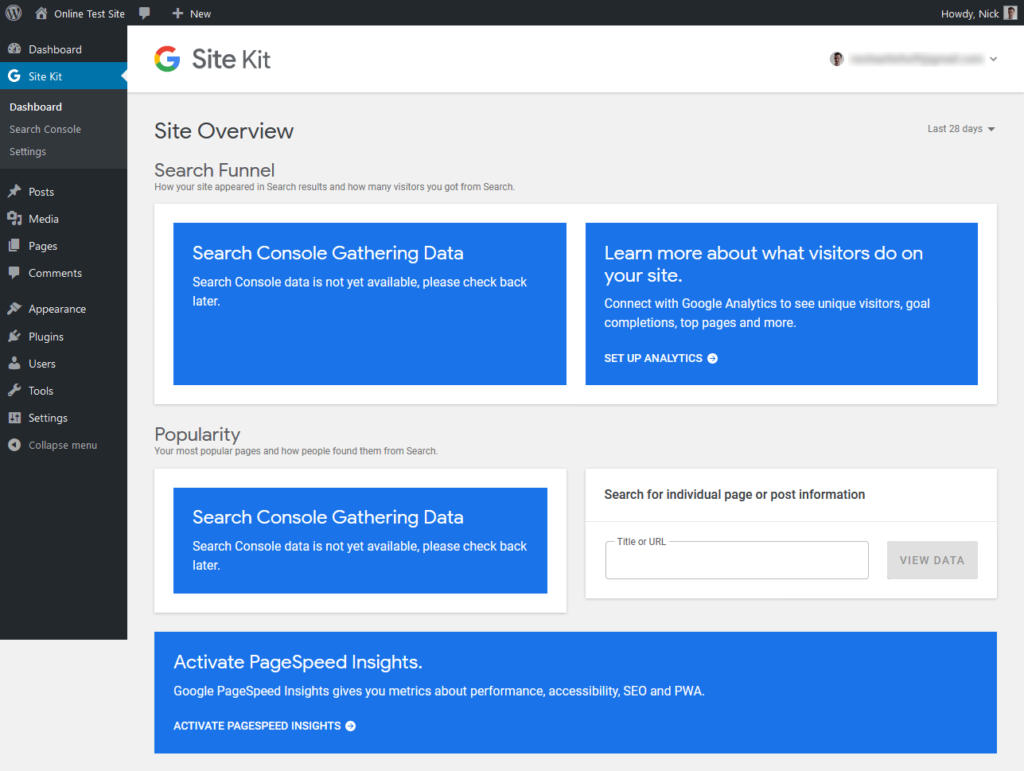
From the screenshot above, you can see that Site Kit adds its own menu item to the WordPress dashboard. Here, you will not only see your data later but it’s also where you manage the plugin settings.
Site Kit gives you several prompts to set up Google Analytics and other Google services but the official place to take care of this is under Site Kit > Settings > Connect More Services.
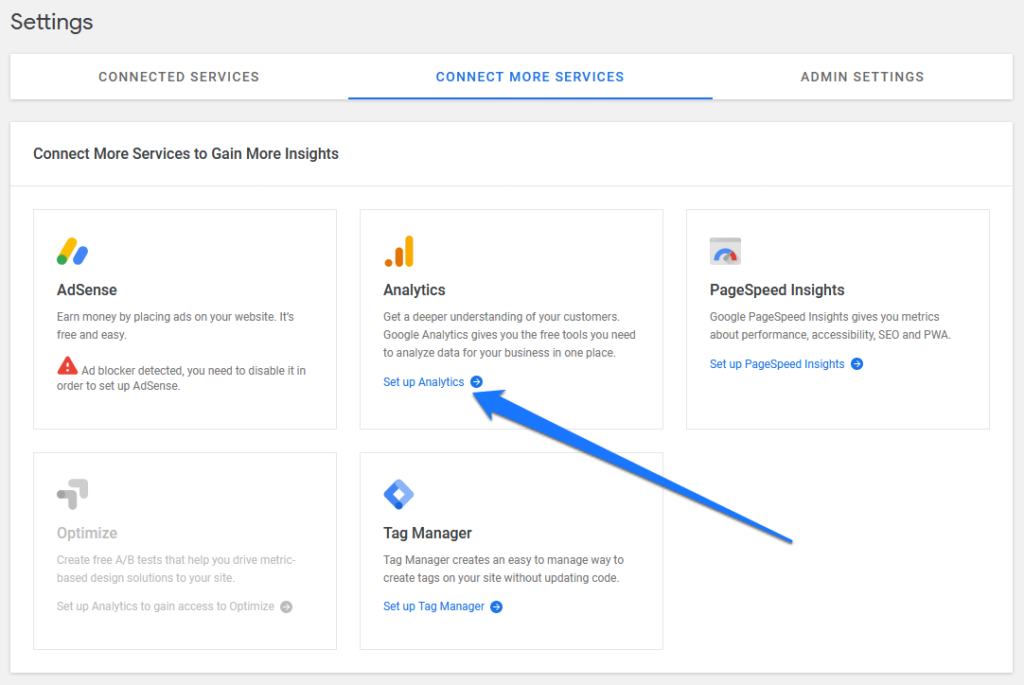
Here, under Analytics, click the blue link to set it up. The next step, again, takes you to a page where you need to choose which Google account to use, followed by prompts to grant access permissions.
After that, you go back to the WordPress back end to pick the account, property, and view you want to connect to. As mentioned, this does not work with Google Analytics 4 yet.
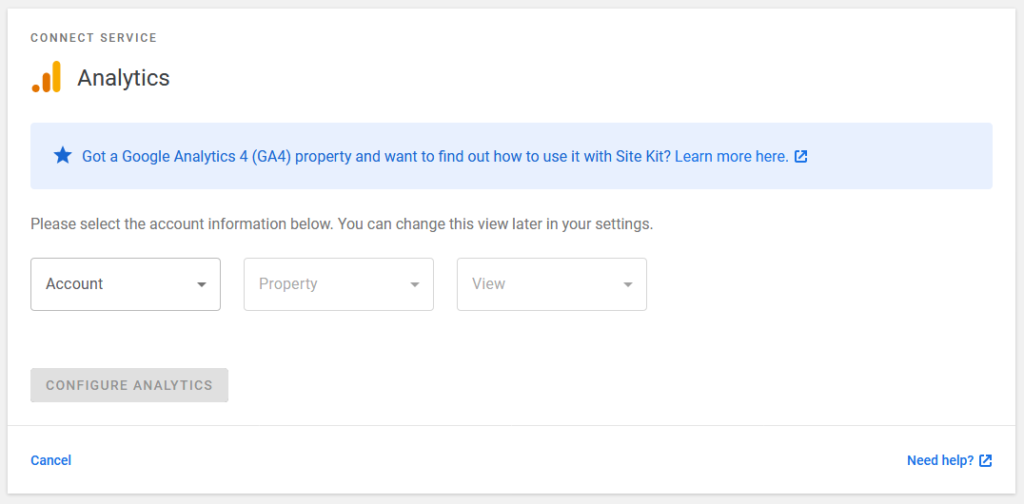
Pick whatever is appropriate and then click Configure Analytics. That’s it, your WordPress site is now connected to Google Analytics.
5. Check the Rest of the Plugins
When done with the initial operations, you can now view the information Google has on your site inside the WordPress dashboard. You find a mix of all of it under Site Kit > Dashboard.
However, the thing that interests us most at this point is the Google Analytics section, which you find under a menu item of the same name.
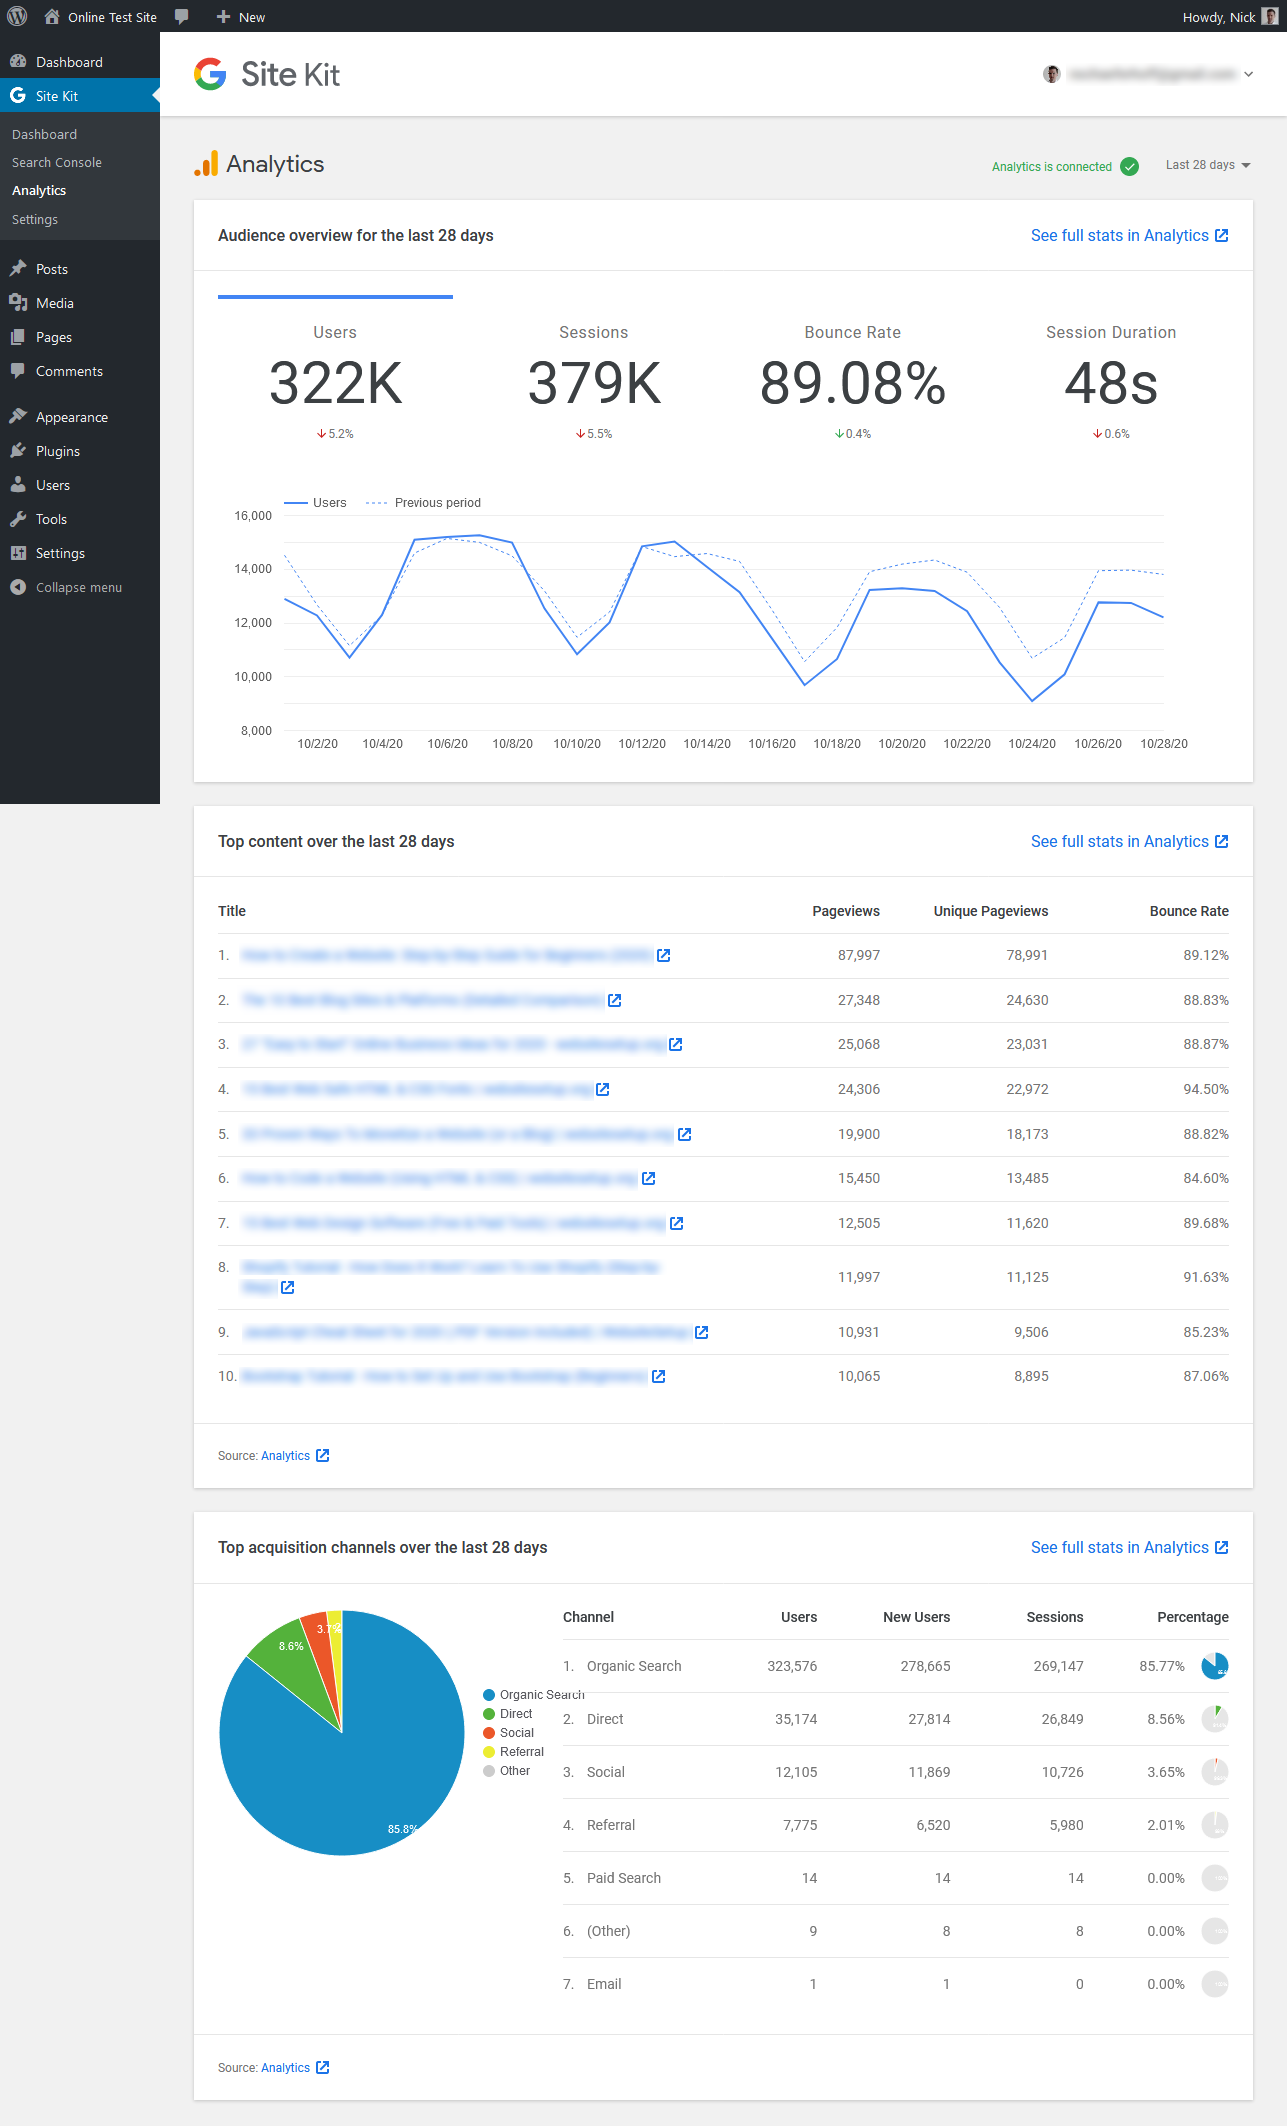
Here, you see the basic information about your site namely an audience overview (including a comparison to the previous period) as well as top content and acquisition channels.
In the upper right corner, you able to switch the time period that you see the data for (the last 7, 14, 28, or 90 days). You also have links everywhere that take you to the respective pages inside Google Analytics itself.
Under Site Kit > Settings > Connected Services, you can use the little arrow button to open your Google Analytics settings and then the Edit link to change its settings.
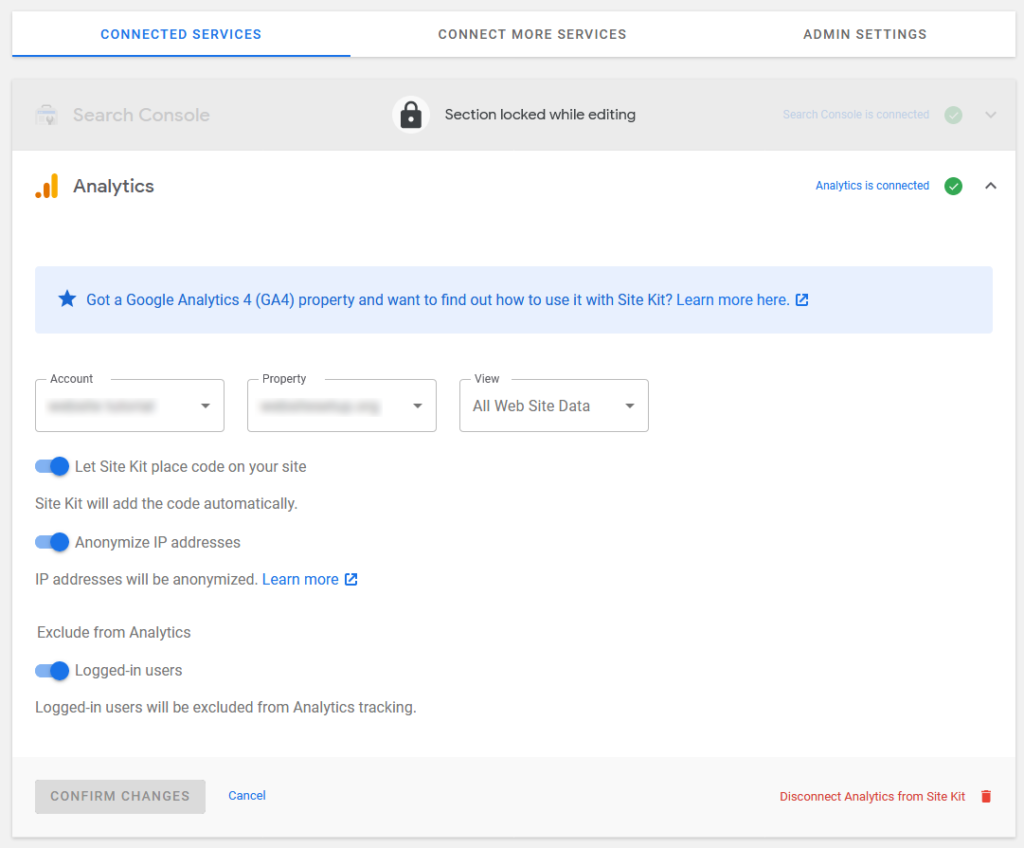
Here are some important options like the ability to anonymize visitor IP addresses (important for GDPR) and exclude logged-in users from being tracked. All of this is enabled by default, so you usually don’t have much to do here but it’s still worth checking.
Aside from that, the plugin doesn’t have that much more to offer. The admin settings pretty much only let you switch Google usage tracking on and off. You can also add more services, view their status under Connected Services, and also disconnect them there.
You are able to disconnect the entire Google Site Kit by clicking on the email address in the upper right corner and choosing Disconnect. That’s it, but it’s also this lean architecture that makes Site Kit such a good option to add Google Analytics to WordPress.
Other Plugin Options
As already mentioned, Site Kit is far from the only way to connect the web analytics suite to your site. Below are a few more options to choose from.
If these choices aren’t enough for you, there are even more. You can find them with a quick search in the plugin directory.
Install Google Analytics to WordPress Without a Plugin
In order for Google Analytics to start tracking your visitors, the tracking code mentioned above needs to be present on every page of your site you want to track user behavior on. Usually, that’s all of them. Here’s how you can achieve that manually.
Option A: Insert the Code Into header.php
One of the main ways to add the tracking code to your site is to insert it into your header. This way, it will load on every page.
Thanks to the way WordPress is set up, this is very easy to achieve. Most standard themes have a header.php file that is responsible for outputting the site header section. So, you can simply input the Google Analytics code here.
However, when you make changes to theme files, be aware that it’s always best to do it in a child theme. Otherwise, they will get lost when you update your main theme. Child themes are super useful in general and you should definitely read up about them. Also, don’t forget to back up your WordPress site when making any changes like this.
Once you have created your child theme, simply copy the header.php from the main theme into it and start editing. You can do that directly in the WordPress back end via Appearance > Theme Editor.
Copy and paste the tracking code from Google Analytics into header.php right after the opening <head> tag.
Also, make sure the code is wrapped in <script>...</script> brackets! Otherwise, browsers won’t recognize it for what it is. That’s it! Now save and you are good.
Be aware that your theme editor might be disabled for security reasons (which is a good idea). In that case, you can also make the edits on your server with an FTP client like FileZilla.
Alternatively, you can also use a plugin like Head, Footer and Post Injections to insert the script into your header. Some themes also have native functionality for doing so.
Option B: Use functions.php
Another possibility to add Google Analytics to WordPress without a plugin is to use the functions file. You can do the same thing as we did above, however, instead of adding the tracking code to header.php directly, you insert it into the head section via a function.
To do so, simply edit your (child) theme’s functions.php file and add the following piece of code (but use your own measurement or tracking ID instead of ours):
function ns_google_analytics() { ?>
	<script async src="https://www.googletagmanager.com/gtag/js?id=G-B175YGY1T1"></script>
		<script>
		  window.dataLayer = window.dataLayer || [];
		  function gtag(){dataLayer.push(arguments);}
		  gtag('js', new Date());

		  gtag('config', 'G-B175YGY1T1');
		</script>
	<?php
}

add_action( 'wp_head', 'ns_google_analytics', 10 );
Save, upload, and from that moment, Google Analytics should start tracking what’s going on on your site.
Option C: Use a Custom Plugin
A third option to manually add the tracking code to your site is creating your own plugin (even if – technically – that’s not adding Google Analytics to WordPress without a plugin, but we really meant third-party plugins here). Using this method gives you the ability to switch tracking on and off from the WordPress back end. Plus, it makes sure that the Google Analytics code stays on your site even if you change themes.
If you have never created a plugin before, don’t worry – it’s really easy! Before we get to it just a quick note: for the below to work, your active theme needs to have the wp_head hook inside header.php. That’s usually implemented by default but it’s worth checking!
Once you’re done, all you need to do is create a new PHP file. Take the text editor of your choice, make a new file, and save it as something similar to nick-google-analytics.php. Then, add the following code to it (hint: it’s the same function as before plus a header that lets WordPress know this is a plugin).
<?php
/*
Plugin Name: Custom Google Analytics Plugin
Plugin URI: https://websitesetup.org
Description: Add the Google Analytics tracking code to your site header.
Author: Nick Schäferhoff
Version: 1.0
*/

function ns_google_analytics() { ?>
	<script async src="https://www.googletagmanager.com/gtag/js?id=G-B175YGY1T1"></script>
		<script>
		  window.dataLayer = window.dataLayer || [];
		  function gtag(){dataLayer.push(arguments);}
		  gtag('js', new Date());

		  gtag('config', 'G-B175YGY1T1');
		</script>
	<?php
}

add_action( 'wp_head', 'ns_google_analytics', 10 );
Be sure to replace the sample tracking code (everything between <script/> and </script>) with your own. Also, adjust the plugin header to whatever you want.
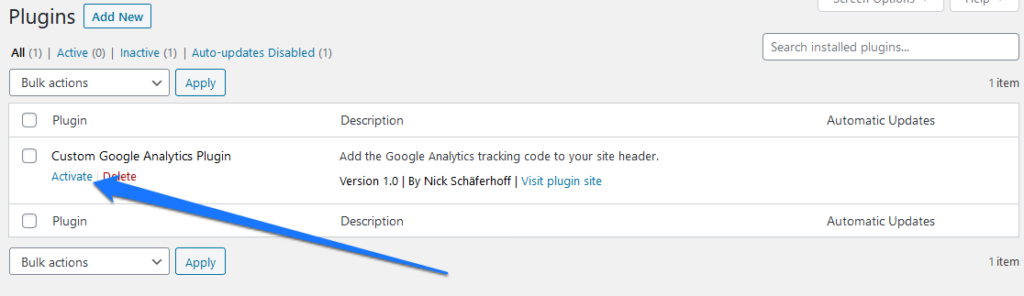
Once done, save the file and upload it to your site’s plugin folder (wp-content > plugins). You can also give it its own subfolder if you like. When you are done, activate it from the WordPress back end like any other plugin.
While the above isn’t very complicated, an even easier way to install Google Analytics in WordPress is using one of the many available plugins (see above).