Learning how to move your website to HTTPS is an important issue. These days, we share sensitive data like credit card and bank information or login credentials dozens of times per day.
Using the web for shopping gives us many conveniences. We no longer need to go out to run errands, buy groceries, pay bills or talk to others face to face. Hell, right before writing this guide, we were trying on glasses online!
However, there’s a flip side. As a website owner – especially if you have an online shop and/or deal with financial or other sensitive information – you have a responsibility to keep it safe. One of the most important steps to do so is to use HTTPS and SSL encryption on your site. That’s what we will talk about in this guide.
In this guide, we will first talk about what we mean by HTTPS and SSL and how it works. Also, we will talk about reasons to add encryption to your site. Then we will tell you where you can get an SSL certificate for your site and finally provide you with a step-by-step guide on how to move your site to HTTPS.
Ready? Then put on your safety goggles and let’s talk some security.
Click here to see 8 steps to move your WordPress to https://
How HTTPS Works – A Short Definition
Before diving into how to move your website to HTTPS, let’s first define what we are talking about. Even if you don’t know exactly what HTTPS and SSL are, you have probably seen them at work before.
HTTPS and SSL are Visible on the Site URLs
These days the URL of most big sites (and increasingly also the smaller ones) start with https:// instead of the familiar https://. In fact, if you look into your browser bar while on this very website, you will see exactly that.

Next to it, you will also notice the padlock symbol. This is how modern browsers show that you are on a site that uses SSL encryption. In some cases, they even include the name of the company. Both are signs that you are on a site that takes the privacy of its visitors seriously.
What Does That Really Mean?
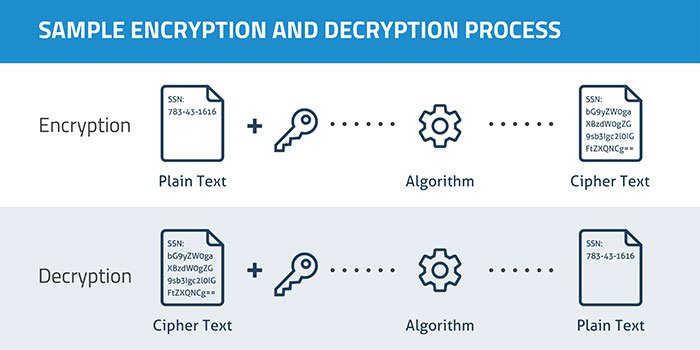
HTTPS stands for Hypertext Transport Protocol Secure. Its cousin, HTTP (which stands for the same minus the Secure at the end), is the communication protocol usually used for facilitating web traffic.
What’s the difference?
The secure version uses an SSL (Secure Socket Layer) certificate to establish a connection between browser and server. That means any information that is exchanged gets encrypted.
Sounds useful, right? But do you really need it on your site? Let’s go over some good reasons to add HTTPS to your WordPress website.
A quick note: Technically SSL is not the correct name anymore. In the late 90s, the name changed to TLS (Transport Layer Security) and SSL was actually retired. However, its name stuck around.
How to Move Your WordPress Site to HTTPS (8 Steps)
Alright, now we are getting to the meat and potatoes of this article: how to move your site from HTTP to HTTPS. We will take this step by step to make sure you can follow along without a problem. After all – we care about your site’s security as well!
1. Back-Up Your Website
Whenever making major changes to your site, you should always back it up first. That way, in case something goes wrong (not that we are expecting it) you can go back to the working version.
As this case is no different, backing up your website is your first task. Even better – if you have the possibility, run through the process below on a test server first, not only your live site.
2. Implement Your SSL Certificate
The first thing we will do is get ourselves an SSL certificate. How easy or complicated this process is, depends largely on your host.
For example, while researching this guide, we found out that our current host does not support Let’s Encrypt and doesn’t plan on doing so. Needless to say, we are in the process of switching. Hopefully, your’s is a bit more forward-thinking, such as the companies on this list.
The optimal scenario is that your host offers an option to move your site to HTTPS right in the management dashboard. For example, to switch your site to Let’s Encrypt in cPanel with Cloudways, you can follow these instructions. Find the same steps for Plesk here.
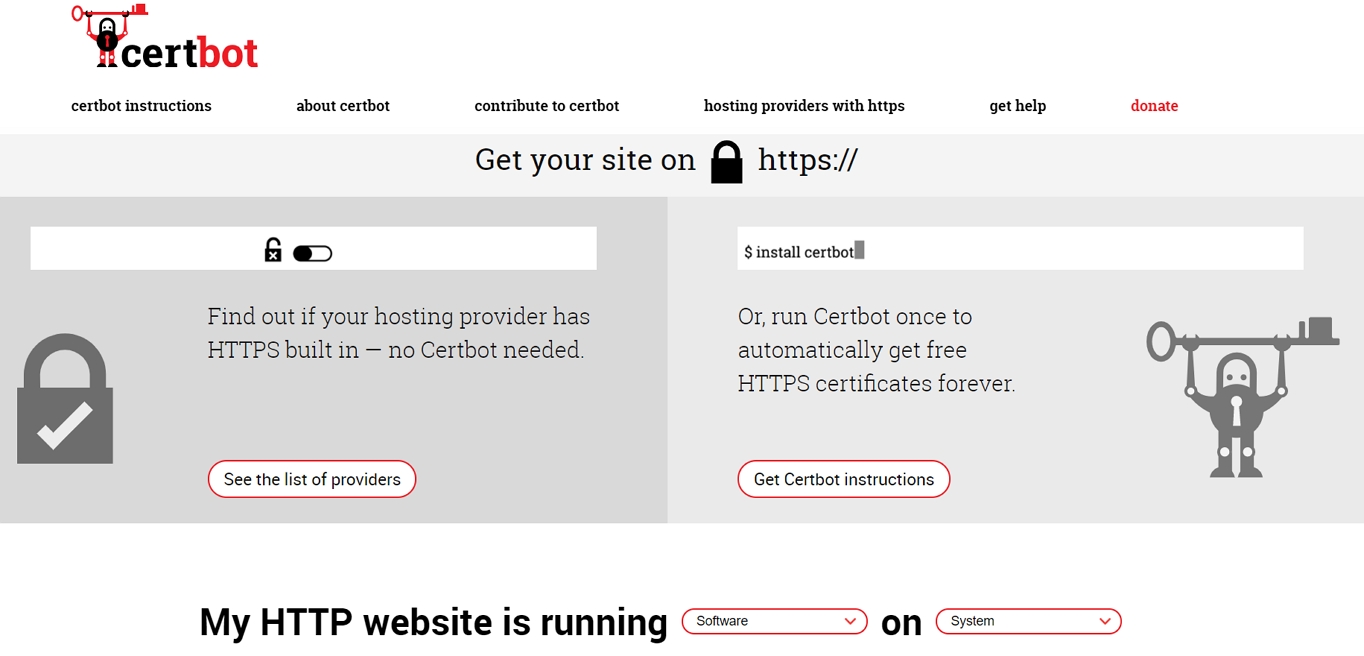
For everyone else, there is Certbot. If you have administrative shell access on your server, you can simply select the type of web server and operating system you are using. After that, the site will tell you how to implement Let’s Encrypt on your server.
If you get your SSL certificate from a different source, follow the instructions of your hosting provider to implement the switch (that’s also the reason why turning to them in the first place is not a bad idea).
Once that is done, you need to start making the necessary changes to your WordPress website. This is what we will talk about next. If you feel that the below is too technical, you can also give the plugin Really Simple SSL a try. It takes care of most of the heavy lifting described next.
3. Add HTTPS to the WordPress Admin Area
The first place where you will get to enjoy the new safe connection is the WordPress dashboard. By securing the back end first, you make sure that whenever a user logs in, their information is exchanged securely.
To do so, open wp-config.php in your WordPress root folder and add the following line somewhere before where it says That’s all, stop editing!.
define('FORCE_SSL_ADMIN', true);
Once you have updated the file, it’s time to test if it works. For that, try to access your login page with HTTPS in the URL, for example via https://yoursite.com/wp-admin. If everything worked correctly, you should have a secure connection now. Then continue.
4. Update the Site Address
After moving the WordPress backend over to HTTPS, it’s time to do the same for the remainder of your site. You can do that by updating your site address under Settings > General.

Add https:// to the beginning of both the WordPress address and site address. Then update your settings by saving. Be aware that you might need to log in again afterward.
5. Change Links in Your Content and Templates
Now it’s time to update any links in your content and database that include the old HTTP protocol. A plugin like Velvet Blues or the Search and Replace script can help with that. However, be careful! If handled incorrectly, they can also screw up your site. Good thing you made that backup earlier, right?
If you have links to external resources and assets in your theme templates and function files with absolute HTTP links, it’s important to correct these, too. Things to consider:
- Images, videos, audio hosted on your site
- Web safe fonts
- Iframes
- JavaScript and CSS files or assets referenced within those files
- Internal links
If possible, change your links to // instead of https://. They will then create relative links themselves!
6. Implement 301 Redirects in .htaccess
The next step in moving your site to HTTPS is setting up a redirect that sends visitors automatically over to the secure version. For that, we will use .htaccess. This is the name of an important system file on your server (usually in the WordPress root directory).
It usually contains settings for using pretty permalinks, so your installation probably already has one. To find it, make sure to allow your FTP client to show hidden files because .htaccess is invisible by default. If you don’t have one, just create a plain text file, rename it to .htaccess and upload it to the WordPress root directory.
After that, add the following lines to it:
<IfModule mod_rewrite.c>
RewriteEngine On
RewriteCond %{HTTPS} off
RewriteRule ^(.*)$ https://%{HTTP_HOST}%{REQUEST_URI} [L,R=301]
</IfModule>
That’s it. From now on, visitors (including Google bots) should automatically land on the HTTPS version of your WordPress site. Make sure no page is available in both versions. This can lead to problems with duplicate content. Not good for SEO.
7. Test and Go Live
Ok, now that we are done with the main steps, it’s time to test if everything works correctly. For that, head on over to SSL Test. Insert your domain name and click Submit. This will give you an overall score of how well you implemented SSL on your site and details to find out potential issues in order to fix them.
After that, crawl your site with a tool like SSL Check. That way, you can catch any leftover links that you forgot. If everything fine, it’s time to go live.
 Well done! Now you only need to update some peripheries.
8. Update Your Site Environment
If that worked fine, now it’s time to do the last few steps to complete the transfer to HTTPS:
- Update your sitemap — Ideally, your SEO plugin does this automatically. However, it doesn’t always work that way. With Yoast SEO you might have to switch off the plugin once for it to update the sitemap. Don’t forget to include it in your robots.txt file and update all other hardcoded links you might have there.
- Add site to your webmaster tools — Go to every webmaster tool you are using and add the HTTPS version of your site as a new property. While you are there, upload the new sitemap. You might also consider doing a fetch and crawl and submit any disavow files that are already active for the old version of your site.
- Update your CDN — If you are using a content delivery network (one of the ways to speed up your WordPress site), you also need to switch it to SSL. Many of them have that feature built-in and your CDN should have documentation on this. Otherwise, ask their support to help you.
- Make the switch in your analytics — If your analytics needs a default URL, make sure to upgrade it with the new prefix. For Google Analytics, you find the option under Admin > Property Settings > Default URL. Also, note down when you made the switch to HTTPS to understand traffic changes.
- Preserve social share counts — If you show social share counters on your site, you might have to make some changes in order to keep them up to date. Don’t forget to update the links to your site in your social profiles! And do the same in your email templates.
That’s it! You have successfully managed to move your website over to HTTPS. Congratulations, that was no small feat. If everything went fine, all that’s left is patting yourself on the back and celebrating. Should you run into problems, we have some troubleshooting tips up next.
Why Should You Move Your Website to HTTPS?
Currently, only 57 million of all websites use SSL. Consequently, it doesn’t seem like technology is essential to run a successful web presence. However, there are still convincing reasons to become part of the minority.
1. Your Site Handles Sensitive Information
First of all, if you have an online shop that handles credit card information or similarly sensitive data, moving your site to HTTPS is an absolute must. Clients want to trust your site and they should be able to. It is your responsibility to make that happen.
For example, if someone uses a public wifi spot to access an unsecured site, others are able to steal their payment details. If they use that information to steal from your client, how likely do you think that person is to come back to your site? Not very.
Without HTTPS it is also possible to alter the data your visitors receive. That way, a third party could add ads, malware, or other things you definitely don’t want others to see on your web presence.
However, even if you “only” deal with normal login information, it’s not a bad idea to offer an extra layer of security and keep it safe. Your users will certainly appreciate it.
2. HTTPS is a Sign of Trustworthiness and Authenticity
Speaking of visitors: because of the general push for HTTPS adaptation on the web, encryption has become something that consumers increasingly expect.
Why do they care? Because the little padlock doesn’t only mean that their traffic is protected but also that the website is authentic and who it claims to be, not some fake.
So, if they have the choice between your site without HTTPS and a competitor who has implemented it, chances are good they will decide against you. Especially since major browsers (Chrome, Firefox) now mark sites, which have forms on pages without HTTPS, as insecure.
In the future, they might generally warn you of any site that doesn’t have encryption in place. And you really don’t want to be among those.
3. Benefits for SEO
Not only do consumers expect you to make the move over to HTTPS, but search engines also do. Google officially announced in 2014 that having an SSL certificate in place is now a ranking factor. What’s more – while weak at the moment, the importance of HTTPS will increase over time.
In addition to that, referral data from HTTPS to HTTP is blocked in Google Analytics. So, if you have a website running on the old protocol and get a lot of referrals from sites running on HTTPS, you won’t see it correctly in your web analytics. That way, you might not be aware of platforms that send you lots of traffic and lose out on amplifying your marketing channels.
4. Faster Loading Times
Staying on the topic of SEO, HTTPS is also significantly faster. Don’t believe us? Try it here (use a private window to prevent image caching). When we ran the test, HTTP was 144% slower than HTTPS!
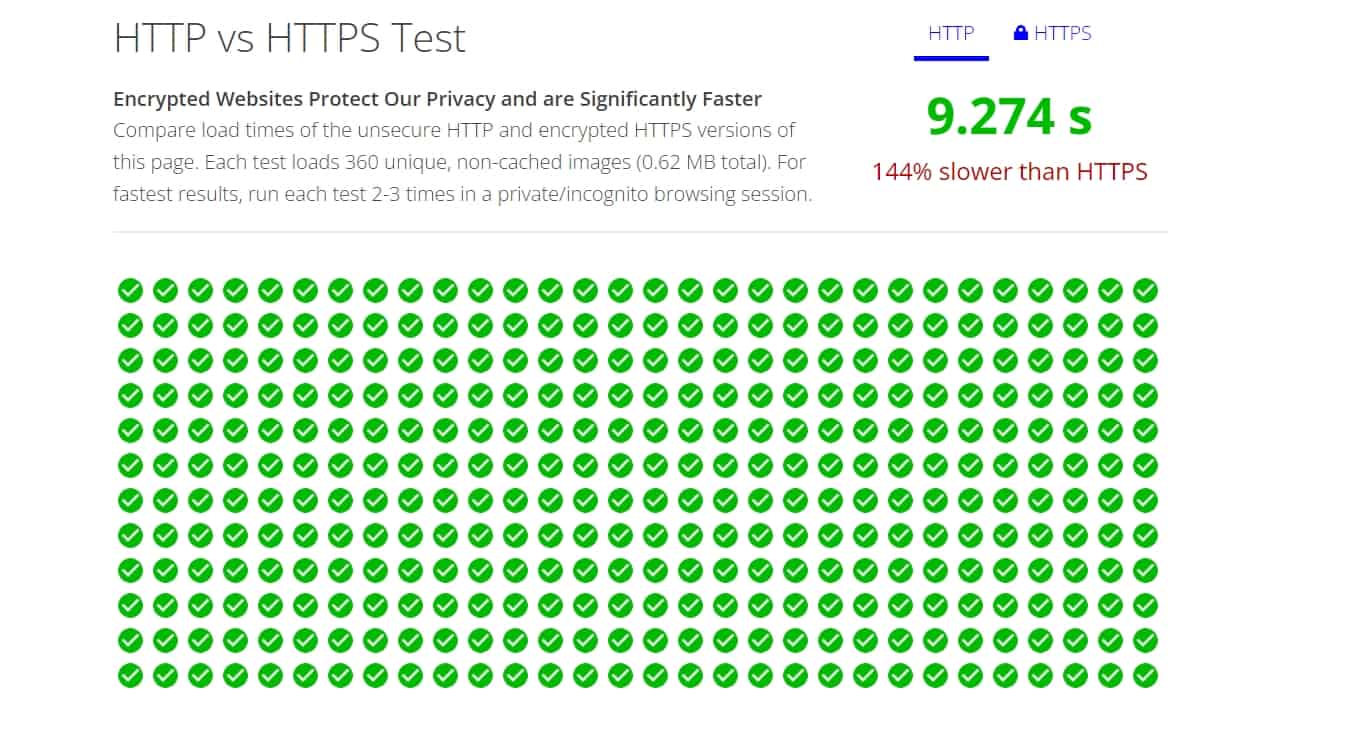
Pretty bad, right? Especially since page loading speed is also a ranking factor.
Not only that but visitors care about it. In fact, a large chunk will leave your site if it doesn’t load within three seconds.
HTTPS Troubleshooting Tips
Unfortunately, moving your site to HTTPS is not all sunshine and rainbows. Some stuff might come up that needs dealing with.
Mixed Content Warnings
The most common problems that arise after you move your website to HTTPS are mixed content warnings. This happens when the browser finds non-secure links on an otherwise secure page. This is usually a matter of updating links to jQuery libraries, custom fonts, or similar to their HTTPS version.
You should usually take care of this while scanning your site before publishing it. However, if you find a warning like this, make sure to check what is causing it.
Aside from the aforementioned tools, you can also use Why No Padlock? for single pages. Then, correct whatever is the issue.
Decreased Search Rankings
Making the switch from HTTP to HTTPS can influence your rankings negatively. What?! Didn’t we say earlier that this is good for SEO? Why would your rankings go down then?
Before you go back and kick HTTPS to the curb, hear us out first. If your SEO is affected negatively, this is usually only temporary.
You see, Google treats https:// and https:// URLs as two different entities. Even if you set up 301 redirects (as we have done above), those only transfer 90-99% of the link juice. That’s why your rankings might go down in the beginning.
However, after the initial dip, they should actually increase over time. As mentioned, Google considers the use of SSL a positive ranking factor, so if you move your website to HTTPS, you actually make it more attractive in their eyes. This will benefit you in the long run.
In a Nutshell…
Keeping your site and its traffic secure is one of the most important issues for any website owner. Knowing they can trust you with their sensitive data matters to consumers. In times of increased data theft, that is a huge asset and HTTPS and SSL are the tools to achieve it.
Besides signaling trustworthiness to consumers, when you move your website to HTTPS it also lets you benefit from increased speed and better SEO. Plus, with a free service like Let’s Encrypt, the cost is no longer a deterrent.
Above, you have learned how to obtain a free SSL certificate and implement it on your WordPress website. We have gone through the necessary steps to move your entire site over to HTTP’s secure cousin and also talked about other considerations to take into account when making the switch.
If you have followed along, you are now able to add HTTPS and SSL to your WordPress website. Know that this is a great investment for the future and where the web is moving. Your visitors, users, and your site will thank you.