Looking for how to add an email newsletter subscription to your website?
Then you’re in the right place.
This is a beginner-friendly tutorial on how to add a good-looking subscription box to your WordPress website, and how to connect it to an email marketing service. Best of all, this won’t cost you a dime.
But before we get down to the nitty-gritty, let’s have a look at what pre-work you need to do before we start adding the email newsletter subscription.
Is There Any Pre-Work Required?
The good news here; you basically need nothing on top of what you already have, which is:
- A working WordPress website
- An admin account on that website
- Roughly 15 minutes of your time
There are just three steps to the entire process:
- Sign up with Constant Contact
- Create a newsletter signup form
- Add the form to your site
Here’s how to get through all of them (no coding skills required).
Step 1: Sign Up With Constant Contact (Or any other provider)
“What’s Constant Contact?” – we hear you asking. To say it simply, Constant Contact is a tool that will take care of your newsletter subscribers and deliver your email messages to them.
“Okay, but why can’t I just send my newsletters from Gmail?” This is a common question. And rightly so – it’s an intuitive thing to ask.
Well, as much as Gmail works fine when you’re sending one email message to one person (a classic case of personal use), things don’t work out just as well when you start sending the same message to multiple recipients – like you would with a newsletter.
After a while of doing that, your emails will be marked as spam and stop being delivered to your recipients entirely. This is why you want someone else to take care of the actual sending of emails. Ideally, this should be a company that has a good reputation and won’t get your messages flagged.
This is where Constant Contact comes into play.
Here’s what you should know about Constant Contact when using it to handle your site’s email newsletter subscription integration:
- There’s a 30-day free trial, so you can test out the platform and see how you like it.
- It lets you craft your emails in a visual interface, using drag and drop functionality.
- It has advanced email marketing automation features that help you interact with your subscribers more effectively.
- Constant Contact will take care of keeping your list of subscribers safe and in tune with the international data privacy laws.
- Constant Contact will also handle new subscriptions coming in and make sure that everyone who opted-in to receive newsletters from you will indeed receive them.
- Constant Contact can be integrated with your site easily.
- You get additional social media tools (for posting new updates), and even a website builder for free.
Constant Contact starts from $20 / month. For that price, you can send an unlimited number of emails to a list of 500 subscribers.
To get started with Constant Contact, go to ConstantContact.com and click on the button labeled SIGN UP NOW.

During the sign-up process, you’ll have to provide your personal info and also enter the details of your payment method (you won’t be charged during the first 30 days).
If all goes well, you’ll receive a confirmation email and will be able to log in to your user panel.
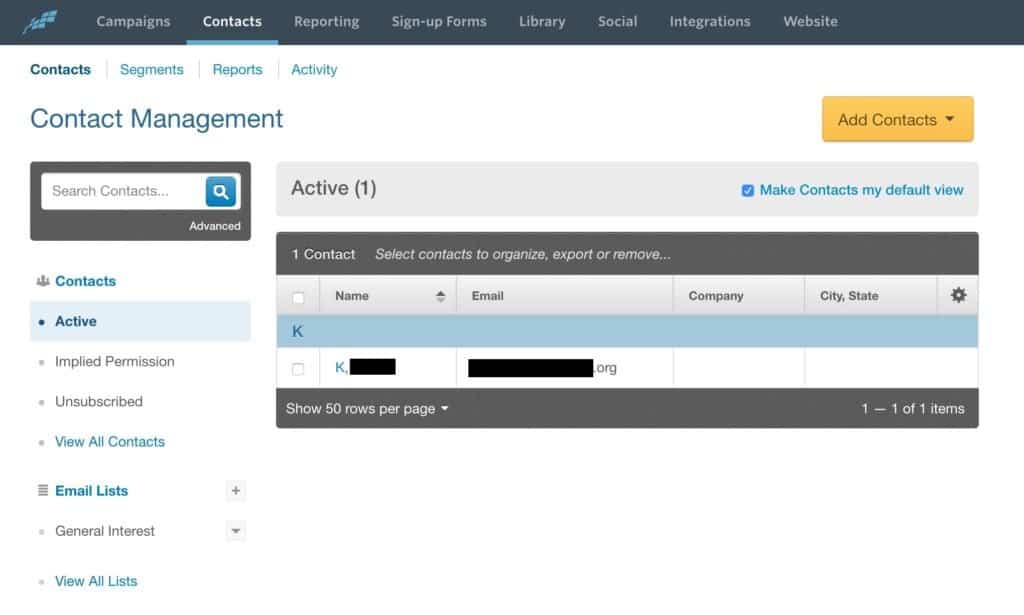
By default, Constant Contact creates one primary list of contacts for you and puts your own email in it – so you are your first subscriber. This is also where all your actual subscribers get assigned when they sign up to receive your newsletters. You can find that list of contacts by clicking on Contacts from the main menu.
Just to give you an idea of what Constant Contact can do for you, here are the other sections available via the main menu on the dashboard:
- Campaigns – this is where you’ll go to send out new newsletters
- Reporting – once you have a couple of newsletters sent, this is where you’ll see reports on the effectiveness of your campaigns, clicks, opens, and more
- Sign-up Forms – this is where you can create new signup forms to then add them to your website
- Library – Constant Contact gives you access to stock photography in partnership with Shutterstock
- Social – This is Constant Contact’s bonus feature allowing you to post updates straight to your social media profiles
- Integrations – a catalog of possible integrations with third-party tools and services
- Website – a fully featured website builder.
Step 2: Create a Newsletter Signup Form
An excellent place to start your actual work with Constant Contact is by creating a new signup form – i.e., the form that people will use to get onto your newsletter list.
To begin, click on Sign-up Forms in the top menu.

Next, click on the Create Sign-up Form button. Constant Contact will give you a choice of four different types of forms:
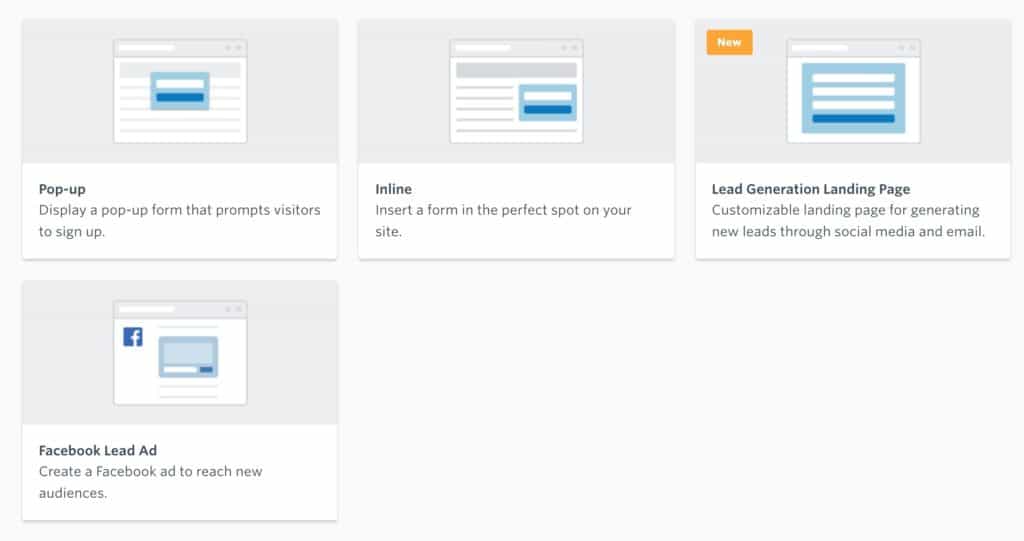
Since we’re discussing today how to add an email newsletter/subscription to your website, you’ll most likely be interested in either a Pop-up or an Inline form. We’ll go with the latter.
Right out the gate, Constant Contact shows you a basic version of the form:
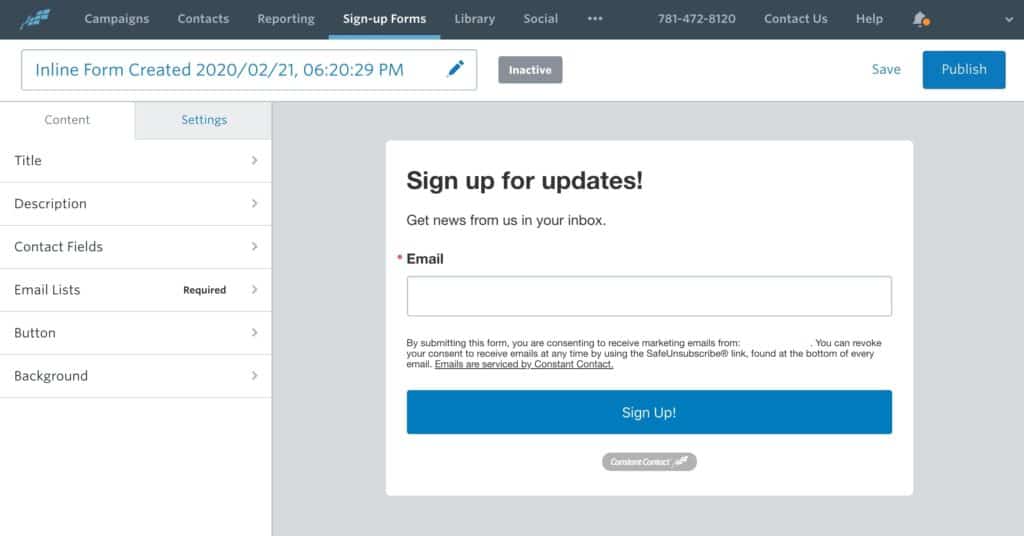
You can customize this form however you wish by clicking through the options available in the sidebar, writing your own copy, adjusting the background, the signup button, and also picking the set of fields that you want to put on the form (going with just email will generally land you more subscribers – signing up will be less of a hassle for them).
Speaking of writing effective copy, this is something you’ll have to figure out on your own. You should think about how to make your message unique to your website and the type of audience you want to reach.
When you’re done working on your form, click on the Publish button in the top right corner.
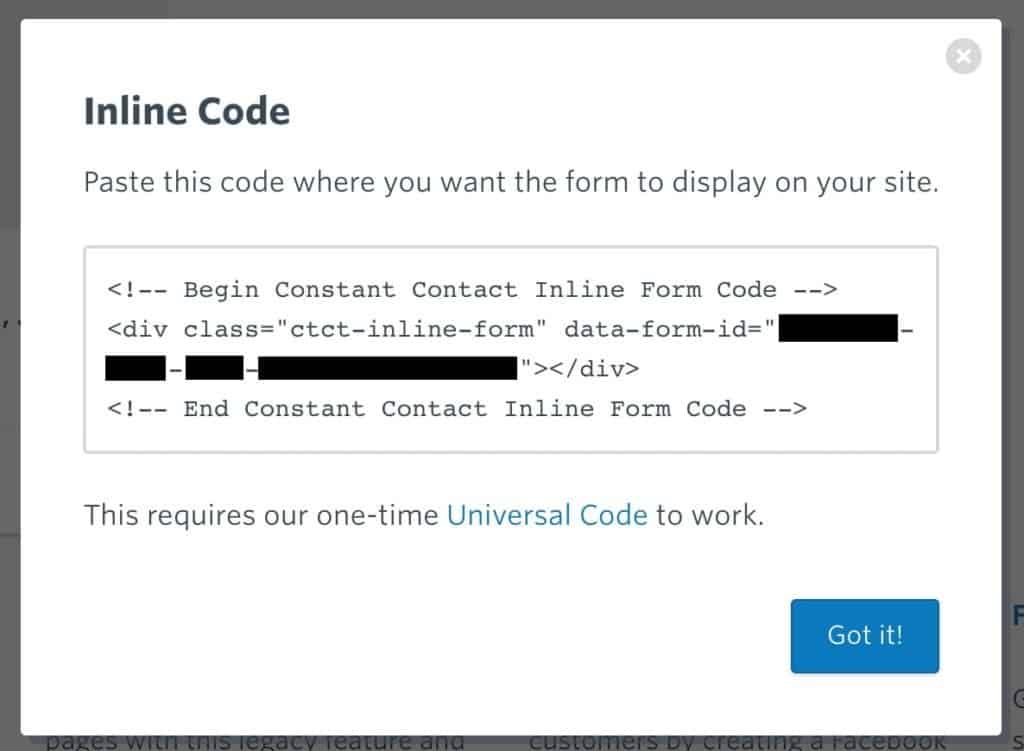
You’ll see a success message along with some instructions on what to do next.
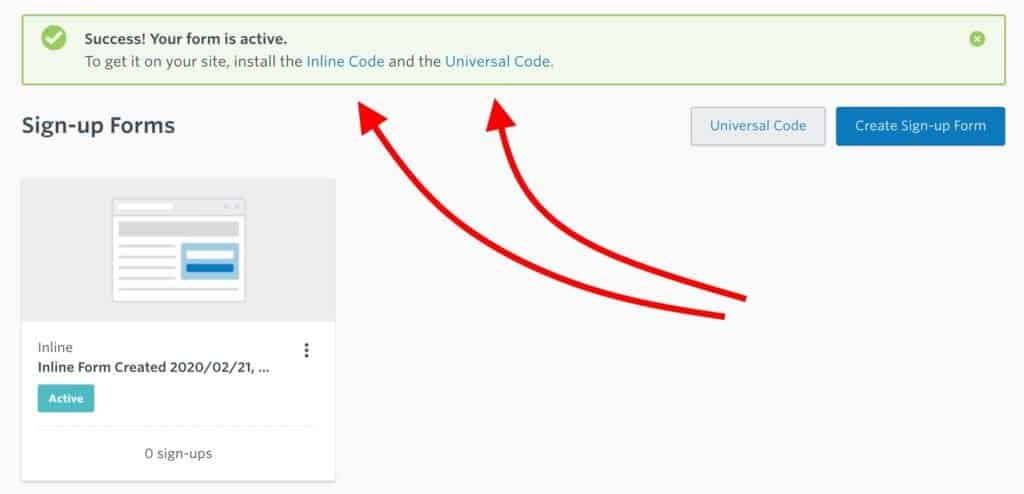
- Click on the Inline Code link (see in the screenshot above) and copy and paste it somewhere handy – like into a new file on your desktop.
- Do the same with the Universal Code.
Step 3: Add Newsletter Signup Form to Your Site
The last thing left to do is adding your newsletter signup form to your website.
Constant Contact doesn’t restrict what you can do here in any way. You can effectively include the form anywhere you want – in the sidebar, below your blog posts, on the homepage, literally anywhere.
This is all done using the two pieces of code that you were given in the previous step: Universal Code and Inline Code.
We’ll do the Universal Code first.

Constant Contact instructs you to paste it right before the closing </body> tag of your site’s source code. But don’t worry if you’re not quite sure what this means. In practice, there’s a handy workaround we can employ here.
We’re going to use our site’s widgets to handle the Universal Code inclusion. Since widgets are usually present on all sub-pages within a WordPress website, adding a piece of code into a widget works just as well as adding it before the closing </body> tag.
In your WordPress dashboard, go to Appearance → Widgets. Grab the Custom HTML widget and drag it onto one of the widget areas you have available – preferably some area in the footer. Paste in your Universal Code there. Like so:
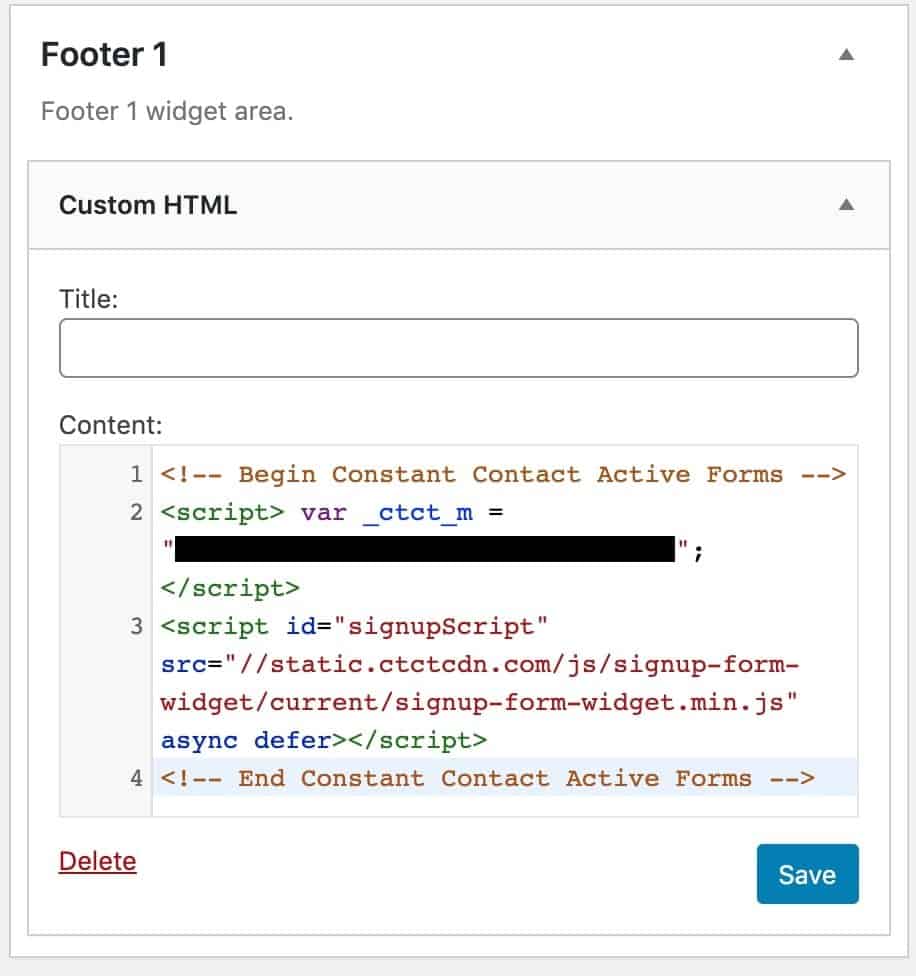
Click on Save.
At this stage, you’re halfway into adding the newsletter subscription form to your site!
Now you’re going to take your Inline Code and paste it exactly where you want your subscription form to appear.
Two popular possibilities:
- (a) Placing the subscription form below blog posts
- (b) Placing the subscription form in the sidebar or in another widget area
(a) Placing the subscription form below blog posts
When working on a blog post, click on the “+” button to add a new block, and select the Custom HTML block from the list.
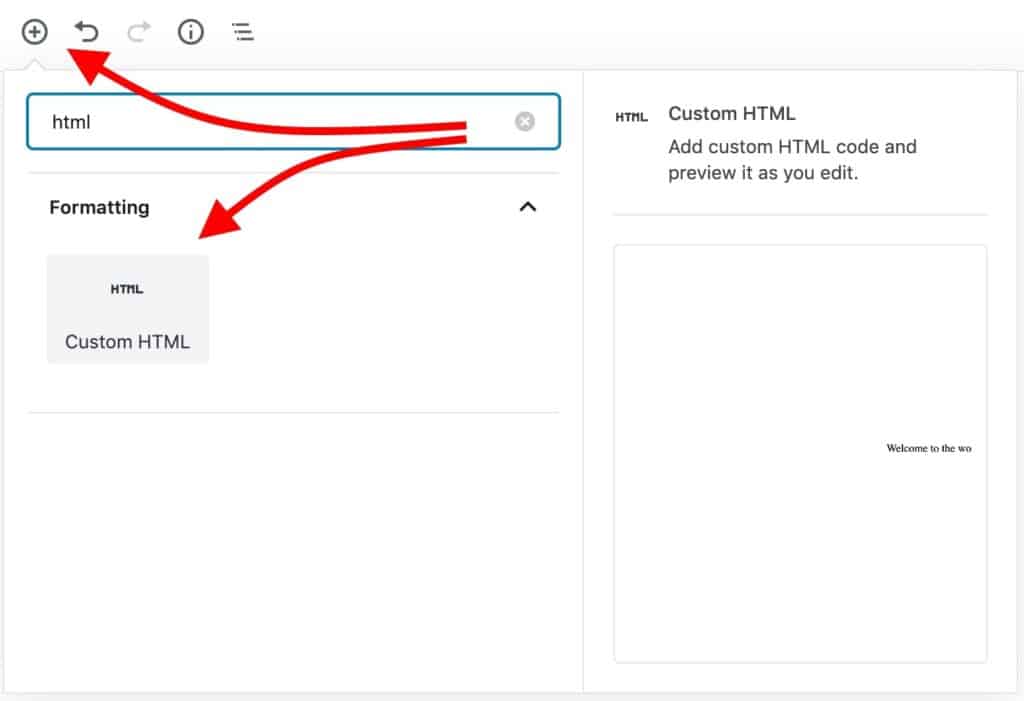
Paste in your Inline Code into the block. Like so:

Once you save the post, your subscription form will appear in the exact spot where you placed that Custom HTML block.
(b) Placing the subscription form in the sidebar or in another widget area
Adding a subscription form to the sidebar of the site or in some other widget area is probably the most popular approach that most people take.
To do that, just go to Appearance → Widgets in your WordPress dashboard. Pick a widget area (your sidebar, for example) and add the Custom HTML widget to it – it’s the same type of widget we used for the Universal Code a couple of steps above.
This time, paste in your Inline Code there and click on Save.
At this stage, your newsletter signup form has been added to a widget area and it is fully operational. Everyone who visits your website will be able to see it!
Done and Done!
That’s it; we’ve just managed to add an email newsletter subscription to your website. Are you happy with how your signup form has turned out? Is there anything else we can help you with?
If you want to learn more about building a WordPress website and how to use it for marketing your business, we have more info on the site: