There are many instances where you need to change your domain name, but without migrating your website to a new server.
For example, if you decide to rebrand or you want to switch between an old domain and a new one.
It can be tricky to do, especially if you want to make the switch with SEO in mind.
So, here are the steps of how to change a domain name for WordPress while still keeping search engines happy.
Ready? Let’s start.
1. Buy a New Domain Name
Before you’re able to change your domain name, you need to buy one first. For that, you can go to a domain registrar.
Prices vary depending on the registrar as well as the type of domain you’re buying.
For a Top-Level Domain (TLD) such as a .com or .net, it’s about $10-$20 per year. Other types of domains such as .io can be about $100 per year. So, be sure to consider your budget when choosing a domain name.
How to Choose a New Domain Name
Other considerations you should take into account when choosing a domain are:
- Who is your target audience and what will they likely relate to and remember?
- Do you want your domain to have a keyword in it for Search Engine Optimization (SEO) purposes?
- Is the name you’re thinking of catchy and memorable?
- If you speak to a lot of people in person, you may want a domain that has an obvious spelling.
- A .com’s still preferred, but other domain extensions are starting to gain popularity.
- Be sure the name you choose isn’t trademarked or that another company in your industry isn’t using a similar one.
Beyond that, choosing the right domain depends on your specific use case.
For example, hyphens or numbers in domains are easily forgotten so they’re not desirable.
On the other hand, if you’re a law firm or a local business with these included in your business name, it would make sense to also choose to have them in your site address.
The same idea applies to using your business’ area code.
Keep in mind that a domain is a long-term investment so be sure to choose one wisely.
While you can get a new one at any time, if you switch URLs, you’ll lose out on the credibility you earned for your domain. This, however, negatively impacts your SEO.
Asking for feedback on names you’re considering may also help you make the right choice.
2. Change Nameservers
Next up is changing your nameservers.
If you bought your domain from one of these registrars Namecheap, GoDaddy, or Domain.com, but your site is hosted elsewhere, you’ll need to update your nameservers.
Update them at the same registrar where you purchased your domain using the steps outlined below. Skip down to the section that’s relevant to you depending on where you got your new domain name.
Domain.com: Changing the Nameservers
After logging in to your Domain.com account, click the Domains button toward the top of the page.
 Click the Domains button to see a list of your domain names.
Then, find the domain listed that you want to adjust. Click the Manage button.
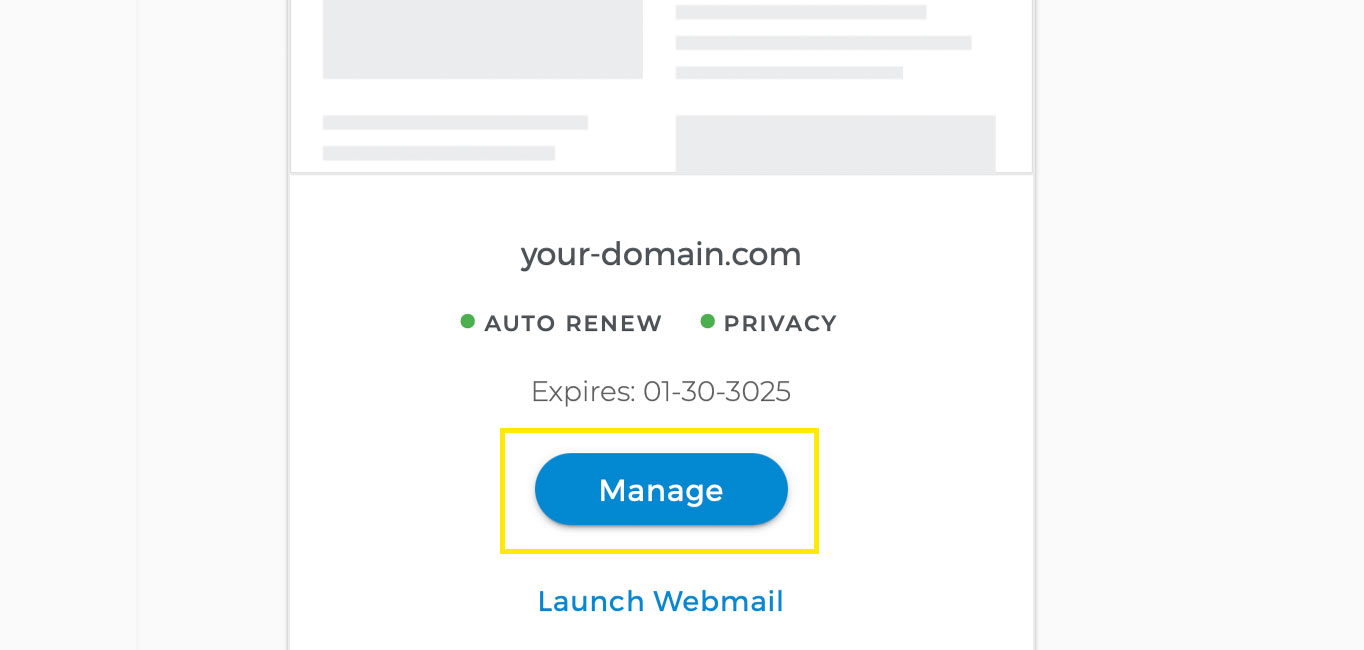 Click Manage for the domain you need to update.
Next, click DNS & Nameservers in the menu on the left-hand side. A list of your domain’s current nameservers will be listed in the main area of the page.
Select the three vertical dots icon next to the first nameserver you want to change. Then, choose Edit from the small drop-down options menu that appears.
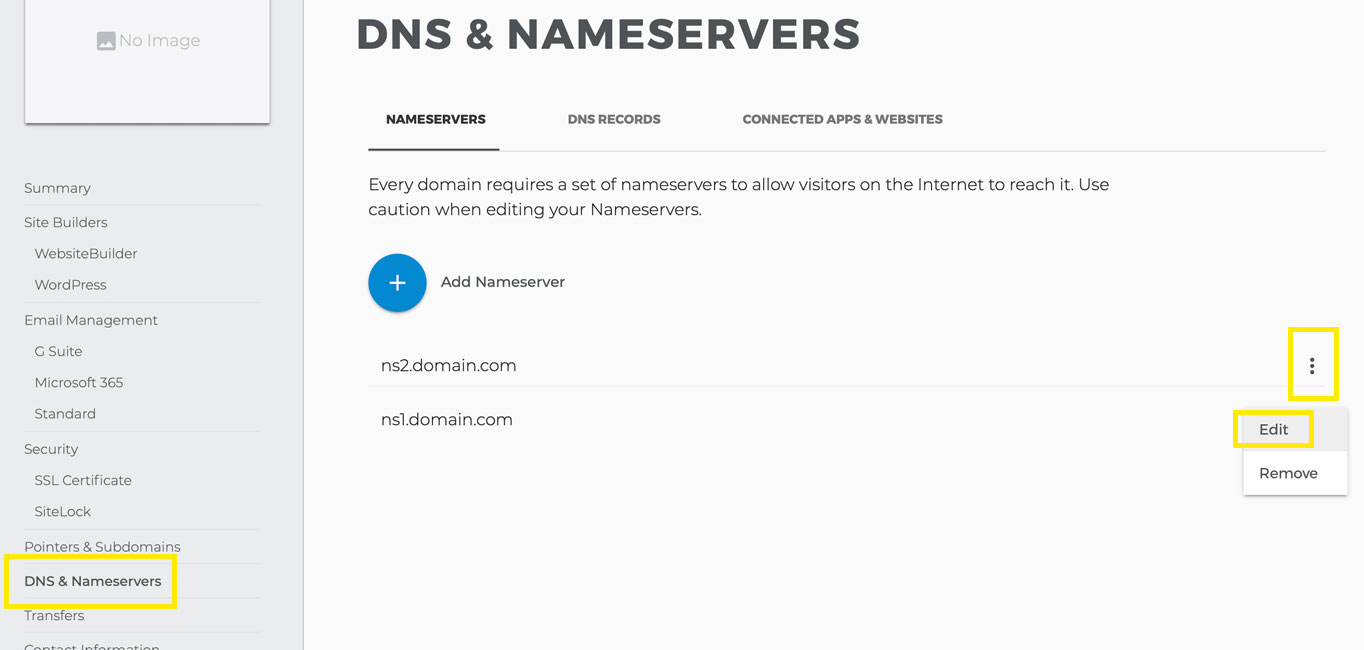 You can edit the nameservers in your domain’s settings.
A pop-up overlay will then be displayed with a field to enter the new nameserver.
You can find this information in your account of the hosting provider you’re using for your website. You may have also been emailed these details when you signed up for a hosting plan.
Once you have typed it in, click Submit your changes.
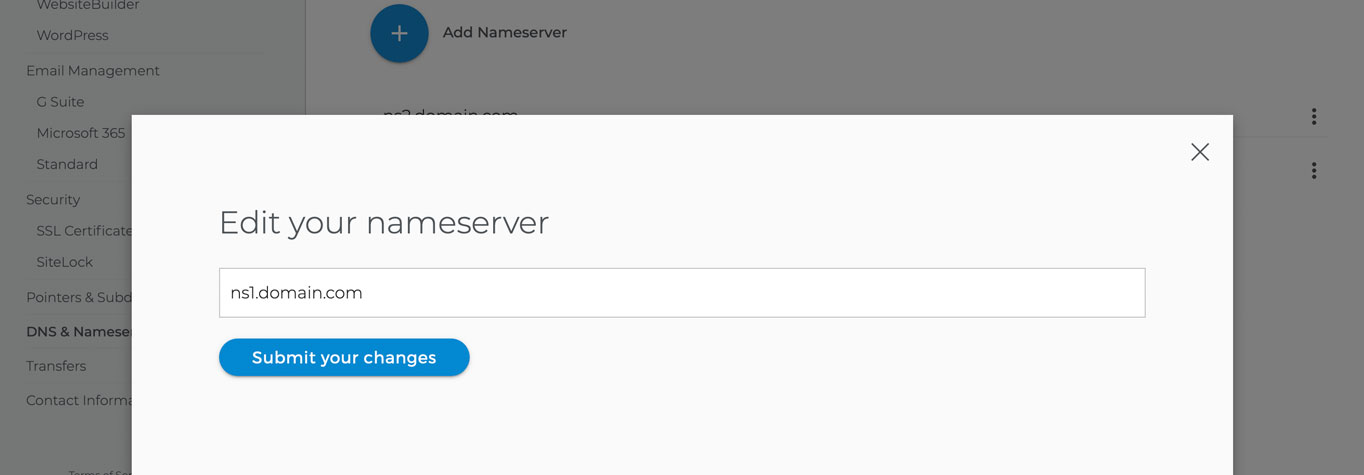 Enter the new nameserver and save your changes.
Click the three vertical dots icon next to the other listed nameserver and update it in the same way.
If your host requires you to enter in more than two nameservers, click the Add Nameserver button.
In the pop-up overlay that appears, enter in the other nameserver you need to add. Then, click the Submit your changes button.
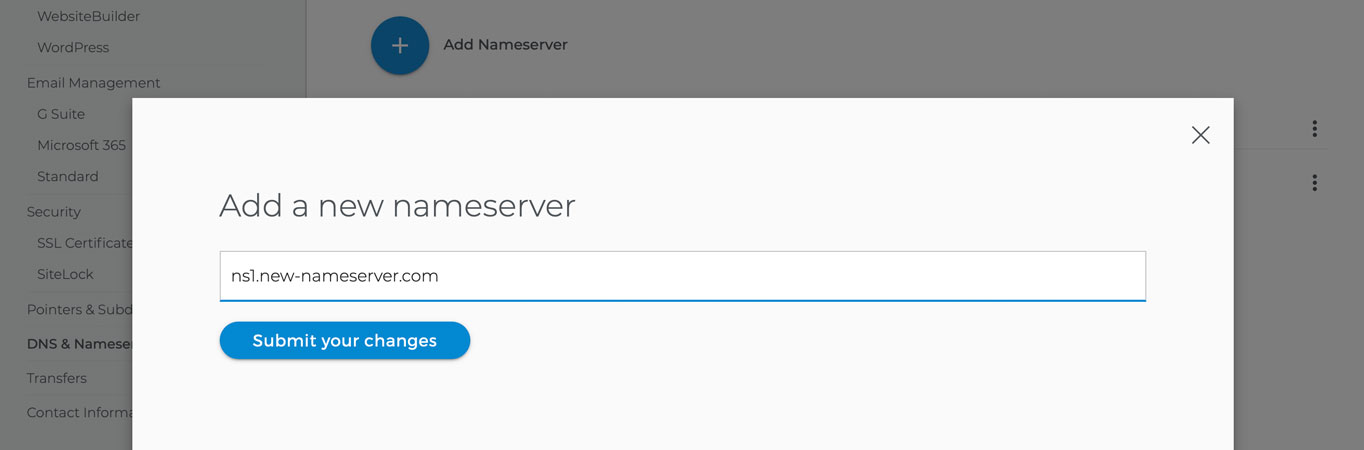 You can add as many nameservers as you need.
You can continue with these final steps until you have added all the nameservers you need for your new domain name.
GoDaddy: Updating the Nameservers
Log in to your GoDaddy account. Click the My Account button at the top of the page in the Control Panel. Then, select Domains from the submenu.
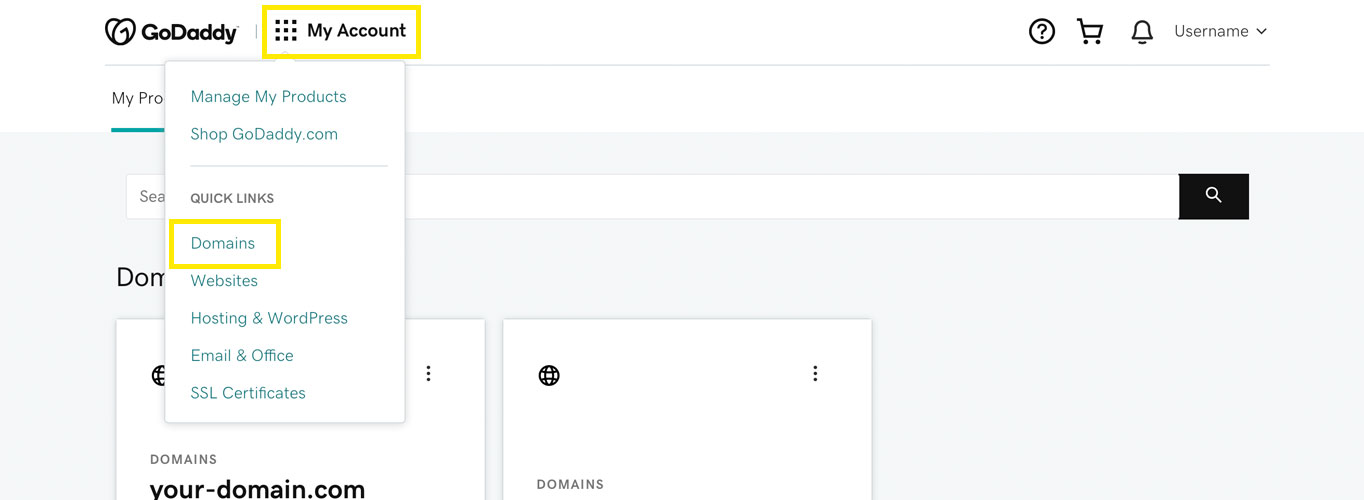 View your domains after logging in.
Click on the domain name listed on the page that you want to change.
 Click on the domain you want to manage.
Scroll down to the Nameservers section and click the Change button.
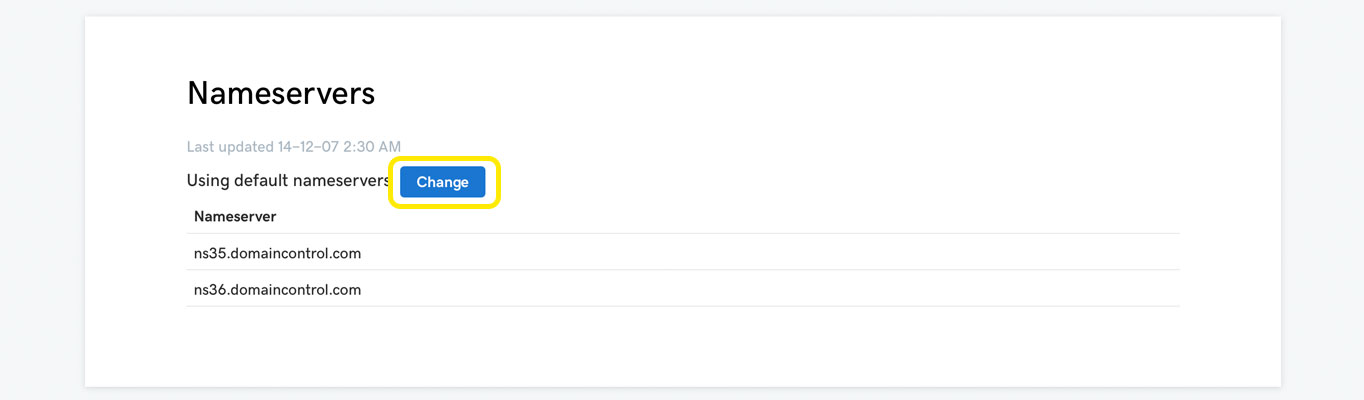 Click the button to change your nameservers.
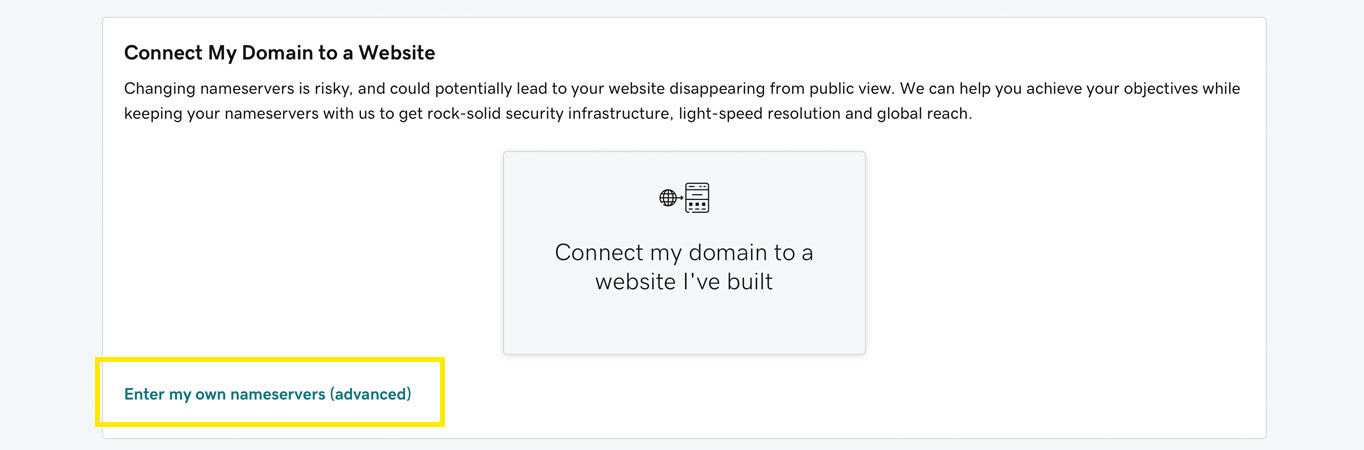
You can choose to click the Connect my domain to a website I’ve built button. You’ll be walked through the steps to change your nameservers in a user-friendly way.
You can automatically connect to popular hosting solutions such as WordPress, Squarespace, Wix, and more.
If you already know the nameservers for your website, then you can enter them manually. Do this by clicking on the Enter my own nameservers (advanced) link.
 Click the link to enter in your nameservers.
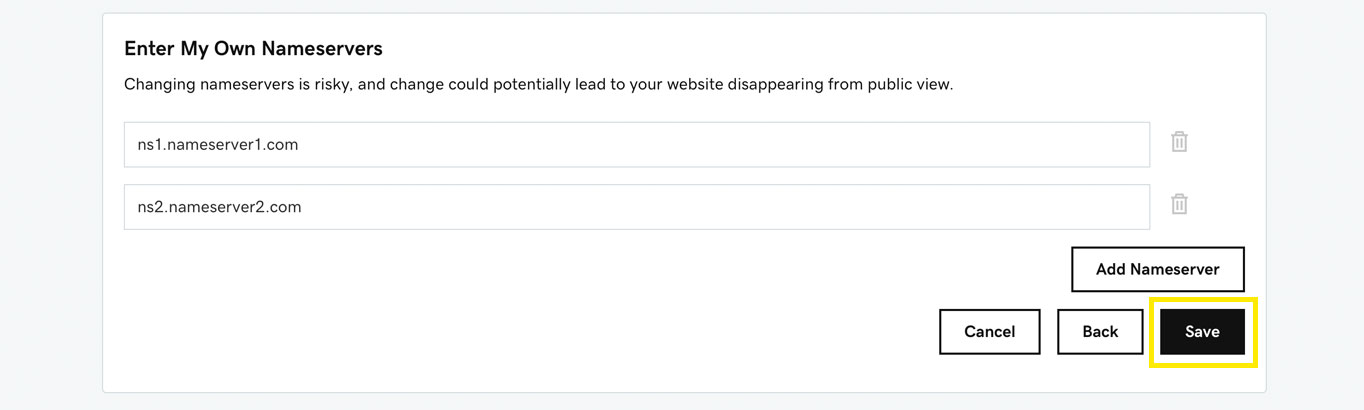
Enter the nameservers into the fields provided. If you need to add more than two nameservers, you can click the Add Nameserver button on the right.
If you decide you want to delete a URL you typed, click the trash icon to the right of the field.
When you’re done entering the information, click the Save button.
 Type in your nameservers, then save your changes.
Namecheap: Setting the Nameservers
Once you have logged in to Namecheap, click on Domain List in the menu on the left.
Then, find the domain listed that you want to update and click Manage on the right-hand side.
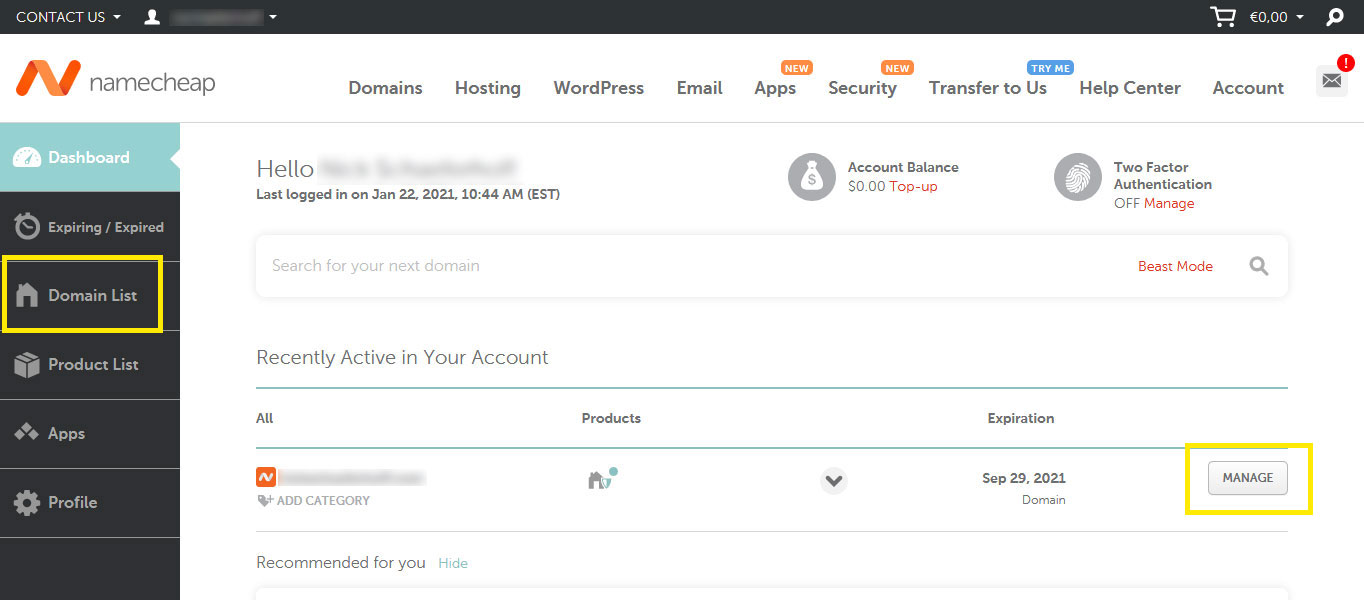 Click the button next to your domain name to manage it.
Next, scroll down the page to the Nameservers section. Select Custom DNS from the drop-down box.
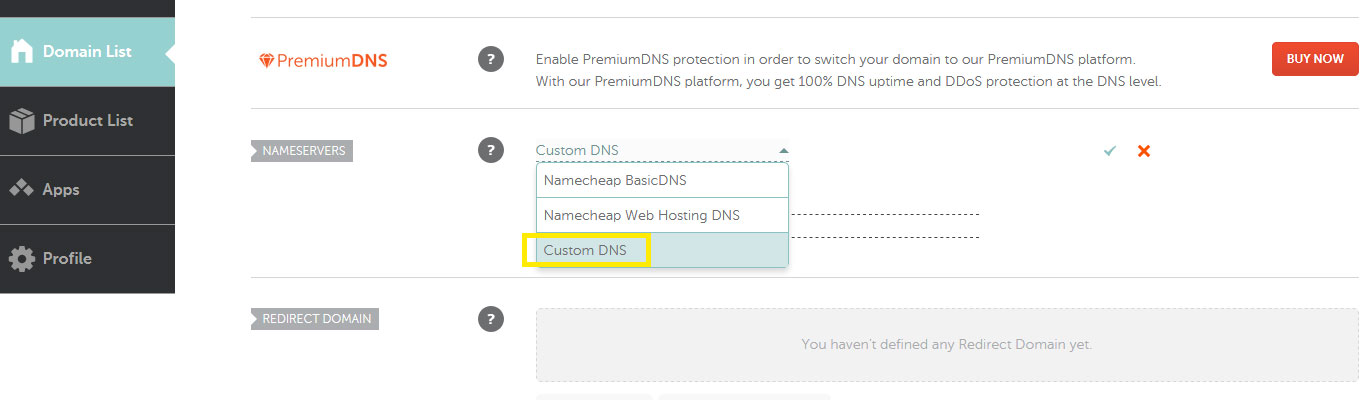 Choose the option you want from the drop-down box.
Then, enter in the nameservers that were given to you by your website’s hosting provider.
If you need to add additional nameservers, click the Add Nameserver button below the text fields.
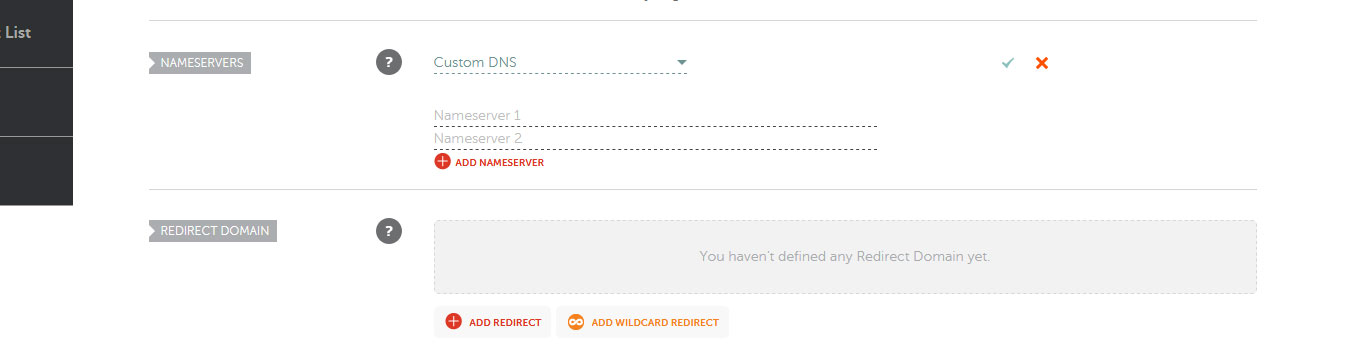 Type in your site’s nameservers and save your changes.
When that’s all done, click the green checkmark to save your updates.
3. Change All the Links from the Old Domain to the New One
Now that you have successfully changed your domain name, you need to update your website. All the references to your old domain need to be changed to your new one. This includes references in button links, menus, image links, and anywhere else the old domain appears.
Fortunately, this can be done fairly quickly in most cases if your site uses a database.
You can search the database for every instance of the old domain. Then, you can enter the new one and replace all instances of it all at once.
If you don’t have access to your database, but you have access to your site’s files, you can update all references to your old site address manually. Although, this can end up being quite time-consuming.
WordPress: Changing all the Links
Whether you’re changing the directory your self-hosted WordPress site is in or you’re changing the entire domain, the process outlined below will help you update all the links on your site. That way, they’ll all point to the new domain name.
Backup Your Files and Database
Before updating all the links to your new site address, it’s crucial that you back up your entire site. This prevents you from losing everything if something goes awry. In such an event, you can restore your site and try again.
Be sure to backup all your site’s files as well as your entire database.
Change URLs in the WordPress Settings
Log in to your WordPress admin dashboard and go to Settings > General.
Update the WordPress Address (URL) and Site Address (URL) fields to your new domain. Then, click Save Changes at the bottom of the page.
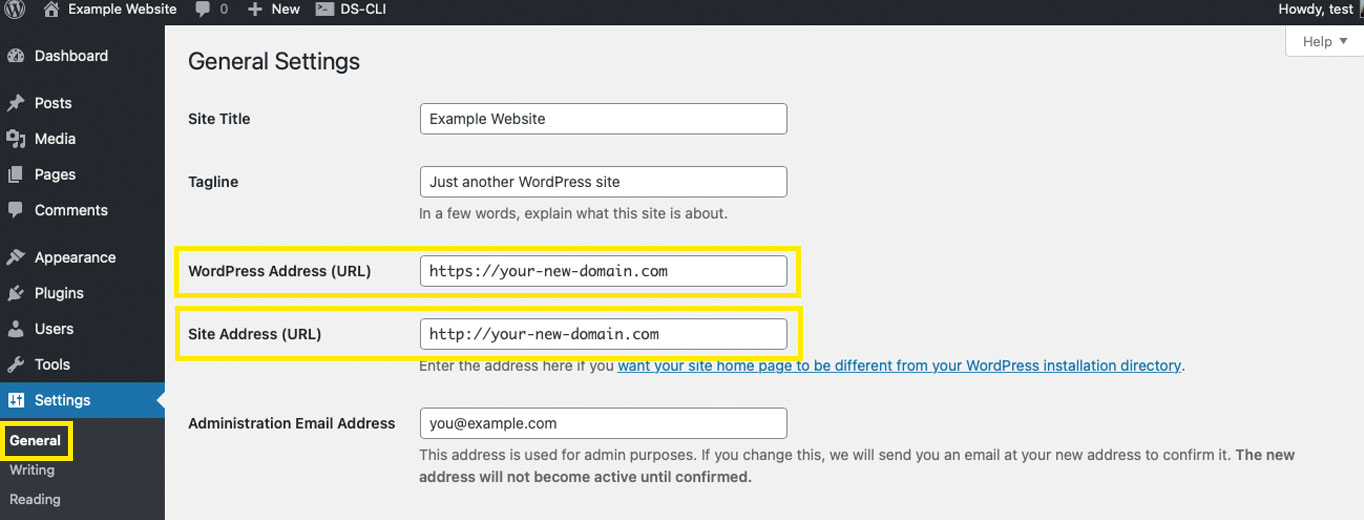 Enter your new domain into the WordPress and Site Address fields.
Your WordPress Address is the URL you want your visitors to enter to get to your website. The Site Address field is the actual location of your site if it’s different from your WordPress Address.
These can be different if your actual website’s location is under something like your-new-domain.com/your-site but you want people to be able to visit your-new-domain.com and still access your site.
If your site is located in the root directory of your server, these two fields can both be filled out with your new domain.
Manually Changing Your Domain Name in WordPress
If you have WordPress Multisite enabled, you won’t be able to access these settings as they aren’t available. Instead, you’ll need to update your wp-config.php file to hard code your new domain.
Download or open this file from your server. Then, add the following before the “happy blogging” line toward the bottom:
define( 'WP_HOME', 'http://your-new-domain.com' );
define( 'WP_SITEURL', 'http://your-new-domain.com' );
Be sure to replace your-new-domain.com with your actual domain name.
Once that’s done, save the file and upload it back to your site’s server.
Search and Replace Old Links with a Plugin
After you have switched your old domain for your new one, you need to search for all instances of your old domain on your site. Then, replace them with your new address.
This step is necessary because images and other links often break, especially if the old links have been hard-coded into your site.
To fix it, you can either update all these links with the steps below or with a plugin.
The free Search and Replace plugin can quickly make the switch for you in about a few clicks.
MySQL and MariaDB: Search and Replace Old Links
For most other websites that use MySQL or MariaDB, you can use a query to search and replace the old links with the new ones.
In the command line, enter the following, but replace your-old-domain.com and your-new-domain.com with your actual old and new domains, respectively:
UPDATE domainList
SET
    domain_names = REPLACE(domain_names,
        'you-old-domain.com',
        'your-new-domain.com');
Changing Links When Your Site Doesn’t Have a Database
If your site doesn’t use a database, you’ll have to manually find the references to the old domain and replace them yourself.
Make sure you back up your whole site before you make any changes.
If you put your code in a code editor, you can search for every instance of the old domain and replace it with the new site address quickly. Although, be sure to use a code editor that has a search and replace feature. Otherwise, you’ll need to manually search for each instance of your old domain, which is incredibly time-consuming.
Download each of your site’s files and open them in a code editor, update the links, save the file. Then, upload them back to your site’s server.
Refer to the documentation of the code editor you choose to know how to conduct a search and replace for links.
To find a great code editor, check out 10 Best HTML Editors and 10 Best IDE Software.
4. 301 Redirect from Old Domain to New Domain
At this point, your site should work just fine. But, from an SEO perspective, you need to do a few more steps to ensure your ranking won’t be affected too much.
The first step in this process is to create a 301 permanent redirect. It’s a permanent way to inform search engines that you have changed your site’s domain name and you don’t plan on reverting back to your old domain. That way, search engines can update their records automatically to preserve your ranking as much as possible.
Below are the steps of how to create 301 redirects.
For further details, you can also check out step six in the guide: How to Move HTTP to HTTPS on WordPress.
No matter where your domain is registered, be sure to create a 301 redirect for both the www.your-new-domain.com and your-new-domain.com versions of your site address.
Domain.com: Setting up a 301 Redirect
Start by logging into your account and clicking the Hosting button at the top of the page. Then, click on the .htaccess Editor link in the menu on the left.
It’s like a user-friendly version of a website’s .htaccess file.
Then, click the Add URL Redirect button.
 You can redirect your site to your new domain using the .htaccess editor.
In the first field that comes up, add the old domain for your site. Then in the field under it, type in your new domain name.
Double-check that the information you entered is correct, then click Add Redirect.
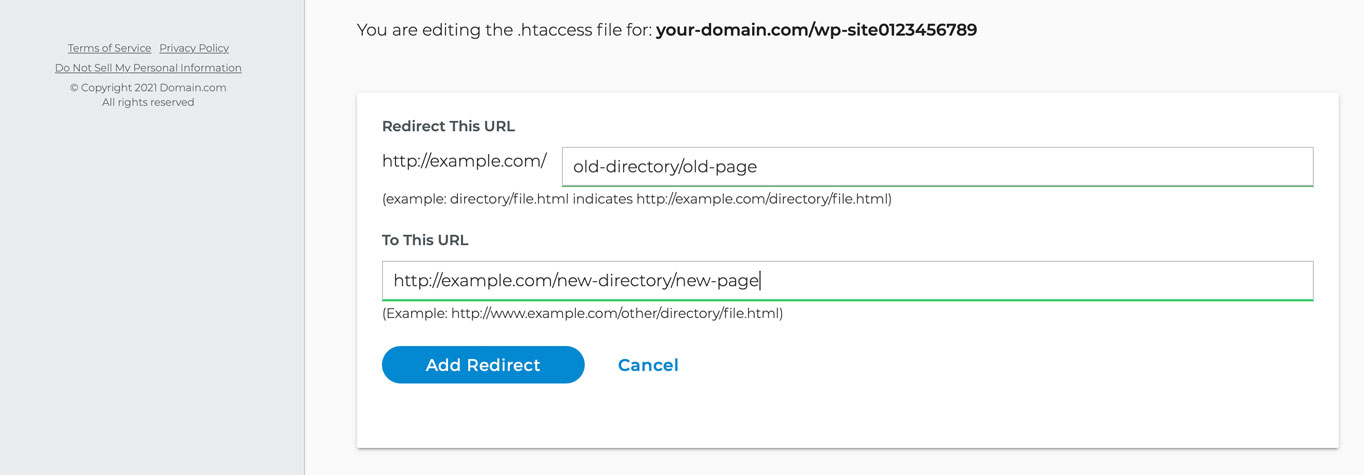 Fill out the form to create a 301 redirect for your site.
GoDaddy: Creating a 301 Redirect
After logging into your account, go to My Account > Domains again and click on the domain you want to manage. It’s the same place you went to earlier when you were changing the nameservers.
Scroll down to the Additional Settings section and click on Manage DNS.
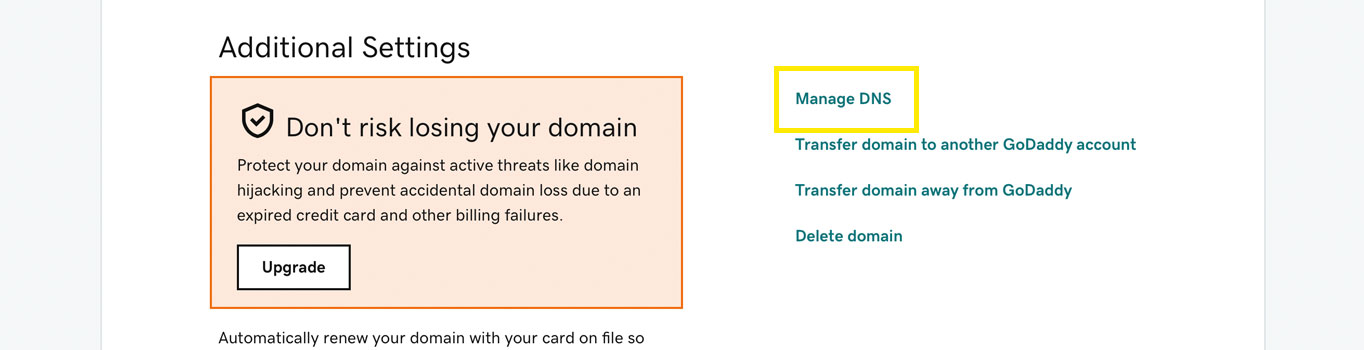 The Manage DNS settings page has a domain forwarding section.
Then, scroll all the way down to the Forwarding section and click Add next to Domain.
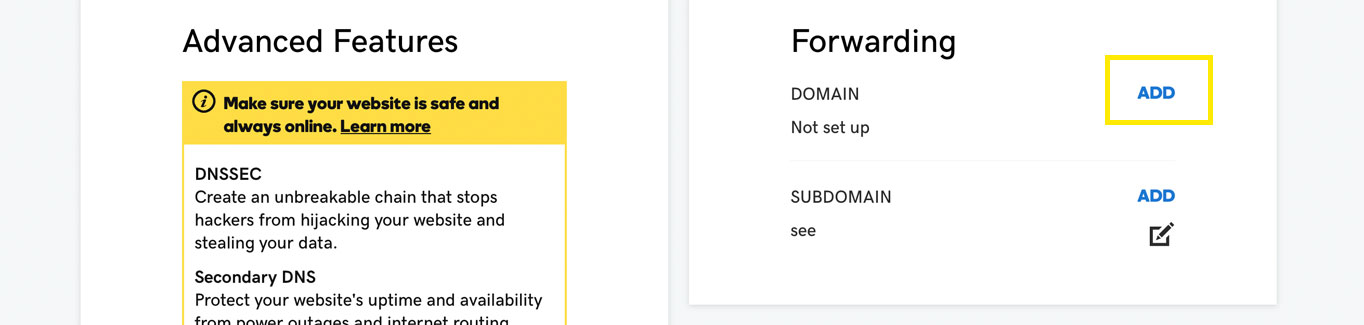 Add domain forwarding to redirect your site to the new address.
Next, fill out the form. If you have an SSL certificate installed, choose https:// in the drop-down box at the top of the form. Otherwise, choose http://. Then, type in your new domain name in the text field next to it.
Under Forward Type, select Permanent (301) and under Settings, click the Forward with masking option.
Fill out the site’s title, description, and keywords. You have to fill out at least one of these three fields.
When you’re done, click the Save button at the bottom of the form.
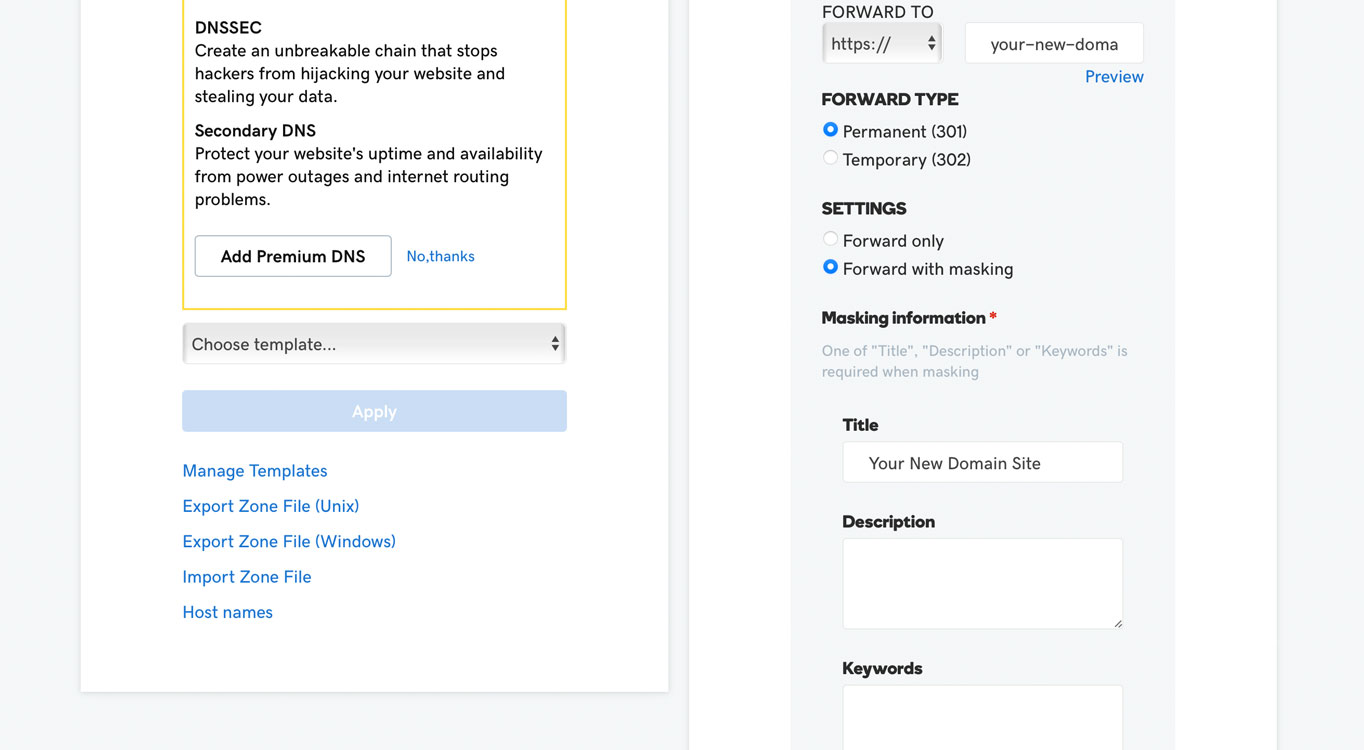 Domain forwarding has an option for 301 redirects.
Forwarding your domain with masking means that after a user has visited your site with the new address, they’ll continue to see your new domain in the address bar of their browser as they go from page to page. It won’t just redirect to the old domain.
Namecheap: Adding a 301 Redirect
To add a 301 redirect to your Namecheap domain, log in and go to Domain List in the menu on the left.
Then, scroll down to the Redirect Domain section and click the Add Redirect button. You can click it multiple times to add additional fields for each redirect you need.
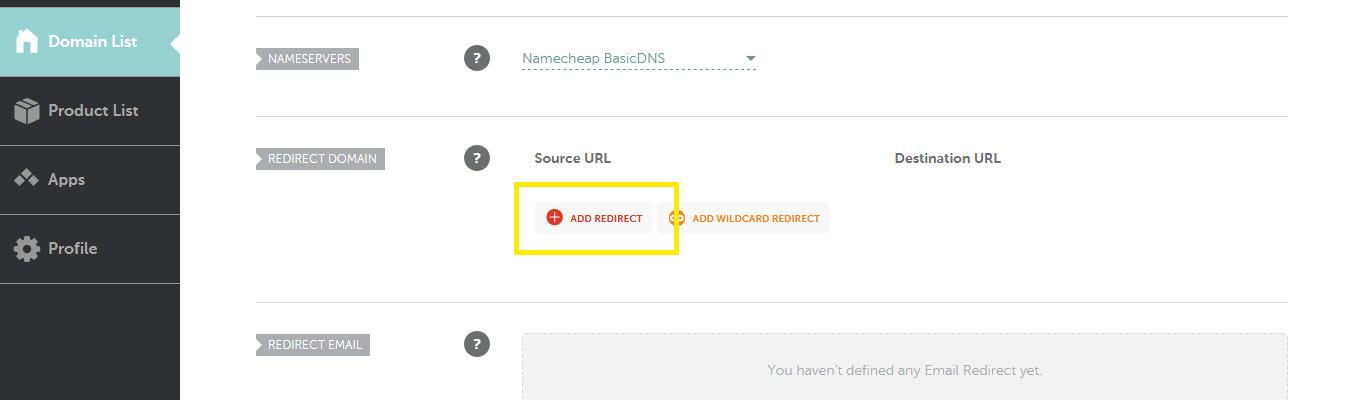 You can add a URL redirect on the Domain List page.
Type in the old domain name under the Source URL field and the new name under the Destination URL text field.
When you’re done, click the green checkmark next to each line to save your changes.
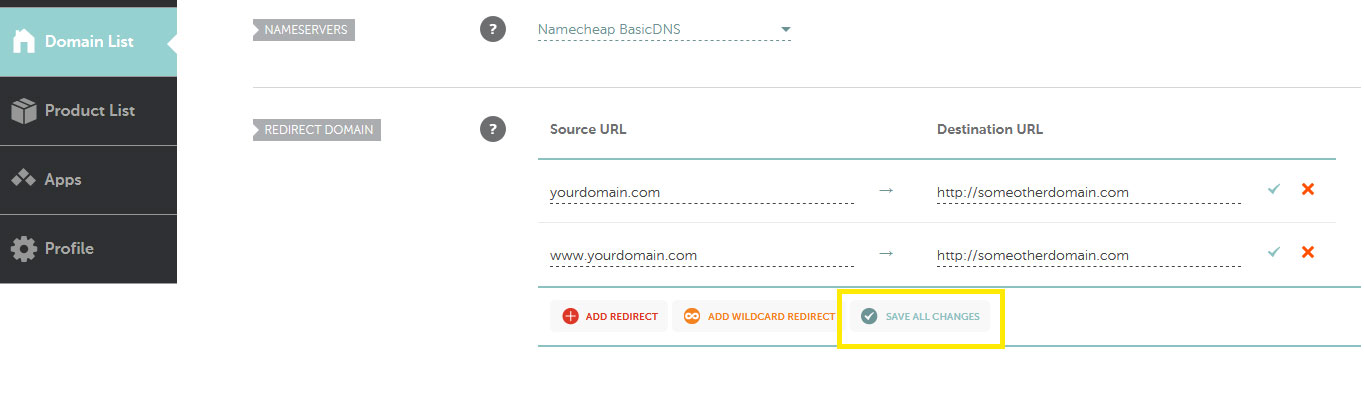 Type in your old domain, then your new one, and click the checkmark icon.
5. Test and Make Sure Everything Works
At this point, you’re almost done. Take the time to test your site and make sure you can visit your site with your new domain.
You may need to clear your browser’s cache. So, try that if you’re having trouble. You may also need to wait a little while for it to work.
Typically, it only takes a few minutes for the changes to take effect. But, it could take up to 72 hours.
6. Update URL in Google Search Console
The final step you need to take is to update Google Console with your new domain name. Doing this will help Google quickly understand you updated your domain name. That way, your ranking won’t drop.
For details, check out Google’s knowledge base page: Change of Address Tool.
Go to the Change of Address Tool and select Add property from the drop-down list toward the top, left-hand corner.
Directions will appear in the main content area of the page.
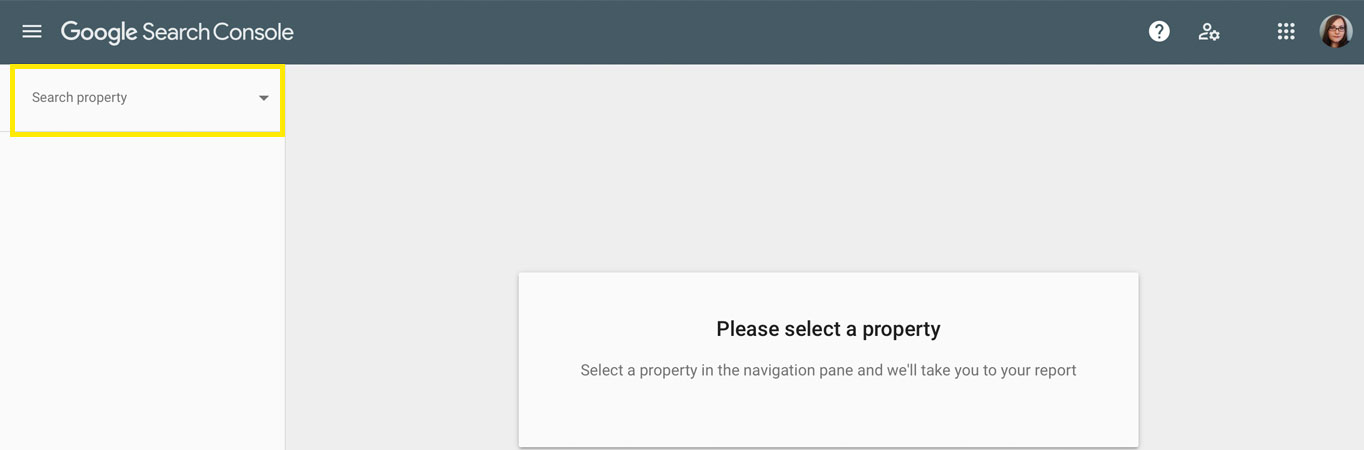 Before you update Google Console, you need to add your new domain to it.
Then, in the inline pop-up that appears, choose whether your new domain should have a “www.” prefix.
Enter your new domain name and click Continue.
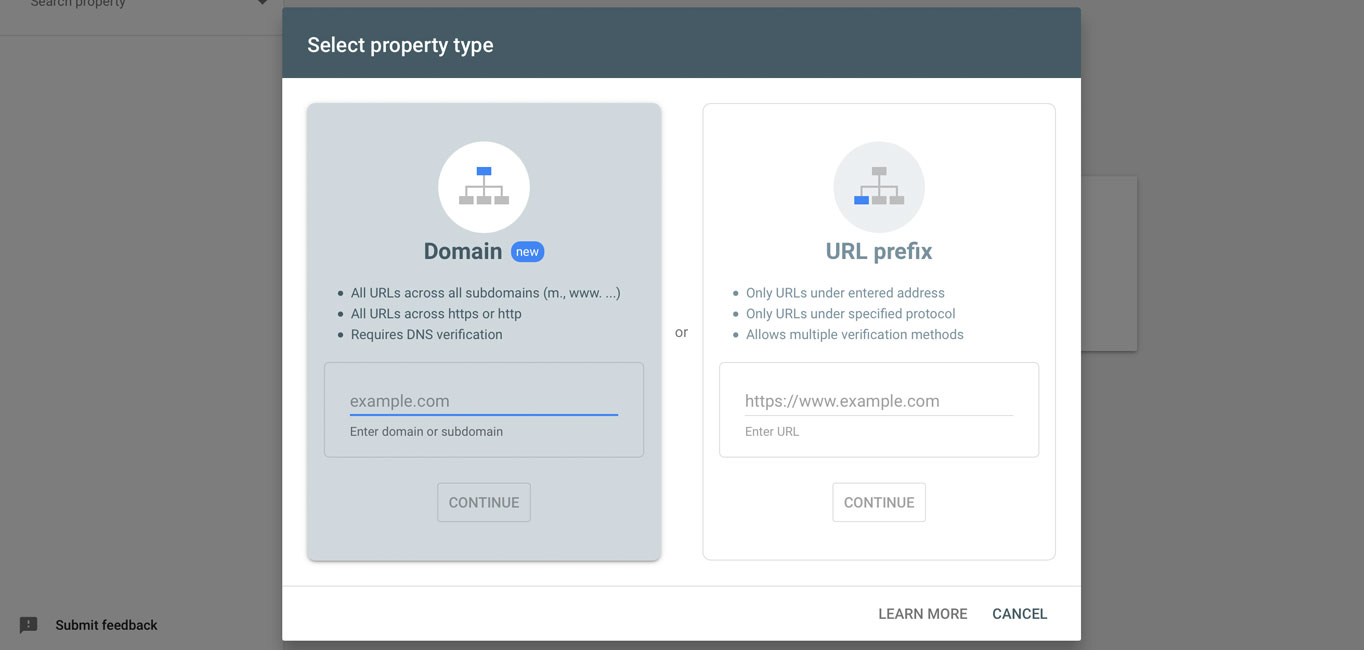 Choose whether or not you want a URL prefix.
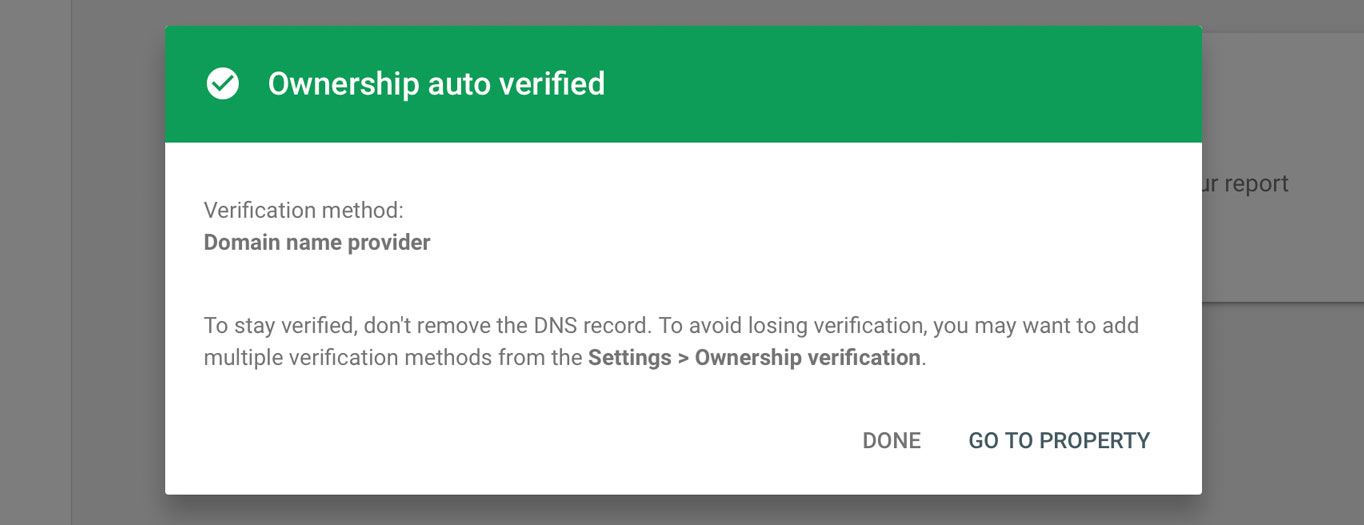
Your new domain should automatically be verified. If this isn’t the case, then it’s not set up properly and you’ll need to go back through these steps to fix it.
Or if it’s indeed set up properly, you may just need to wait a few minutes or up to 72 hours as previously mentioned.
Once you see the “Ownership auto verified” message, click Done.
If you want other ways to verify the ownership of your new domain, go to Settings > Ownership verification.
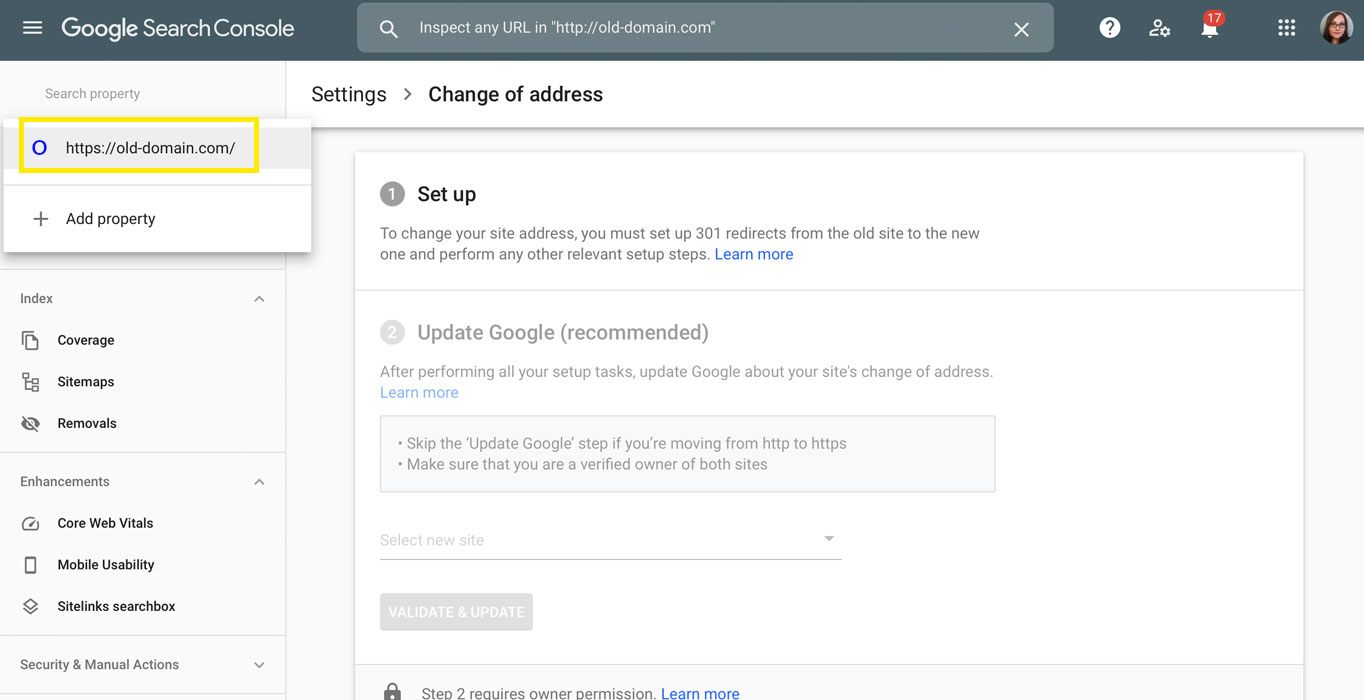
 Once your new domain has been verified, you can update your old one.
Next, click the Search property drop-down box and select your old domain from the list.
Under Update Google, select your new domain from the drop-down box.
Then, click the Validate & Update button.
 Select your old domain and then follow the instructions on the page.
Additional Considerations
If your site has backlinks, they’ll redirect to your existing website with the new URL.
Don’t forget to check your success indicators such as traffic and conversions. Make sure there isn’t a huge drop in performance in Google Analytics. If you do see a huge drop, it means there’s an error somewhere that needs to be fixed.
Be sure to also verify your rankings and visibility and crawl your website for errors.
Don’t forget to update social media with your new address to further direct your search traffic properly.
In Conclusion
There are so many tutorials out there that describe how to create a new website. Or, how to migrate your website and change your domain name in the process. But what if you only want to make a domain name change from your existing domain without switching hosts?
The steps above should have helped you accomplish just that. By now you have switched your current domain to a different domain.
If you’re not sure you can make the changes on your own, you can contact your webmaster.
Were you able to successfully make the switch to your new domain name? Did you run into troubles along the way? Share your experience in the comments below.