In 2022, building a website has never been easier. Whether you’re starting an online store or a lifestyle blog, there are numerous website builder tools available at your fingertips.
However, launching a website with a strong foundation and without any hiccups is an entirely different matter. For your website to hit the ground running, you need to take care of elements beyond setting up a few pages and writing copy.
In this website launch checklist, we’ll walk you through every step you need to take in order to guarantee a smooth and successful website launch. We include 30+ essential tasks and instructions on how to complete each one, plus two downloadable website checklists for you to use pre- and post-launch.
Are you ready to launch your website?
Website Launch Checklist
Pre-Launch
- Make sure your SSL certificate works
- Update your CMS to the latest version
- Set up a backup solution
- Integrate an analytics solution
- Make sure all pages you need are in place
- Prepare for 404s
- Test your site’s navigation and internal links
- Proofread your content and copy
- Ensure your website is accessible
- Check your website on mobile devices
- Test for problems with different browsers
- Check your XML sitemap
- Double-check all URLs are correct
- Generate a robots.txt file
- Add metadata to all pages
- Use schema markup whenever possible
- Check for technical SEO errors
- Ensure your site design is cohesive
- Make sure your website is legally compliant
- Configure your website’s permalink structure
- Consider AMP integration
- Make sure you have relevant CTAs
- Create social media profiles
Post-Launch
Pre-Launch Checklist: 23 Things to Do Before Launching a Website
Before you launch your website, you should have it live on a staging site. This will allow you to make edits and play around with formats to ensure everything is perfect before you push it live.
In our website planning checklist below, we cover 23 tasks we recommend tackling pre-launch.
Let’s dig in.
1. Make Sure Your SSL Certificate Works (HTTPS)
Secure Sockets Layer (SSL) certificates validate your website’s identity and enable you to use HTTPS for secure data transfer. It’s essential for eCommerce sites in particular, although there’s really no excuse for skipping this step regardless of your niche, particularly since you can generate an SSL certificate for free. If you do not confirm your SSL works, your website may be labeled as ‘not secure.’
Many good web hosts will take care of setting up an SSL certificate for you. If not, you can use a service such as Let’s Encrypt to generate a free certificate and set it up manually.

However, keep in mind that some websites require different types of certificates, in which case, you might need to purchase one. In either case, you’ll want to get your certificate up from the get-go.
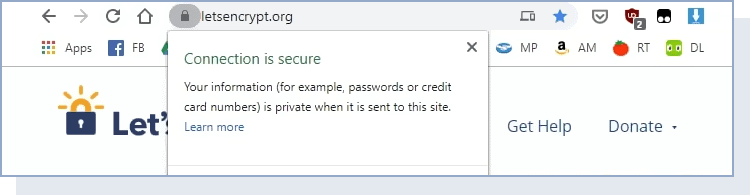
Enabling HTTPS Traffic
Once your SSL certificate is in place, you can re-route all your website’s traffic through HyperText Transfer Protocol Secure (HTTPS). As such, you ensure the security of all the data going back and forth from your site. Plus, most browsers will display whether your site is HTTPS enabled:
If you don’t configure your website to use HTTPS, visitors will get a warning when they try to access it, which is terrible for business and your traffic levels:
To avoid this big, problematic warning, we recommend following Google’s guidelines for enabling HTTPS. If you’re a WordPress user, we also wrote a guide on how to move your site to HTTPS, which you’ll want to take a look at.
2. Update Your Content Management System (CMS) to the Latest Version
Using a CMS can simplify your life in a lot of ways. This type of software usually provides you with a broad range of tools to create, update, and manage your pages and blog posts, even if you don’t have web development knowledge.
However, much like other software, you’ll need to update your CMS to ensure it remains stable and provides you with its latest features. For a real-world example, see WordPress. This CMS rolls out updates frequently and includes new features every few months.
Before you launch your website, you want to double-check that you’re using the latest version of your CMS and whether it works well with your site. This will practically ensure you won’t run into any nasty surprises on launch day and beyond.
Most CMSs will let you know when you need to update the software, so staying up-to-date with the latest releases shouldn’t be an issue. Even after your website goes live, we recommend you always update your CMS whenever a new version goes live, so keep an eye out for notices.
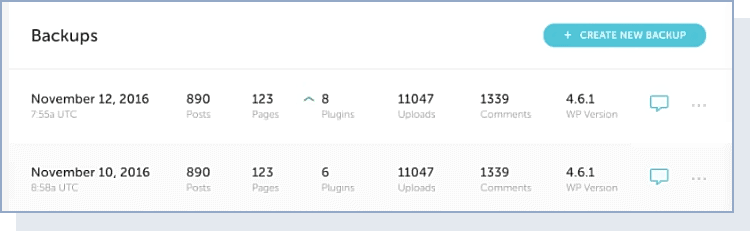
3. Set Up a Backup Solution
In short, backups can be a lifesaver. You should have a recent backup of your website, which you can restore if the worst happens to your website. Consider a backup as the last resort. It doesn’t prevent anything but becomes invaluable once something goes wrong.
There are a lot of ways you can backup your site. You can copy and download files manually, use a third-party service, or do it through your web host.
For peace of mind, we recommend using a web host that offers a backup solution by default. As such, you don’t have to worry about configuring anything, and if something goes wrong, you can restore your site with a few clicks. However, it’s always good to have a third-party solution available in order to have an off-site backup as extra protection.
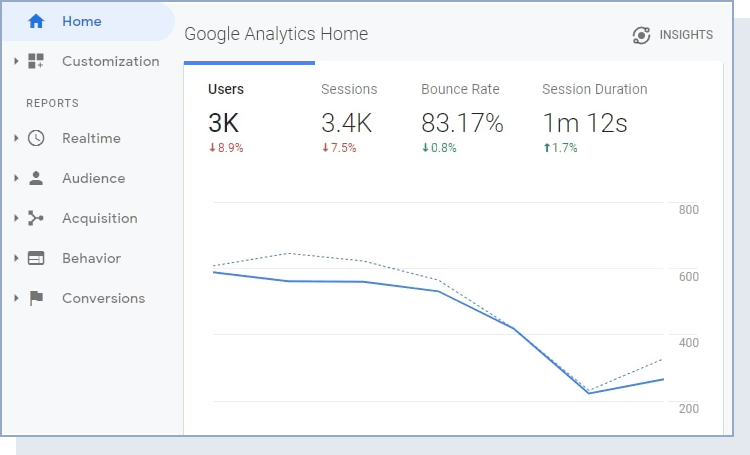
4. Integrate an Analytics Solution
Website analytics provide you with information about your website’s visitors. This includes traffic, behavior, demographic data, and much more. It’s not an exaggeration to say without analytics, you’re mostly flying blind. You might know if your website is getting traffic, but you won’t get any insights into what your visitors are doing and where they’re coming from.
To give you an example, look at your website’s bounce rate analytics. If the rate you see gets too high, you can infer there’s a problem with your website’s UX or performance, and take action before it gets worse.
There are a lot of analytics platforms to choose from, but we’re big fans of Google Analytics. Not only is it free, but it also throws a lot of data in your face.
5. Make Sure All The Pages You Need Are in Place
When visitors check out a site with unfinished pages, they’re likely going to think it’s either abandoned or incomplete. Neither is a great look for any website, and it can impact the level of user trust and the semblance of professionalism.
A common problem with building websites is that we often think too ambitiously at first. Instead of thinking about the core pages your site needs from the get-go, you end up considering dozens of options in order to realize the ideal in your head. This level of ambition is great, but it can (and often does) delay your site’s launch.
Our advice is to return to the drawing board and outline which pages are critical to your website’s functionality. Stick to those for your launch and make sure they’re all ready for the public. Once your website is live, you can begin to think about expanding it.
Below are five core pages we recommend every new site start with:
- Homepage: Make sure your homepage displays your vision clearly. Include relevant CTAs and user-friendly navigation to guide customers through the buyer’s funnel.
- About Page: Give customers a sneak peek into who you are. Tell them what your brand is all about and include any accomplishments, goals, or brand values.
- Products or Services Page: Display your product or service and give insights into important features and benefits.
- Blog Page: A blog is a great resource to inform customers about product updates, latest trends, and answer common questions.>
- Contact Page: This allows users to contact you, plus it adds a layer of trust.

6. Prepare for 404s
While 404 errors are uncommon for new websites, it’s always important to be prepared should a visitor mistype a URL. Preparing for 404s will improve your user experience and help you point users in the right direction to ensure you don’t lose a customer.
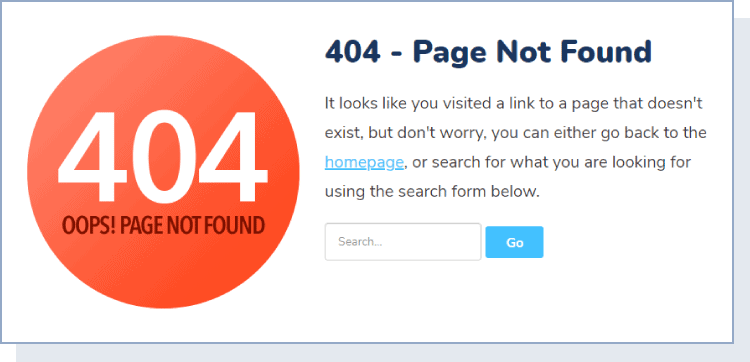
When setting up a custom 404 page, make sure it includes:
- Simple and clear language that isn’t confusing for visitors
- A search bar for users to navigate back to the page they were looking for
- A link to your homepage or popular posts on your website
- Contact information so the user can get in touch with you
To make sure you stay on top of 404 errors, you can set up email alerts to fix any errors early before they become a recurring issue.
7. Test Your Site’s Navigation and Internal Links
Another aspect that can make a website look half-baked is the presence of broken links. We might forgive a broken outward link or two, but if we run into a buggy navigation menu, it can be a deal-breaker.
However, unless your website’s page count is tiny, checking every link by hand can be incredibly time-consuming. Fortunately, there are plenty of online tools that do the link-checking for you.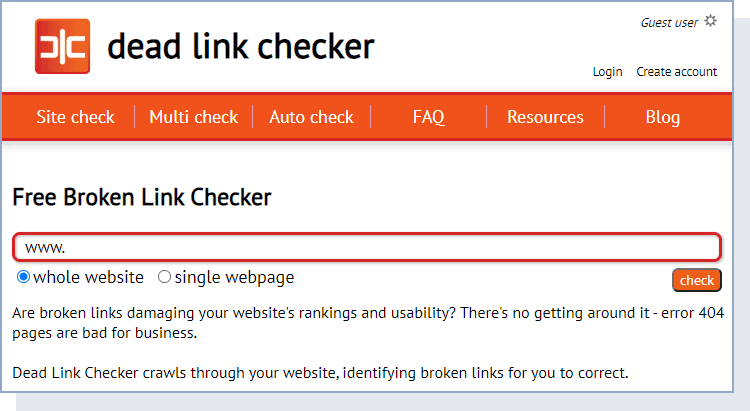
Let the link-checker do its thing, and fix any broken links within your content, which should only take a few minutes.
8. Proofread Your Content and Copy
For the first element, let’s stick to the basics. No one wants to visit a website filled with typos, or with copy that reads as if a machine wrote it. Before your website goes public, you need to take a fine-toothed comb to it and make sure you catch aspects such as:
- Grammar and spelling mistakes
- Inconsistencies with your copy
- Redundant content
Your content should be easy to read. Make sure you have consistent font sizes and include bullet points and headers to make content scannable for the reader.
Images and videos are a great way to break up text and explain confusing topics in a more digestible way. However, be sure your images are optimized and properly labeled with alt text and double-check your video files are working properly.
If you need a bit of help, you can use online grammar checking tools, such as Grammarly, to help you weed out common errors: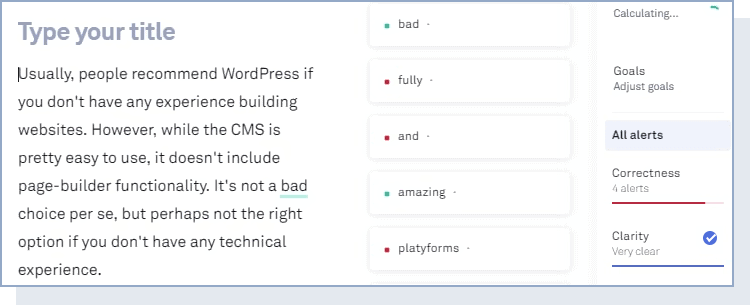
Even the best grammar checking tools can’t make up for poor writing, though. If you think your copy is weak, take the time to rewrite the essential bits before launch and get a second set of eyes before publishing. Otherwise, your website will look unprofessional.
9. Ensure Your Website is Accessible
A great website isn’t just about style or substance, it also has to offer a great user experience (UX). This means being easy to interact with, read, and navigate for everyone— including those with disabilities.
We’ve already covered several of these steps in the previous points, however, there are still a few accessibility guidelines you want to follow, including:
- >Ensuring users can navigate your site using the keyboard
- Adding alt text to your images
- Using headers properly
- Making sure your forms work
All those small tweaks combined make for a highly accessible website. This means close to 100 percent of your visitors can enjoy your site, and you provide a better all-around experience for those with impairments too.
To test your website accessibility, you can use one of the tools below:
Use these tools to explore your site and identify exactly what needs to be improved.
10. Check Your Website on Mobile Devices
Most of the world interacts with the web mainly through mobile devices. However, not all websites are built with mobile devices in mind. Some issues your website might face include:
- Being hard to interact with (e.g., text that’s too large or small, difficult-to-click elements, etc.)
- Using media not optimized for small screen sizes
With Google’s focus on mobile-first indexing, you want your website to be mobile-friendly from day one. The easiest way to test this is by grabbing a mobile device of your own, checking to see if navigation is simple, and interacting with the site to root out any problems.
There’s also a wealth of tools and services you can use to test your site’s mobile readiness. For example, Google offers a Mobile-Friendly Test you can run on your site for free. The test generates a thorough report which tells you what you’re doing right, wrong, and how to fix it. It’s perfect to quickly gauge your small-screen suitability.
11. Test for Problems with Different Browsers
You’ve likely come across a website that works on one browser, but not another (especially if you’re a ‘90s child). Needless to say, you don’t want this to happen with your website, so it’s essential you test it using different browsers before launch.
There are hundreds of browsers you can test, but let’s be honest, most people use the big five. These are Chrome, Safari, Internet Explorer/Edge, Firefox, and Opera. It’s easy enough to install all of them and test your website manually.
If you want to go the extra mile, there are also online services that provide you with many more obscure browser options to test your site — BrowserShots is a good resource for this. However, some quick in-house tests with the big five should be enough for most cases.
12. Check Your XML Sitemap
XML sitemaps are files that include all the URLs search engines should index on your site. For example, you can use sitemaps to ensure Google doesn’t miss any key pages, so they show up on the search engine results pages (SERPs) as you’d expect:
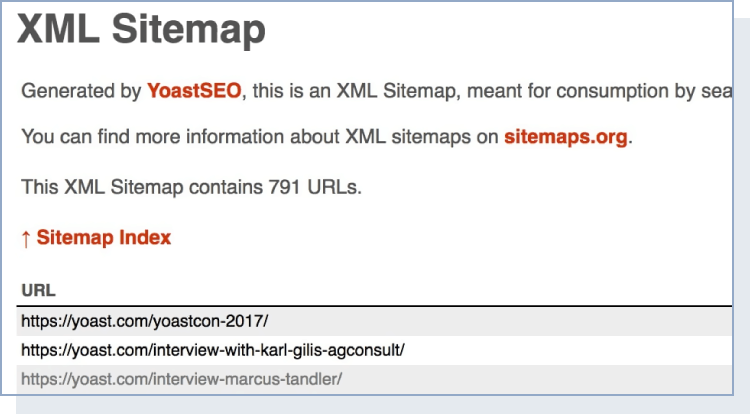
To put it another way, sitemaps are simple collections of the URLs on your website. Most SEO plugins will build a sitemap for you. If you’re using WordPress as your CMS, install the Google XML Sitemaps plugin. This plugin allows you to determine how frequently you want your sitemap submitted to search engines. It can also automate the process to submit a sitemap any time a new page is published.
However, you can easily use an online service to crawl your website and help you put together a sitemap automatically. If you aren’t using WordPress, there are other tools online available — such as XML Sitemaps— that can work for any type of website. Once it’s ready, make sure it is working properly and submit it to search engines.
13. Double-Check all URLs are Correct
This may seem like an obvious step, but you’d be surprised how many people overlook this. Oftentimes, when a site is moved from the staging site, URLs have to be changed. Double-check all URLs are present and correct on the live version of your site.
14. Generate a robots.txt File
While they’re not entirely the same, robots.txt files are similar to sitemaps in some ways. This file tells search engines which pages it should and shouldn’t crawl. With this file, you can also tell crawlers how to treat external links, block specific agents, and more. Here’s how a robots.txt file looks:
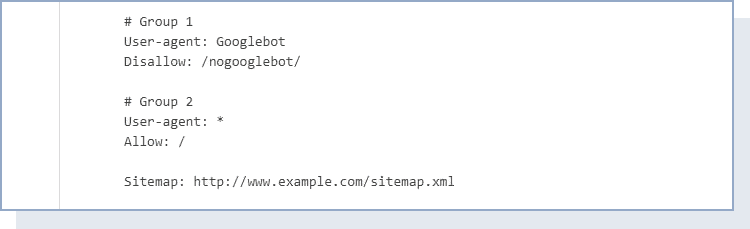
These types of files can get incredibly complicated, so we recommend you check out Google’s guidelines on what to include and how to format yours.
15. Add Metadata to All Your Posts and Pages
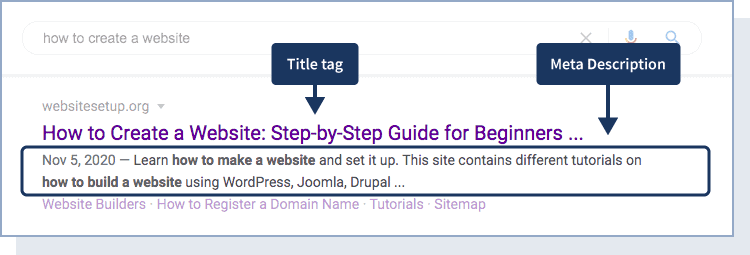
For the uninitiated, metadata is the collection of information that search engines use to determine whether your content is relevant. There is a broad range of metadata elements you can add to your posts and pages, but the two key ones are:
- Title tags: This is the title that shows up on the SERPs. Keep your titles under 60 characters and make sure it is an accurate description of the page.
- Meta descriptions: These are the short descriptions below your title tags discussing what the page is about. We recommended descriptions between 50 and 155 characters — any longer and your description may be cut off.
The goal is to create title and meta description combinations that include the keyword you want to rank for and entice users to click on your site when it shows up in SERPs.
Remember, you need to add metadata to all the pages on your website. The same also applies to any new content you publish down the road. Make sure there are no spelling and grammar errors, and no meta descriptions are repeated. The more your metadata is ‘on point,’ the greater the chance of organic traffic coming your way.
16. Use Schema Markup Whenever Possible
There’s a lot more data you can add to your pages to give search engines an even better idea of what type of content they’re dealing with. For example, Schema markup is a type of code you can include on your pages, which can help to dramatically improve your Click-Through-Rate (CTR) within SERPs.
Using Schema, your pages can show up as rich snippets. These are results that offer more contextual information users might be interested in. For example, if you publish a recipe online, you can use Schema markup to generate a snippet that displays a photograph, calorie information, cooking time, and more:
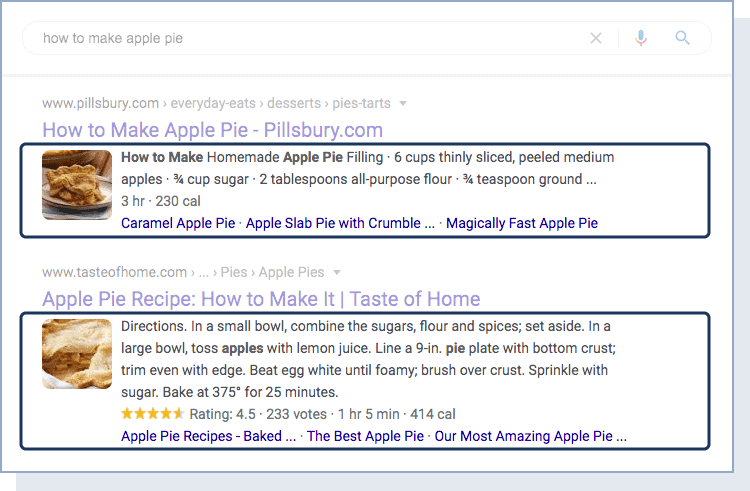
There are hundreds of types of elements you can use with Schema markup, so it’s worth getting acquainted with the code before launch. It could be the difference between a slow launch and a successful one.
17. Check for Technical SEO Errors
Before launching your website, it’s important to audit your technical SEO implementation for any errors. Technical SEO involves optimizations that make your site easy to crawl and index by search engines.
Below are a few technical SEO components to check:
- Make sure all meta titles and meta descriptions are unique and each page has a specific purpose tied to — and optimized for — a relevant keyword.
- Double-check that all URLs reflect your site architecture and are search-engine friendly. Keep your URLs simple and descriptive of each page.
- Ensure there are no duplicate content issues — each page on your website should be unique.
- Check your site’s health. Ensure there are no broken links, your page speed is up to par, and all pages you want to be crawled, are crawlable.
There are several tools online that can help you check your technical SEO and perform an SEO audit:
By completing the above, you are ensuring that search engines can properly crawl your site and that it will have a fair shot at appearing in search results. If you have any of the technical SEO errors listed above, you could lose valuable organic traffic and potential customers.
18. Ensure Your Site Design is Cohesive
To ensure a successful website launch, your web design needs to be cohesive and reflective of your original plan. You do not want some formatting and images to be inconsistent with the rest of the site.
To ensure your site design is up to par with your vision, use the design review checklist below:
- Review each page for inconsistencies: Ensure layout, fonts, format, headers, and content is consistent.
- Check font styles and elements: Ensure font styles, spacing, colors, line height, leading, and navigation are consistent throughout your site.
- Check image quality: Double-check that all images are optimized and compressed for the web. Ensure your image size is consistent throughout.
- Purchase proper licenses: If you use stock imagery on your site, make sure licenses have been purchased for each image.
It’s common for the above elements to be overlooked, so make sure you get a few sets of eyes on your new design before launch.
19. Make Sure Your Website is Legally Compliant
If you haven’t hired any legal counsel, we recommend doing so. Internet law can get confusing (and messy). Every industry has its own set of laws and regulations to follow, so it’s important to make sure your website complies with any necessary set of rules.
Below are a few things to look out for:
- Add a ‘Terms of Service’ page that explains your services and any privacy policies in detail. This is especially important if you are an eCommerce company.
- Make sure your website notifies users of the use of cookies. This is required in some countries.
- Ensure all codes, plugins, fonts, and images have been purchased and have the proper licenses.
- PCI compliant.
While this may seem boring, it’s a necessary step you’ll thank yourself for later.
20. Configure Your Website’s Permalink Structure
At some point, you’ve probably run into websites that use complex URL structures, such as yourwebsite.com/public/2018/post=3463452
A quick glance can tell you what type of content you’re dealing with, but beyond this, the URL doesn’t tell you a lot. More importantly, URLs like this can be a bit unwieldy and unmemorable. Ideally, you’d go with a permalink such as yourwebsite.com/blog/classic-carbonara-recipe.
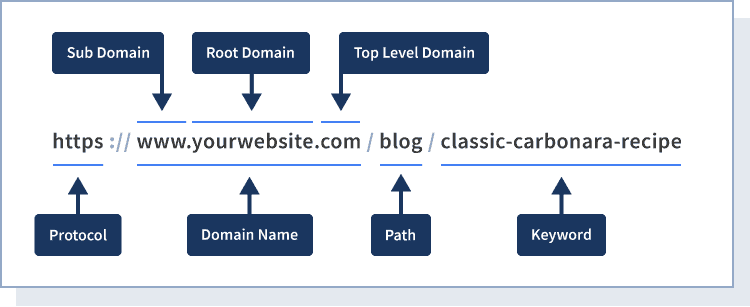
Not only is a ‘pretty’ URL structure more memorable, but it also gives visitors a lot more information. Ideally, you want to adopt a permalink structure that works for your needs. That way, you won’t have to switch down the road once you’ve already published a broad library of content.
As with many other WordPress settings, changing your permalink structure is simple to do. In fact, WordPress has a full article on the subject, and you should be able to achieve it in a matter of minutes.
21. Consider AMP Integration
Google’s Accelerated Mobile Pages (AMP) is a framework that seeks to improve the performance of the web through a set of guidelines they believe makes for ‘better’ websites. As you’ll expect from the name, there’s a heavy focus on smaller screens, although you’re able to view these pages at any size.
There has been a lot of controversy around the project from its inception, as it can impact the style and experience of a lot of websites. In contrast, using AMP could net your pages a boost in the SERPs by appearing above organic content.
Even so, AMP is not a great fit for all types of websites, so you want to consider carefully whether to use it or not. If we’re talking about blogs or text-heavy content pages, AMP can be a great fit. Overall, it’s not a requirement (unlike most of the elements in this checklist) but it is worth considering if you haven’t already.
22. Make Sure You Have Relevant CTAs
Every page should have clear calls to action. Calls to action (CTAs) guide users down the buyer’s funnel, getting them to the most important pages on your site. These are usually in the form of buttons, email sign-up forms, or social sharing. Make sure your calls to action are clear and enticing.
23. Create Social Media Profiles for Your Website
Most successful websites have a healthy presence on social media. In other words, they have active profiles that publish new content often, engage with followers, and generate some ‘buzz.’
The best time to start building your site’s social media presence is from day one. However, before you get started, you’ll want to figure out which platforms are the best fit for your content.
Take a restaurant, for example. You might not want a Twitter account, but a presence on Instagram is definitely a good idea.

Focusing on the platforms where your audience is likely to be will save you a lot of time and effort. Even so, gaining followers can take a while. Although you may not see much benefit from the start, it will pay off over the long-term, as you can direct those users back to your site.
Once you create social media profiles, add social icons to your website. Make sure each button has a “share” functionality that entices users to click, and hopefully share on their own social media profiles.
To guarantee you don’t skip a step, download our printable pre-launch checklist below.

Post-Launch Checklist: 8 Things to Do After Launching Your Website
Congratulations! Your new site has been launched. However, your work isn’t done yet. There are several things you need to double-check to make sure everything went smoothly.
1. Test Your Site UX
To ensure visitors stay on your new site and don’t bounce, the first thing you need to do is test your site for user experience (UX). Are all internal and external links working properly? Do buttons link out to the right pages? Is your navigation easy to understand? Does each page lead the user where you want them to go?
Look at your site from the eyes of a new visitor. Ensure every photo loads properly, each design renders as expected, and your copy is easy to understand. If you find any errors, handle them quickly.
2. Ensure Your Site is Secure
This is arguably the most important post-launch step. It’s critical to double-check that your website is secure. If you will be taking payments from customers or storing their information, get advice from a legal counsel or a related professional to ensure you comply with all laws and your new site is safe from hackers.
3. Verify Your Analytics is Working Properly
Check that your analytics is set up and running smoothly. Having data for the first months of your website’s launch will prove invaluable. It will provide you with key customer insights that will help you pivot where necessary and help lay the foundation for a successful brand.
Below are a few things to double-check post-launch:
- Funnels and goals are set up properly >
- Default URL is set up correctly
- Google Search Console is linked
- IP addresses of your home, office, employees, and affiliates are filtered out
- eCommerce tracking and site search tracking are turned on
- Views are set up correctly
- Tracking scripts and analytics codes are inserted correctly
It’s worth spotlighting that new websites often don’t get a lot of traffic. This means it might be a while until your analytics tool starts to collect any valuable information. Even so, it’s better to have it up and running from the start, so you don’t have to play catch up later on.
4. Submit Your Sitemap and Request Indexing
Your website launch won’t matter if it doesn’t show up in search results. To ensure your site appears on the largest search engine out there, log in to Google Search Console and submit a new sitemap.xml.
To submit a sitemap to Search Console, first log in and go to the Dashboard of your new site. On the left-hand side, click on “Sitemaps.” From there, enter the URL of your sitemap. Typically, the URL is “example.com/sitemap.xml.”
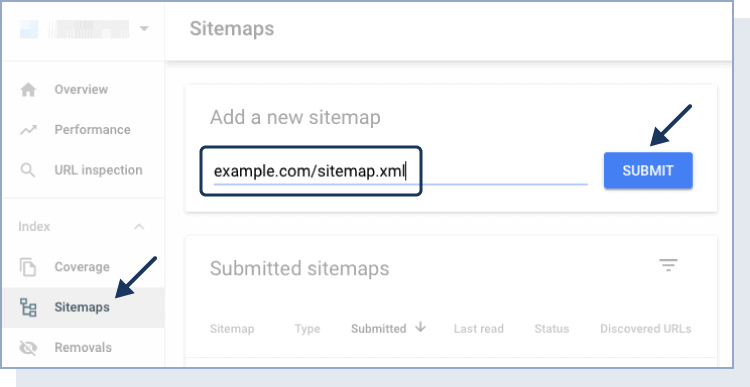
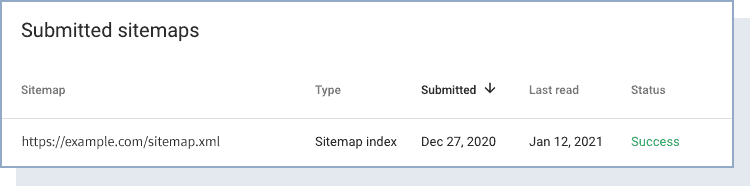
Once you submit your sitemap, you’ll see it at the bottom of the page. Under Status, it will say “Pending.” Once Google has indexed your site, that “Pending” will change to “Success” along with the date that it was indexed.
5. Crawl Your Site and Check Your Technical SEO Components for Errors
Crawl your site once more to ensure that no errors or issues occurred post-launch. Compare this crawl to the previous one. Are there any discrepancies? If so, double-check that these weren’t intentional and handle any issues needed.
With your crawl, take a look at your technical SEO components again. Are all page titles, meta descriptions, and URLs appearing and accurate? Use PageSpeed Insights to ensure your load time is acceptable and optimized, and make sure your XML sitemap has been submitted to search engines. Check for possible indexation issues and ensure 301 redirects are in place for any old URLs. Make sure your site’s pages are not set to noindex, nofollow.
6. Ensure Backups are in Place
In step three of our pre-launch website checklist, we recommended creating a backup solution. Now is the time to check the implementation of this backup strategy. To avoid losing all your hard work, make sure a copy of your website has been created and that ongoing copies are being made on a regular basis.
7. Check Your Conversion Path is Working Properly
If you’re an eCommerce website, spend some time double-checking that the features of your conversion path are operating correctly. Any contact forms, payment processes, thank you messages, and more should be working correctly at the launch of your website.
8. Promote Your New Website
Lastly, have fun promoting your new website! You’ll be competing with millions of other sites on the web, so it’s critical to make some noise in the space.
Below are some of the top ways to promote your website:
- SEO: Search engine optimization is a critical source of organic traffic. If your on-page SEO is up to speed and you have a bucket of authoritative content tied to relevant keywords, you should be able to rank for queries that are essential to your business. Once you start to rank on page one, you’ll see traffic increase.
- Paid Advertising: Paid advertising is a great source of traffic — especially in the short term. If you’ve just set your SEO strategy, consider investing in paid ads before you start to see organic results. Google Adwords is a popular advertising tool used to get your website in front of the right customers.
- Email Campaigns: Use your existing database to send out an email informing your network of your new site launch. Tell them what’s new and highlight important features. Consider investing in an email marketing campaign — there are a plethora of available to help you get started.
- Social Media: Announce your website launch on all of your social media channels. Create a Facebook page before your launch and start to build a community. Go live on Instagram after the launch of your site to notify viewers of anything that’s new. Add calls to action to all of your posts and create engaging videos.
Creating a buzz around your brand and new site launch is very important. By promoting and marketing your new website, you’ll increase brand awareness and traffic to your site — resulting in a bucket of potential new customers.
Download the post-launch website checklist below to ensure you don’t miss a step!
