Drupal is a free, powerful content management system that lets you create custom websites, blogs, portals, and more. It has all the features you need to build a fully functional website, is highly customizable, scalable, and free to use.
In this step-by-step Drupal tutorial, we will show you how to build a website using Drupal. The current stable version at the time of this writing is Drupal 11, and the instructions below apply to Drupal 10 and 11.
However, using Drupal is not as easy as creating a website with WordPress or website builders. While it’s not that hard to pick up, to really customize your site, knowledge of HTML and CSS would be helpful.
Here’s what this Drupal tutorial for beginners will cover:
-
- Get web hosting
- Install Drupal (quick install, Composer, or manually)
- Get to know the user interface
- Set up user roles and permissions
- Change your Drupal site’s theme
- Configure the theme
- Set up a new front page
- Create another page and add it to the menu
- Make a blog and start posting
- Organize content with taxonomy
- Learn to delete and modify content
- Activate and deactivate default modules
- Add contributed modules
- Get familiar with blocks
- Manage existing blocks
- Create custom blocks
- Use the Layout Builder
- Keep your Drupal site maintained
Total time to create a website using Drupal: ~3-4 hours Skill level: Intermediate
All clear? Then let’s get started.
What Kind of Websites Can You Build With Drupal?
Before getting into the tutorial, let’s have a quick look at what Drupal can do for you. Drupal can be used to create almost any kind of website:
- Personal or business websites
- Blogs and news websites
- Portfolio, art, music, and multimedia sites
- Forums and community sites
- E-commerce sites and online shops
- Enterprise and government websites
- Educational institution sites
You can find additional examples in the Drupal case studies section.
To summarize, whatever website you are aiming to build, Drupal allows you to do so. Let’s now look at how to get started.
Understanding Drupal Versions
A quick note on versions: Drupal 9 reached end-of-life in November 2023, and Drupal 10 followed as the stable release before Drupal 11 arrived in 2024. If you’re starting a new site today, you should use the latest stable version (currently Drupal 11). The good news is that upgrading between major versions is much smoother than it used to be, so the steps in this tutorial apply broadly to Drupal 10 and 11.
1. Find Web Hosting for Your Drupal Site
Before you can build a website, you need a place where it is located and reachable – that’s web hosting.
Already have hosting? Move on to step 2 of the Drupal tutorial.
When choosing hosting, consider four main factors:
- Uptime – Uptime percentage shows how much of the time your site will be up and running. We recommend that you choose something that meets or exceeds the industry standard of 99.9%.
- Page load speed – You should choose a host that loads your pages quickly. Faster hosting means a better experience for your visitors and better search engine rankings.
- Customer support – You’ll have to sort out issues with support at some point. Choose a host that has responsive, high-quality customer support.
- Price – Hosting services vary widely in price. Choose one that you can afford and that has satisfactory ratings on the first three factors.
Most providers should have the right system requirements for Drupal (see the documentation). The best among them (e.g. Bluehost) also have “one-click install” for CMS platforms like Drupal and Joomla, so you don’t need to handle the manual installation.
2. Run Through the Drupal Installation
There are several ways to install and set up a Drupal website. The most common are: using a web hosting company’s “quick install” option, using Composer (the recommended modern method), or downloading and installing Drupal manually via FTP. We’ll cover all three.
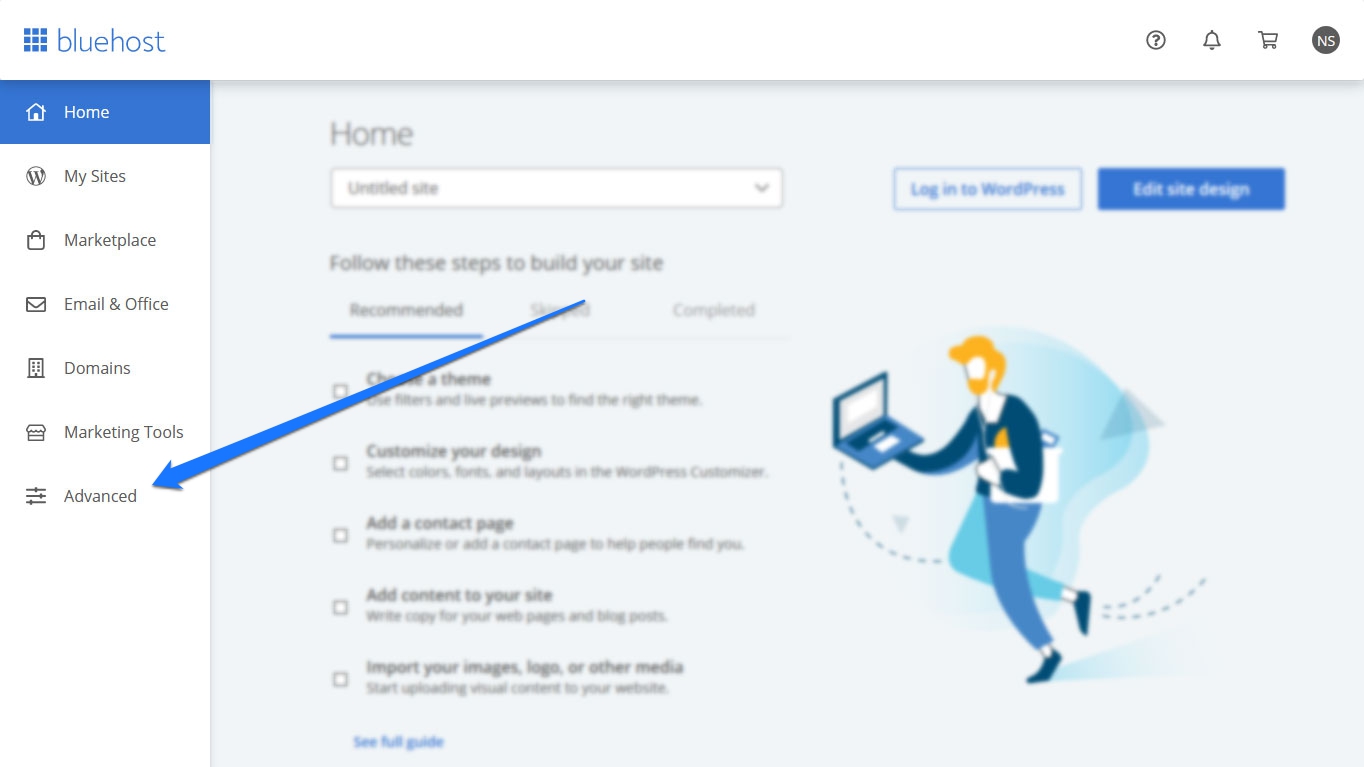
2a. Install Drupal Automatically on Bluehost.com (Quick Install)
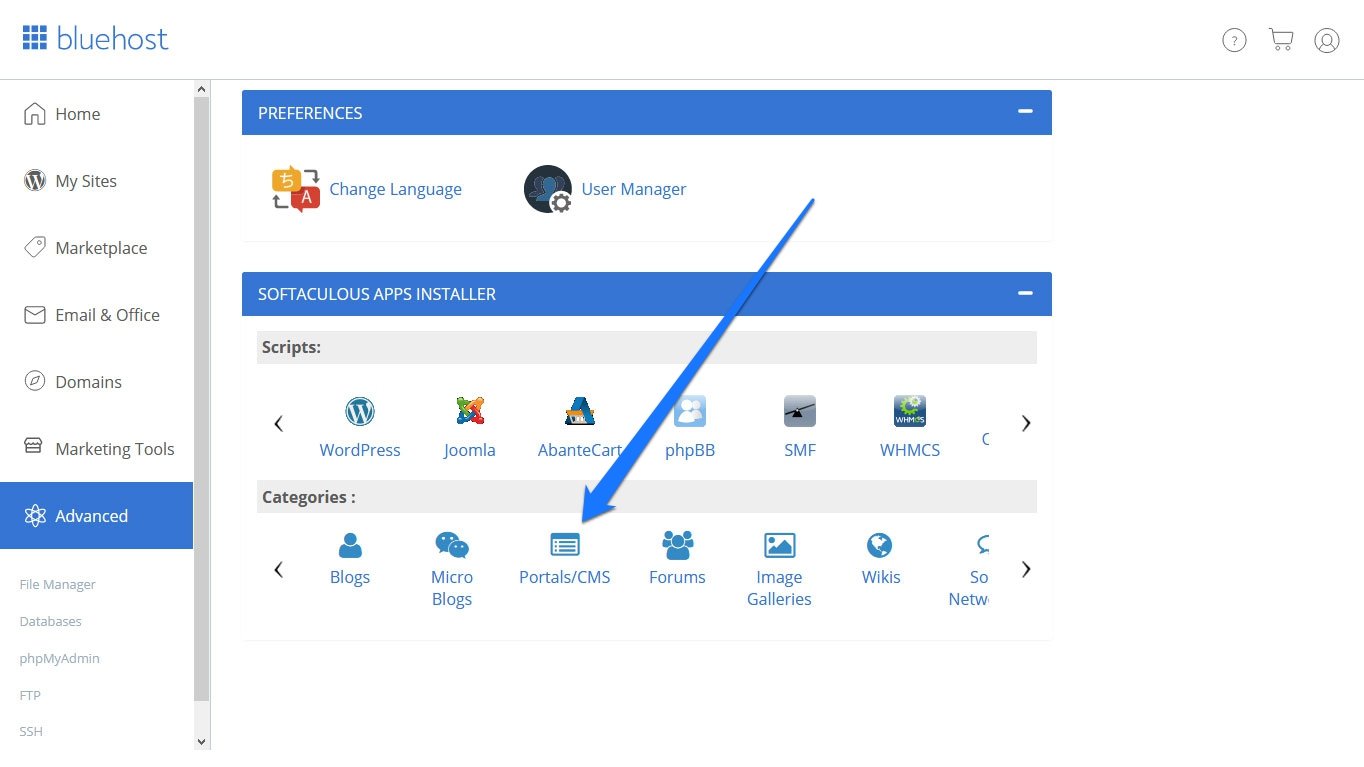
Let’s start with the easiest method. Once you’ve signed up and grabbed a domain at Bluehost, log into your account and click Advanced.
Then scroll down and click Portals/CMS.
From there, use the search field in the upper left corner to search for Drupal and click on the result when you have found it. Then, hit Install Now.
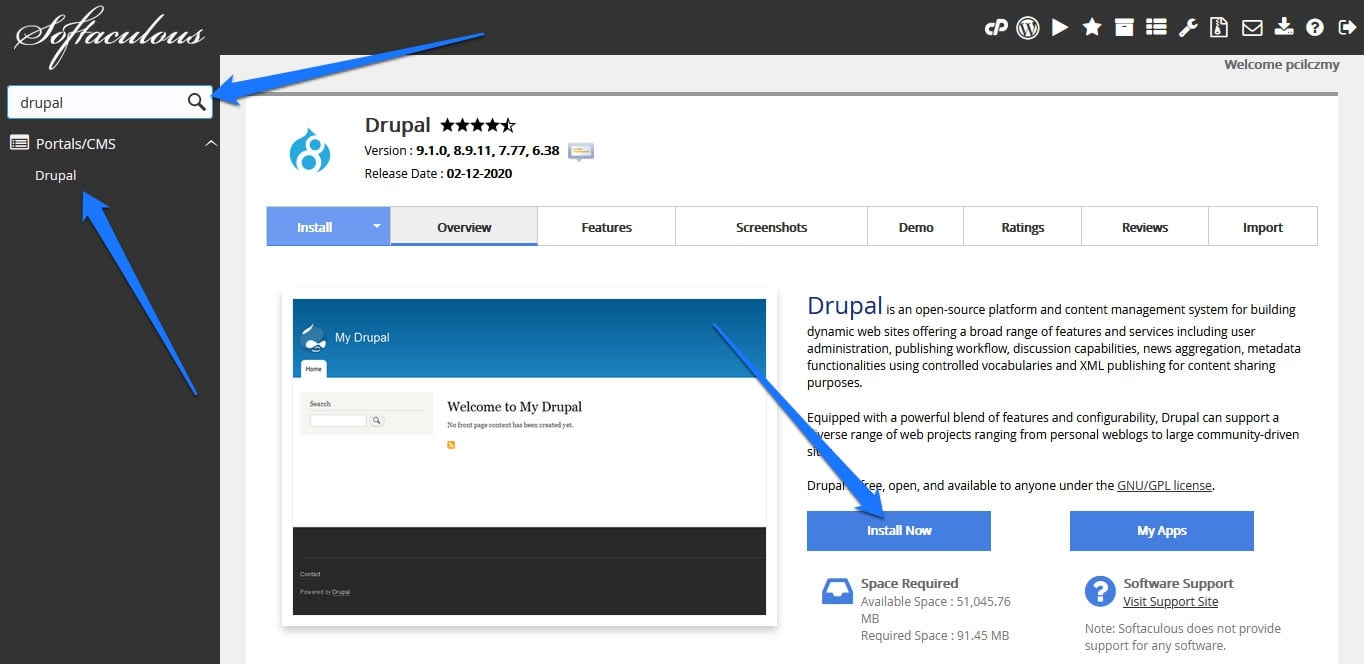
Doing so will get you to a settings screen:
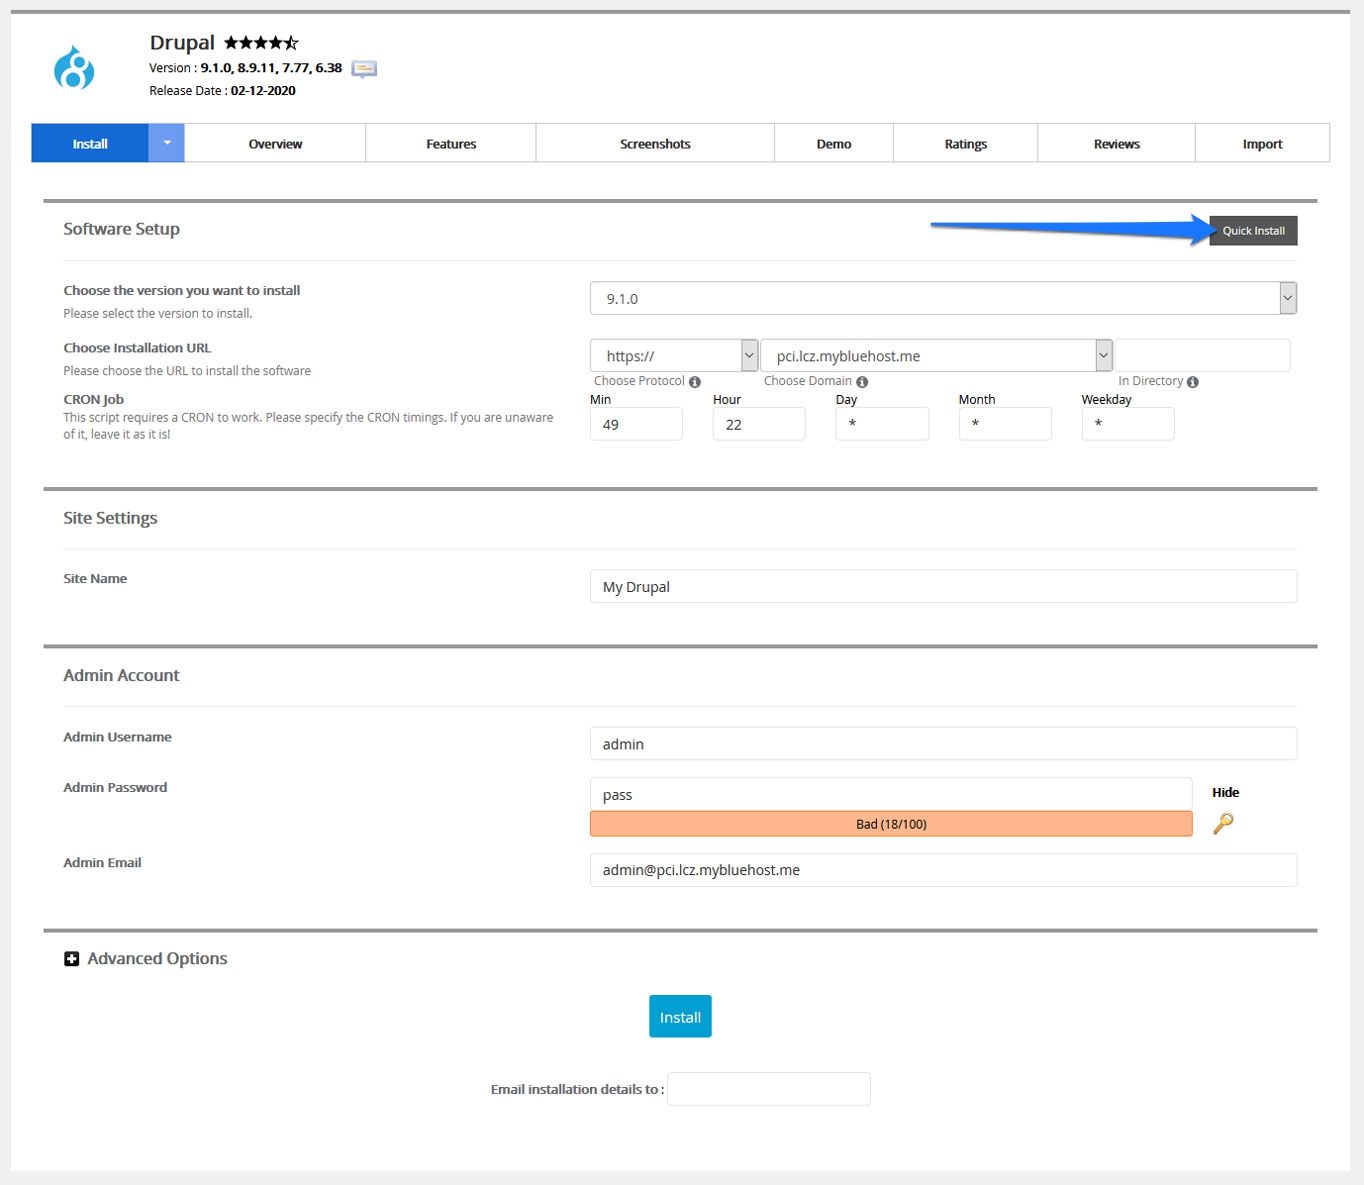
Select Quick Install in the upper right corner. This will take you here:
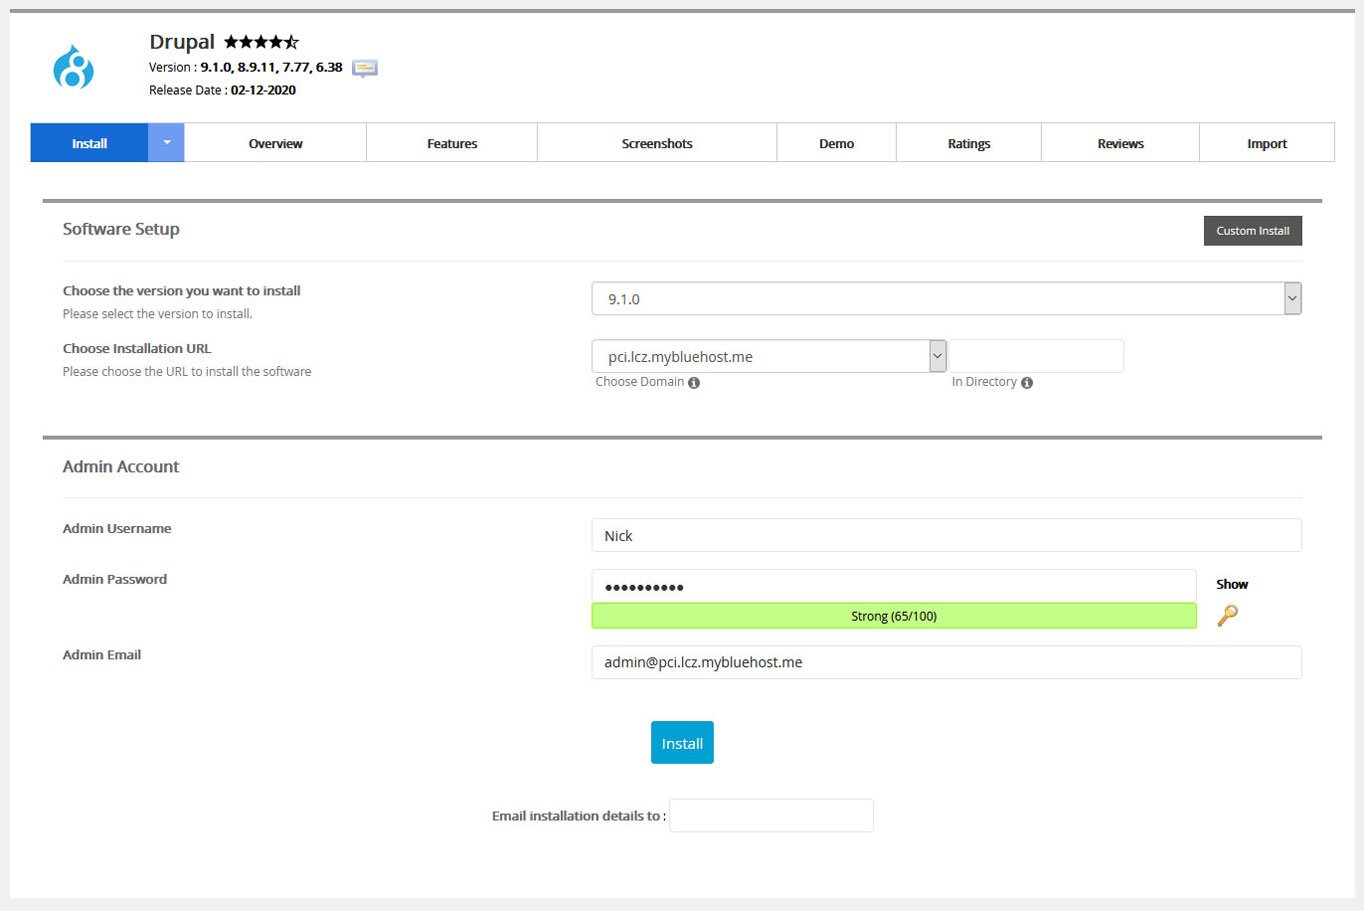
You’ll notice that your Bluehost domain is already set up in the default settings. It’s best to leave everything as is unless you know what you’re doing.
Fill in your admin username, password, and email address. After that’s done, just click Install. Before the installation can continue, you will likely get a message about overwriting default files:
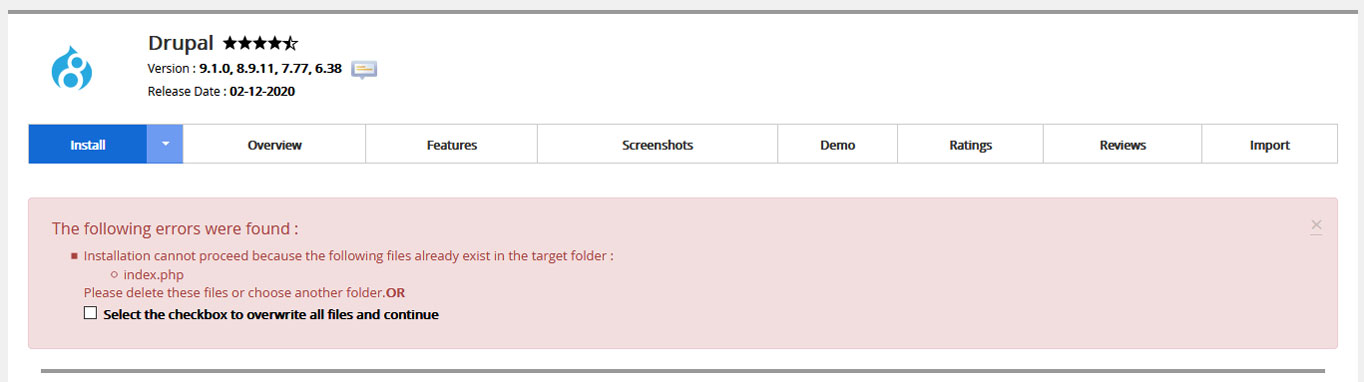
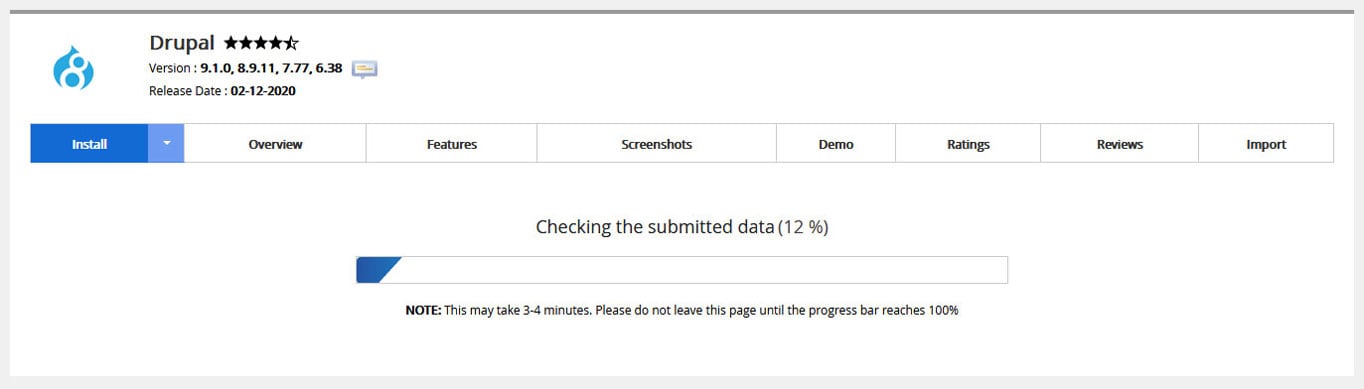
That’s normal, so don’t worry about it. Simply check the box and click Install again. The installation will then start.
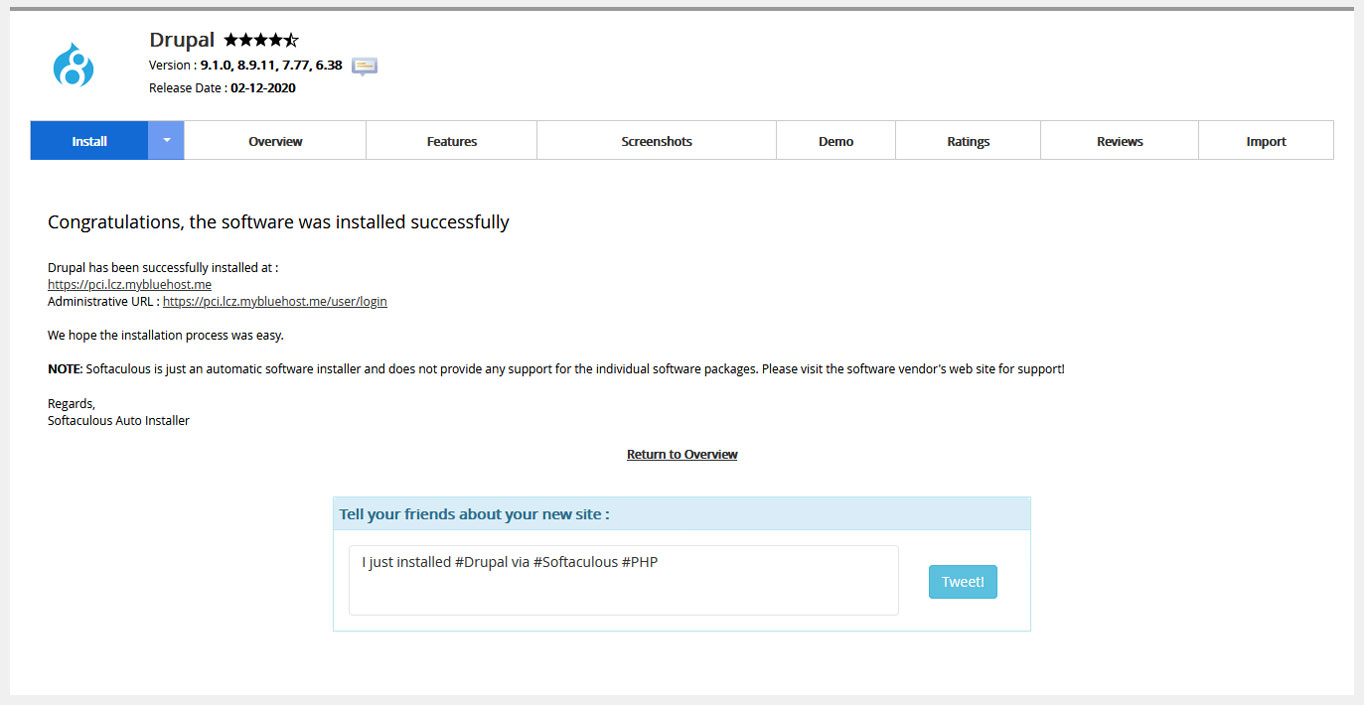
After it is finished, you’ve successfully installed Drupal on your Bluehost domain and you can use the displayed links to check out your new site and get to the login screen. Well done!
2b. Install Drupal With Composer (Recommended)
Composer is the modern, recommended way to install and manage Drupal. It handles downloading Drupal core, modules, and themes – plus all their dependencies – in one tool. If you plan to add contributed modules or keep your site updated long-term, Composer makes your life much easier.
To use Composer, you’ll need command-line (SSH) access to your server. Most quality hosting plans provide this. Here’s how:
- Install Composer on your server if it isn’t already available. You can find instructions at getcomposer.org.
- Create your Drupal project by running this command in your terminal:
composer create-project drupal/recommended-project my-drupal-site
This downloads Drupal core and sets up the correct project structure in a folder called my-drupal-site. - Create a database for your Drupal site through your hosting control panel (just like in the manual method below). Note down the database name, username, password, and host address.
- Point your domain to the /web folder inside your project directory (this is Drupal’s document root when using Composer).
- Run the installer by navigating to your domain in a browser. You’ll see the same installation wizard described in the manual installation section below – choose your language, enter database credentials, and configure your site.
The advantage of using Composer is that later, when you need to add modules or update Drupal, you can do it with simple commands like composer require drupal/module_name and composer update rather than manually downloading and uploading files.
2c. How to Install Drupal Manually via FTP (Any Web Host)
If you’re not using Bluehost’s quick install or Composer, you can also set up Drupal manually. It’s quite straightforward.
Download the Files
Go to the download section of the official Drupal website and hit the download button.

Once on your hard drive, unzip the file you just downloaded. Then, connect to your server via FTP (e.g. with FileZilla) and start uploading its contents to the server location that your domain is pointed at (usually the root directory). This will take a bit.
Create a Database for Drupal
In the meanwhile, navigate to your host’s management panel for MySQL databases. Here, create a dedicated database for your Drupal installation. While the process will be slightly different depending on your provider, you should end up with the following:
- Database name
- A user name with all privileges for that database
- The user’s password
- A database host address
Keep all of this information handy, you will need it soon.
Run the Installation
Once the files have finished uploading, navigate to your site domain. Doing so will start the Drupal installation process.
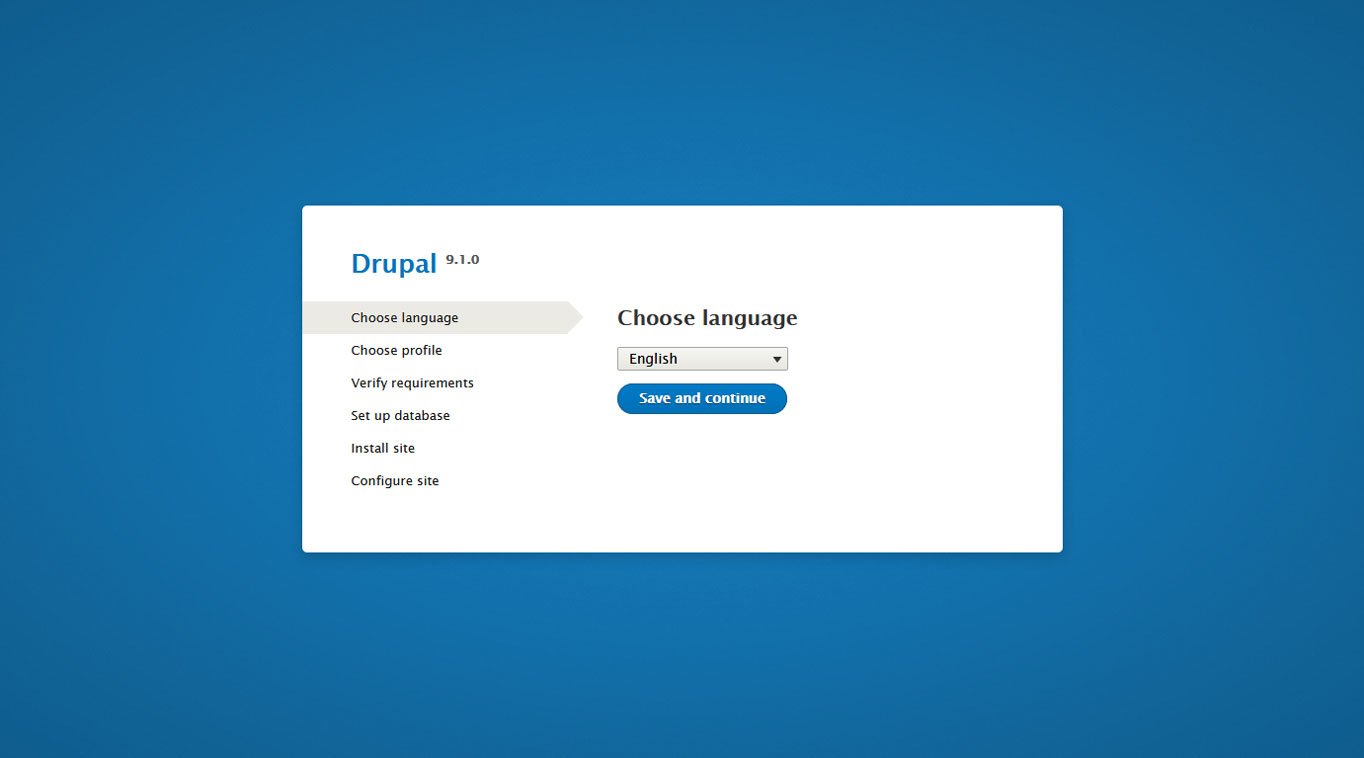
The first step is to choose the language you want your site to operate in. Take your pick and click Save and continue.
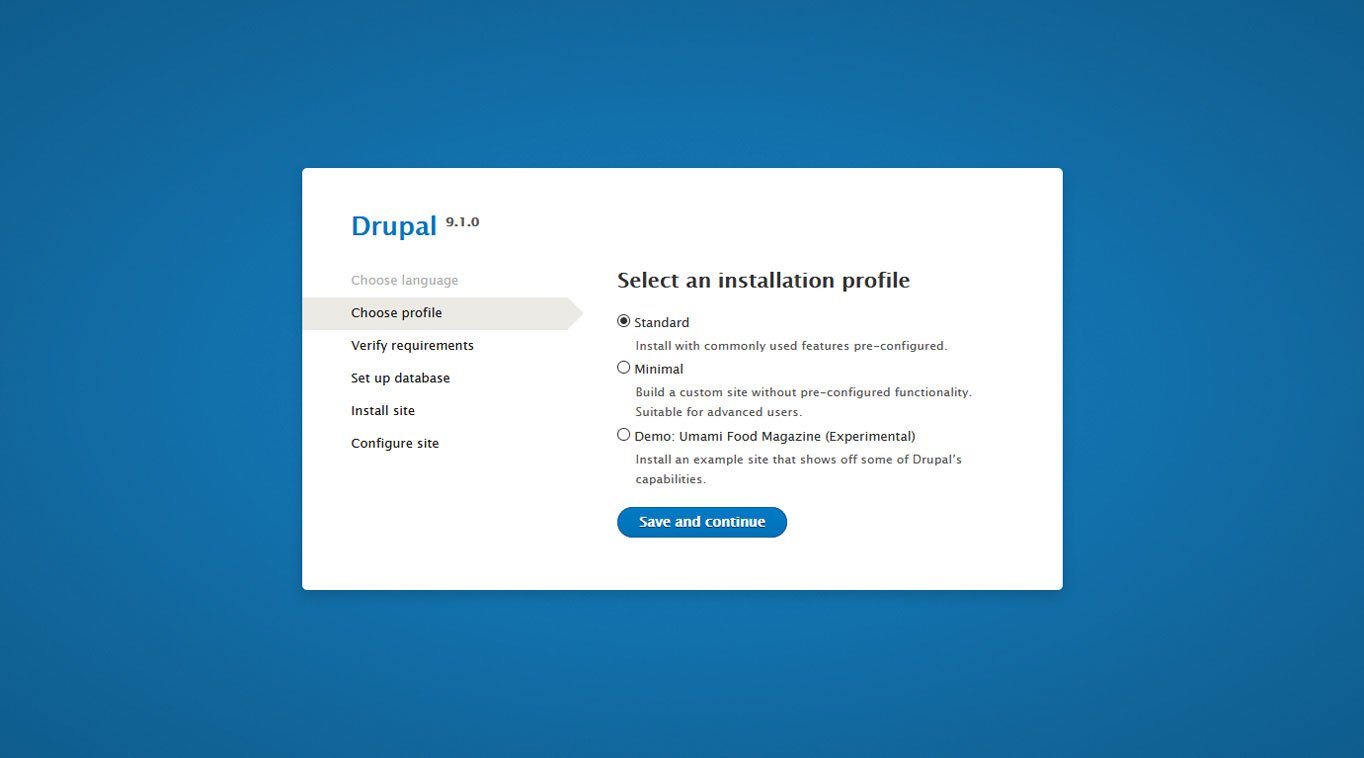
After that, you need to choose your installation profile. This determines whether some of your site features will be pre-configured or not. For this tutorial, we go with the standard Drupal profile. If you are more experienced, you may also use a minimal option.
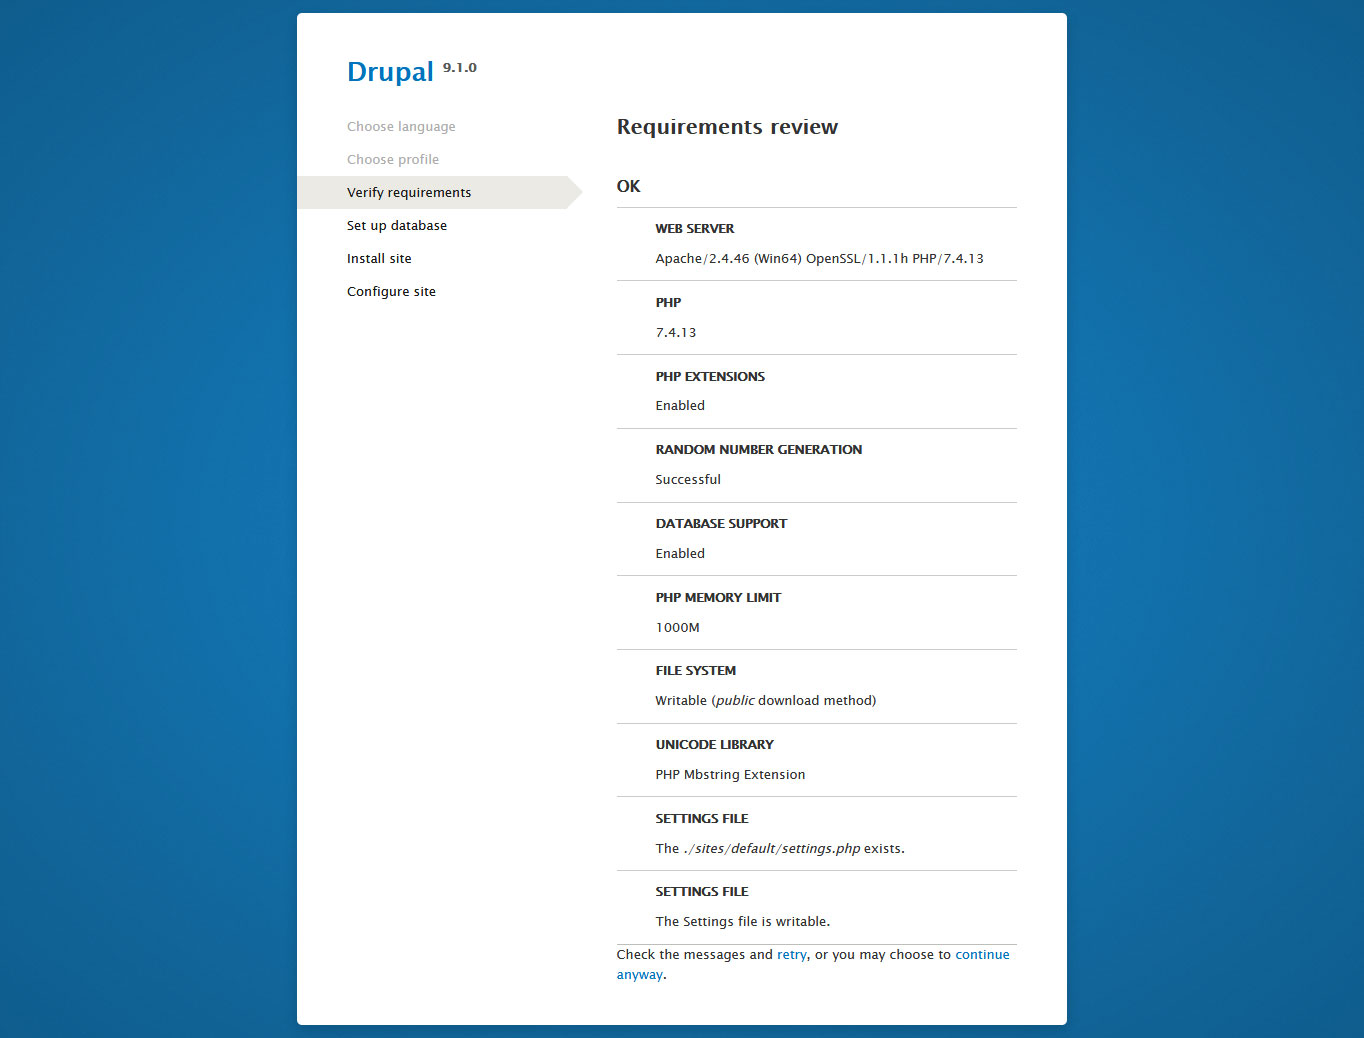
In the next step, the installation checks whether your server environment is sufficient to run the software. Any problems will show up as warnings so you can address them. Continue when you are satisfied.

Now it’s time to put the database information to use that you collected earlier. Input the database name, user name, and password. If your MySQL host address is not localhost, you can change it under Advanced Options. In the same place, you can also assign a database prefix if needed (for example, when you have several sites in one database). Save and continue once you are done.
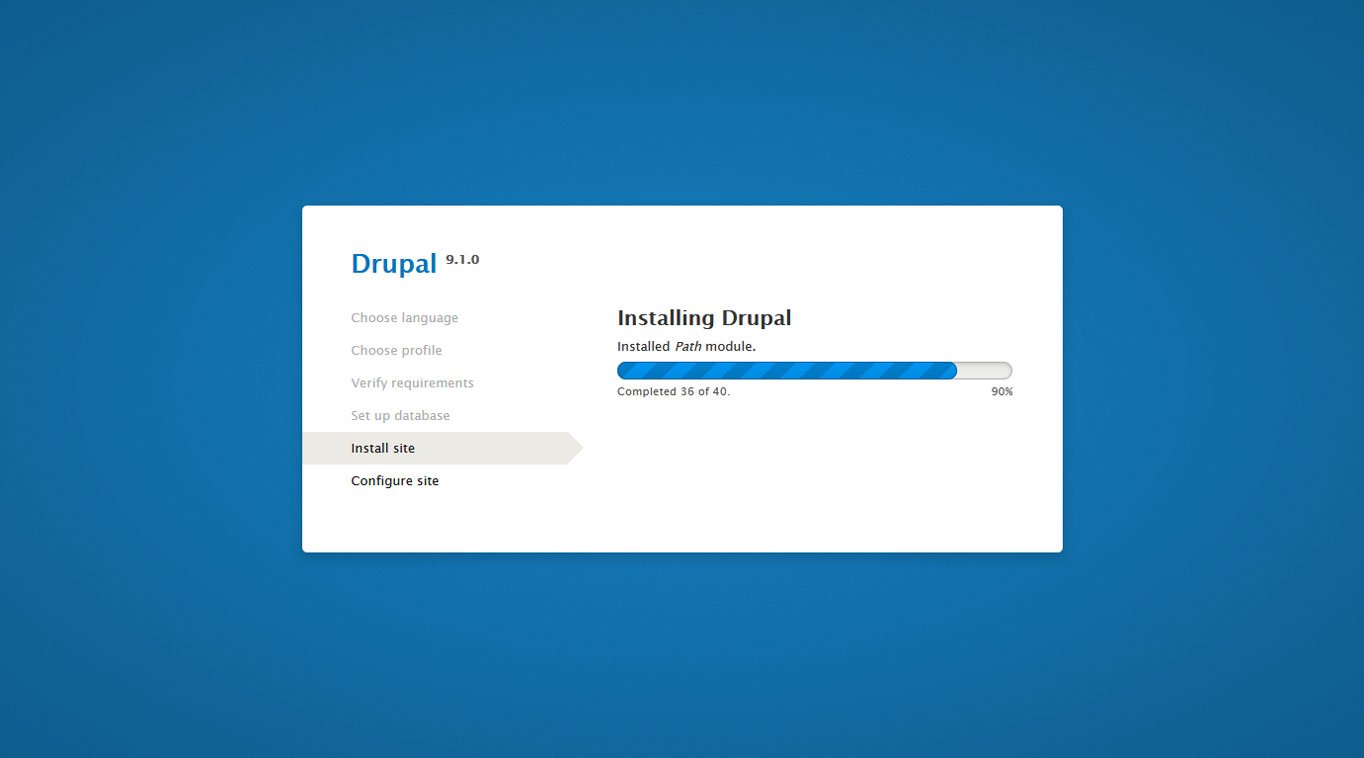
After that, the actual installation begins.
Finalize
The final step is to set up some basic information about your site.
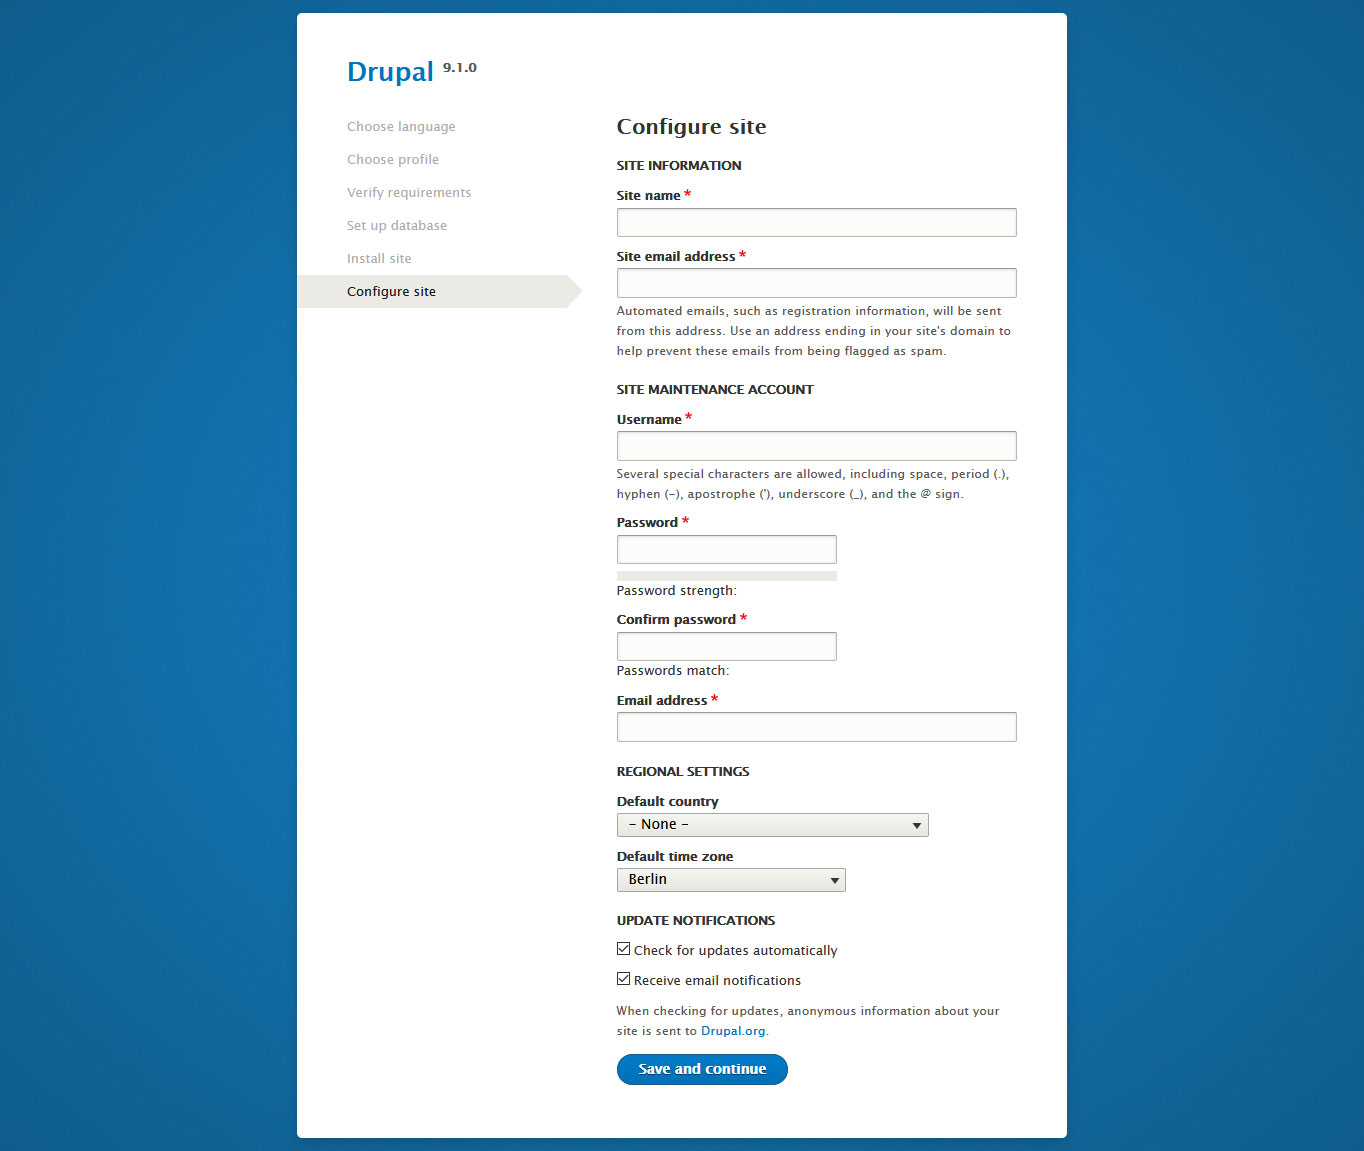
Here’s how to fill it in:
- Site name – The name of your website. You can change this later on, so don’t get too hung up on getting it right.
- Site email address – The email address from which users will receive site notifications.
- Username – The user name of your site’s main admin account.
- Password – Select a strong password to keep your account safe and confirm it once more.
- Email address – The email address associated with your main user. Drupal will automatically fill in the site email address; change it as needed.
- Default country – The default country for your site.
- Default time zone – The time zone your site will use for displaying dates and similar information.
In the end, you need to decide whether your site should check for updates automatically and notify you if any are available. When satisfied, save once more and you are done with the installation.
3. Get to Know the User Interface
After you have finished the installation process, this is what your newly created Drupal site will look like:
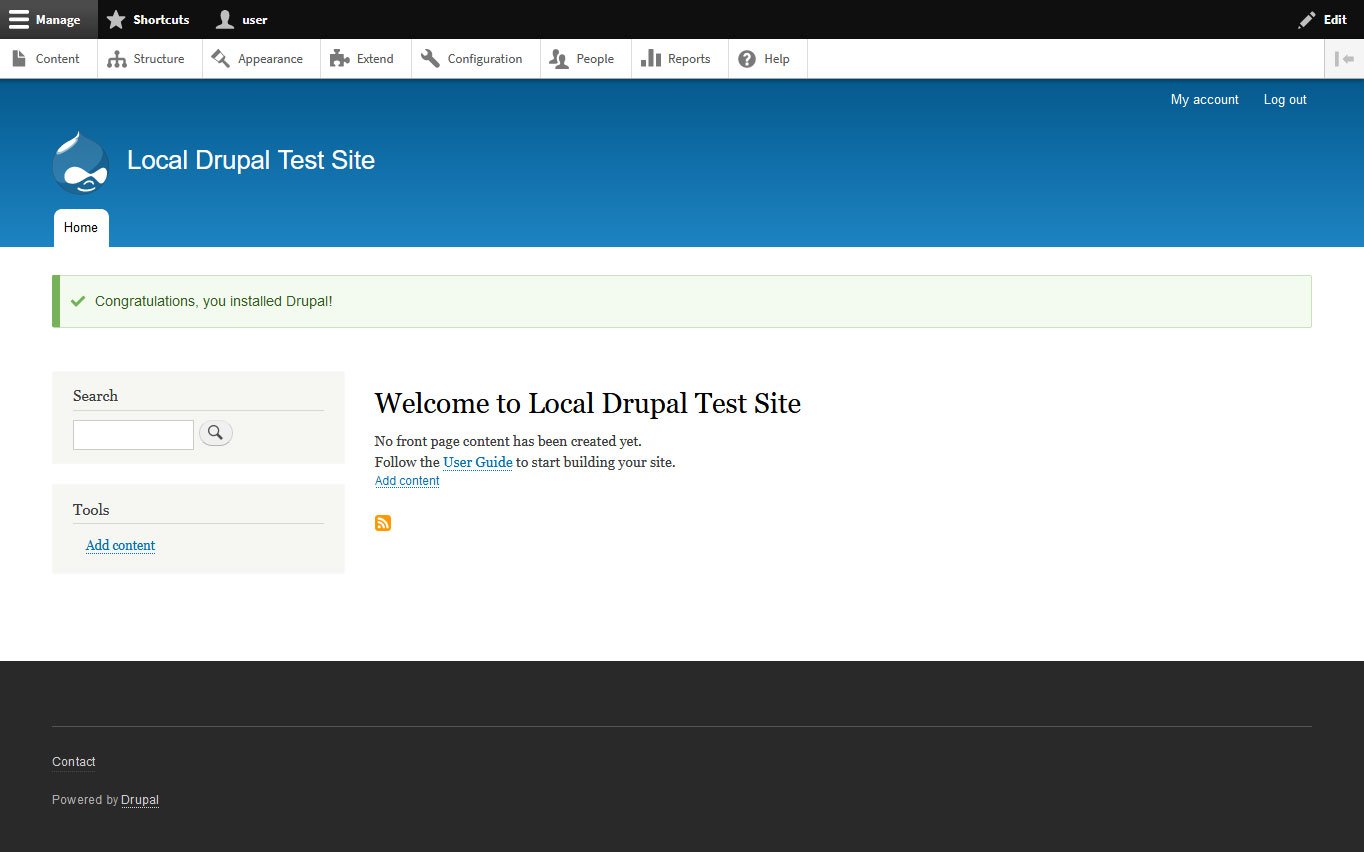
When logged in (you can always get to the login screen via http://yourdomain.com/user/login), at the top of the screen, you see links to all parts of the back end where you can make changes to your site. Here’s a quick overview of each menu item:
- Content – Here, you create basic content like posts and pages. It is also where you manage comments and find your site’s media library.
- Structure – This is where you manage all structural elements of your site including blocks, forms, content types, menus, and taxonomies.
- Appearance – It contains the settings for themes and other appearance-related options.
- Extend – Under this menu, you install, update, and uninstall Drupal modules.
- Configuration – Gives you access to your site settings.
- People – Contains options for users, roles, and permission levels.
- Reports – Here, you find logs, update information, status reports, errors, and other information about your site’s health.
- Help – The central hub for helpful information about basic site administration as well as any modules installed on your site.
By the way, under Shortcuts, you can define your own links to parts of the admin interface that you use often.

That way, you can improve your workflow and make it faster. All clear? Then let’s put this new knowledge to good use.
4. Set Up User Roles and Permissions
Before diving into design and content, it’s worth setting up basic governance for your site – especially if other people will be helping you manage it.
Drupal has a powerful permissions system that lets you control exactly what each user can do. You manage this under People in the admin toolbar.
By default, Drupal comes with a few roles:
- Anonymous user – Anyone visiting your site who is not logged in.
- Authenticated user -Anyone who has created an account and is logged in.
- Administrator – Full access to everything on the site (that’s you).
To add a new role (for example, “Editor” or “Content Manager”), go to People > Roles and click Add role. Give it a name and save.
Then, go to the Permissions tab to specify exactly what each role can and cannot do – from creating content to managing menus to administering users. You can be very granular here.
To add new users and assign them roles, use the People tab and click Add user. Fill in their details and select the appropriate role.
If you’re building a personal site, you can skip this for now and come back later. But for any site with multiple contributors, getting roles set up early saves headaches down the road.
5. Change Your Drupal Site’s Theme
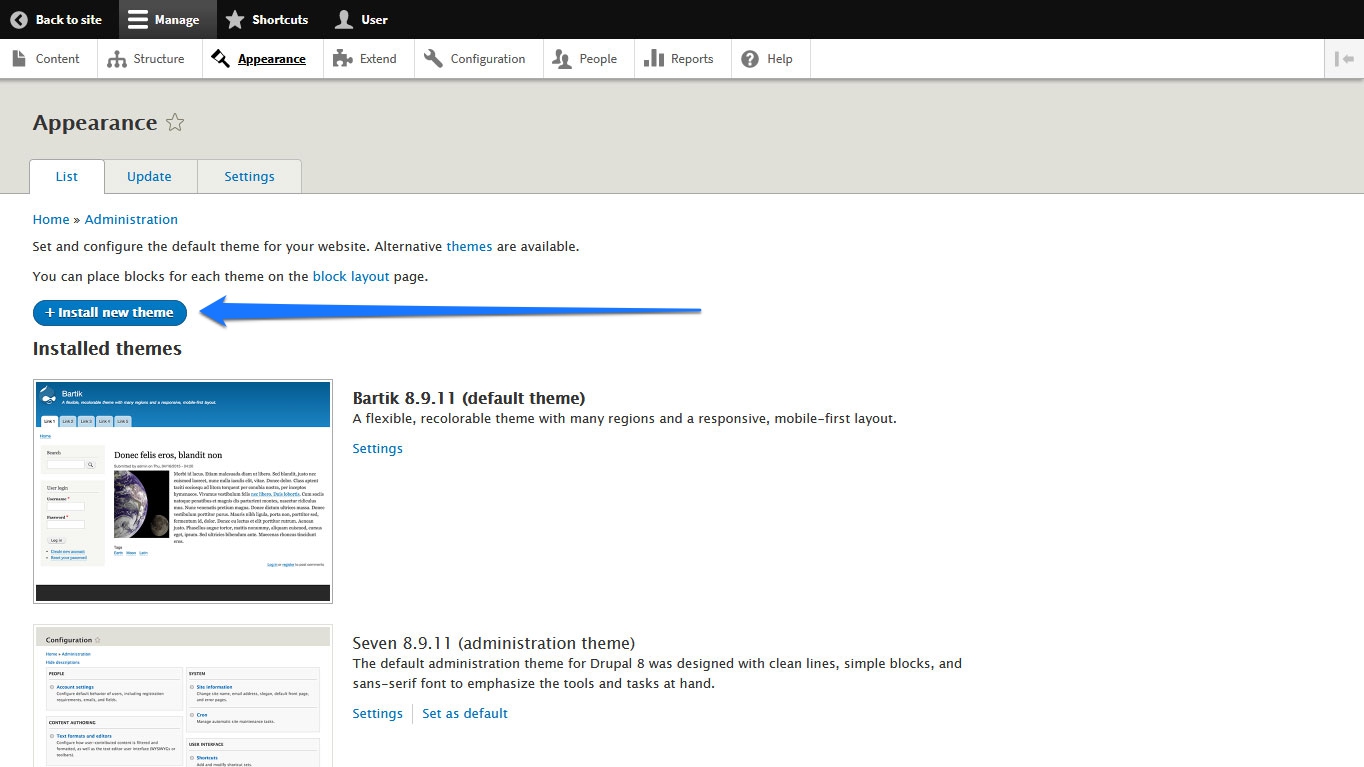
Now let’s make your site look good. Drupal 10 and 11 ship with Olivero as the default front-end theme, which is modern, accessible, and mobile-friendly – a solid starting point. However, you may want to switch to a different theme that better fits your vision. You find theme options under Appearance.
Find a Theme in the Directory
To find new themes, go to the official Drupal theme directory. At the time of this writing, you have a choice of thousands of themes. The directory gives you several ways of filtering them so you can find what you are looking for, including compatibility with your Drupal version.
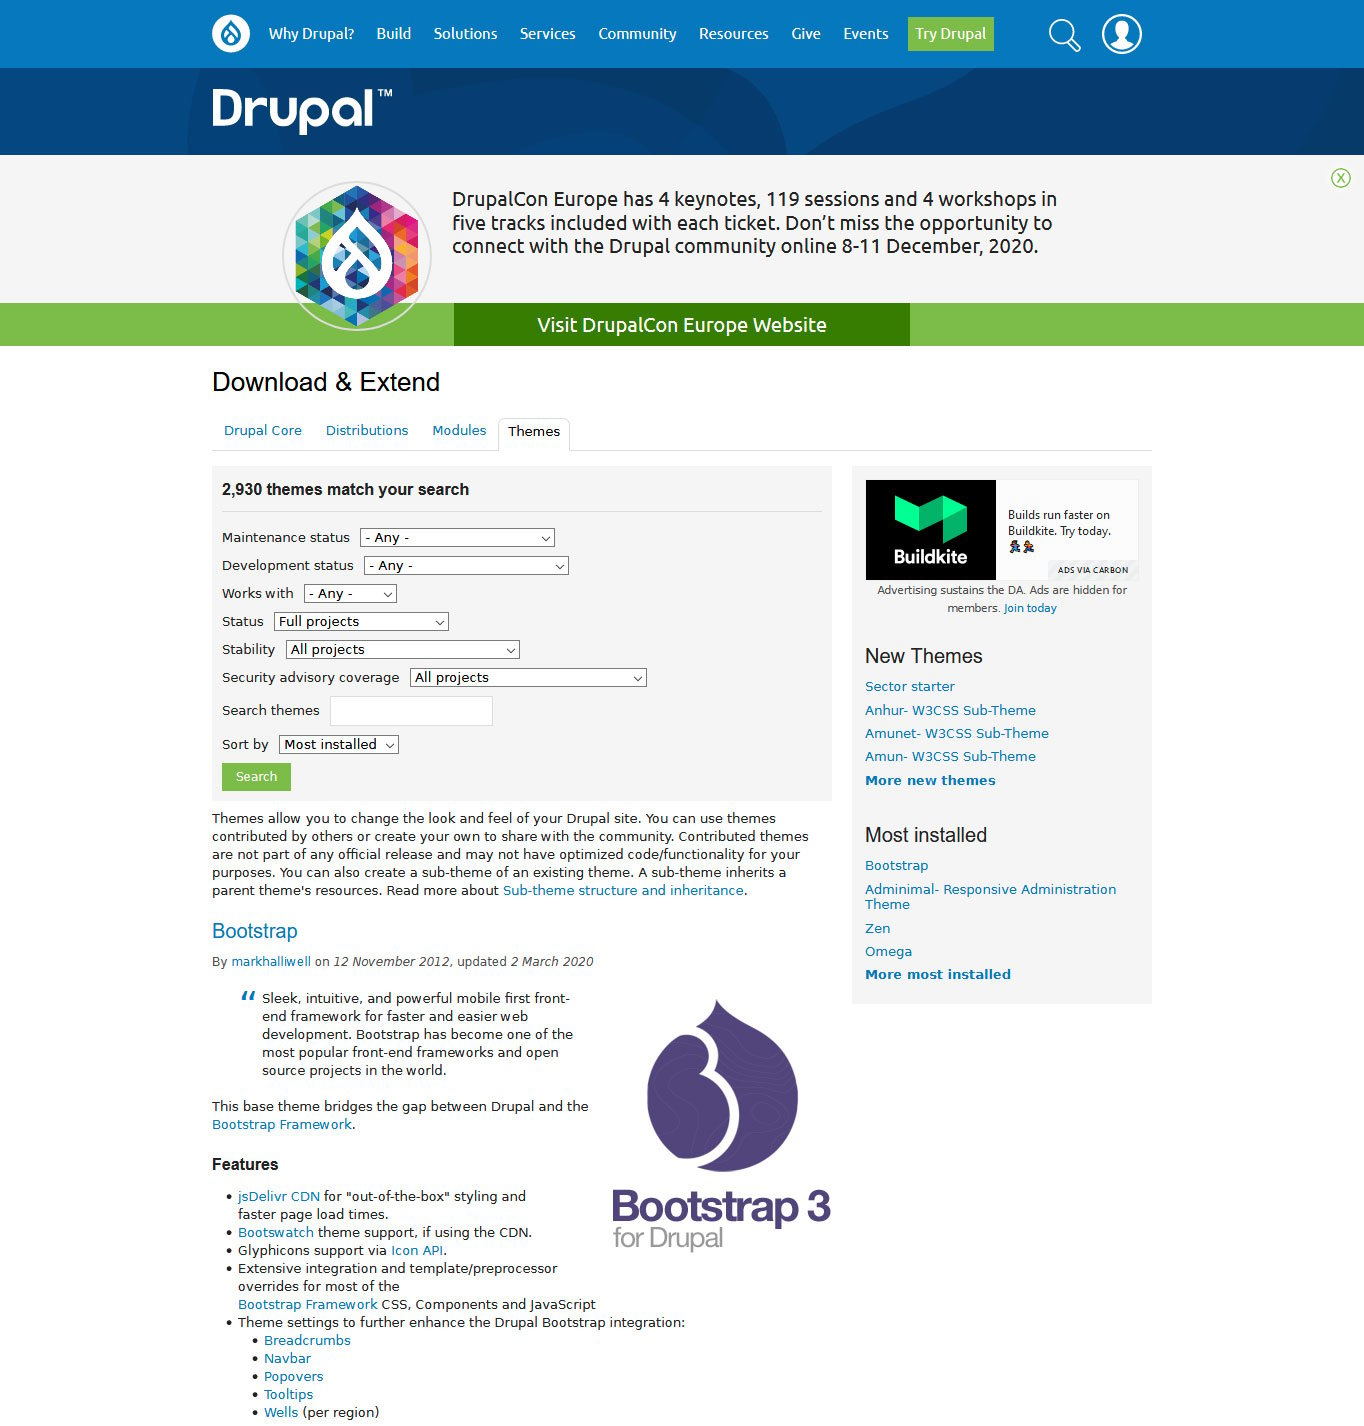
When choosing a theme, make sure it:
- Is compatible with your version of Drupal (10 or 11)
- Fits your level of technical ability
- Allows you to create the design vision you have in mind
- Is mobile responsive (a must)
All themes in the directory have their own page where you can read up on their details and check out a live demo.
Install the Theme on Your Drupal Site
There are two main ways to install a theme:
With Composer (recommended): Run the following command in your terminal:
composer require drupal/THEME_NAME
Replace THEME_NAME with the machine name of the theme from the directory. Then go to Appearance in the admin toolbar and click Install and set as default.
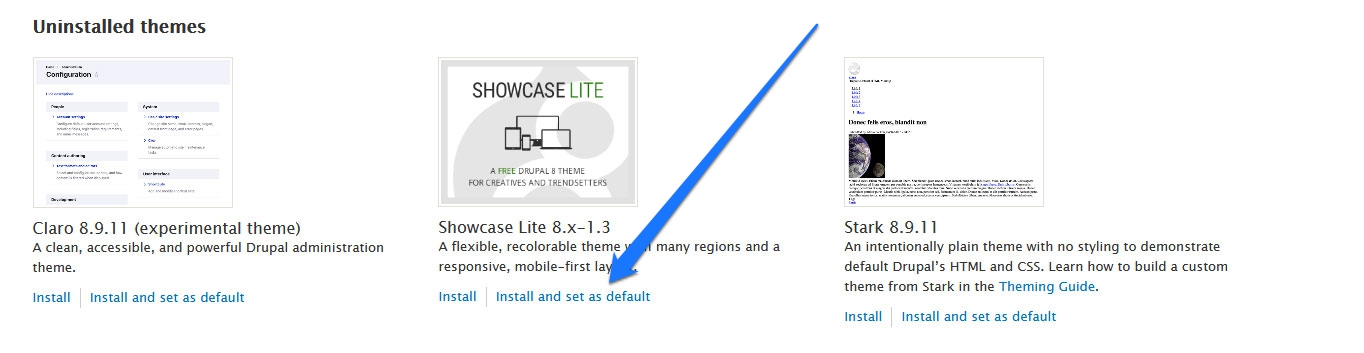
Manually: Download the theme from the directory (you find download options at the bottom of its project page). Then either upload the archive via Appearance > Install new theme in the admin interface, or extract it and upload the folder to your /themes/contrib directory via FTP.
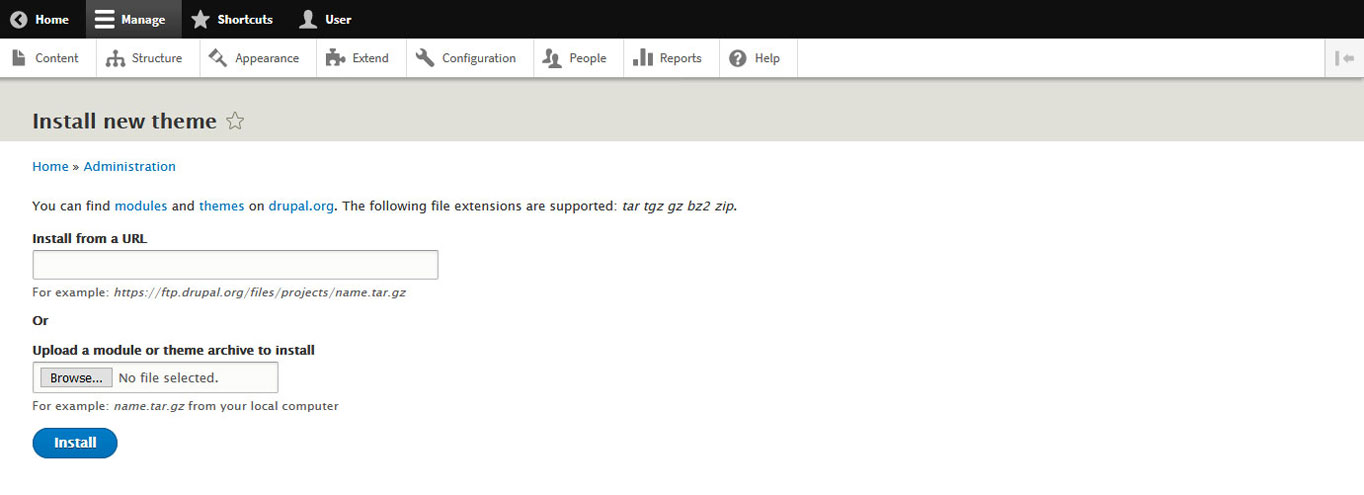
After uploading, you still need to activate the theme from the Appearance tab by clicking Install and set as default.
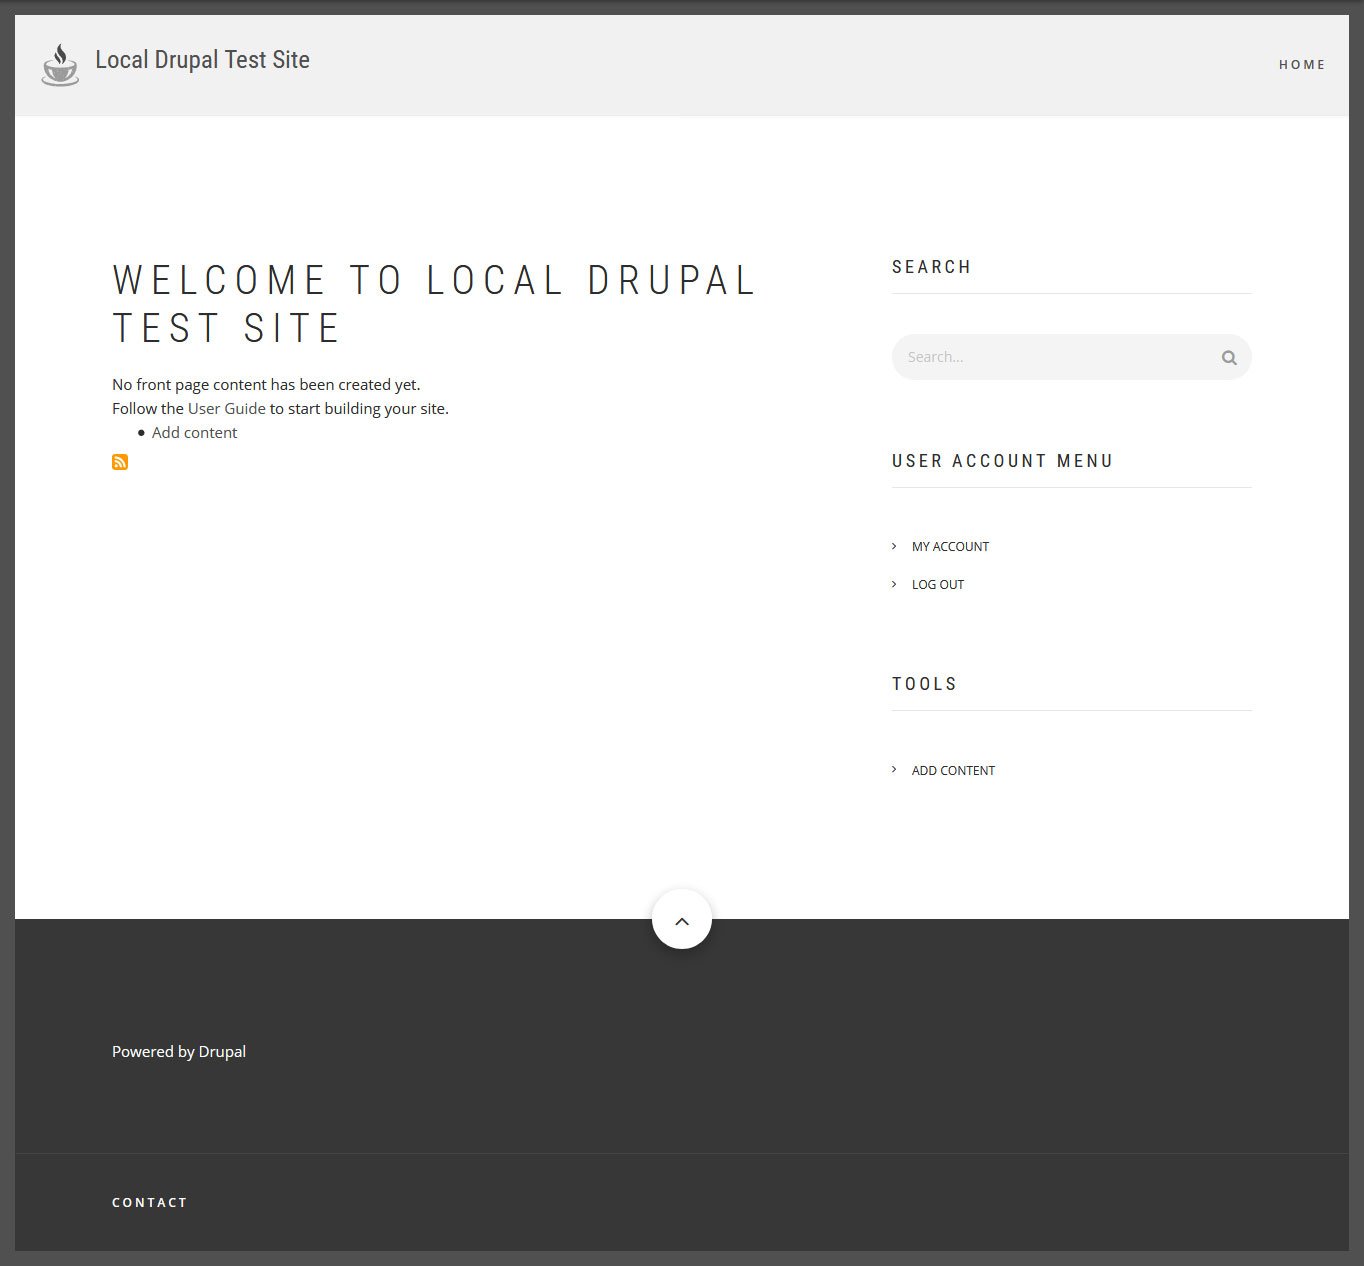
When you have done so and go back to your site (there is a button in the upper left corner), you can see the new theme in action.
6. Configure Your Theme
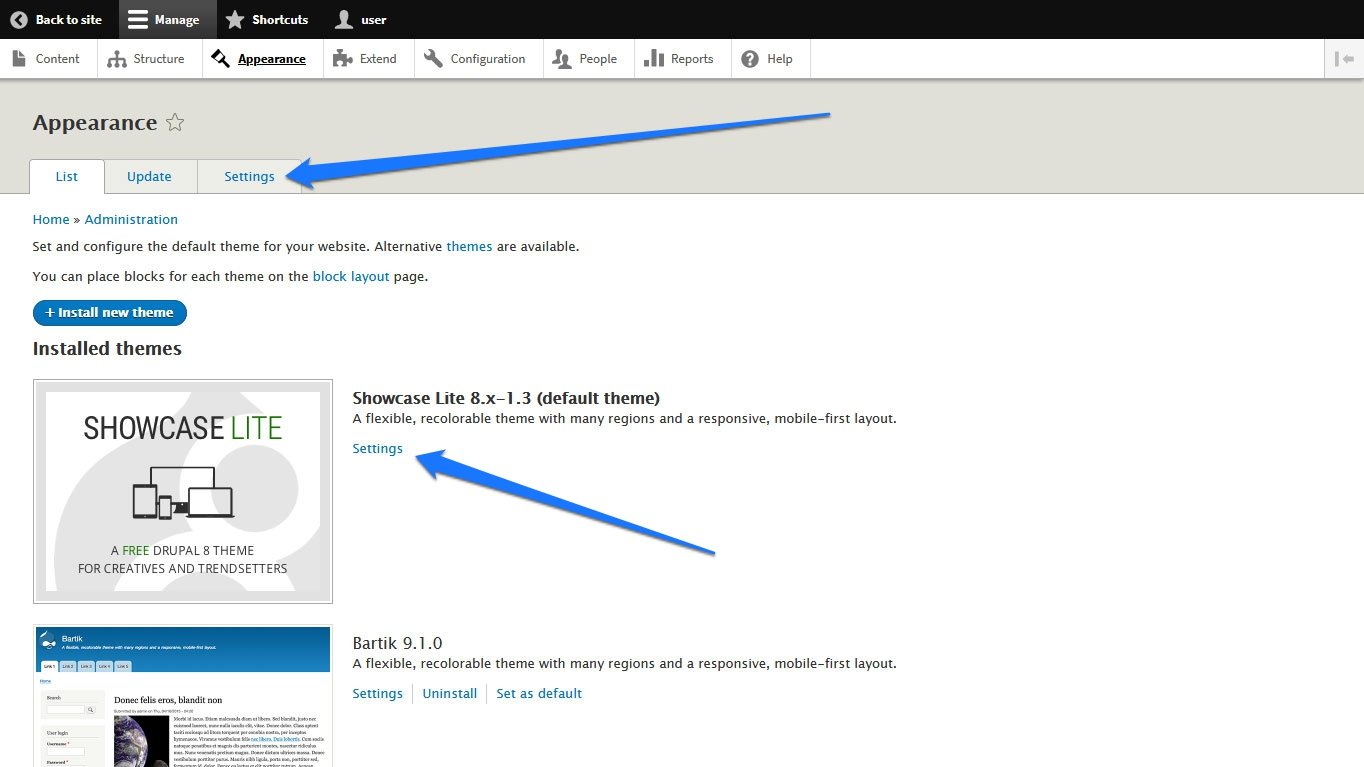
Once you have installed and activated a new site theme, you find it at the top of the list in the Appearance menu. Most themes come with configuration options that you can access by clicking the Settings link next to them. Alternatively, use the Settings tab on top and then pick the theme that you want to edit.
Both get you to the theme settings screen.
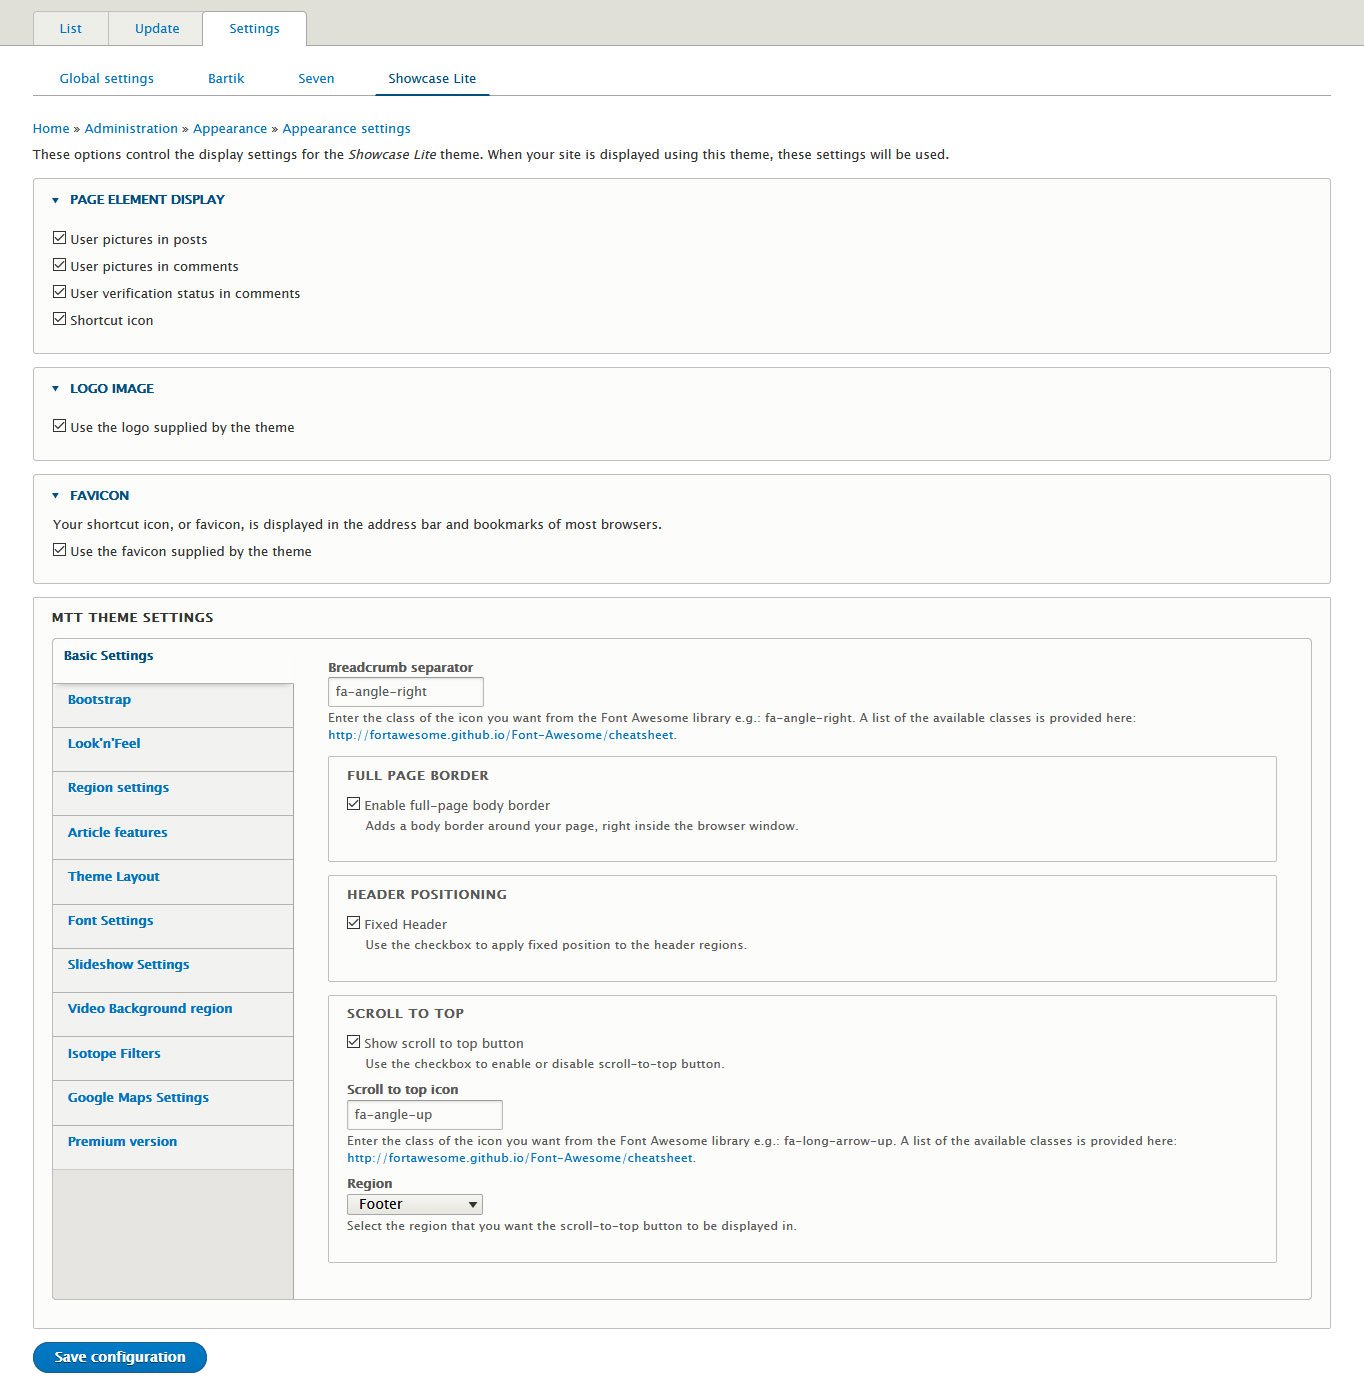
Here, you are able to make any changes that your theme offers and, depending on your theme, even preview them at the same time. This can include changing the color scheme, enabling/disabling user pictures, uploading logos and favicons, setting backgrounds, and more. When you build a website with Drupal, definitely make sure to swing by here so you can take advantage of everything your theme has to offer.
Change Your Admin Theme as Well
Drupal not only allows you to change the front end of your site with themes, but it also offers the same possibility for the back end. In Drupal 10 and 11, the default admin theme is Claro, which provides a clean, modern interface for site management. This is a big upgrade from older admin themes.
If you want to use a different admin theme, you can change it from the drop-down menu under Administration theme at the bottom of the Appearance page.
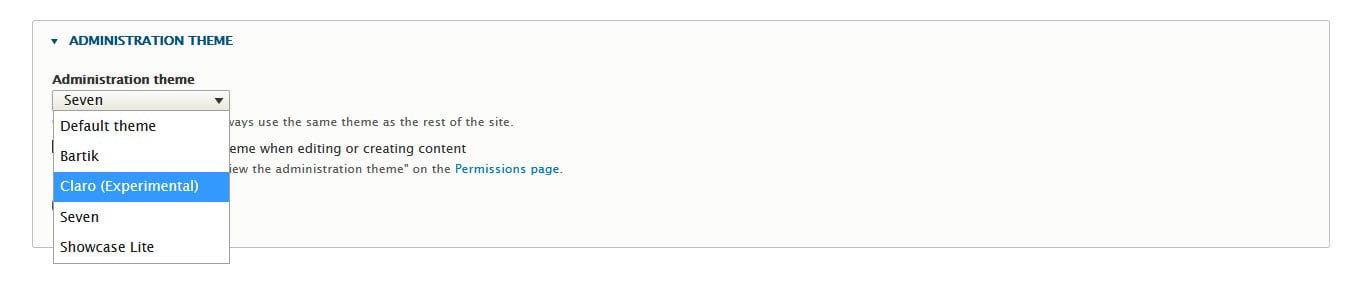
Save the configuration to apply your changes.
7. Set Up a New Front Page
Now your site looks better but it is still pretty empty. Changing that is the next step in our Drupal tutorial.
Create a Page and Fill It With Content
For starters, we want to create a front page so that visitors get to see something when they arrive. For that, go to Content > Add content > Basic page. It will take you to this screen:
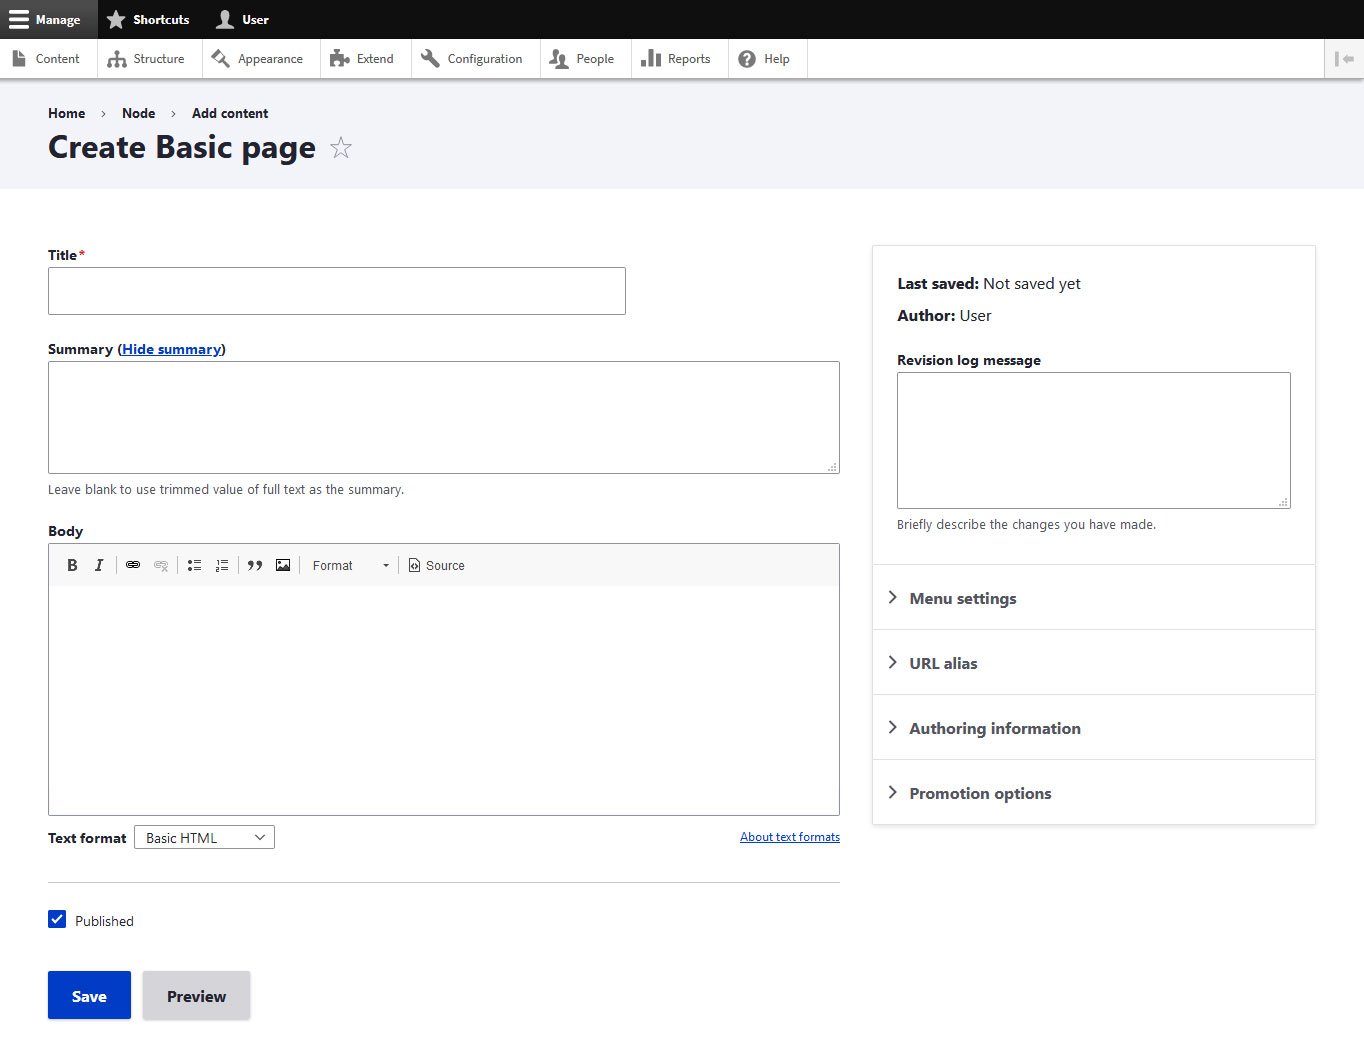
Here, you are able to create content with the built-in editor. At the top, you have the option to define a page title that will also appear on your site.
Below that, you find a link that says Edit summary. When you click it, it gives you the option to provide a summary for your post or page. This is kind of like an excerpt that will appear in certain parts of your site.
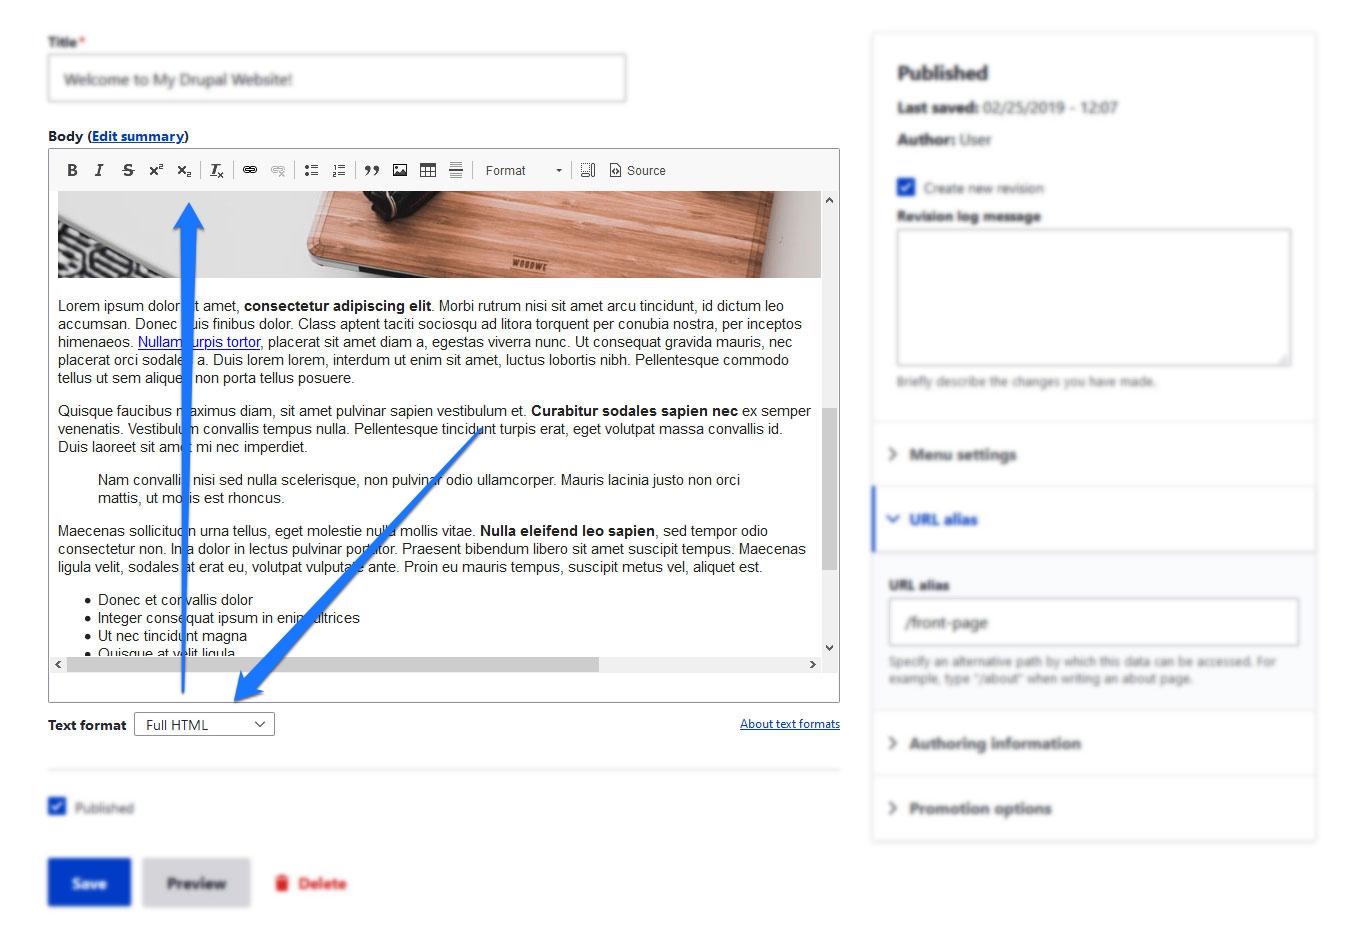
Below that, there is the option to input and format the body text. For example, you can make text bold and italic, add and remove links, create lists, define block quotes, insert images, and use the drop-down menu to define headings. Additional options such as inputting tables or horizontal dividers are available when you switch to Full HTML at the bottom.
If you have ever worked with a word processor or any other content management system, you should find your way around quickly.
Once you are done, make sure that on the right side under URL Alias, you define a slug or URL ending for your page. This happens simply by inputting something like /front-page into the field.
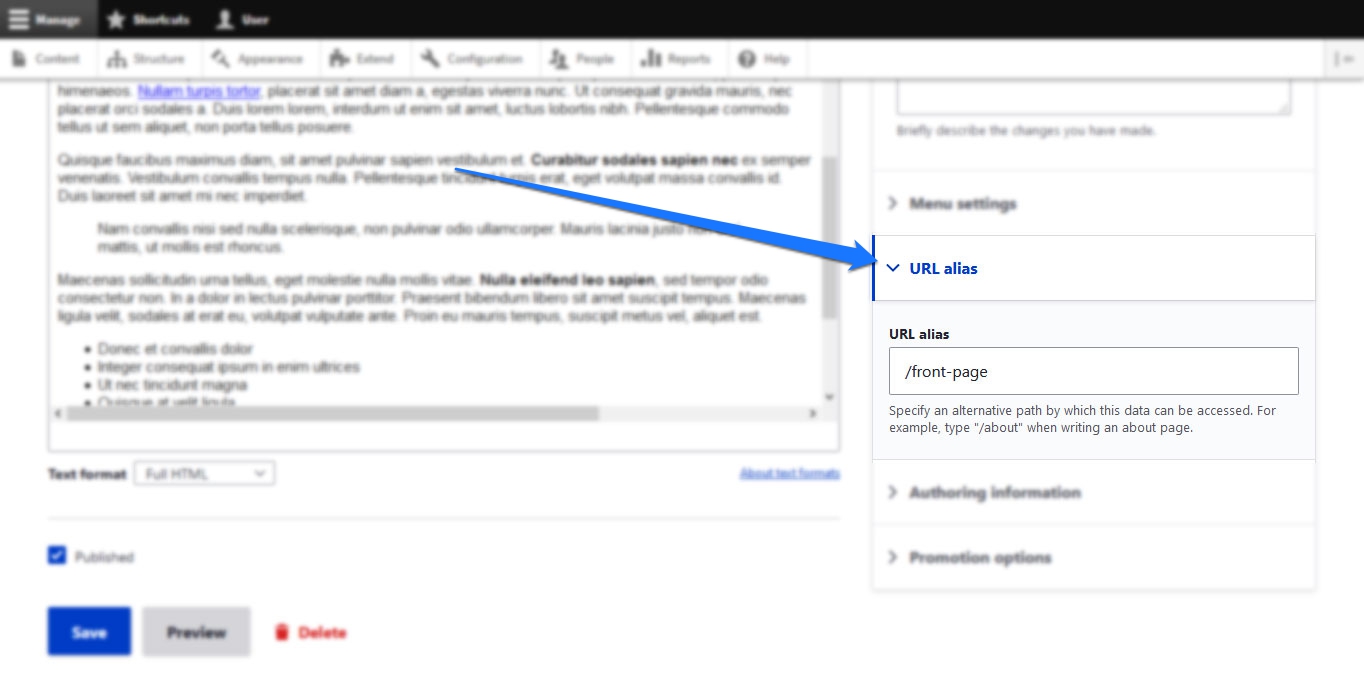
After that, at the bottom, save the post and make sure that the box before Published is ticked.
Define as Front Page
In order to use your new page as the front page, go to Configuration > System > Basic site settings. Here, under Default front page, input the same slug that you defined for your new page.

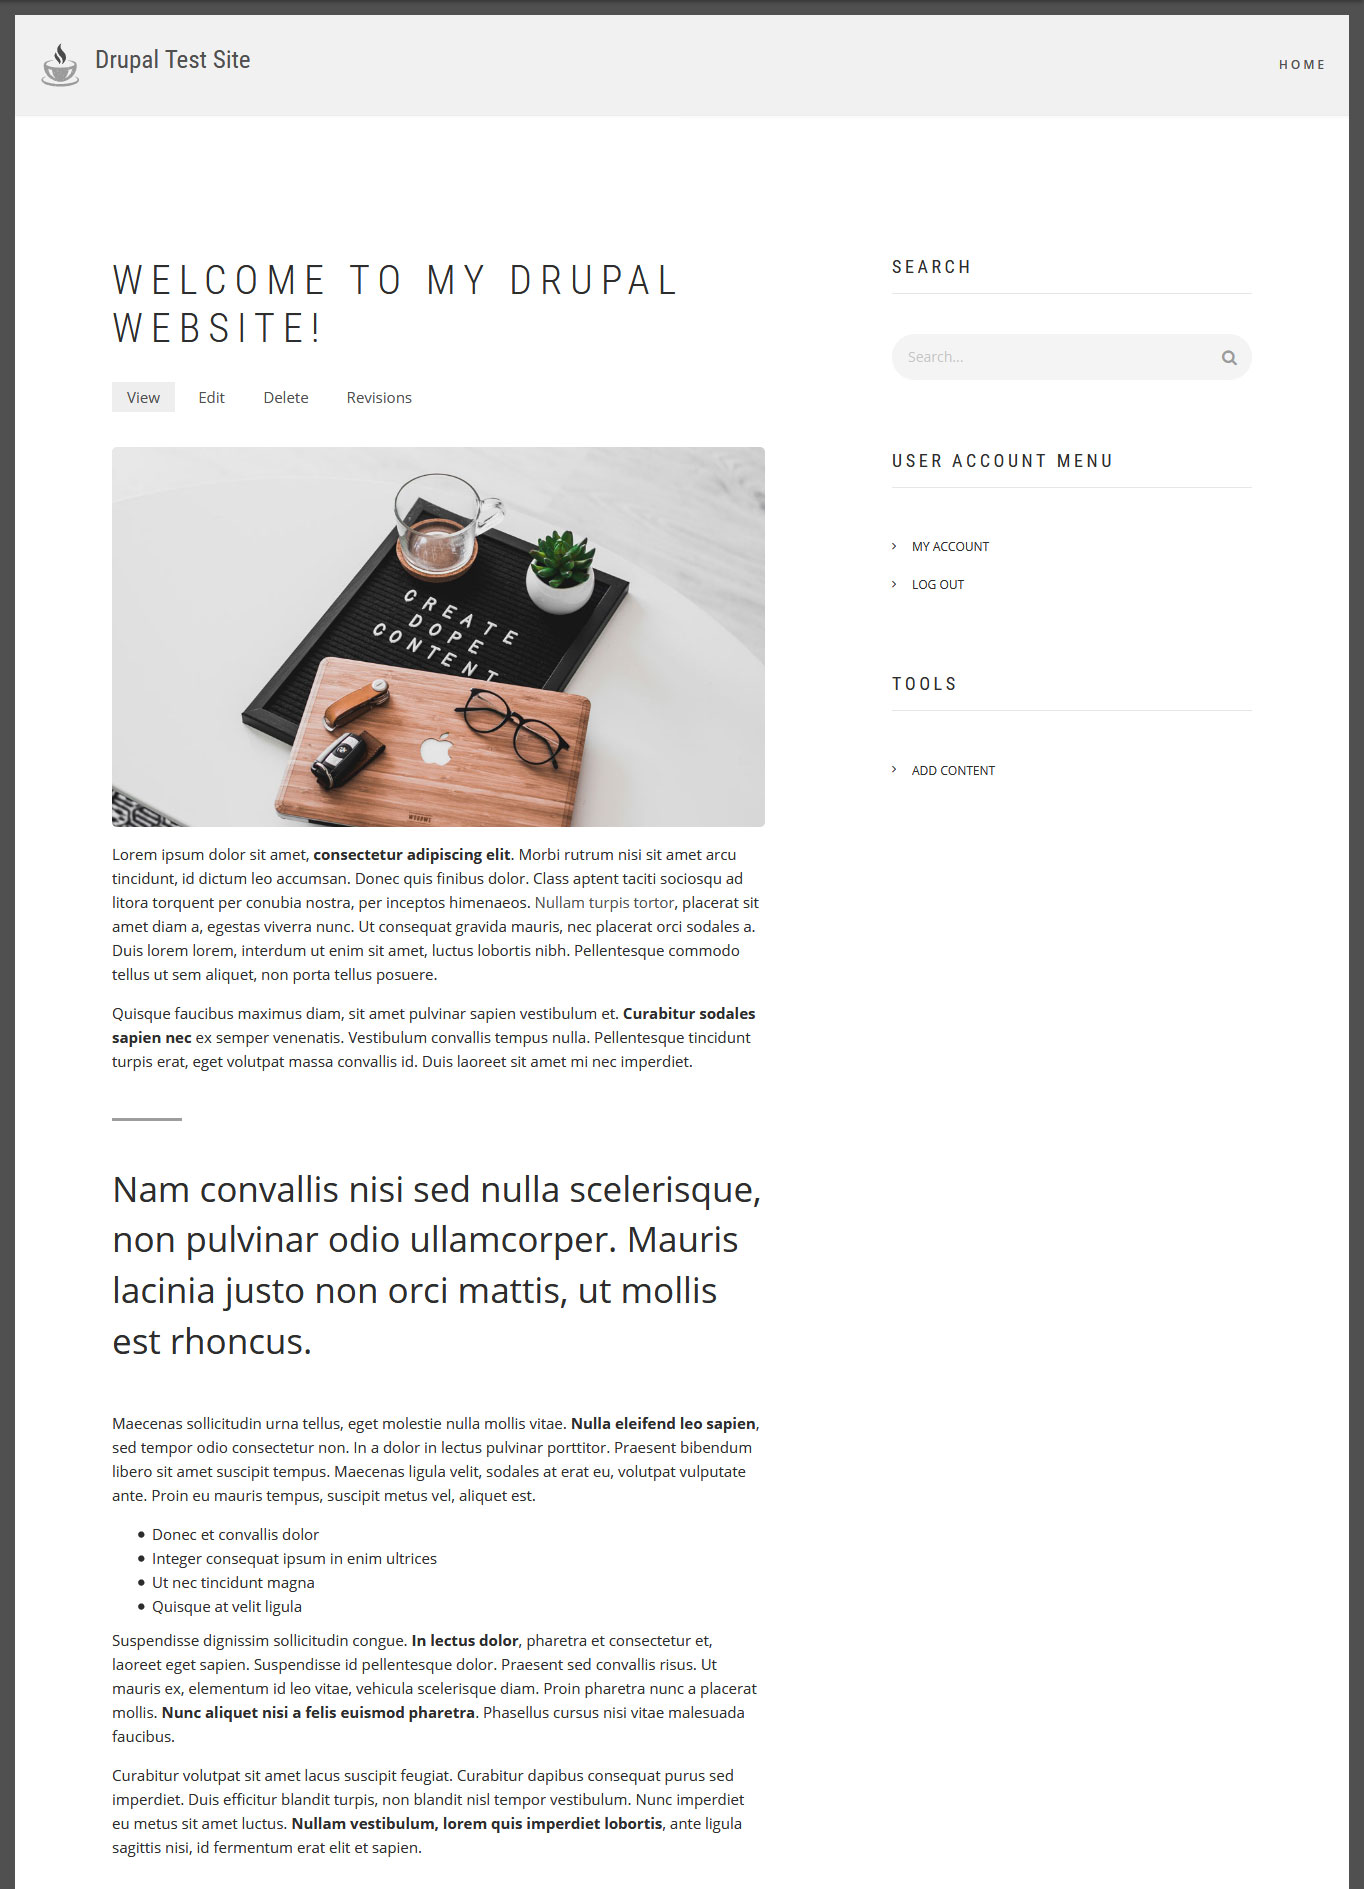
Once you have done that and saved the configuration, your content should show up on the front page of your Drupal site.
8. Create Another Page and Add It to the Menu
As a next step, we now want to create an About page and add it as a menu item. The first few steps are the same as before. Create a basic page, populate it with content, and set a slug (e.g. /about).
However, this time, before publishing, make sure to click on Menu Settings and tick the box that says Provide a menu link.
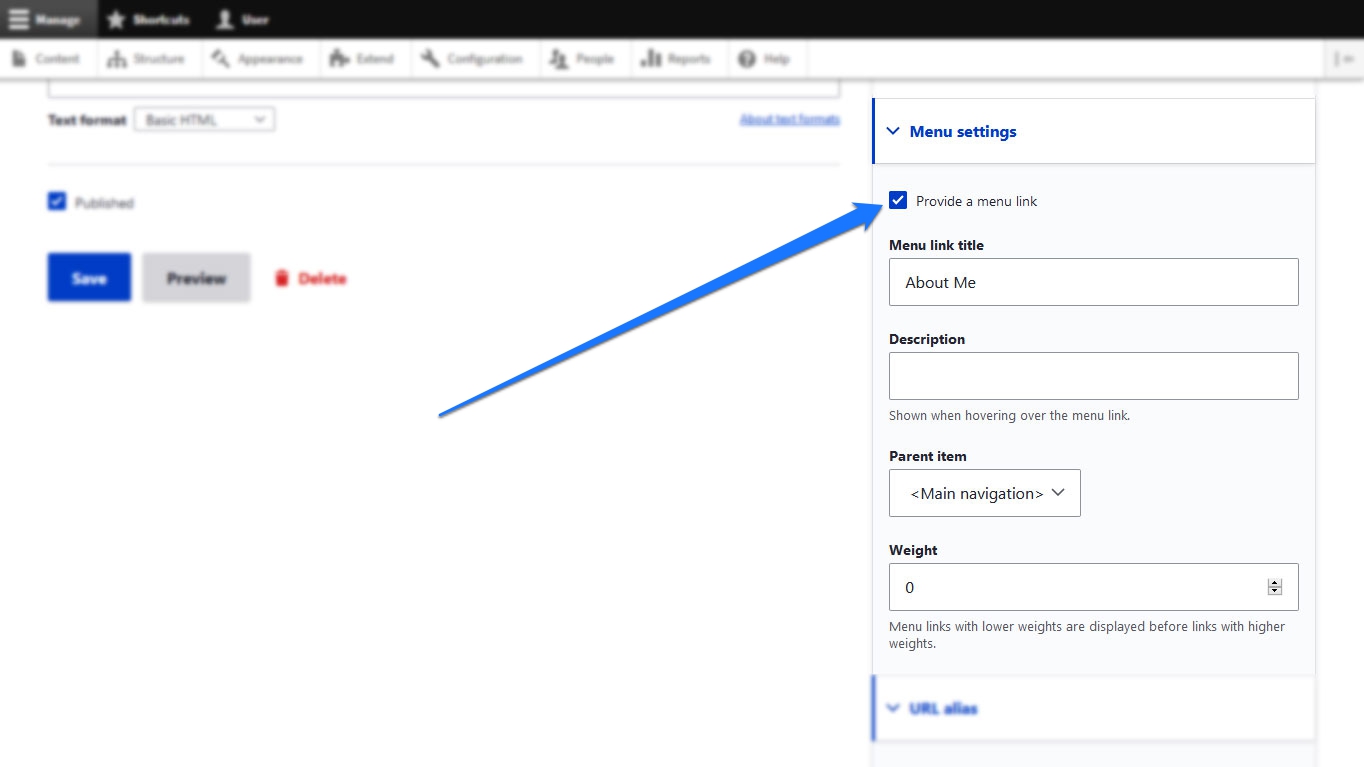
Here’s how to fill in the settings that appear:
- Menu link title – This is the text of the link that users will see on the navigation menu. Make it something instantly recognizable. In this case About Me is a good choice.
- Description – An optional description that will appear when someone hovers their mouse over the menu link.
- Parent item – If you have other menu items already, this setting allows you to create sub-items.
- Weight – With this setting, you can determine the order of your menu items. The higher the number the further in front they will appear.
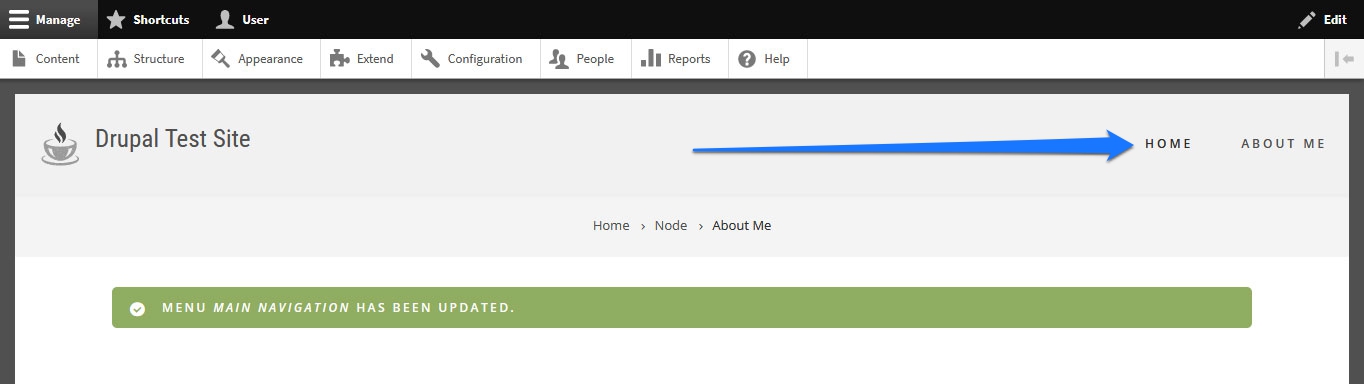
Once you are satisfied with your settings, save the page (with Published active). Drupal should automatically take you back to your front end where you will see both your new page and the new menu item.

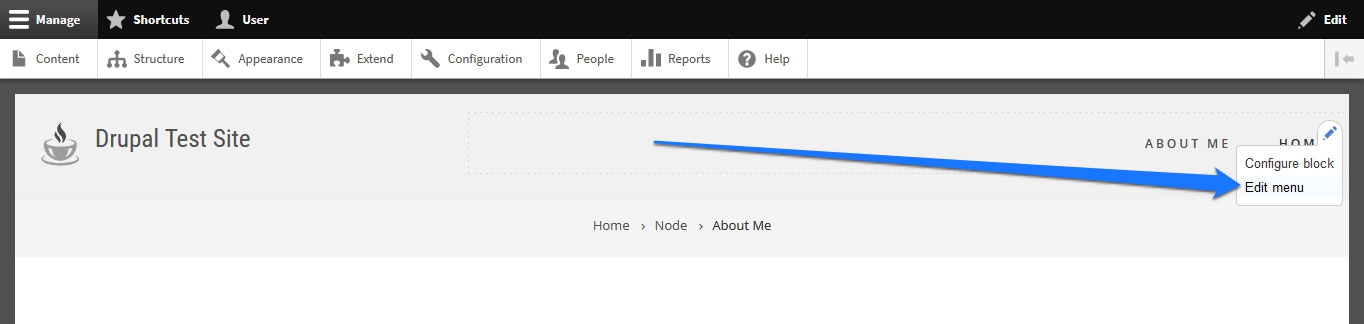
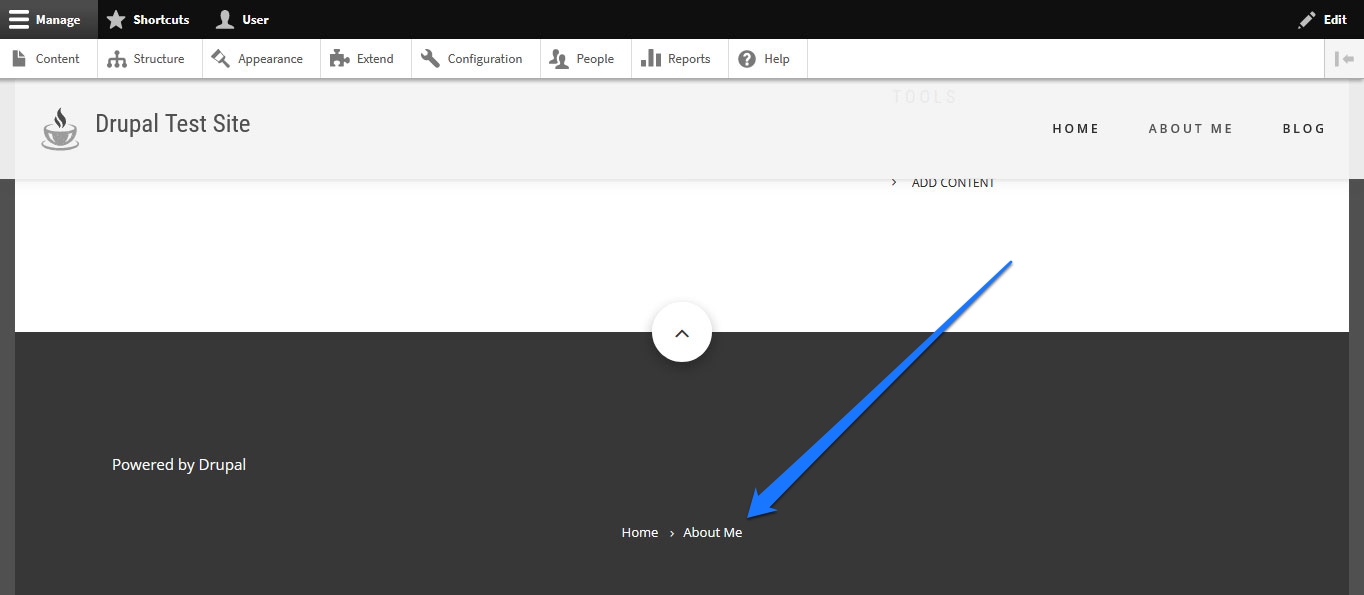
Configure the Navigation Menu
What if the menu is in the wrong order? No problem – simply hover over it and then click the pen icon that appears. This should give you the option to choose Edit menu.
When you do, you get to the menu editing screen.
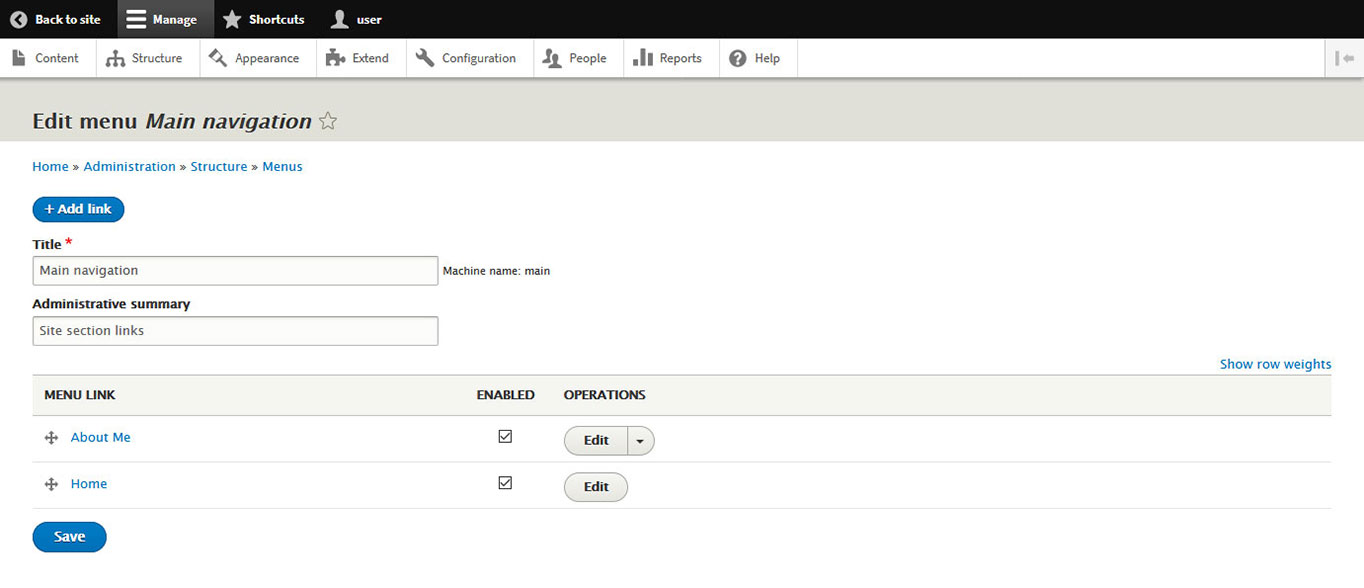
Here, you can simply drag and drop the menu items into the order that you want via the icon on the left. Save when you are done to apply the changes to your site.
Tip: You can also use the Add link button at the top to manually add more pages to the navigation menu. You can also get to this menu via Structure > Menus. Consider adding a footer menu as well for links like Privacy Policy, Contact, or Terms of Use.
9. Make a Blog and Start Posting
Of course, many people who want to create a website also want to start a blog. Naturally, as a proper CMS, Drupal has functionality for that.
Write Your First Article
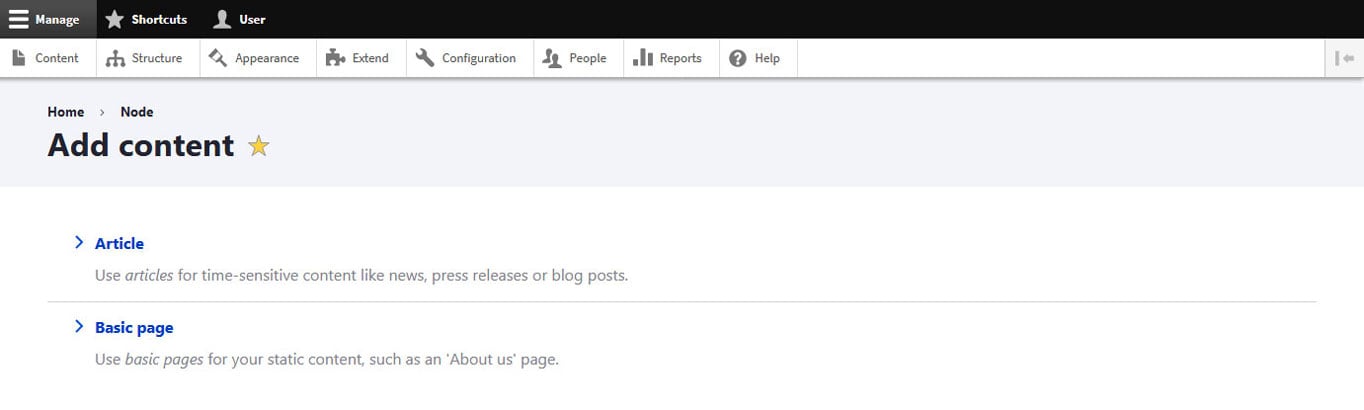
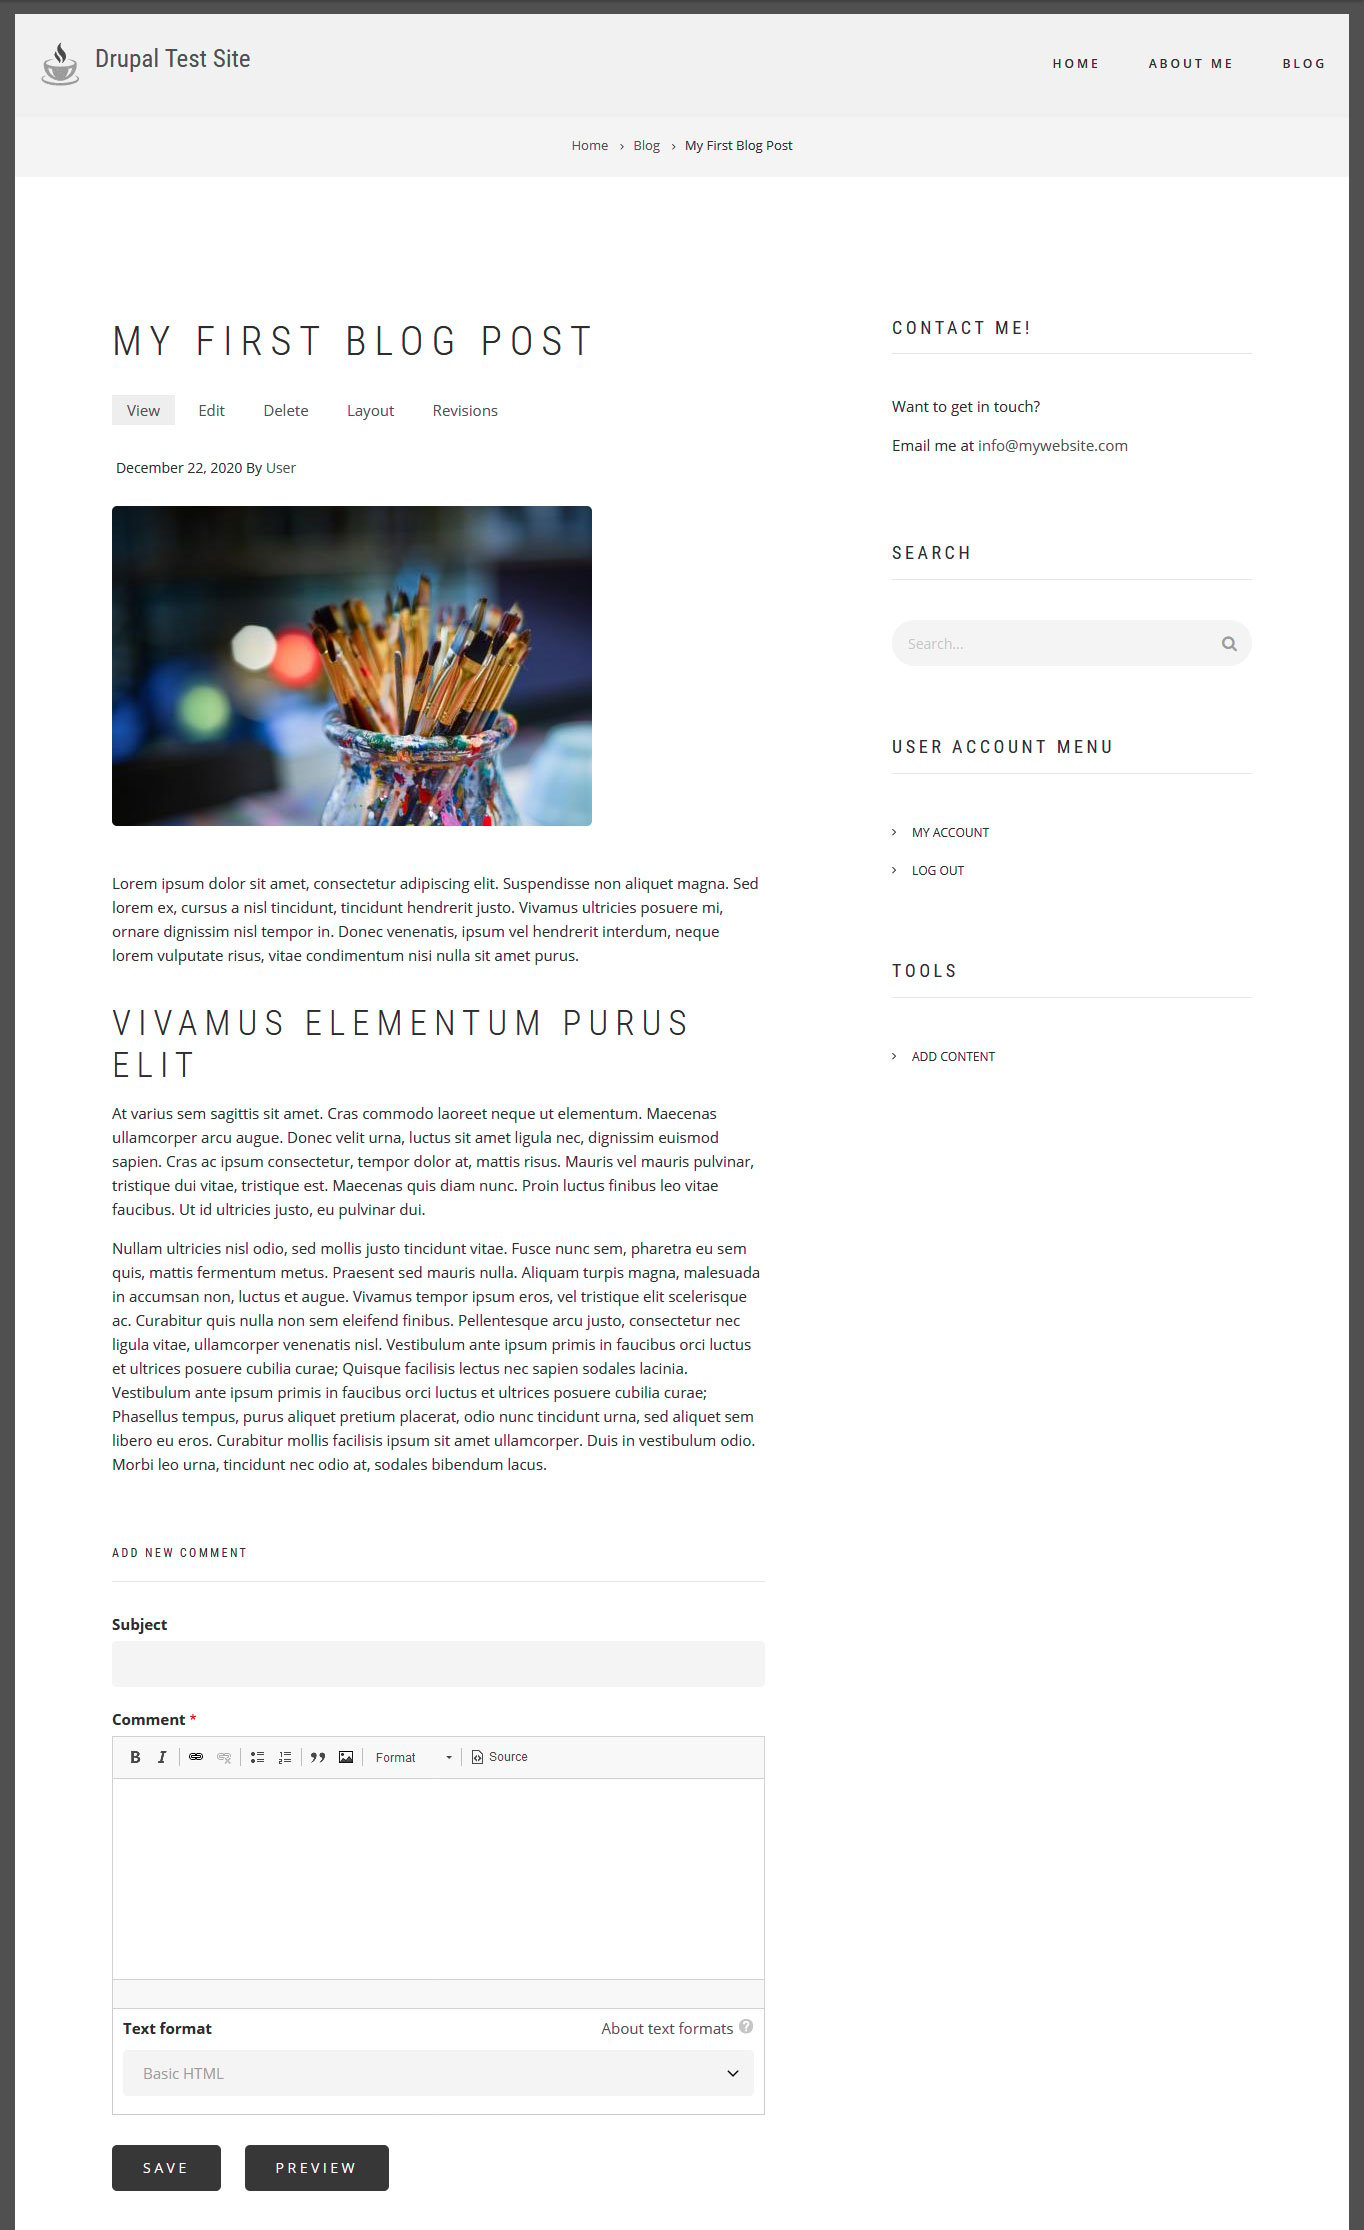
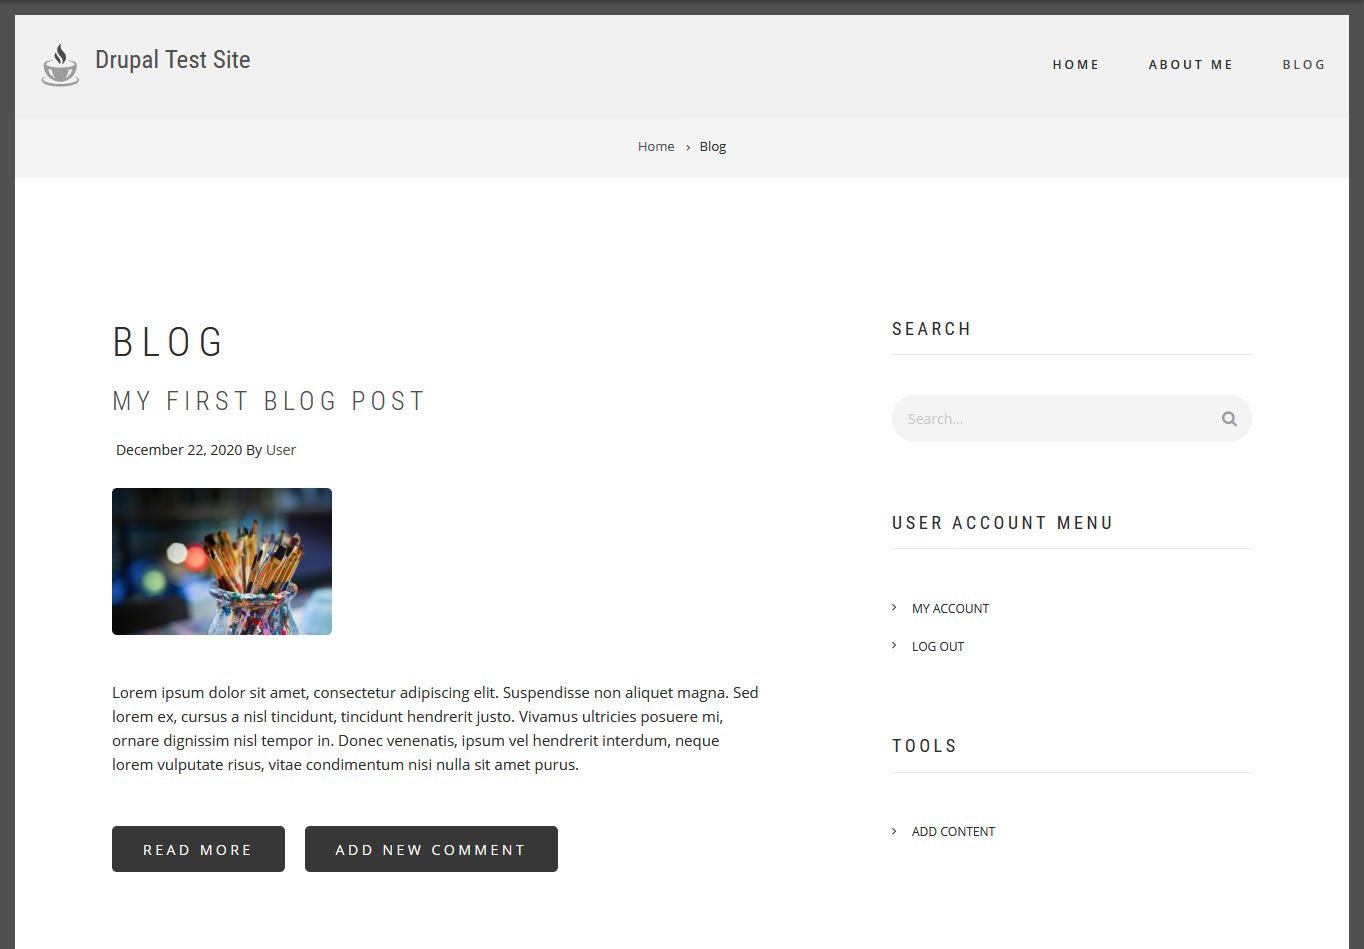
In order to set up a blog, we will first create some content. When we were putting together pages earlier, you might have already seen that besides the Basic page, there is a second type of content called Article.
This is for creating less static content like press releases, updates, and blog posts. It works pretty much the same way as pages: simply create a new article, enter a title, summary, and content, add the URL ending, and publish it.
However, there are some differences. In contrast to basic pages, articles also come with comment settings on the right (by default, comments are enabled) and the ability to add tags and a featured image at the bottom (browse, upload, and add an alternative text).
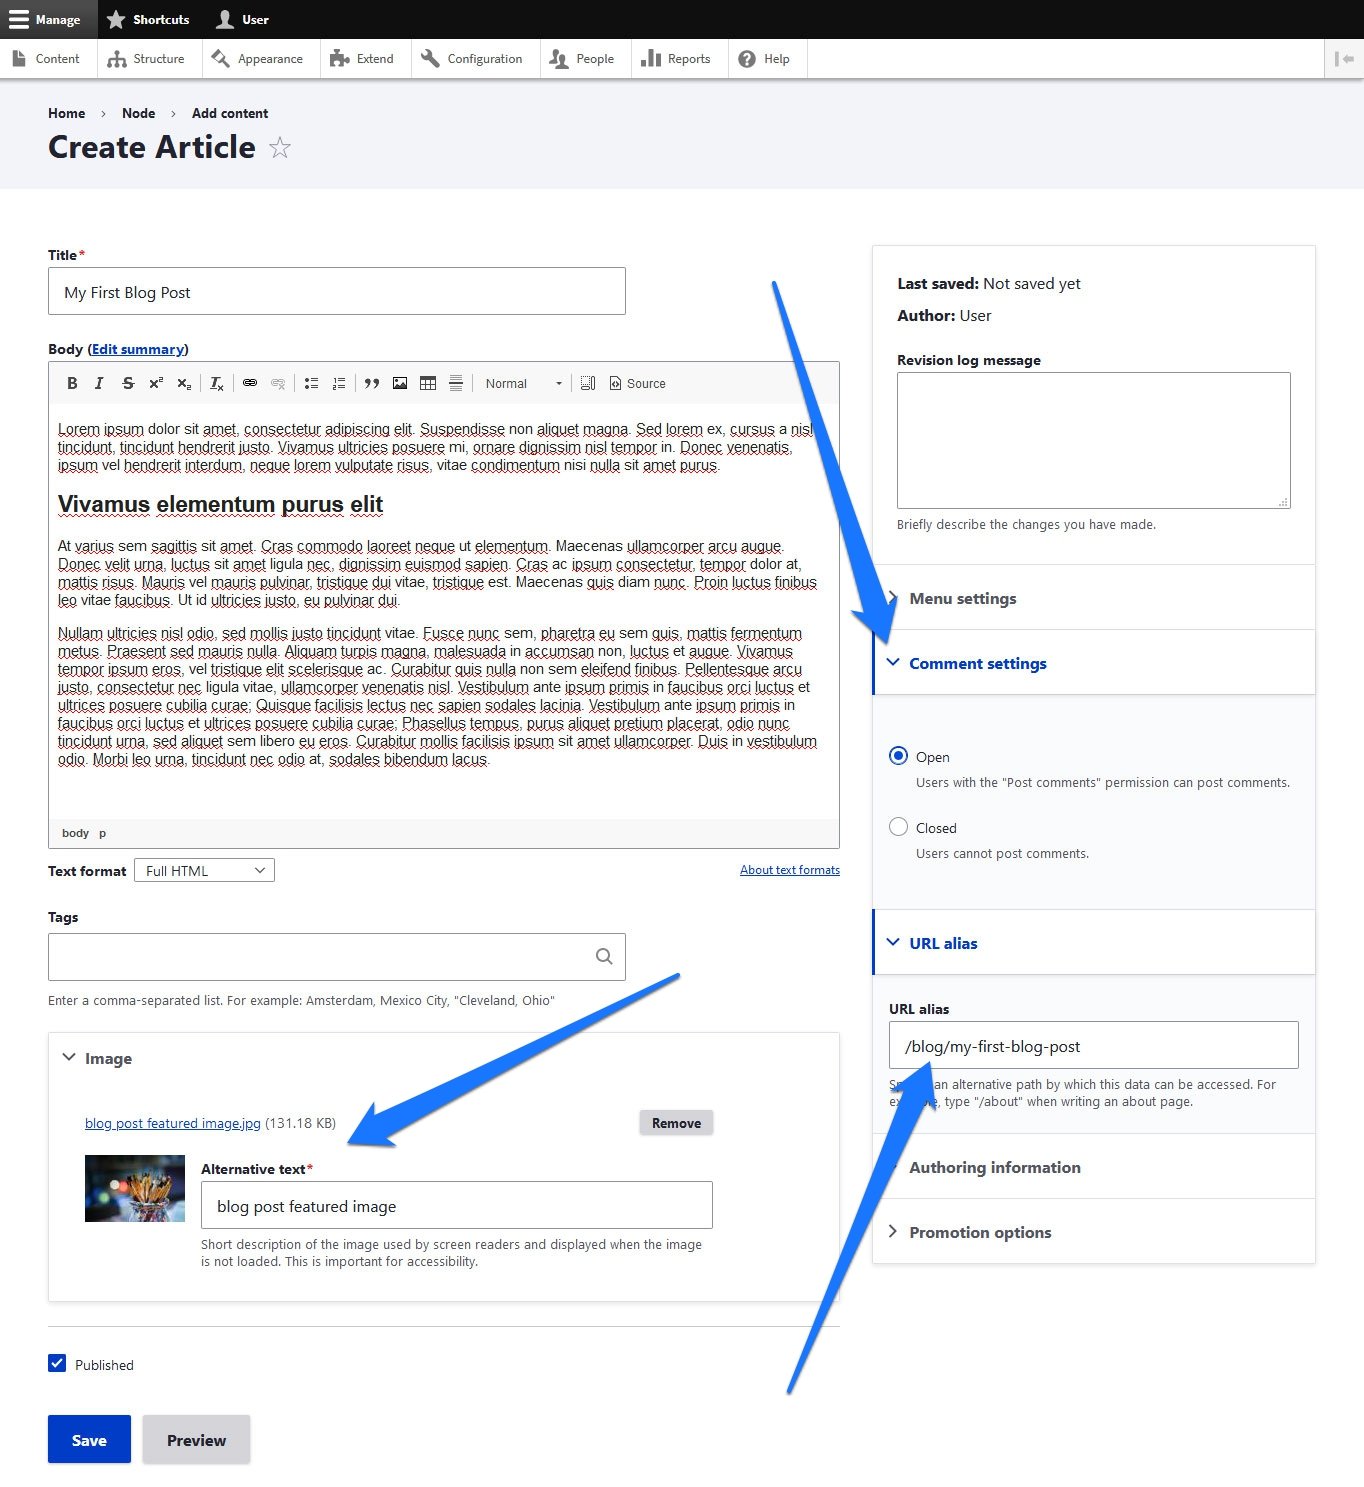
Under URL alias, consider including the blog address into the URL, so something like /blog/post-title if that’s how you want to organize your content. Otherwise, your blog articles will simply appear under http://yourdomain.com/post-title. Under Authoring information you can also change the publishing date and time.
Here is a finished result:
Set Up a Blog Page
Once you have created a blog post, it’s a matter of making it show up on the page. Wouldn’t it be nice to have all blog posts displayed in one place and ordered chronologically? For that, we have to create a View. This is what Drupal calls lists of content and creating them is not that hard. You find the option under Structure > Views.
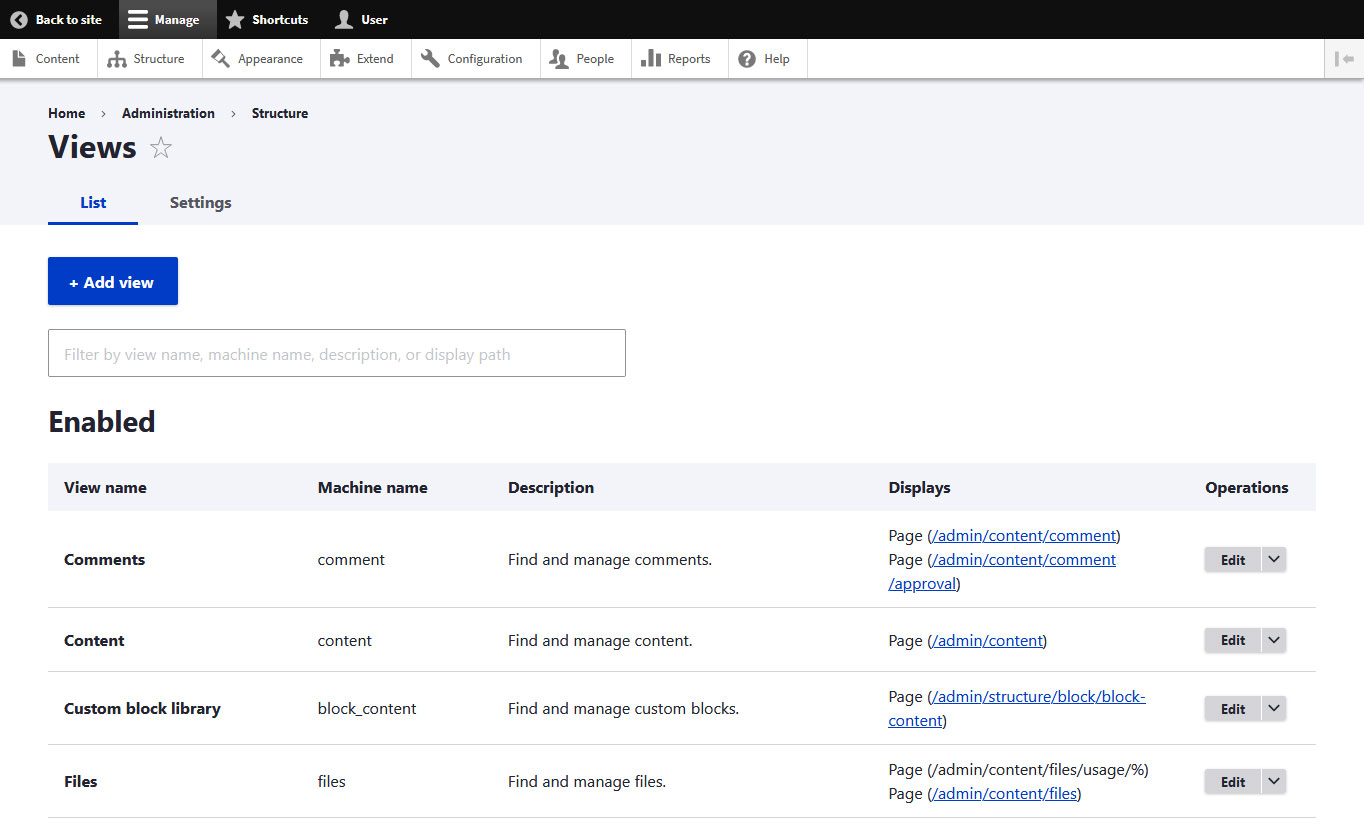
Configure the View
Here, click Add view to get to the configuration screen:
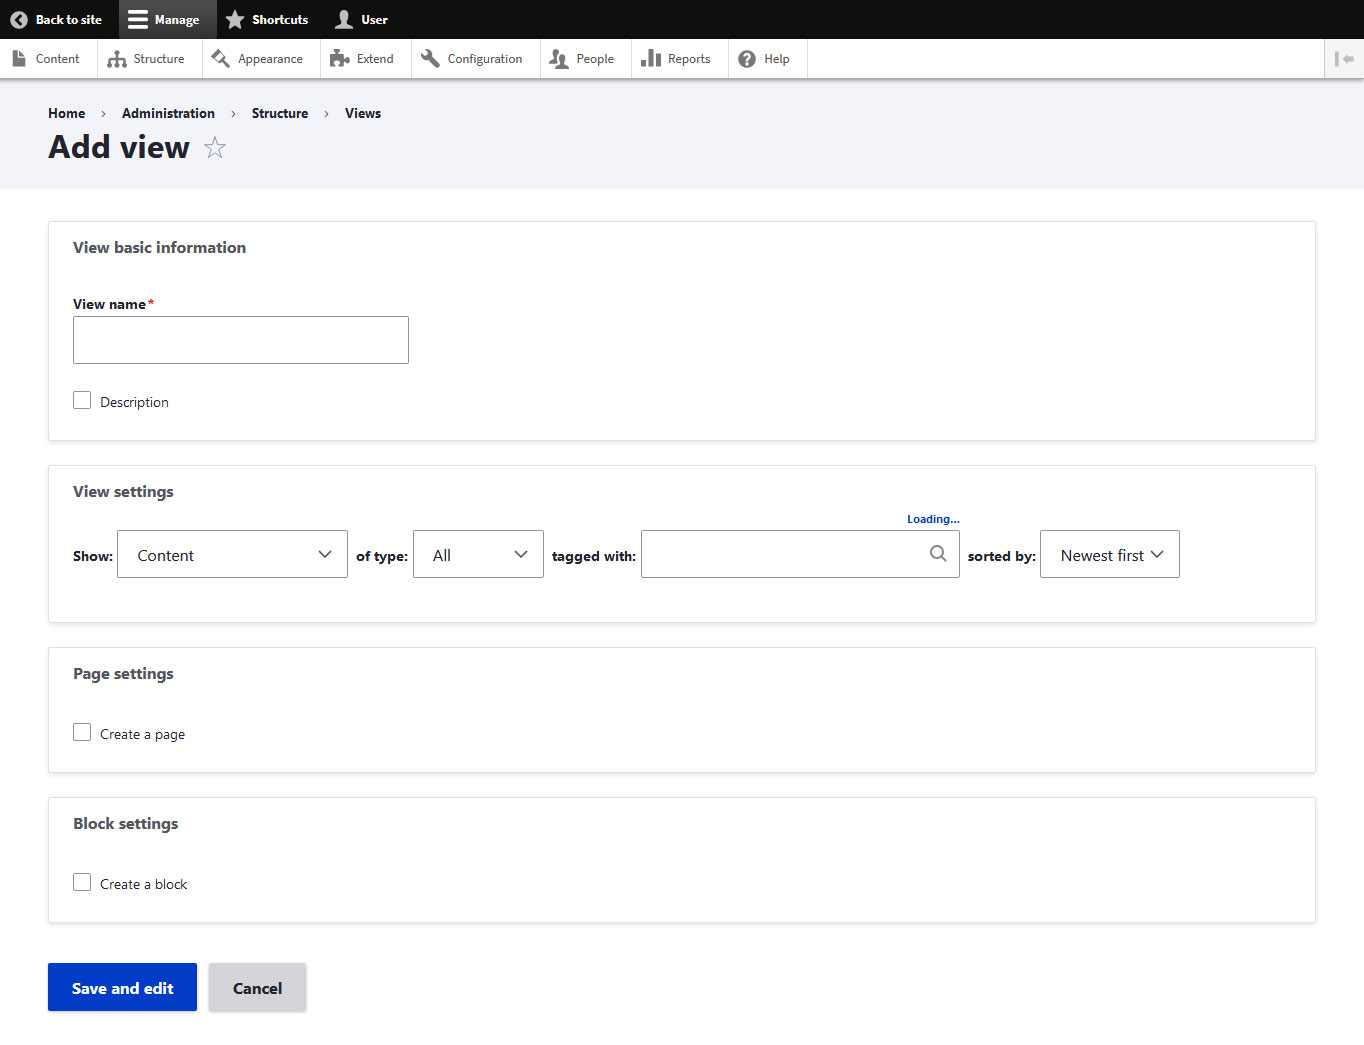
Here’s how to fill in the View basic information:
- View name – This is the name that will show up in the Views menu to help you identify it.
- Description – Shows up in the Views menu as an explanation for what the view does. Filling it in is optional.
Under View settings, pick to show Content of the type Article sorted by Newest first. This way, your latest blog post will always be at the top.
After that, move on to Page settings:
- Create a page – Enable this to have Drupal create an individual page for this view.
- Page title – The title of the page. “Blog” is probably appropriate.
- Path – The page’s URL ending. Again, “blog” is an obvious choice. Be sure to make it the same as what you have chosen in the post URL if you entered anything there.
- Page display settings – Choose in which format to display posts (grid, HTML list, table, unformatted list) and what part to show (teasers, titles, linked titles, or fields). In this case, we went with an Unformatted list and Teasers.
- Items to display – How many posts you want to show on the page.
- Use a pager – Whether to include pagination for this view.
- Create a menu link – Don’t forget to pick your main navigation and configure a link title (may we suggest Blog?).
Hit Save and edit and then you should find your newly created blog on the front end of your site.
10. Organize Content With Taxonomy
As your site grows, organizing content becomes essential. Drupal uses taxonomies to categorize and tag content. Think of taxonomies as a way to group related content together – like categories and tags in a blog.
In Drupal, taxonomies are made up of vocabularies (groups of terms) and terms (the individual labels). For example, you might create a vocabulary called “Topics” with terms like “Design,” “Marketing,” and “Tech.”
Here’s how to set them up:
- Go to Structure > Taxonomy.
- You’ll see a default vocabulary called “Tags” already exists. You can add terms to it, or click Add vocabulary to create a new one.
- Give your vocabulary a name (e.g., “Blog Categories”) and an optional description, then click Save.
- Click Add term and enter your desired labels (e.g., “Tutorials,” “News,” “Reviews”).
Once you’ve created your vocabulary and terms, you can associate them with content types. Go to Structure > Content types, click Manage fields for the relevant content type (e.g., Article), and add a new field of type “Taxonomy term.” This lets you tag each piece of content with the appropriate terms when creating or editing it.
The Article content type already comes with a “Tags” field by default, so you can start using it right away when writing blog posts.
11. Learn to Delete and Modify Content
If you ever want to make changes to or get rid of any of the pages or articles you have created, simply go to the Content menu to see a list of all content on your site.
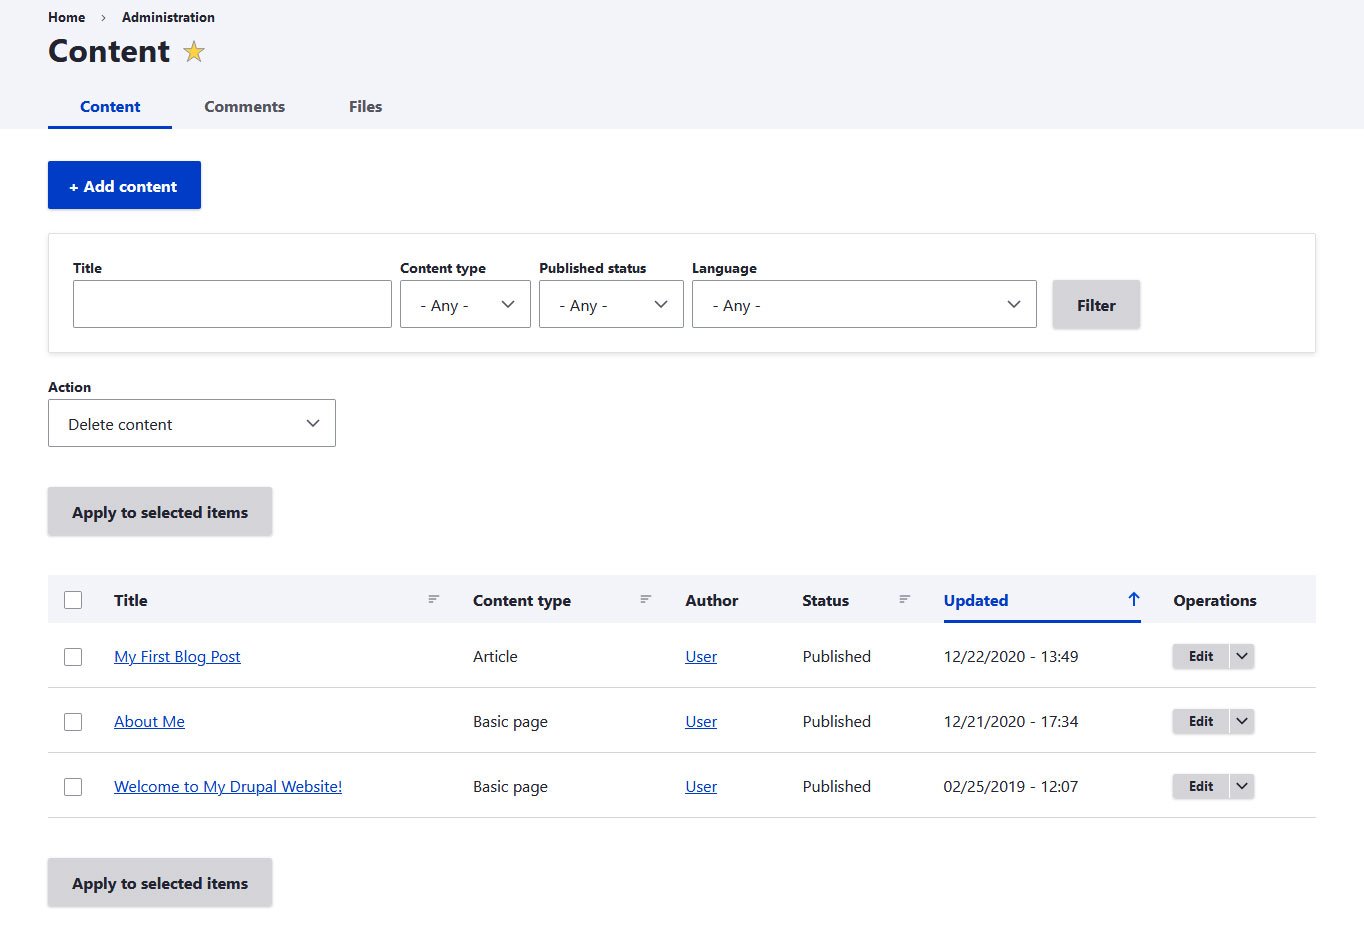
If you have a lot of it, use the filter options at the top to find what you are looking for by title, content type, publishing status, or language.
On the right side, click the Edit button to get back to the editing screen for an individual content piece. Alternatively, click the drop-down button to access the Delete option.
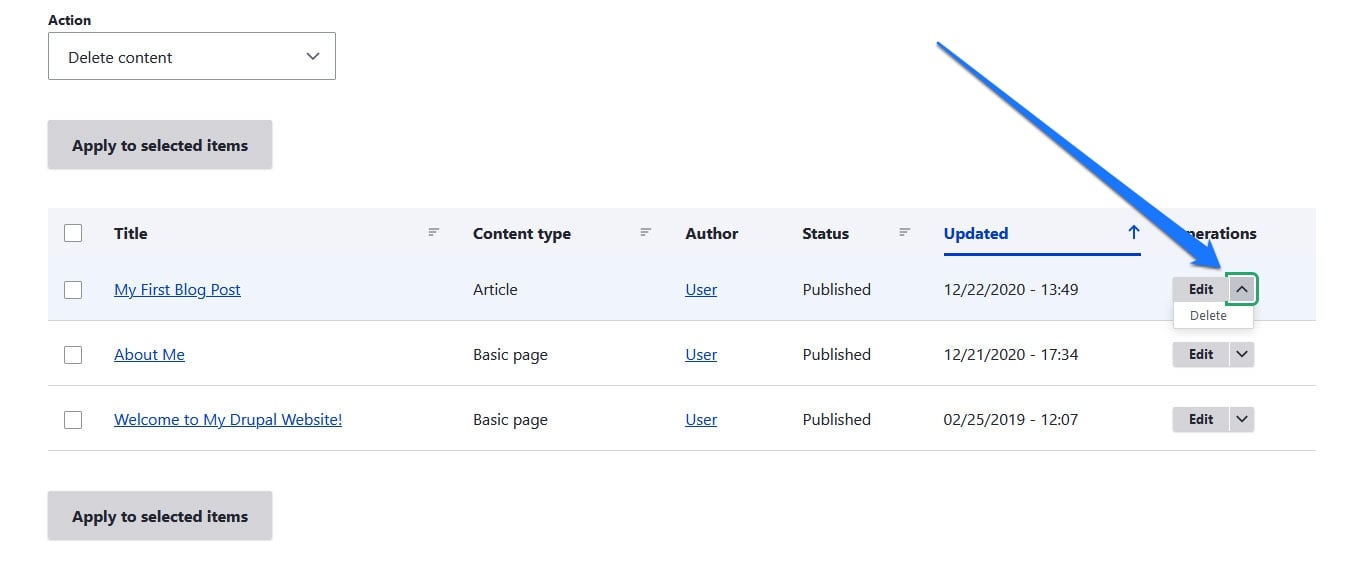
You can also make changes to multiple items at once by checking the boxes on the left side and choosing an action from the drop-down menu above.
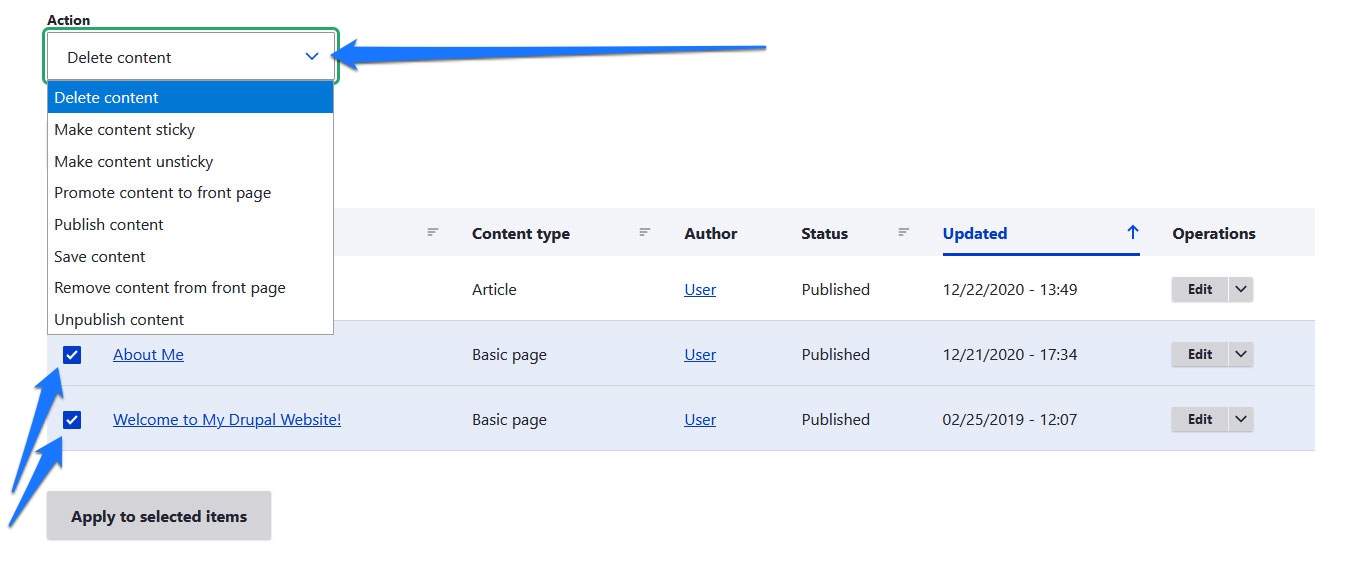
Besides publishing, unpublishing, and deleting content, you can also make it sticky, promote it to the front page or remove it from there, as well as save content to update its timestamp. Don’t forget to click the Apply to selected items button to actually implement your changes.
12. Activate and Deactivate Default Modules
By this point in the tutorial, you should have a basic understanding of how to get around Drupal. However, the system can do a lot more and be extended for any type of purpose.
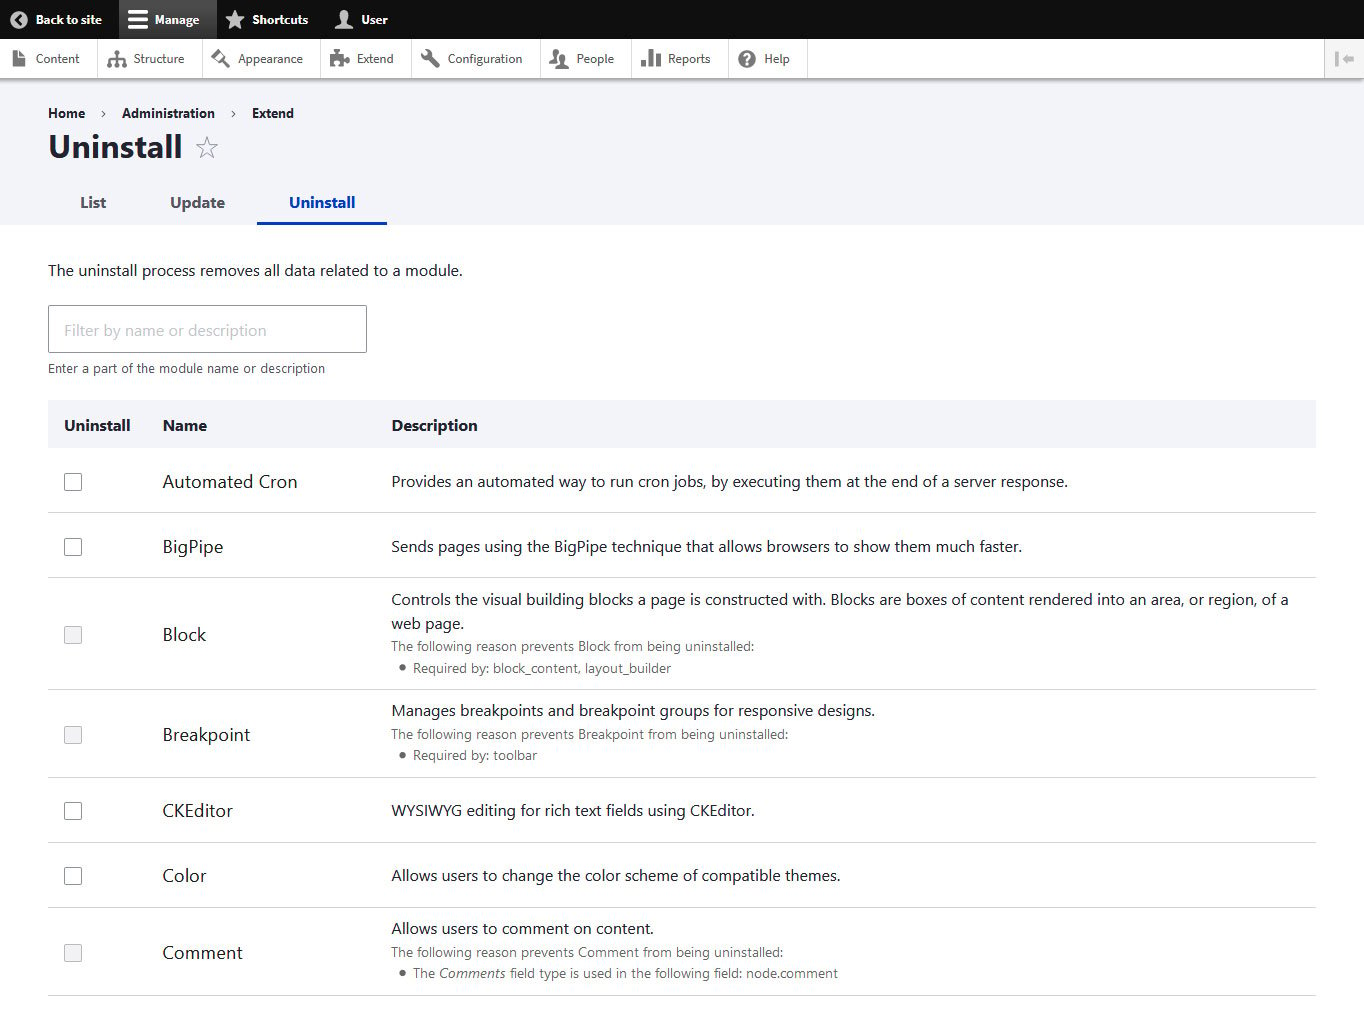
For that, you will use modules. These are programs that add all sorts of features and functionality to your Drupal site. The core software comes with many of them that you can find under Extend.

Not all of the modules will be installed and active by default. To change that, simply tick the box in front and then scroll down and hit Install. The CMS will then take care of the rest.
Conversely, any modules you no longer need, you can get rid of under the Uninstall tab.
13. Add Contributed Modules
Besides the default modules, there are also a lot of options available from the Drupal community. Adding them to your site works similarly to installing themes.
First, find modules you need in the official directory. There are over 50,000 contributed modules to choose from.
With Composer (recommended): Run composer require drupal/MODULE_NAME in your terminal. Then go to Extend, find the module in the list, check its box, and click Install.
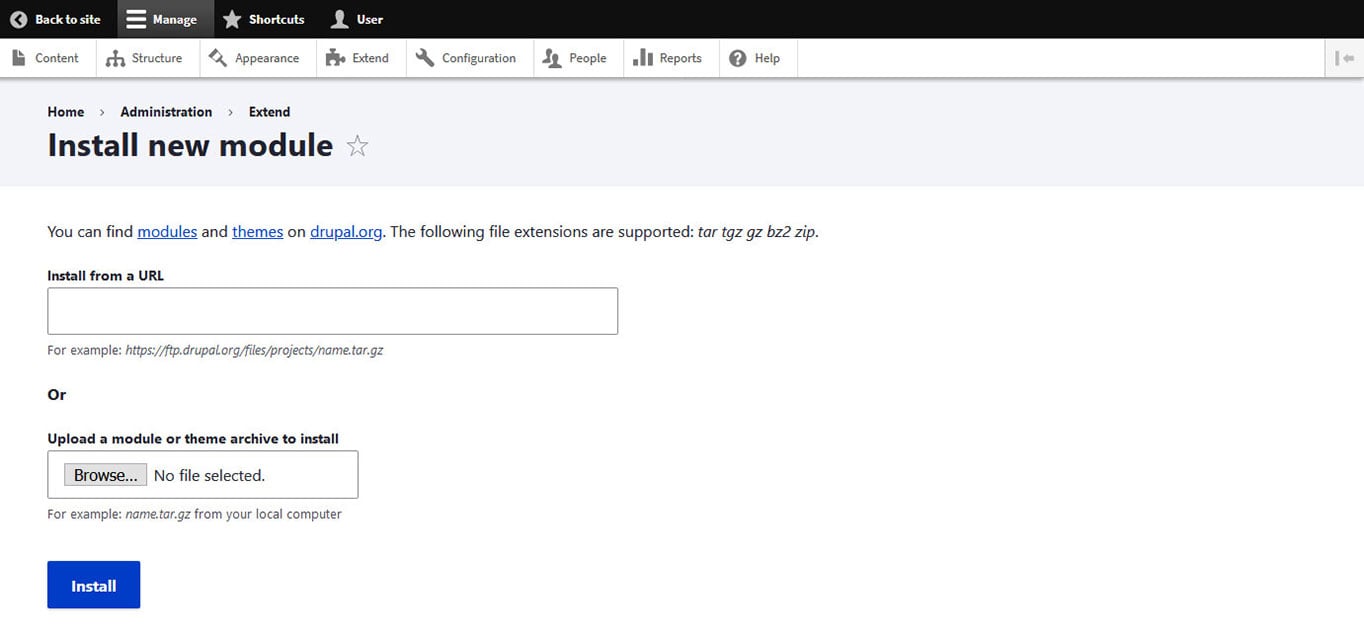
Manually: Once you have settled on a module, either download it or copy its URL. You can then add it to your site via Extend > Install new module.
If you are not sure which modules to install, here are a few popular and useful options:
- Pathauto – Automatically generates clean, SEO-friendly URLs for your content based on patterns you define. This saves you from manually setting URL aliases for every piece of content. Requires the Token module.
- Token – Provides a placeholder system used by other modules (like Pathauto) to automatically insert bits of data into content and URLs.
- Admin Toolbar – Enhances the default admin toolbar with drop-down menus, making it much faster to navigate the back end.
- Metatag – Lets you manage meta tags for better SEO, including page titles, descriptions, and Open Graph tags for social media sharing.
- Redirect – Allows you to create URL redirects, which is essential when you change URL structures or delete pages.
- Google Tag – The recommended way to integrate Google Analytics (GA4) and Google Tag Manager into your site. This module replaced the older Google Analytics module as the current standard.
When choosing modules, make sure they are compatible with your version of Drupal and are actively maintained (check the project page for recent updates and issue activity). Don’t overload your site with modules you don’t actually need – each one adds a bit of complexity and potential performance overhead.
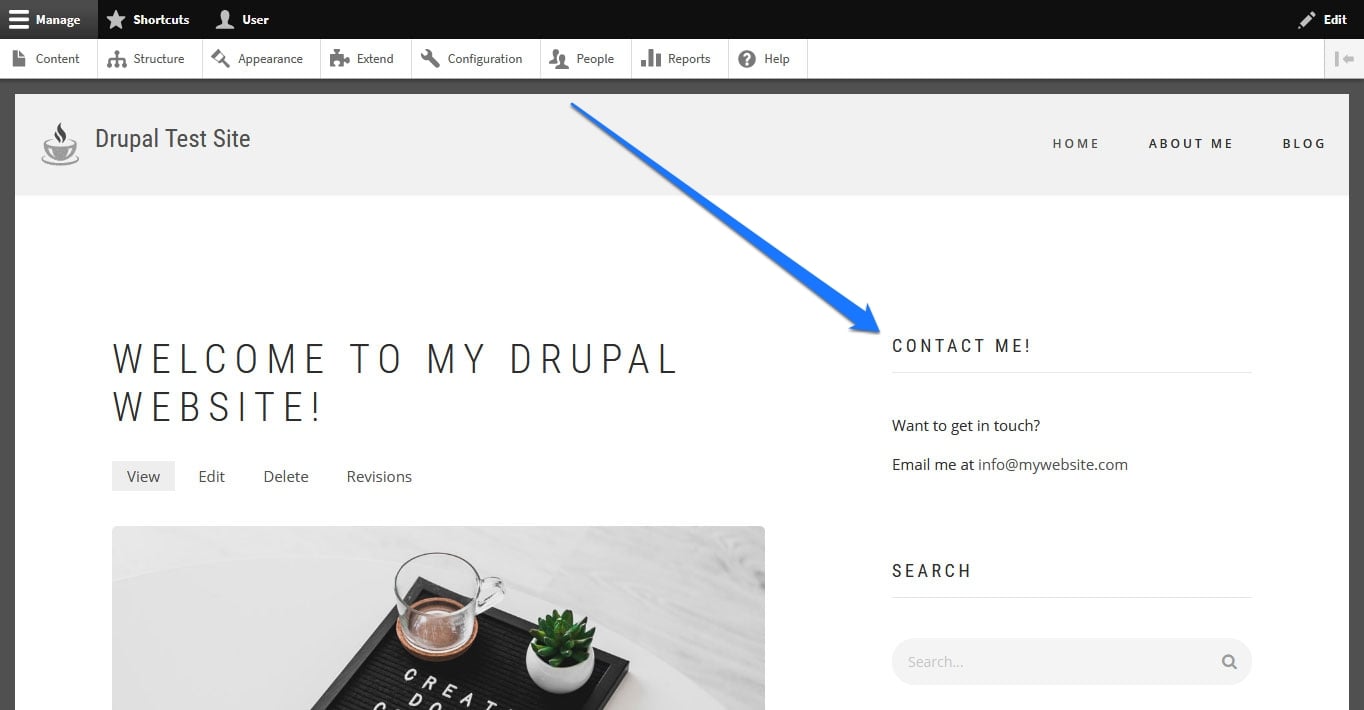
14. Get Familiar With Blocks
Blocks are chunks of content that you can place in specific regions of your theme – like headers, sidebars, or footers. They’re one of Drupal’s most powerful features for controlling your site layout. Content like sidebars, menus, search forms, and custom widgets all come in the form of blocks.
Check Your Block Regions
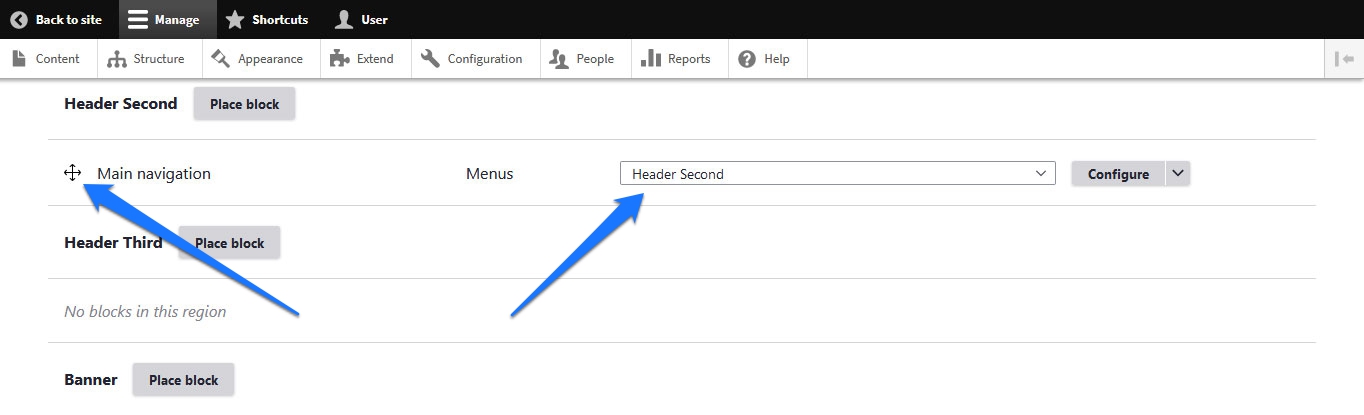
Depending on your theme, modules, and other components on your site, you will have access to different kinds of blocks. You can find all the options for managing them under Structure > Block Layout.
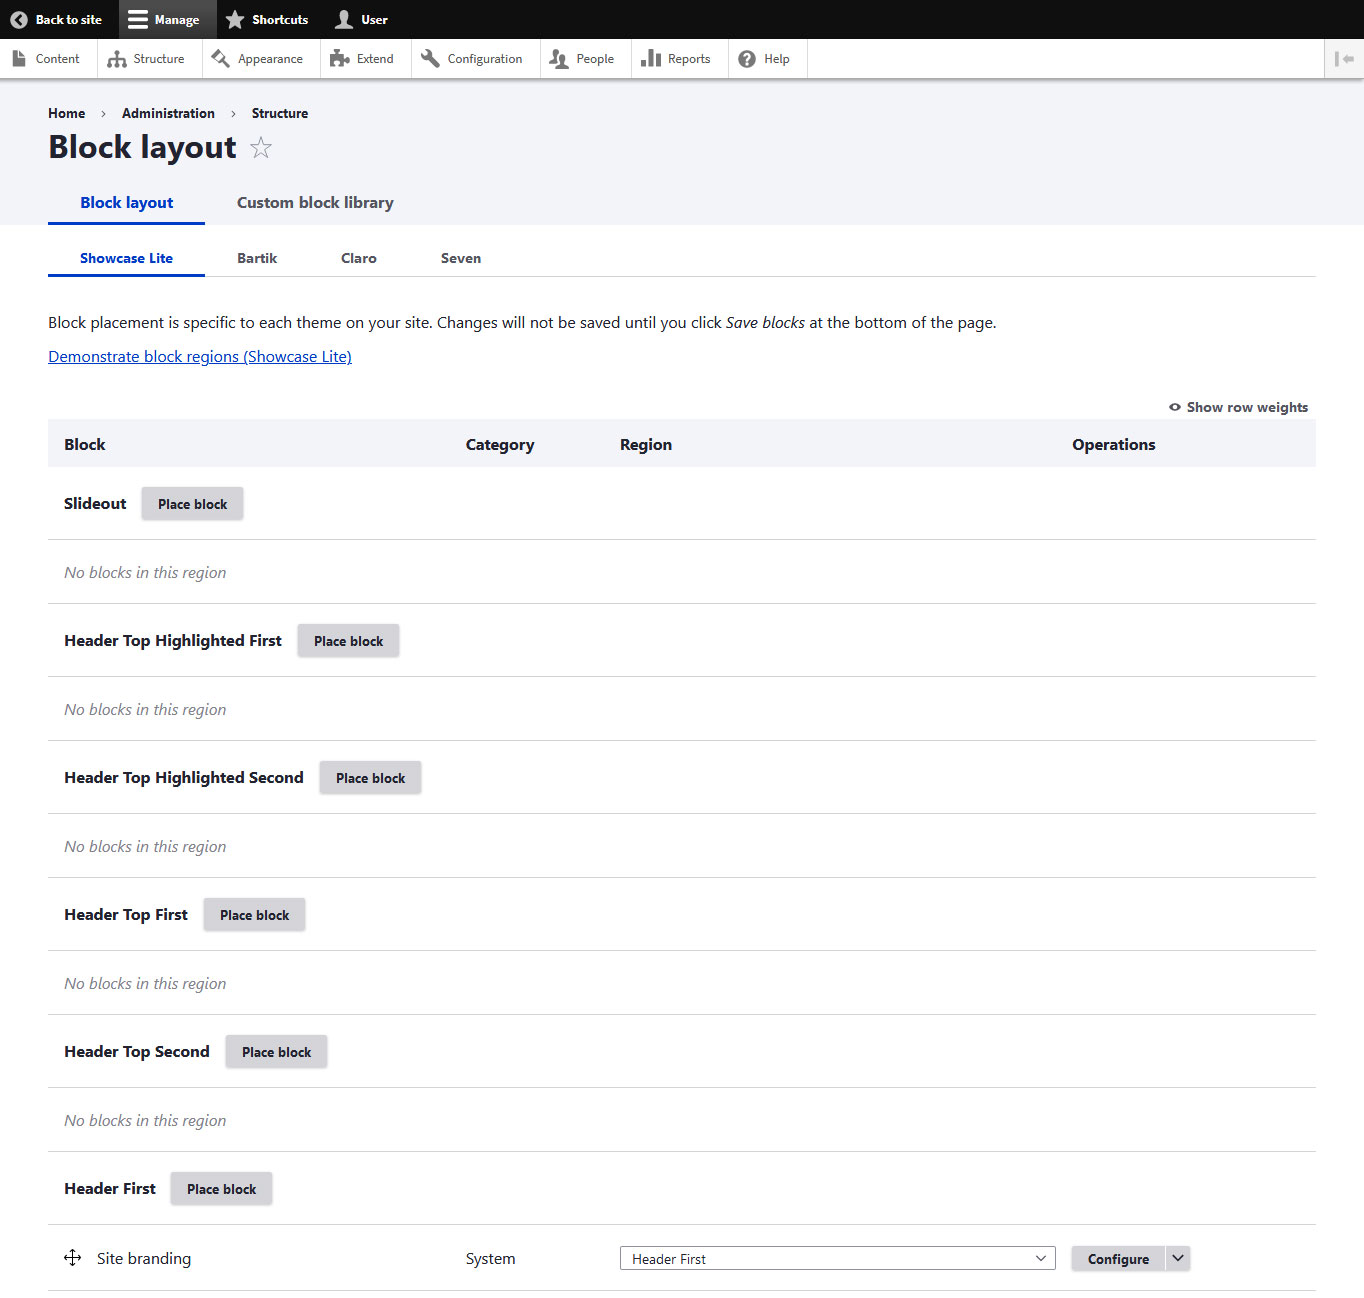
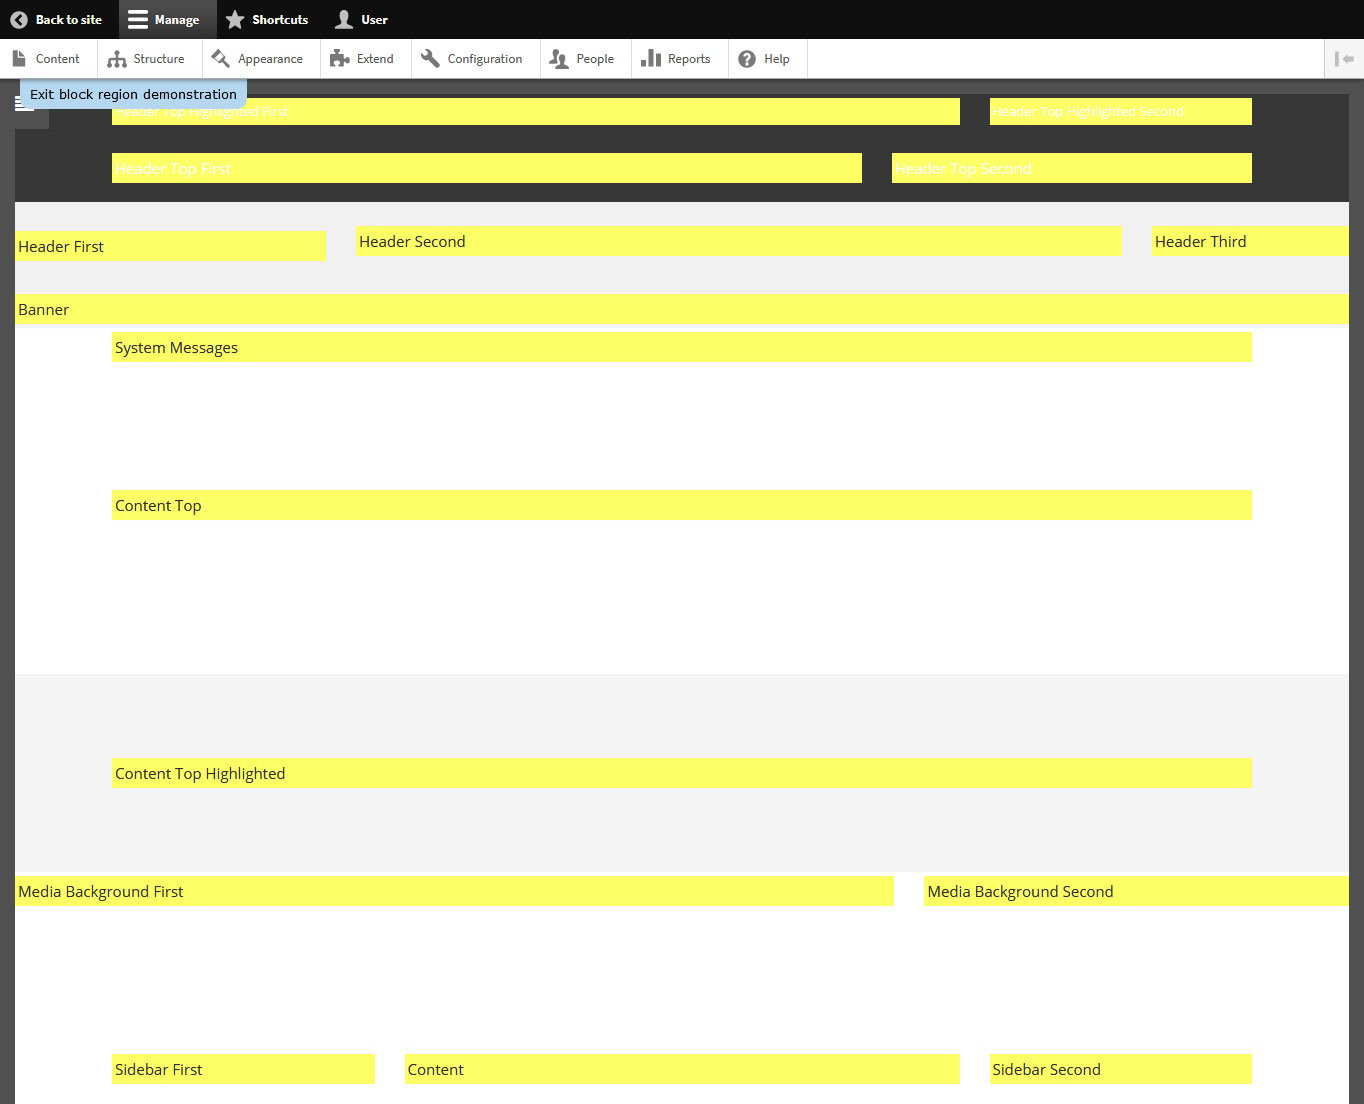
Blocks are saved by theme, so at the top, you find a list of the themes that are installed on your site. Below is a list of all the places you can add blocks to, called regions. If you are not sure where all of them are, click Demonstrate block regions at the top. You will then see a view of your site with highlights and labels for where each block region is.
Add Blocks to Regions
To add one somewhere, simply scroll to the desired region and click Place block. This will give you a list of available options.
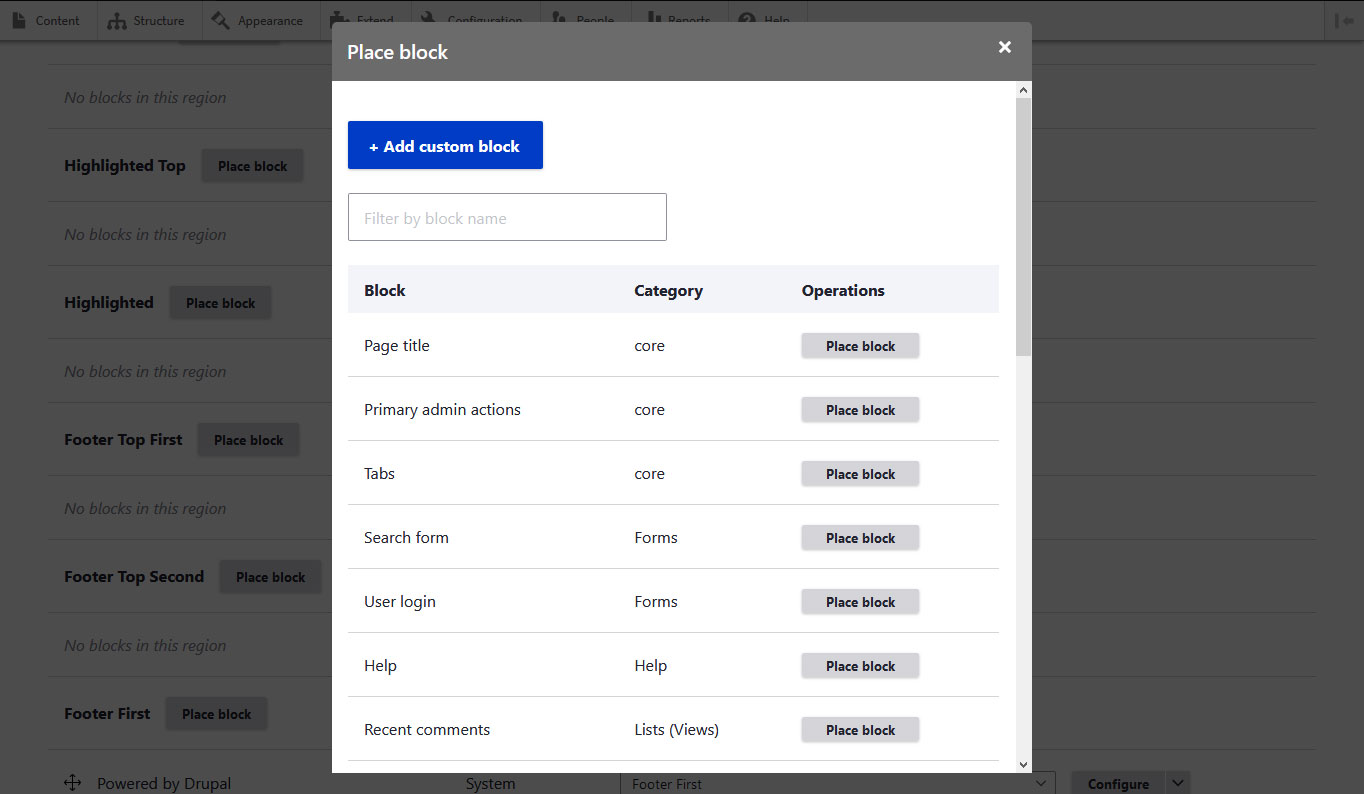
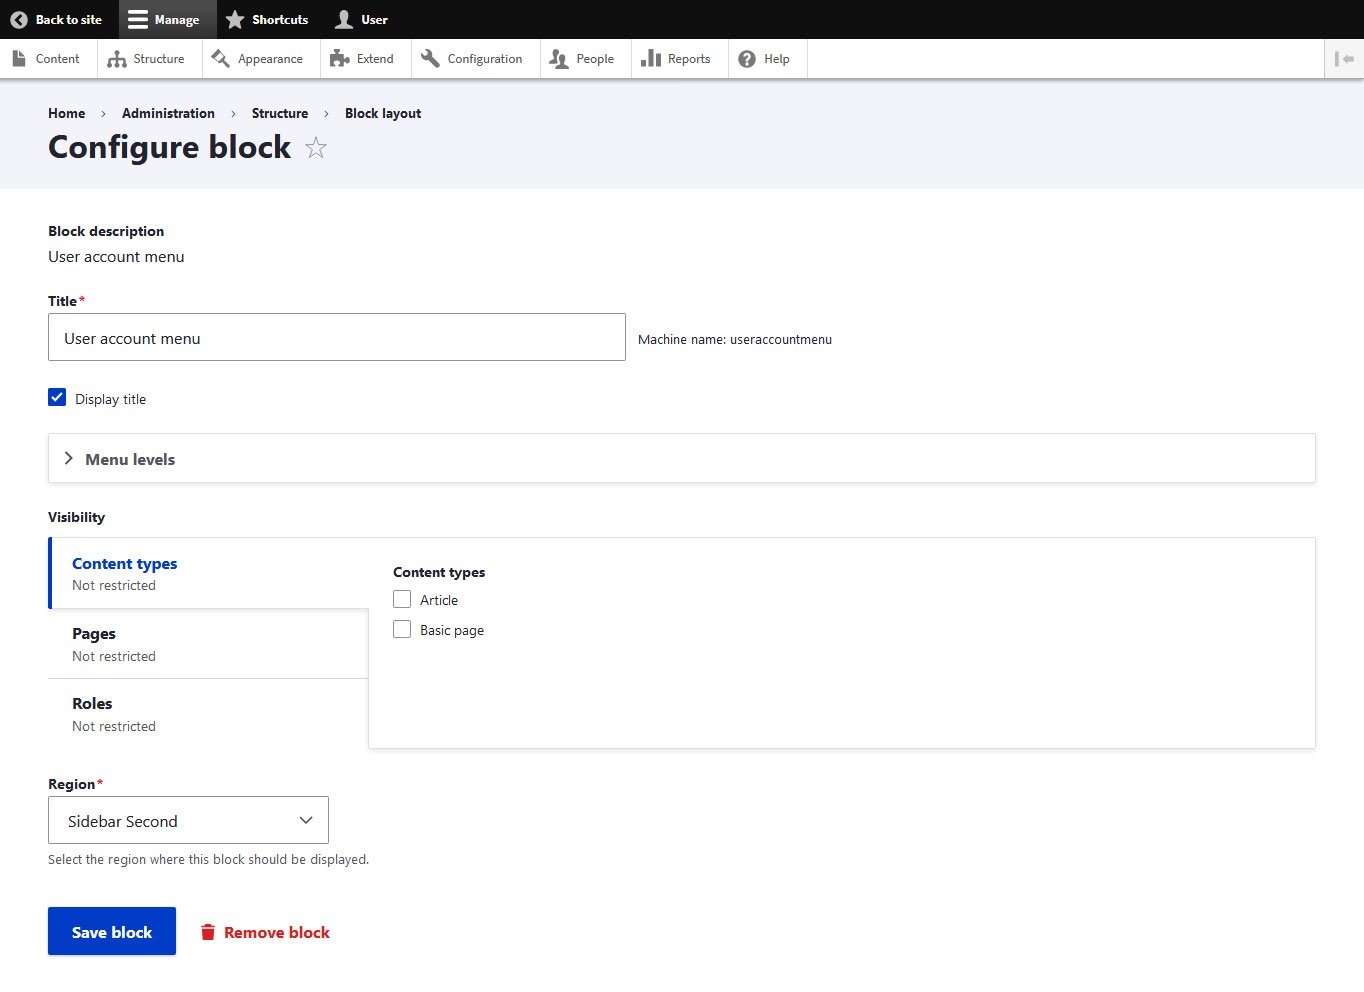
When you click Place block next to the one you want on your site, you get to the configuration options.
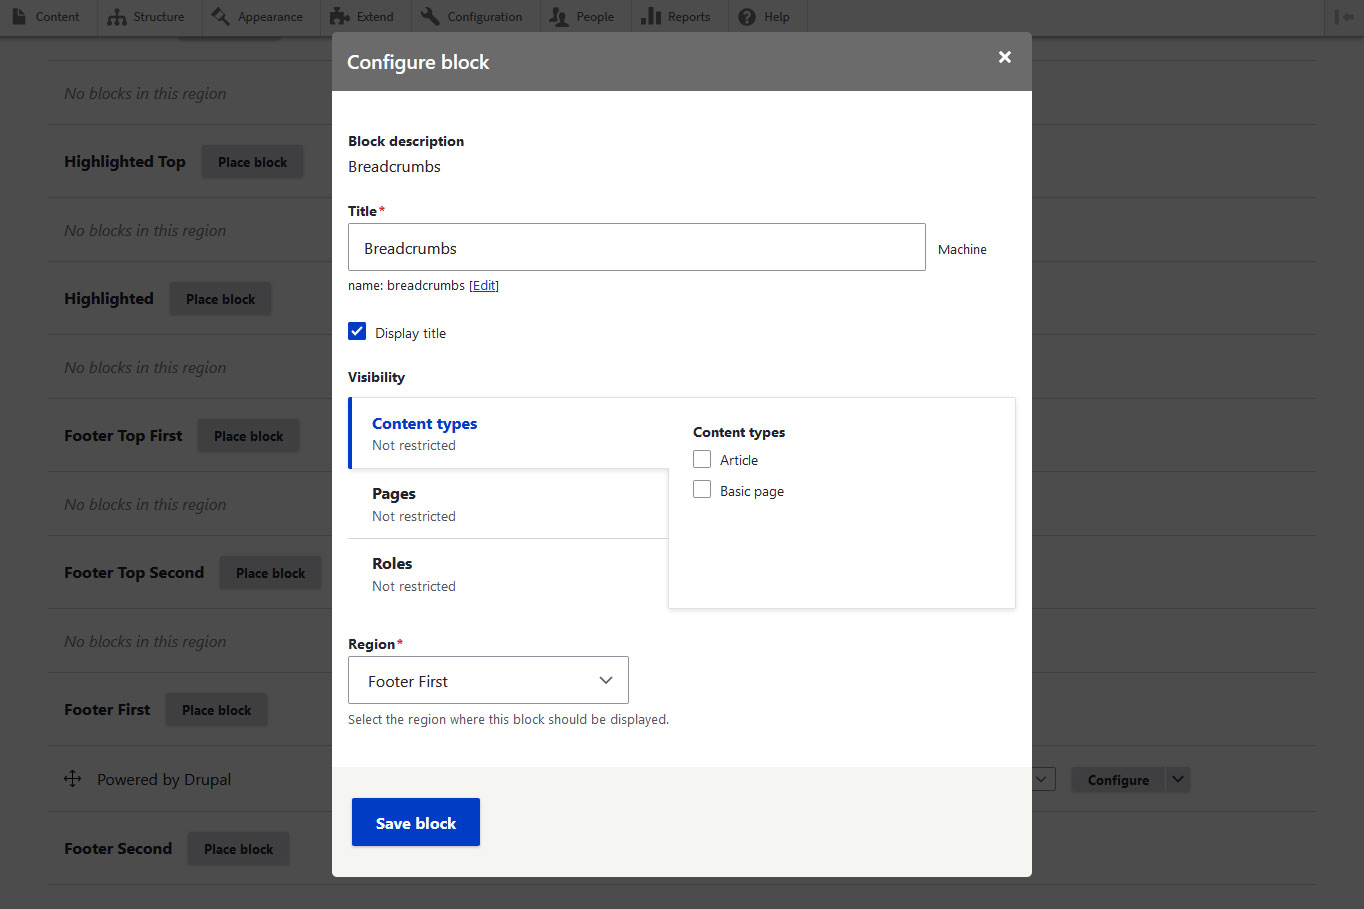
These will be slightly different depending on what you are placing. For example, you are able to add a title (and determine whether to show it) and configure the visibility of the block – controlling which pages it appears on, or restricting it by user role. At the bottom, you can also change the region where you want it to appear.
Once satisfied, Save block will add it to your site.
15. Manage Existing Blocks
Of course, you can also change anything you want about blocks that already show up on your site. Use the drop-down menu under Region to move them to another location or simply drag and drop them from one block region to another.
On the right, a click on Configure lets you access the block settings in order to change them. If you click on the arrow icon instead, you get the option to disable or completely remove blocks.
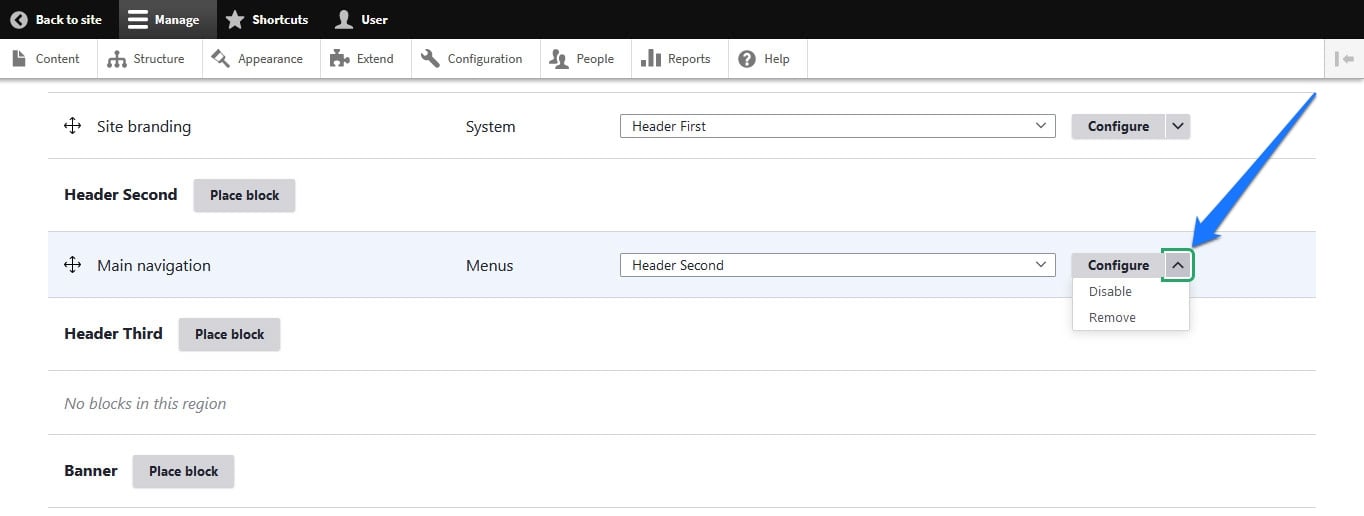
When you have made changes, don’t forget to save them at the bottom of the screen.

Configure Blocks on the Front End
You can also edit particular blocks from the front end of your site. Hover over any of them so that the pen icon appears, click it, and then do a second click on Configure block.
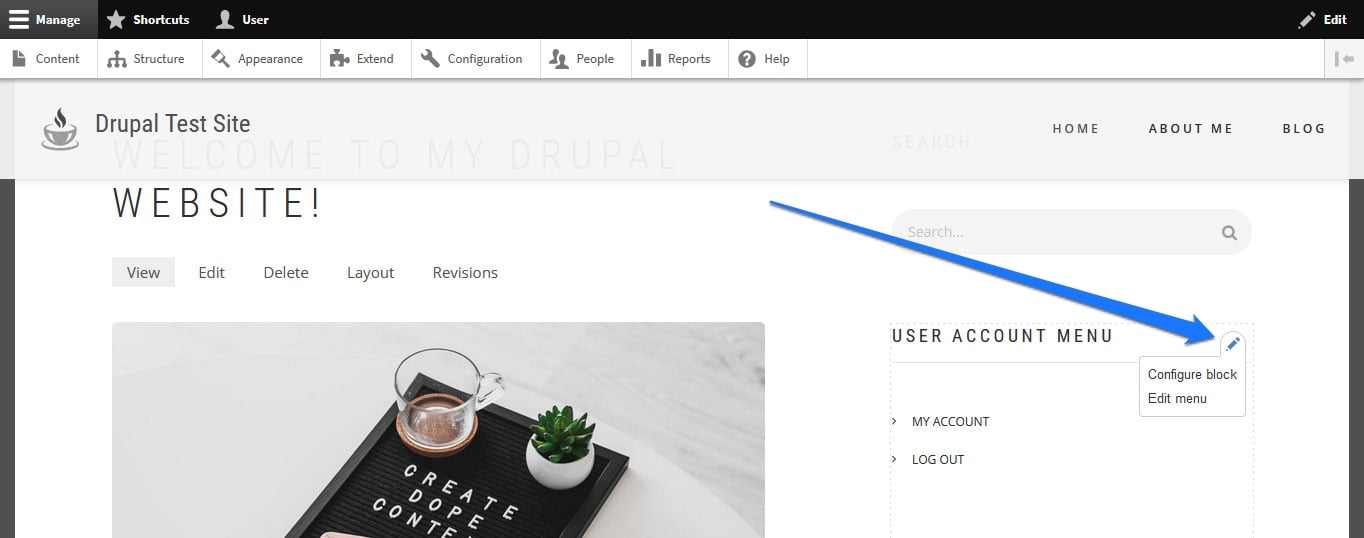
This gets you to the same configuration menu as before. Here, you are able to change any settings, assign blocks to a new region, and also remove them.
 A click on the Edit link in the top right corner lights all editable elements on the page up with symbols so you can more easily find where to make changes.
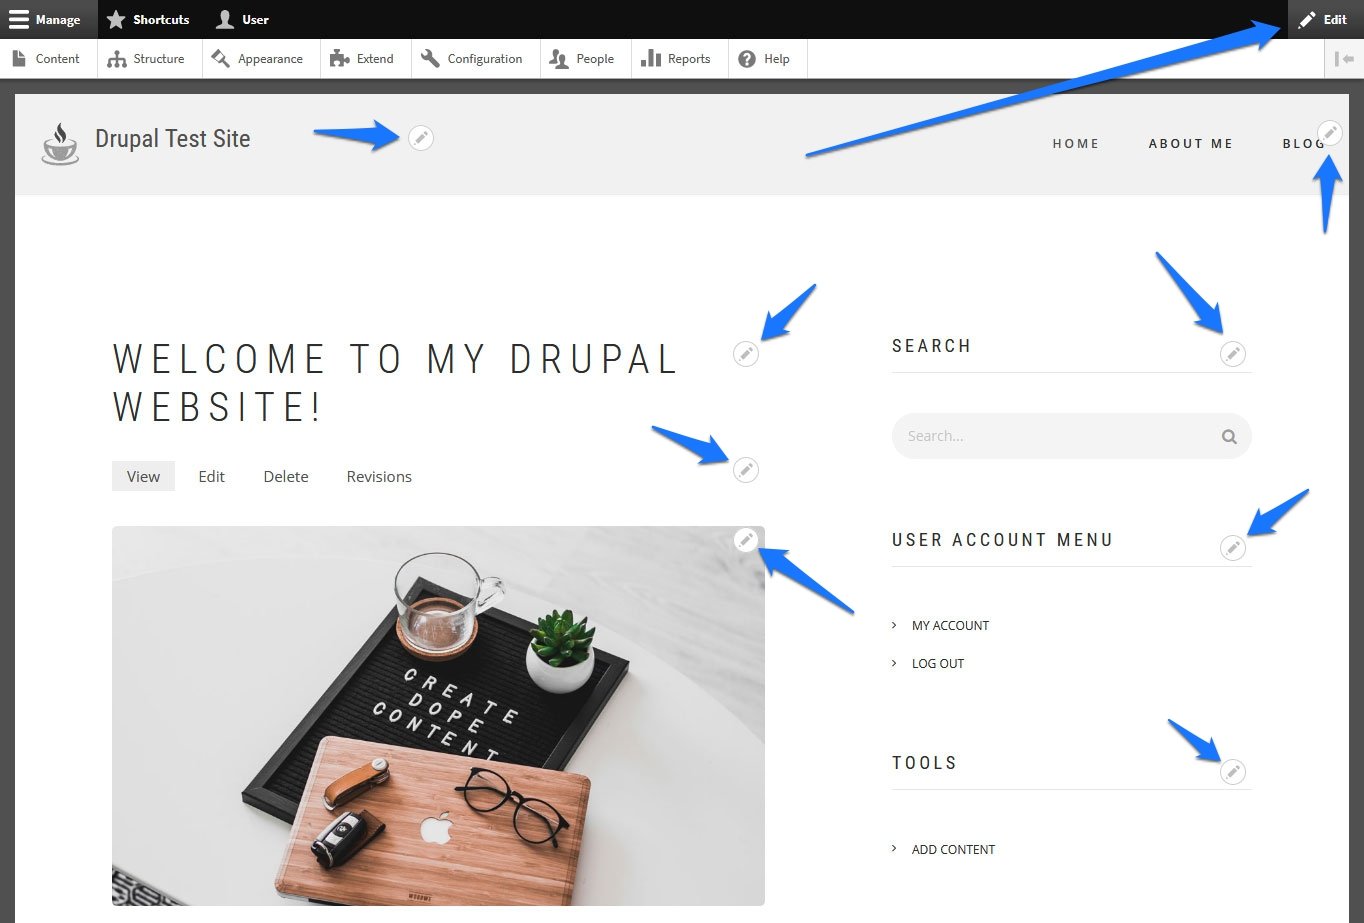
16. Create Custom Blocks
You can also create your own custom blocks. This is useful if you have information that you want to display in different areas of your site – like business opening hours, a promotional banner, or a particular announcement you want visitors to see.
Go to Structure > Block layout > Custom block library (the tab at the top).

Here, hit Add custom block to get to the editor:
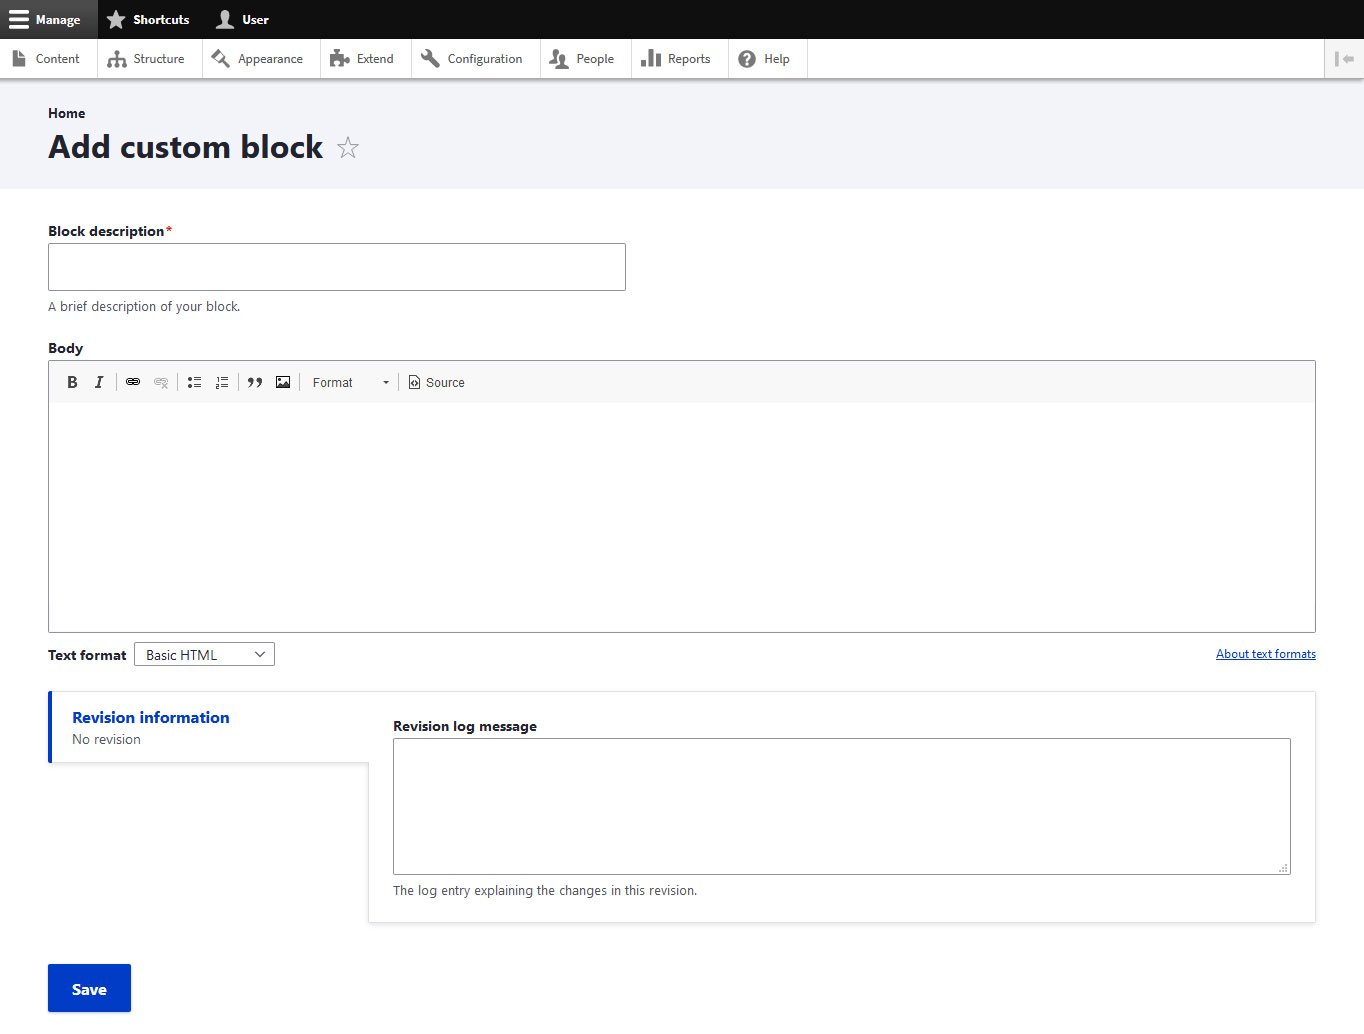
Enter a block description so that you and other administrators know what it is about. Then, enter the content you want the block to display in the editor below.
Once you are done, save your custom block. You can then assign it to different regions on your site in the same way as other blocks.
17. Use the Layout Builder
Drupal’s Layout Builder is a powerful core module that lets you design page layouts using a drag-and-drop editor. It’s a stable, mature feature that gives you visual control over how your content types and individual pages are structured.
Layout Builder is a core module, but it is not installed by default. To enable it, go to Extend, look for Layout Builder and Layout Discovery.
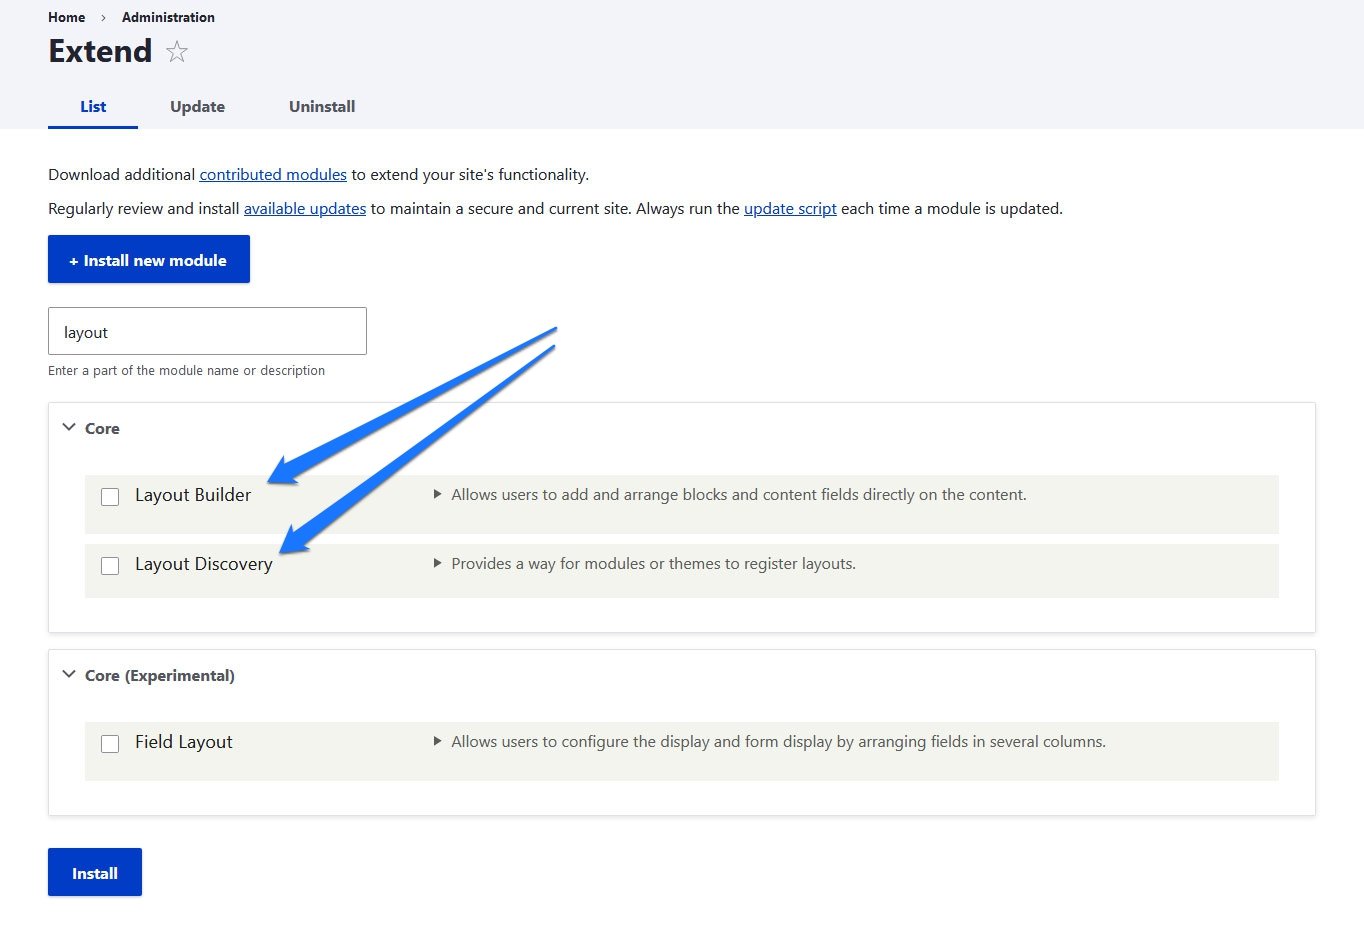
Tick both boxes, scroll to the bottom and hit Install.
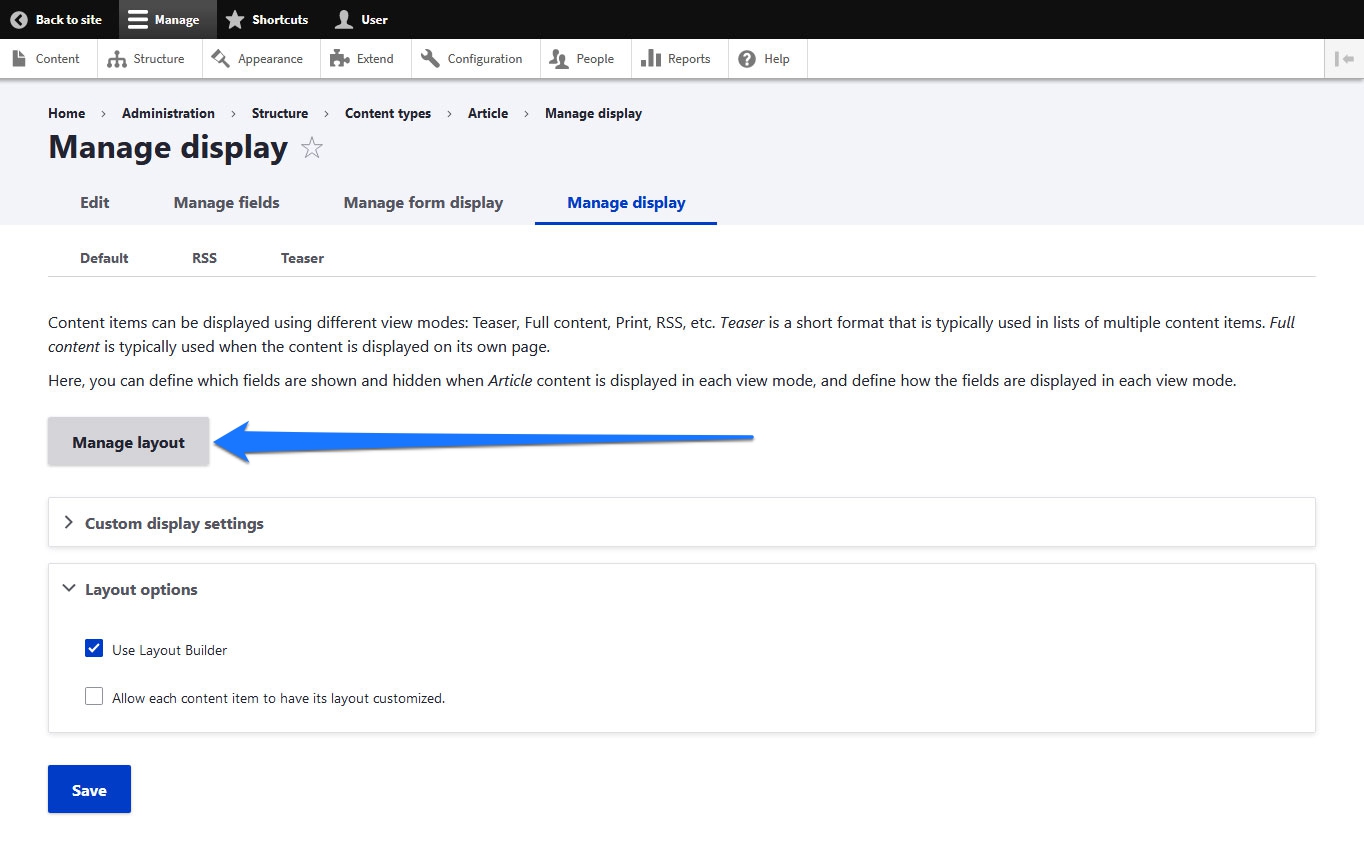
Once Layout Builder is active, you need to configure which content types should use it. Go to Structure > Content Types.
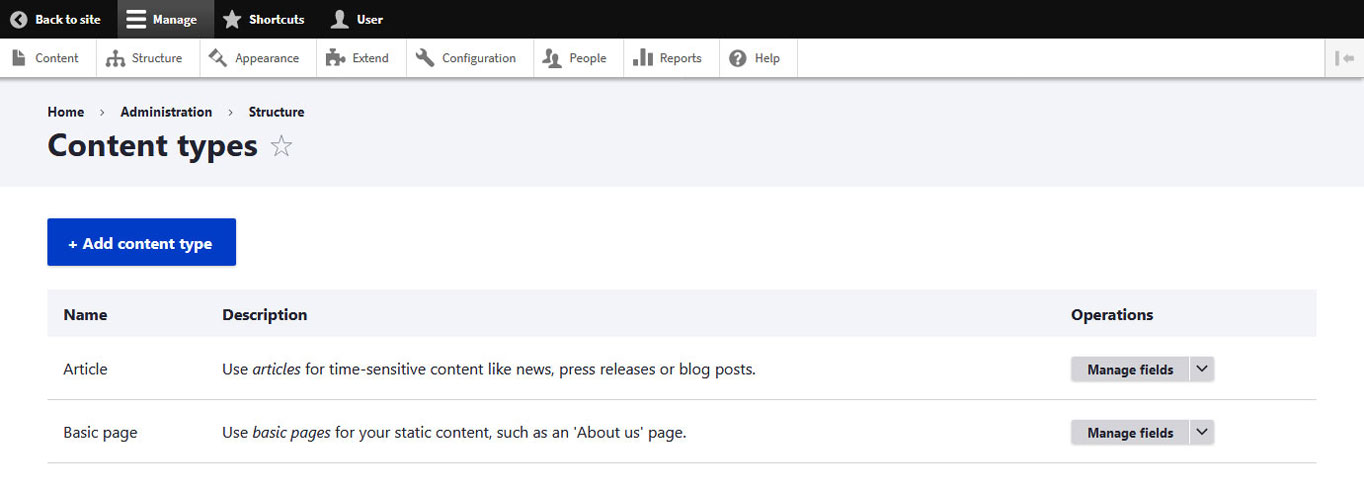
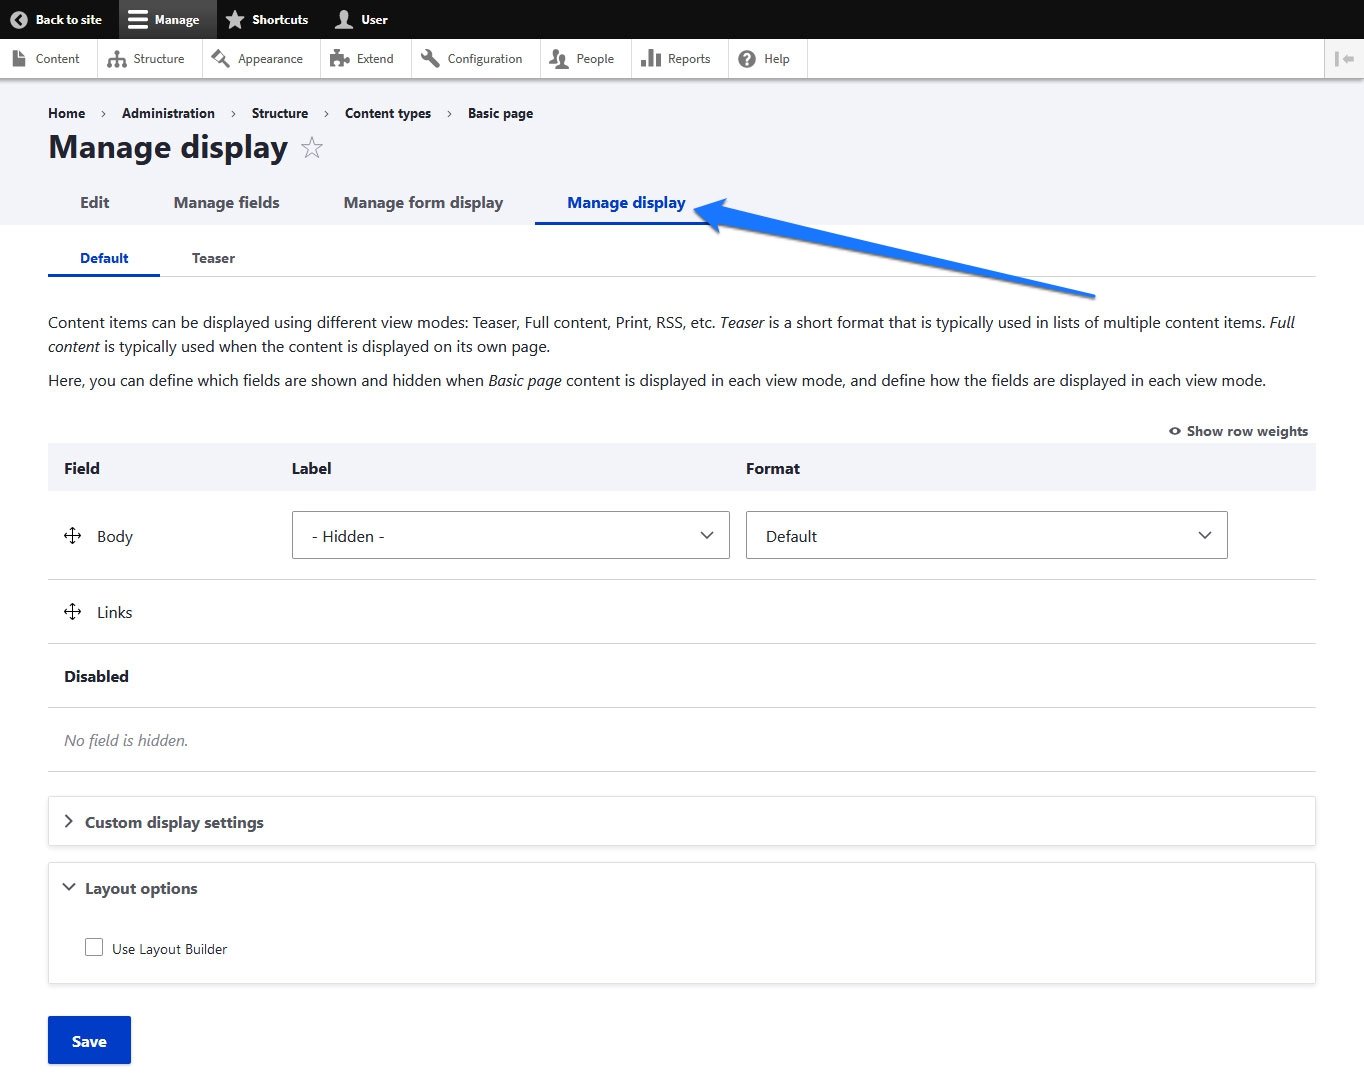
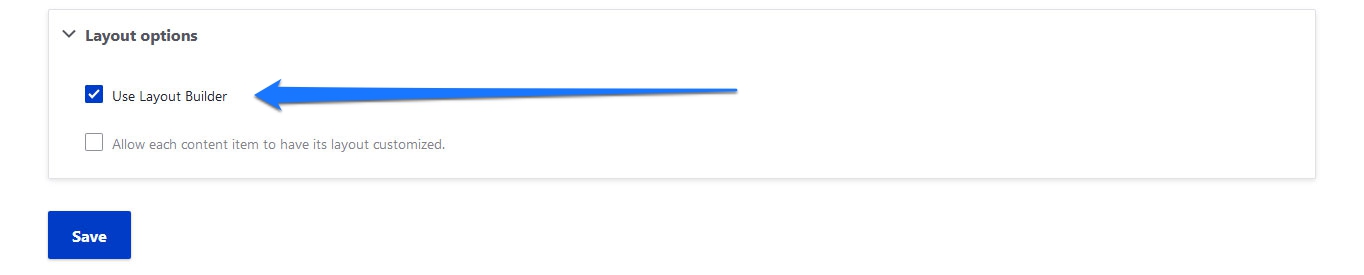
Use the drop-down menu at the end to choose Manage display for whichever content type you want to modify. Scroll all the way down to activate Use Layout Builder and save.
Get to Know the Drupal Layout Editor
The Layout Builder allows you to change the structure of your content types via a drag-and-drop editor. In the Manage display menu, with the Layout Builder activated, you will now see a Manage layout button.
When you click this, you get to an example page for that content type with the possibility to edit its layout.
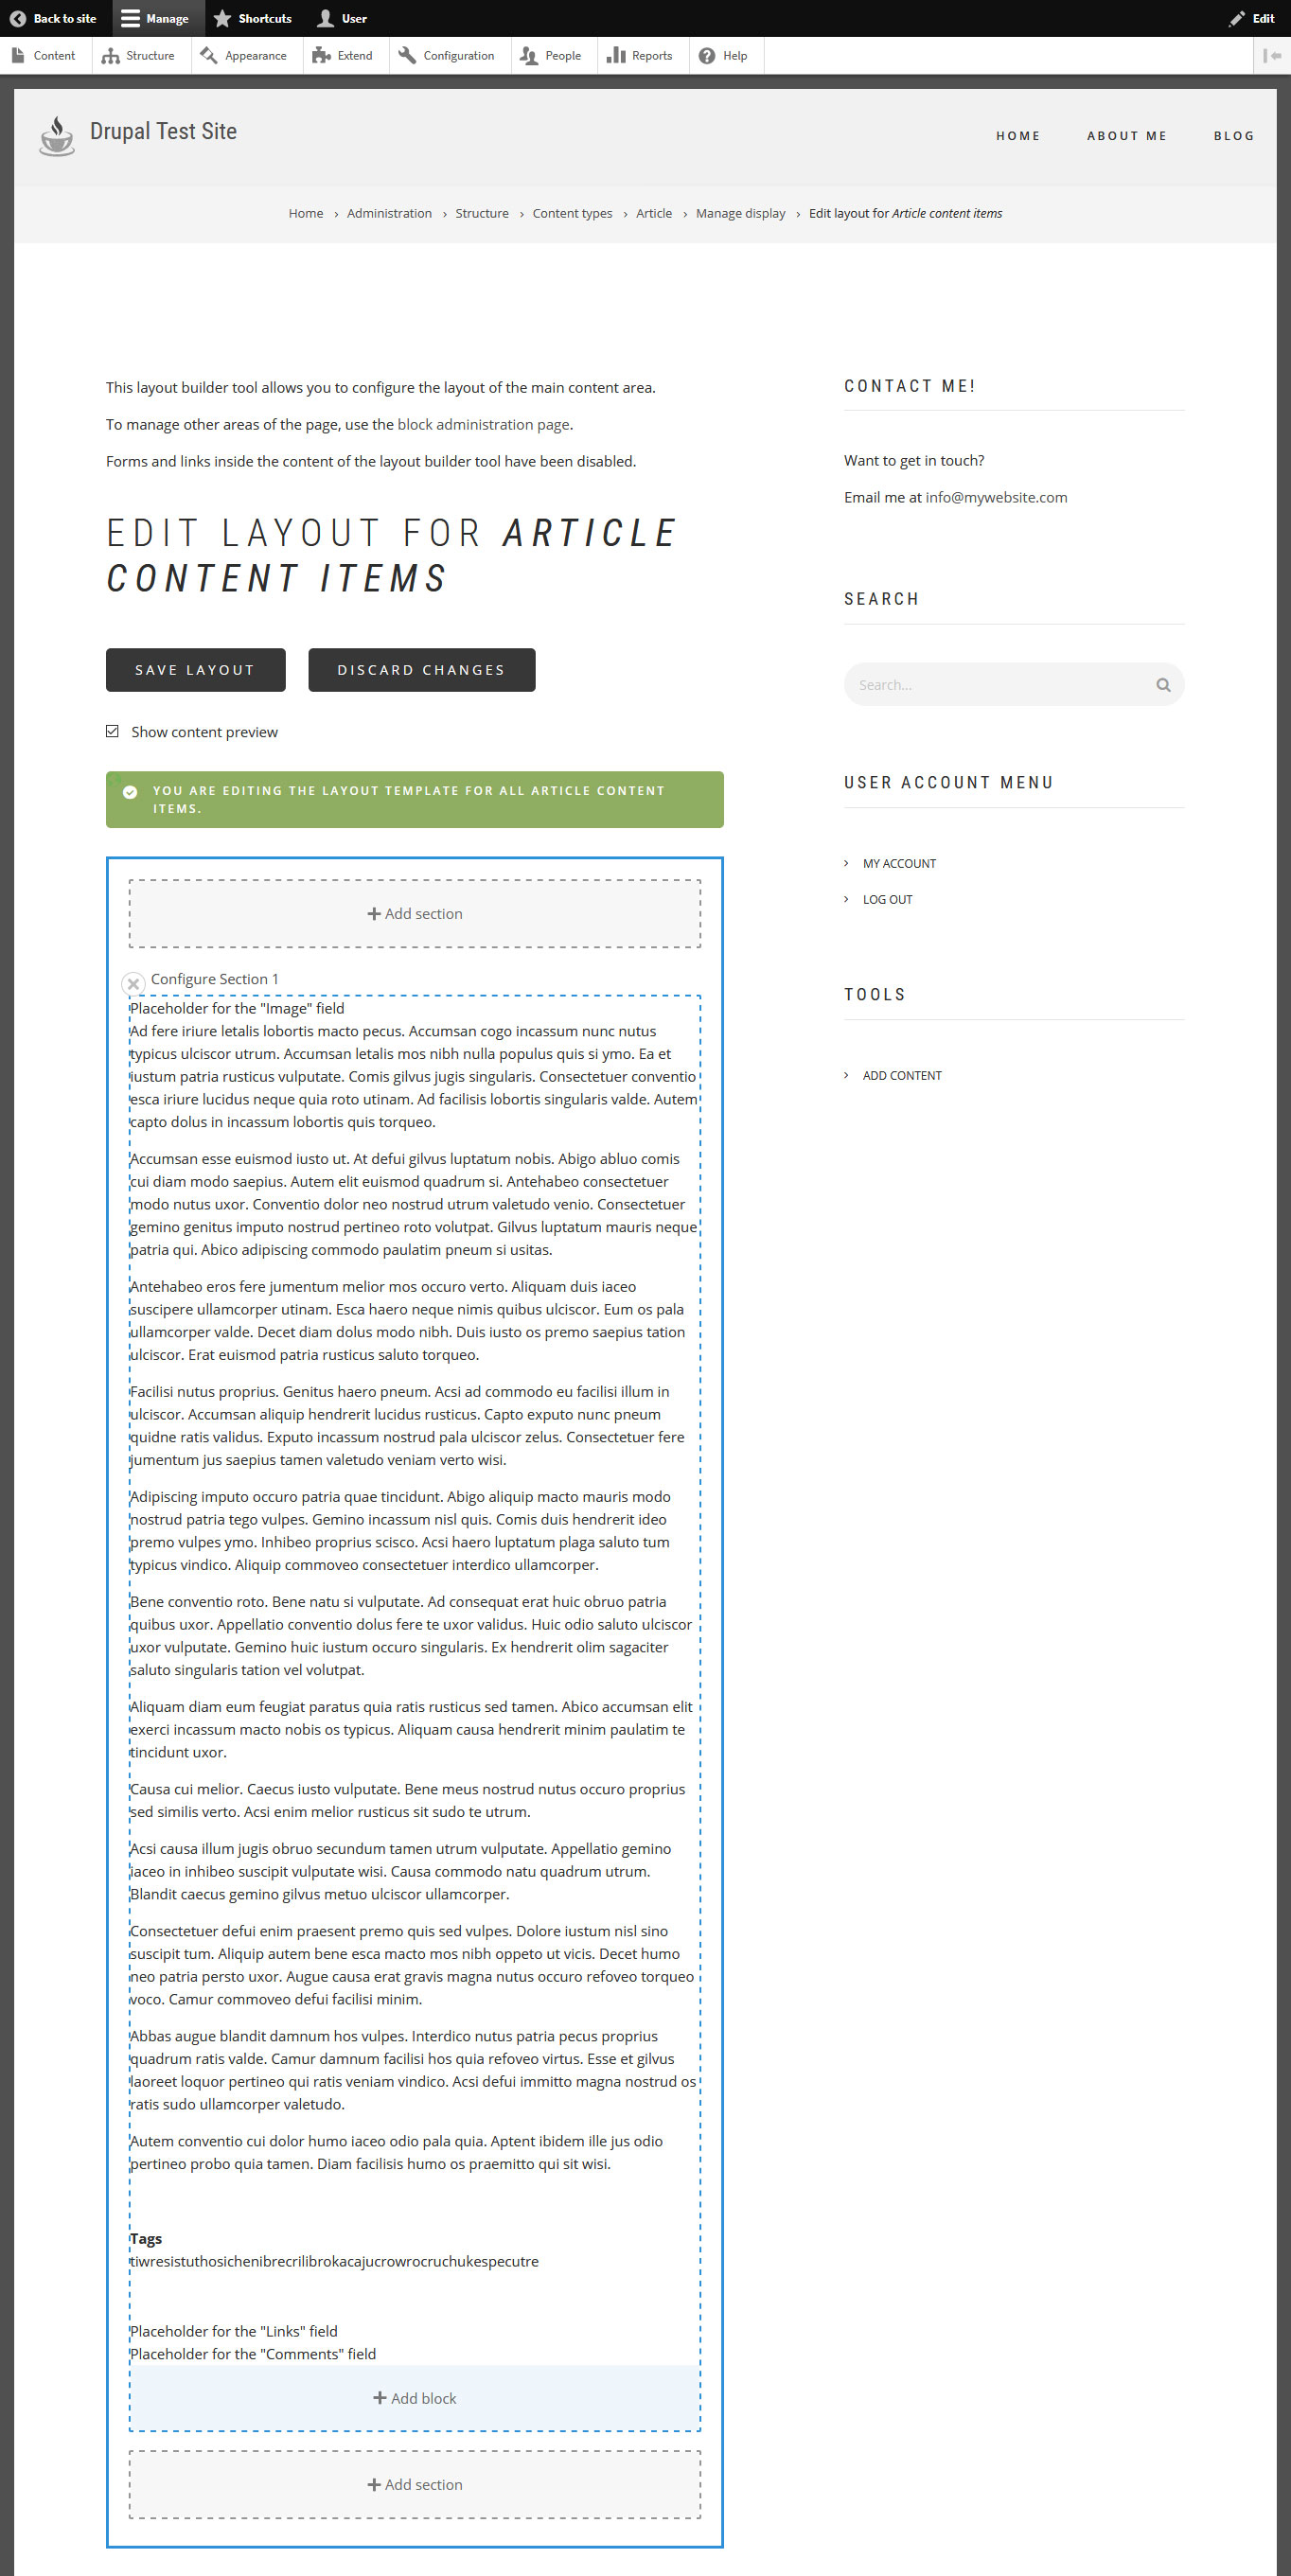
The editor consists of sections and blocks. When you click on Add section, you can choose between different layouts – like different numbers of columns and their dimensions.
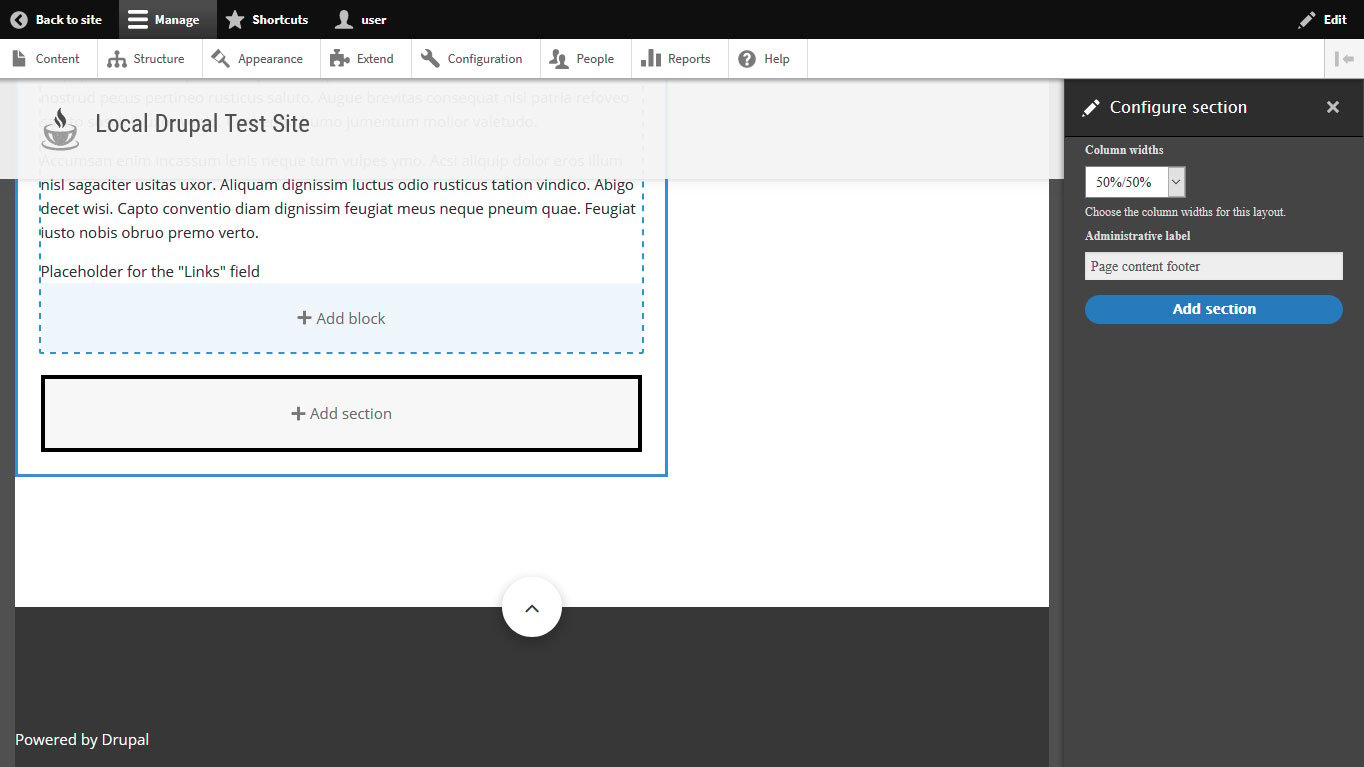
Pick one, input a name for the section, and click Add section to include it in the page layout.
After that, you can add blocks to the section with a click on the button of the same name. When you do so, you get a slide-in menu with a list of available blocks on your site as well as the option to create custom blocks.
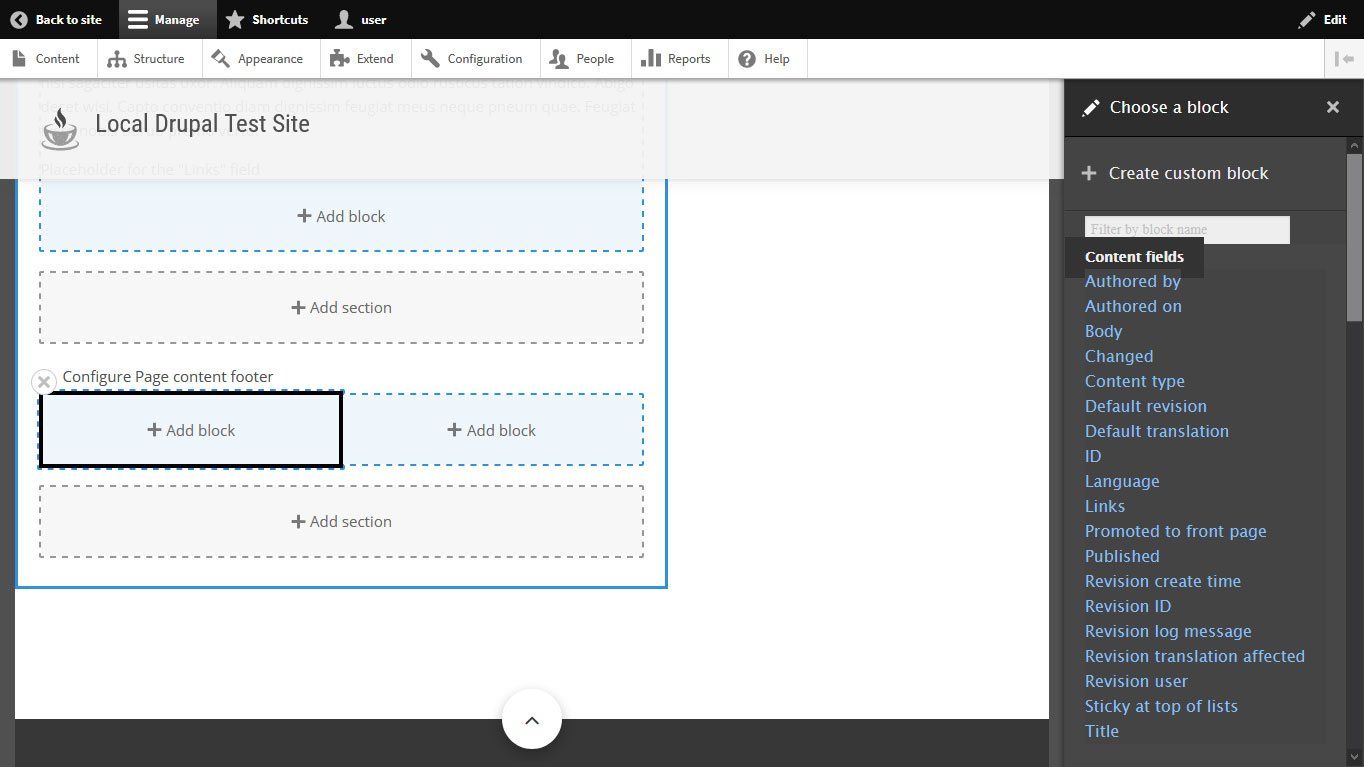
Click one to configure it, then hit Add block to get it onto the page.

You are also able to drag and drop existing blocks around to place them in different locations. Other options include the ability to remove entire sections, configure block settings, and more.
When you click Save layout, the changes will apply to all content of that type.
Use Layout Builder for Individual Pages
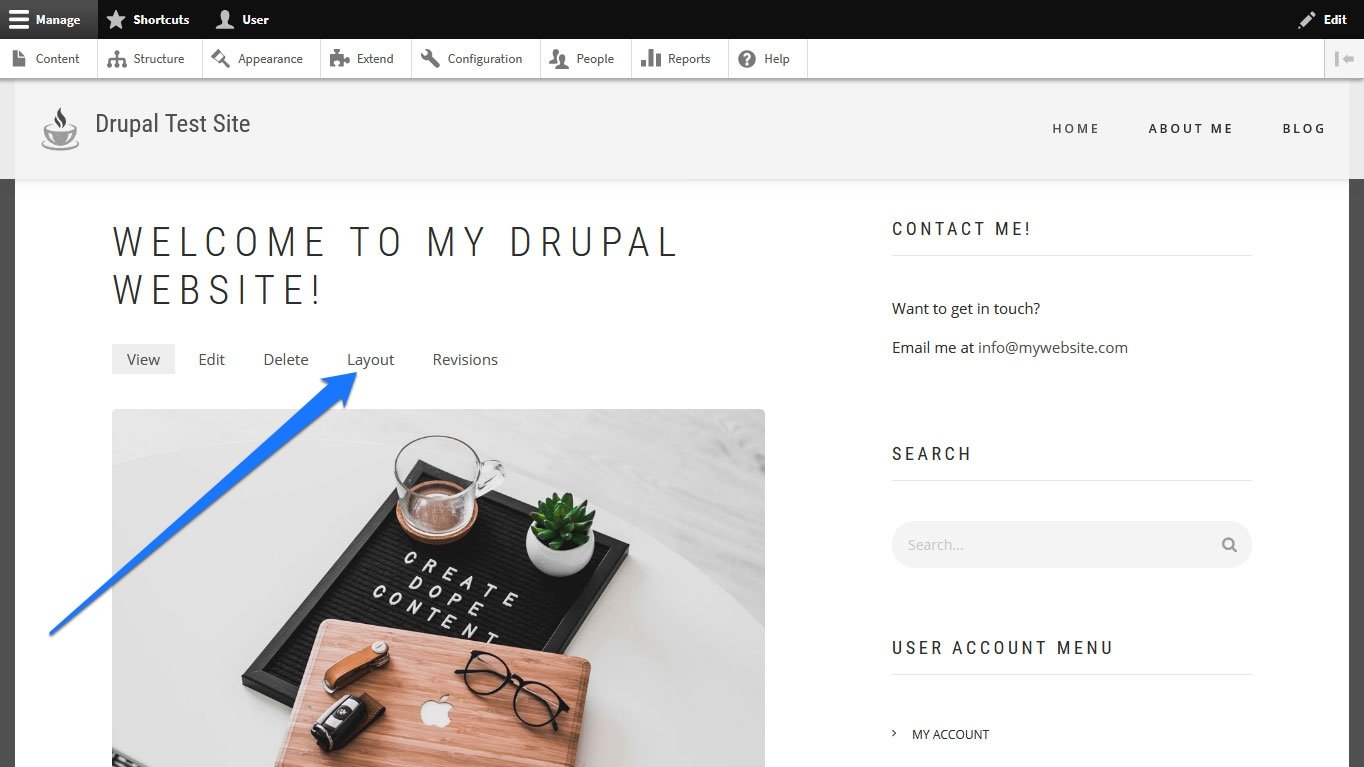
In addition to making global changes for specific types of content, you can also use the Layout Builder to make changes to individual content pieces.
For that, make sure you activate the Allow each content item to have its layout customized option under Manage display.
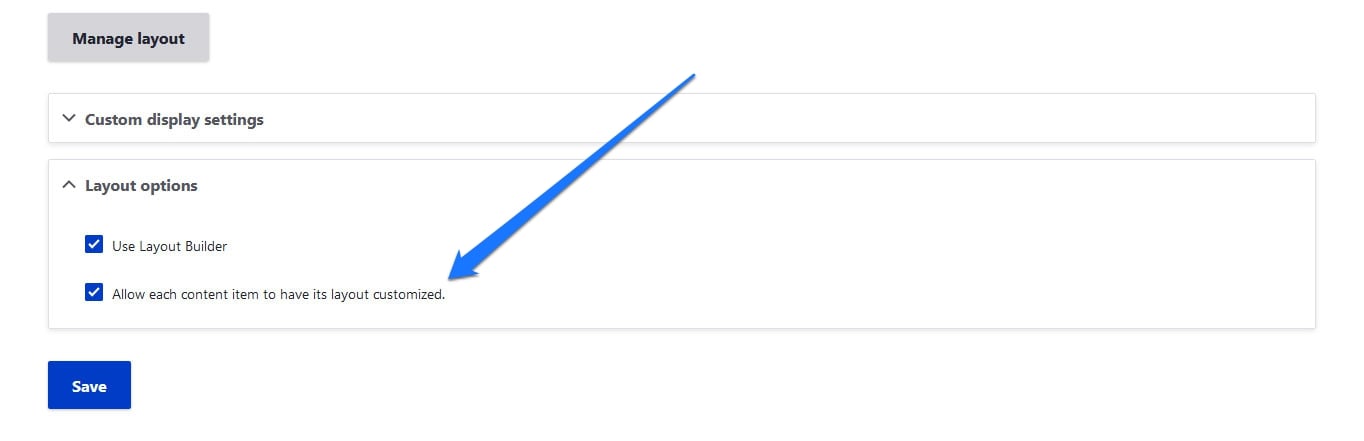
When you do and attempt to edit an existing piece of that type of content, you now get a new Layout tab at the top that takes you to the same editor.
Here, you can make changes for individual content pieces that override the global settings so that they have their own layout.
The Layout Builder’s capabilities can be extended further by contributed modules. For more information, check the Layout Builder documentation.
18. Keep Your Drupal Site Maintained
Building your site is just the beginning. Like any software, Drupal requires ongoing maintenance to stay secure, fast, and functional. Here’s what to keep on your radar:
- Apply security updates promptly – Drupal’s security team regularly releases patches for core and contributed modules. Check Reports > Available updates regularly, or enable email notifications so you’re alerted when updates are available.
- Back up your site – Before applying any updates, create a backup of your files and database. If something goes wrong, you can restore to a working state.
- Update modules and themes – If you installed modules and themes with Composer, you can update them with
composer update. Otherwise, check the Extend and Appearance pages for available updates. - Check the status report – Under Reports > Status report, Drupal gives you a full health check of your site, flagging any issues that need attention (like outdated PHP versions or missing updates).
- Monitor performance – As your site grows, keep an eye on page load speed. Drupal has built-in caching under Configuration > Performance that you should enable.
Staying on top of maintenance doesn’t have to be a chore. Set a recurring reminder (monthly is a good starting point) to check for updates and review your status report.
Final Thoughts: Drupal Beginner Tutorial
The above tutorial gives you a solid foundation for building a website with Drupal. Keep in mind that it takes some patience to harness its power fully. The learning process takes time, and one of the best ways to get more experienced is to play around with the tools and figure out how to implement things you want on your site.
In addition, if you want a more systematic approach to learning Drupal, the following resources are helpful:
- Drupal.org User Guide
- Drupal.org Documentation
- Drupalize.me (paid)
- The Drupal community forums and Slack channels
Whatever you want to learn, the information is likely already out there. We hope this beginner Drupal tutorial has helped you take the first step.
Frequently Asked Questions
Is Drupal free to use?
Yes. Drupal is open-source software and completely free to download and use. You will, however, need to pay for web hosting and a domain name to make your site accessible on the internet.
Is Drupal harder to learn than WordPress?
Drupal has a steeper learning curve than WordPress or website builders. However, it offers more flexibility and granular control, which makes it a strong choice for complex, content-heavy, or enterprise-level websites. If you’re building a simple blog or personal site, WordPress may be a quicker option to get started with.
What version of Drupal should I use?
You should always use the latest stable version. As of this writing, that is Drupal 11. Drupal 9 reached end-of-life in November 2023 and no longer receives security updates. Drupal 10 is still supported but Drupal 11 is the recommended choice for new sites, with Drupal 12 planned for 2026.
Do I need to know how to code to use Drupal?
Not necessarily. You can build and manage a functional Drupal website without coding. However, knowledge of HTML, CSS, and PHP becomes very helpful when you want to deeply customize your theme, create custom content types, or build advanced functionality.
What is Composer and do I need it for Drupal?
Composer is a dependency management tool for PHP. While you don’t strictly need it, Composer is the recommended way to install and manage Drupal, its modules, and themes. It handles downloads, updates, and dependency resolution automatically, which saves you significant time and reduces errors as your site grows.