Before your start, read this
Last update: January 5, 2024
Want to learn how to create a website?
This beginner’s guide will help you make your own website in an easy step-by-step format.
It won’t take long, and if you do it this way, you’ll actually be able to save some money in the long run (more on that later).
Table of Contents
- Choose a domain name (.www)
- Subscribe to a web hosting account
- Set up your website (WordPress)
- Design your website
- Add pages and further customization
Don’t know any code?
No problem — you don’t need to.
We wrote this guide specifically for beginners. However, if you have an interest in learning code (HTML and CSS), read this technical guide instead (not recommended for beginners, though).
And if you do things right, you’ll be able to create your own website without all the limitations and expensive transaction fees you get with website builders.
Scared of making a mistake?
We have covered people’s most common mistakes when building a website so you can recognize and avoid them.
If you ever get stuck setting up your website, our guides come with free help.
Worried it’s a waste of time and money?
Most websites only need a domain name and website hosting to work and serve visitors. That shouldn’t cost you more than $10 a month in total.
The average time to set up a website using this guide is approximately one hour — most manage to build a strong foundation within that time.
Ready to build your website today? Grab a coffee or a tea, and let’s get started!
Step 1: Choose a domain name (.www)
First things first: every website needs a name.
Without a name (also known as a domain name), your website simply cannot function. Think of it as a street address for a house, where the address is the domain name and the house is your website.
When choosing a domain name, there are a few rules you should keep in mind:
- If you’re setting up a business website, your domain name should match your company name.
- If you plan on making a personal website or a personal blog for yourself, then using your full name as the domain name is a good option.
- Try to get the .com version if possible.
Be aware that there are over 100 million active domain names, so all the best ones might be taken. But don’t dwell on it too much — you can always buy another domain name (if needed). If you don’t have a domain, don’t buy it just yet. You can get one for free in step #2.
Domain names usually end with .com, .net, .org, .co.uk, .ca, or .de (among others). If you want your domain name ending aimed at the global population, try registering a .com version. If you want to target local visitors from Canada or Germany, choose the .ca or .de extension.
You can use this tool to check if your desired domain name is available:
Check Domain Availability
Step 2: Get a web hosting account
(This guide is reader-supported. If you click on our links, we may earn a commission.)
In addition to a domain name, you will also need web (website) hosting.
Web hosting is a service — similar to website builders — that allows you to register a domain name and set up a website (we recommend Hostinger to everyone who is just starting out).
By choosing the right option for your web hosting, you can maximize flexibility and, ultimately, access a wide variety of monetization options.
When using a website builder, you are locked with one product — whether it’s Wix, Squarespace or any other website builder.
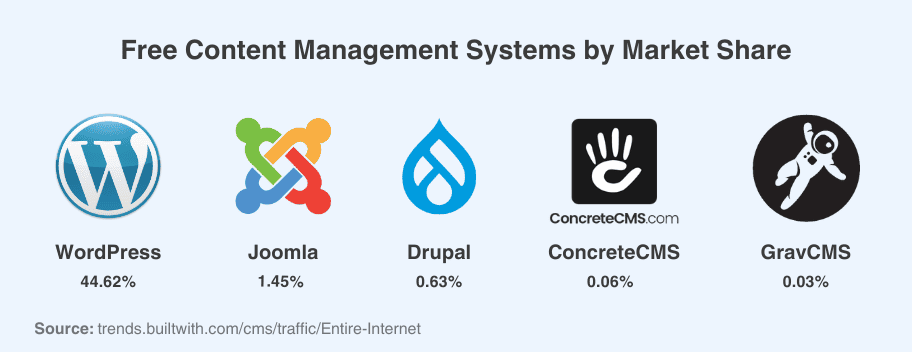
But if you use web hosting, you can set up a website(s) using different free website-building tools like WordPress, Joomla, Drupal, and others. That gives you a lot of flexibility while building your website.
Choosing the right web host has many important benefits for you and your website, especially if you plan on making money from your site.
It also means you won’t be limited in what you can do or how you can charge customers. After all, many website builders take a big cut of your sales. So, if you plan on running a business through your site, be sure to go with a reliable web host.
Web hosting also hosts your website files so your website is online 24/7 for visitors.
While it might seem like all web hosts are basically the same, there are huge differences in speed and reliability. The last thing you want is to lose customers or fans just because your web host isn’t running properly.
Where to find a web hosting provider
One of the cheapest and most reliable providers we’ve found after monitoring over 20 web hosting companies over several years is Hostinger.
Together with a domain name (if you choose the Premium plan), the first year will be only $47. Renewal fees are higher, but not by much if you opt in for longer.
We have also negotiated a promo code for our readers (WEBSITESETUP) to get 7% off any plan that is at least 12 months or longer.
Alternatively, you can pay month-to-month and cancel anytime. Just make sure there are always enough funds available on your payment method because your site will go down if hosting has not been paid for.
Furthermore, unlike many other web hosting providers, Hostinger offers 90+ free website-building tools to be set up through their dashboard. That’s more than any other web hosting we’ve tested to date — incredible flexibility and ease of use.
If you want to set up a website (and register a domain name), simply go to www.Hostinger.com (or any other web hosting provider) and sign up.
Choose your web hosting plan
Hostinger offers three main hosting plans. In this guide, we’ve opted for the “Premium Web Hosting” 12-month hosting plan that comes with a 1-year free domain.
The premium plan is a good choice if you’re just starting out and don’t yet have a large volume of inbound website traffic.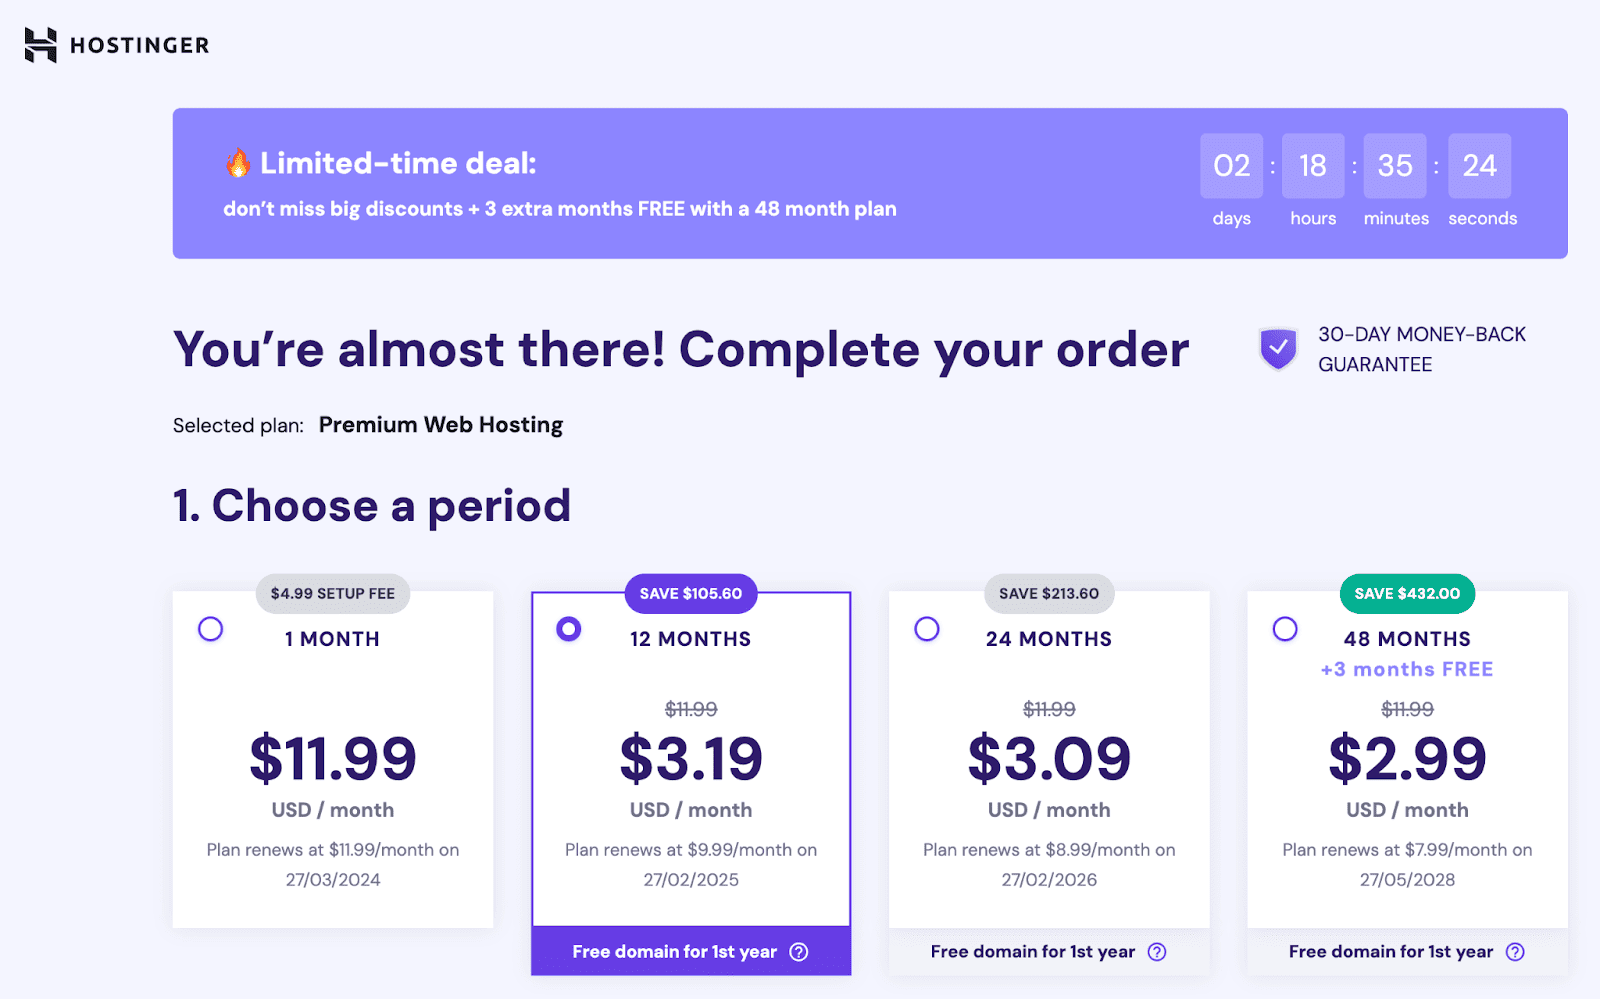 Choose the 12-month plan and click “Sign up.”
Note: You can always upgrade/downgrade your plan if needed.
Create your account and pay
After selecting your plan, you’ll get an overview of it and the available payment methods. You can also remove all the pre-ticked features as you don’t really need them right now. Overall, you should be able to get a one-year web hosting plan for less than $50.
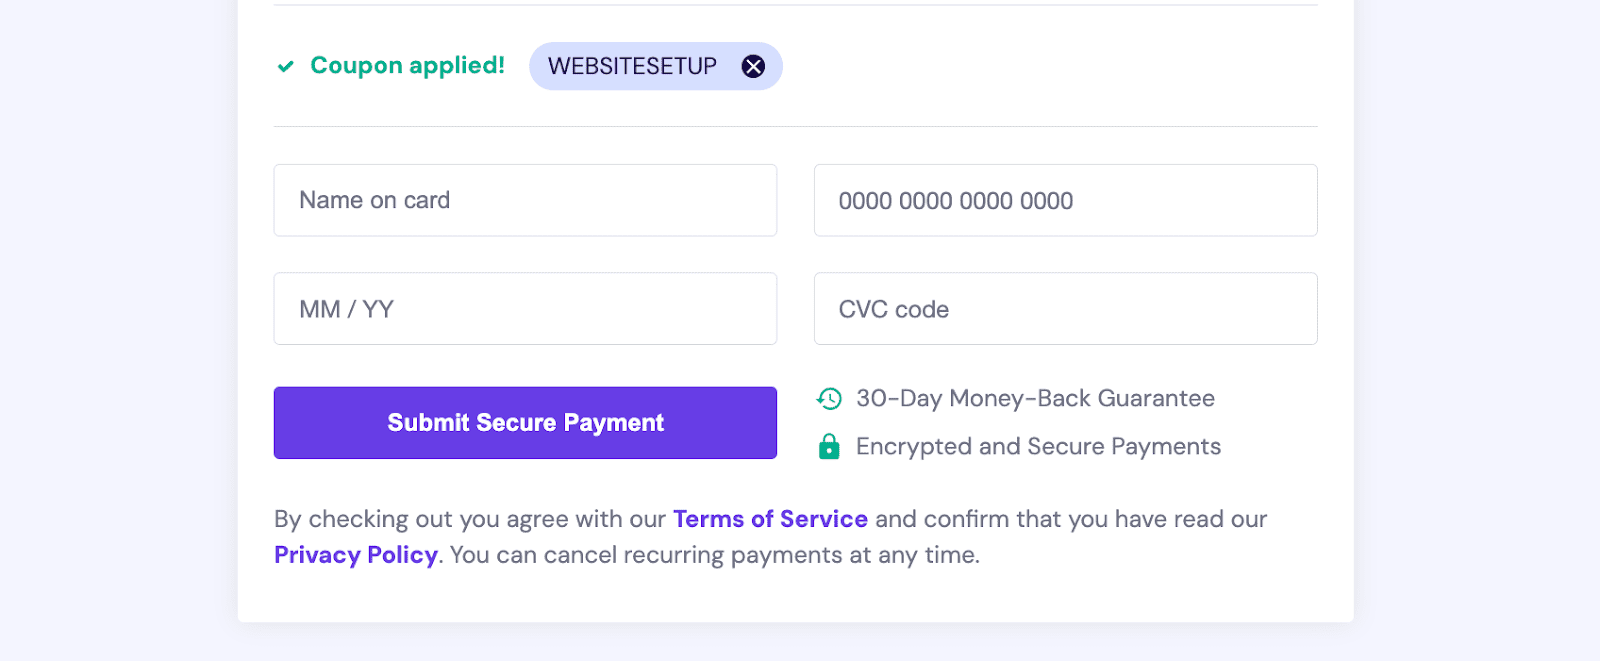
Next, fill out all the required information, such as your first and last name, address, email, and don’t forget to use our coupon code WEBSITESETUP.
Before you enter your payment information, double-check all the above criteria, and if everything is correct, click “Submit Secure Payment.”
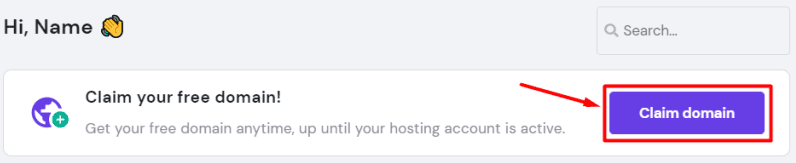
Claim your free domain for one year (Premium Plan)

After completing the purchase, the next stage is to connect your new domain name with Hostinger or register a free domain name (for the first year) directly with them.
You’ll be prompted with three different options to name your website during the hosting setup process. If you’re not sure about the domain name yet, there’s an option to skip this step.
You can otherwise claim your free domain (free for 1 year). If you skipped the option or missed the chance to claim your free domain, don’t worry — you can access the option later through the members area.
Step 3: Set up your website
Congratulations! By now, you should have a domain name and web hosting.
Now it’s time to set up a website.
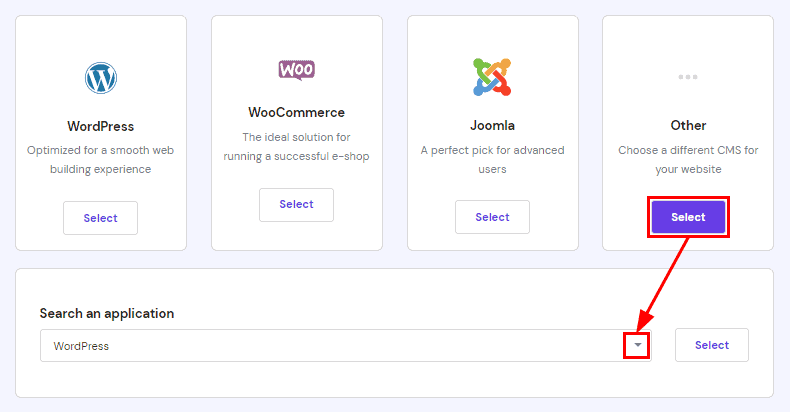
In this example, we will be using WordPress.
WordPress is the most popular free website builder, powering over 40% of all websites on the internet. You can find different statistics from (here, here, and here). WordPress is pretty straightforward and doesn’t come with a huge learning curve.
Since you already have a domain name and web hosting, you can set up WordPress completely free through Hostinger or any other web hosting provider that has one-click installs for free website builders.
Step 1: Log in to your web hosting account.
If you are using Hostinger, go to https://hpanel.hostinger.com/
Step 2: Install WordPress
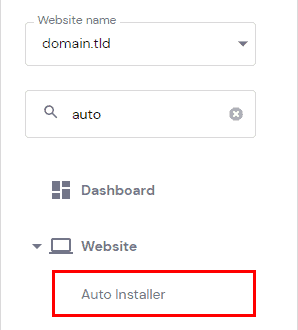
In Hostinger, installing applications automatically is very straightforward. Simply navigate to Websites → Manage. Search for the Auto Installer on the left sidebar and click on it.
If you are using other hosting providers, search for “WordPress” within their dashboard.
Next, you will need to add some basic information about your site, which you can change later on, such as website title, email address, username, and password.
If you get stuck installing WordPress on Hostinger, read this guide.
Step 4: Design your website
Once you set up your WordPress website, you can log in from yourdomain.com/wp-admin.
After logging in, navigate to your WordPress dashboard and select “Appearance” from the left-hand menu.
Here, you can tweak your website’s theme, layout, colors, and fonts.
Essentially, every visual change you want to make on your website can be done through the “Appearance” tab.
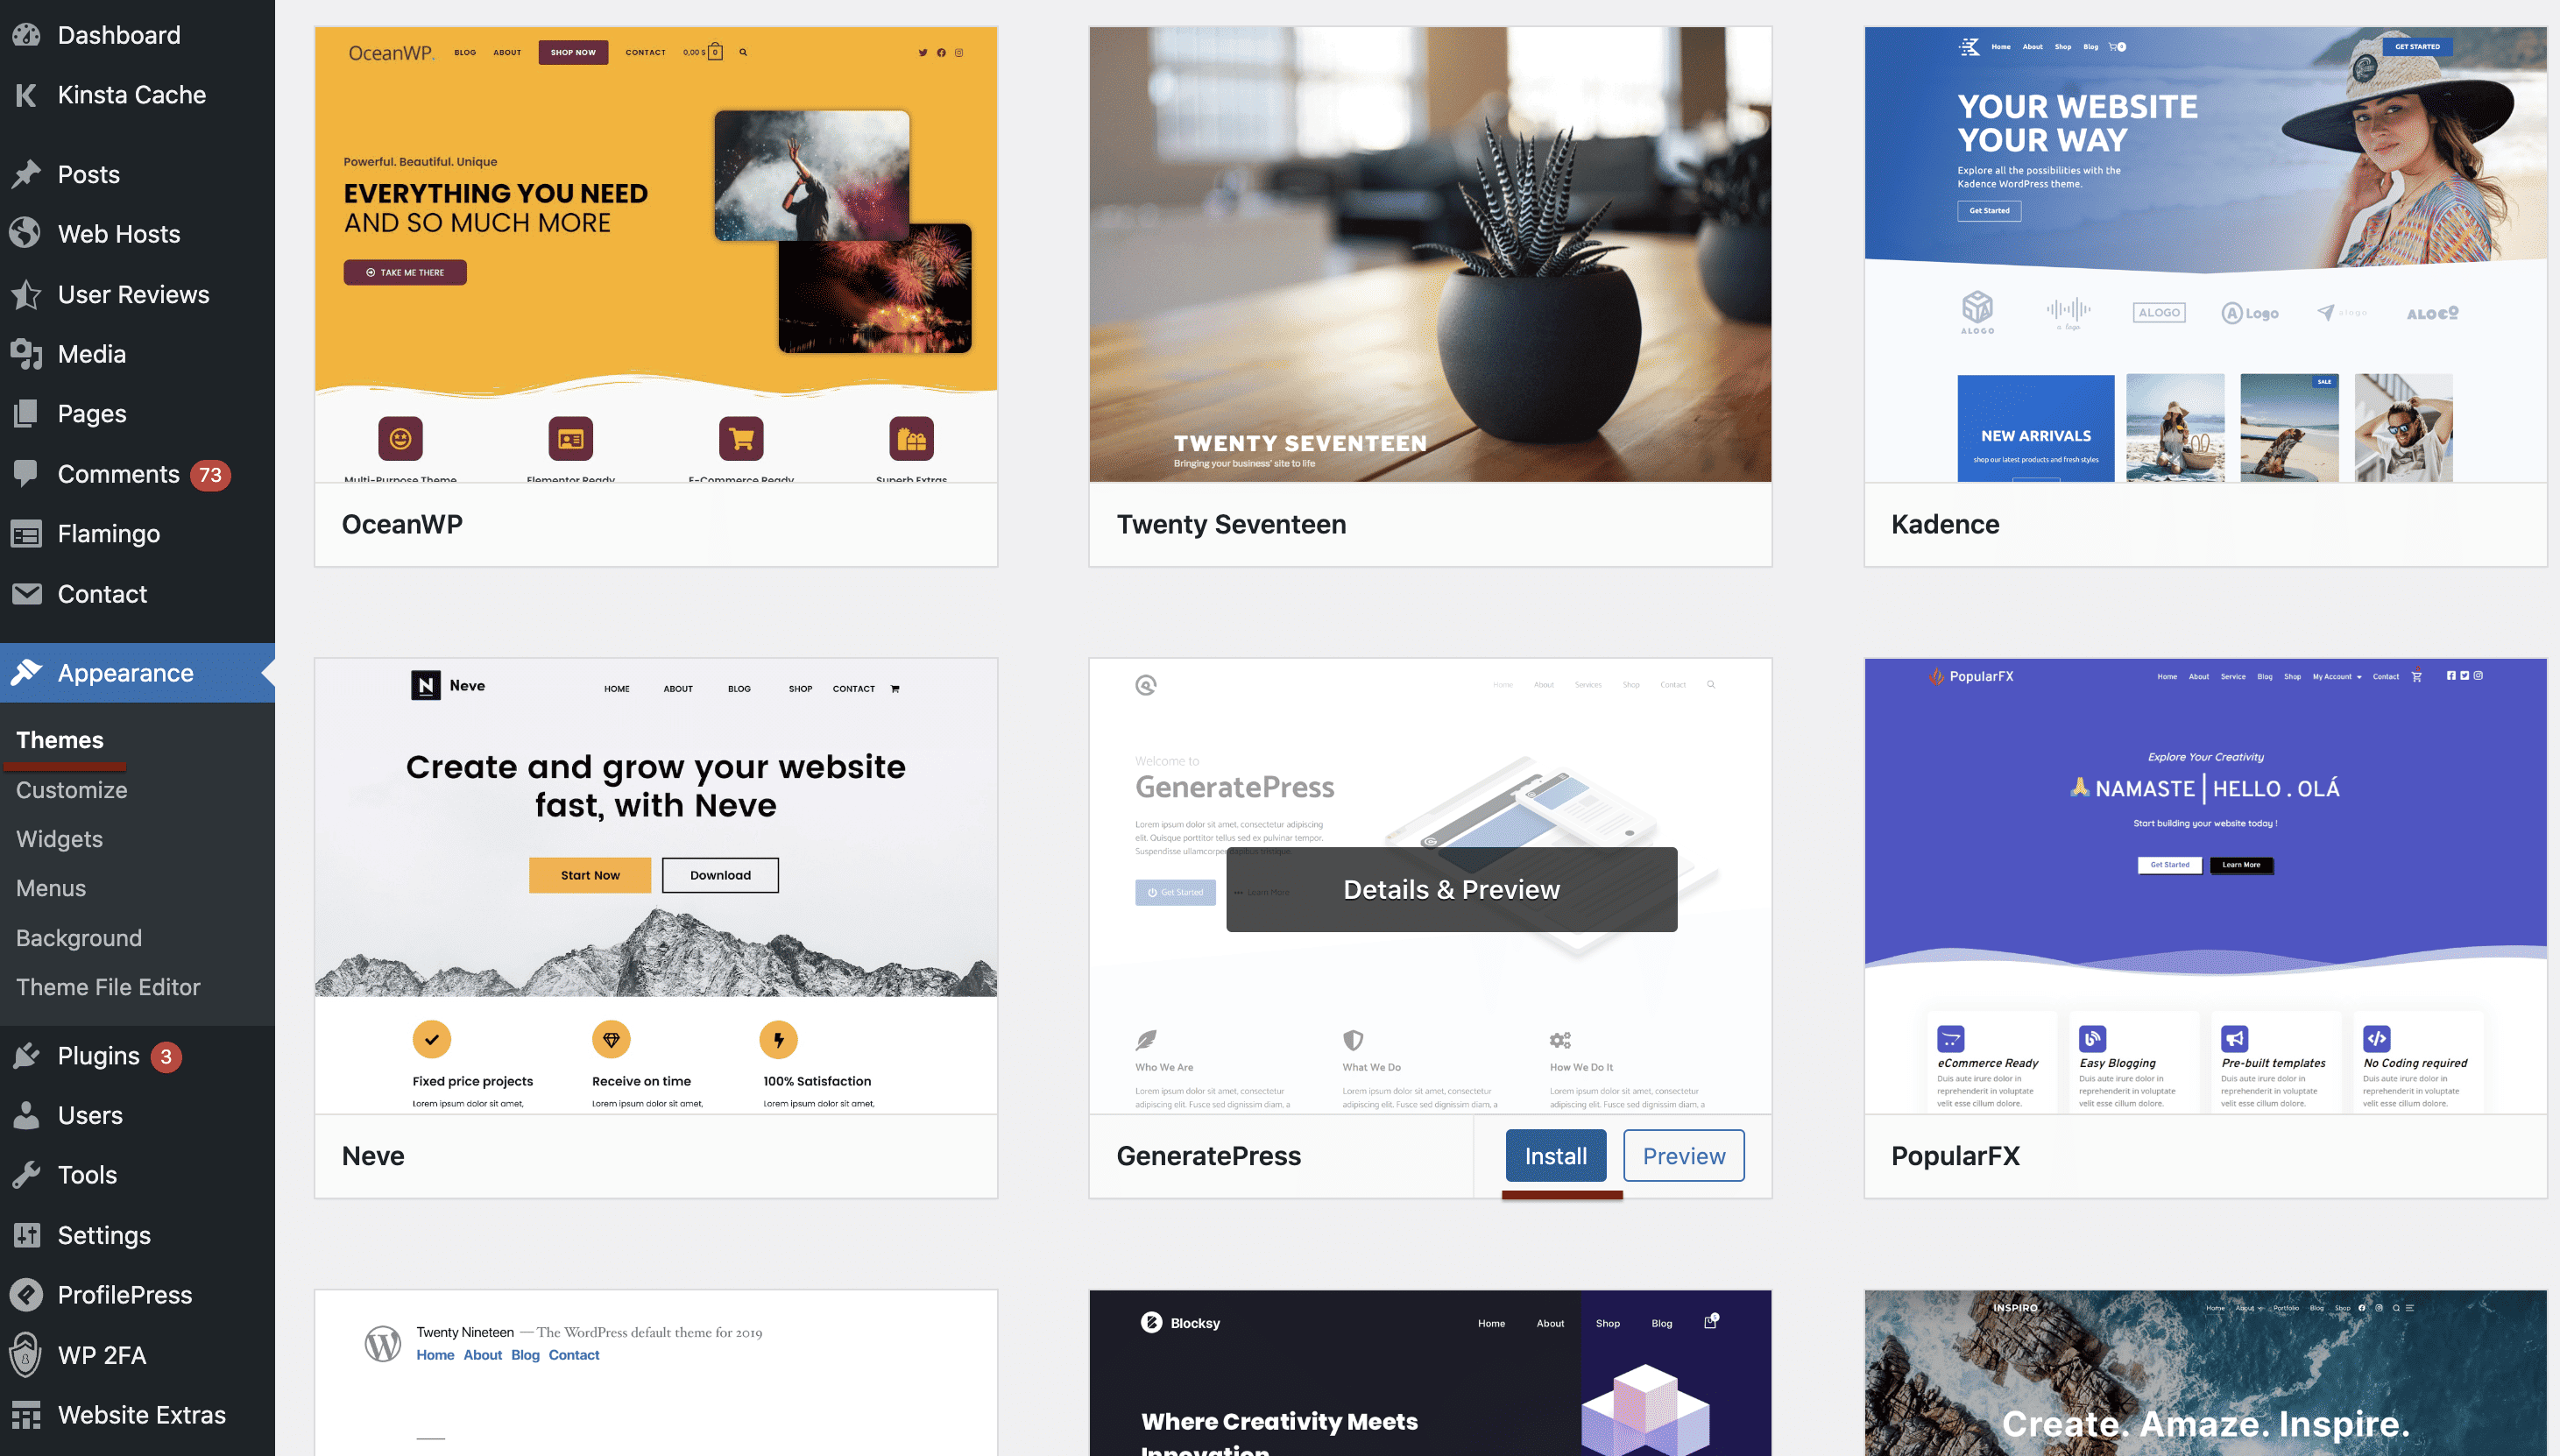
Once you choose the right theme, simply click “Install” and then “Activate.” To help you choose, we’ve put together a list of the best free themes on WordPress.
Take your time to find the right theme for your website. Don’t worry if you choose something that you don’t like — you can always change it back.
Step 5: Create website structure and add pages
Once you have chosen a template, you need to create a structure and add the most important pages.
These are usually:
- Homepage
- About us
- Contact page — here, you can add your social links (Facebook page, Twitter, etc.)
- Our services/products
- Blog
- Gallery
- Testimonials/reviews
Do some brainstorming to determine which pages you need the most, and start from there. Make sure you include those important pages in your header and footer so visitors can access them easily site-wide.
If you’re unsure what your website should include, read this article about the 12 critical elements every site needs.
Adding pages and publishing content
A blank website without any pages or content isn’t of much use to anybody, so in order to make the website accessible and interesting, we need to add some pages and blog posts.
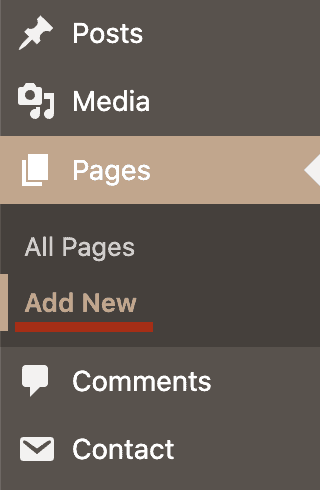
To add pages to your WordPress site, navigate the left-hand menu to “Pages,” and from there, click the button “Add New.”
That will take you to the WordPress block editor.
If it’s your first time visiting this, it will display a quick step-by-step tutorial on how it works and where certain functions are located.
It’s quite easy to work; everything is block-based, which means if you want to add something to your page, you simply need to choose the correct “block” from the menu and fill it in. You can learn more about the block editor in our guide.
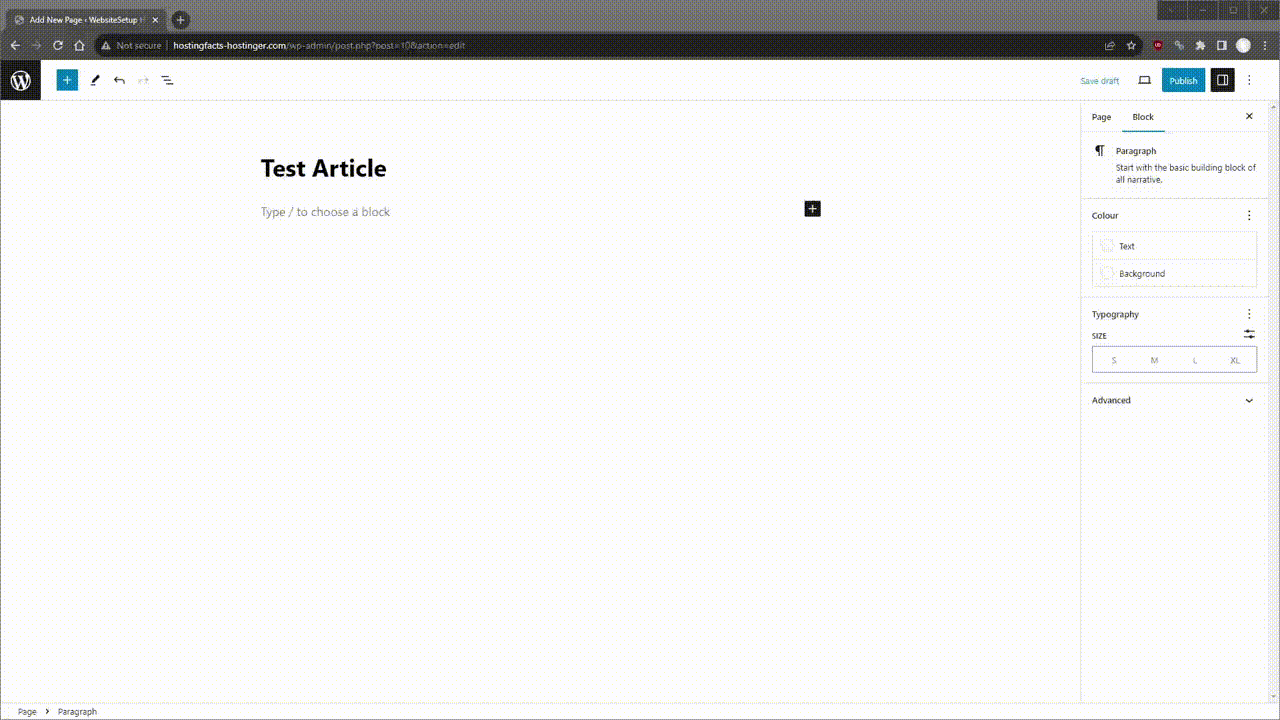
On the left, in the content block section, there are multiple content options to choose from. Each serves a different purpose and adds a different visual element to the page.
Alternatively, the right-hand menu allows you to change some page-wide settings, like the author, the page’s permalink (URL), the featured image, and more.
On the top of the right-hand menu, you can click on the “Block” tab and customize the settings for each block you’ve selected on the page.
Once you’re happy with the page, you can make it public or private. The former will make the content visible to any visitor, while the latter means that it is only visible to you via your website dashboard — this is a useful option to use when still working on a particular page.
There’s also an option to preview the changes you’ve made or to schedule a date and time for the page to be published.
Creating a structure and navigation
Now that you’ve created the pages, you need to add them to the navigation (menu) bar.
That is the menu located throughout your website that provides visitors with access to the rest of the content.
In WordPress, you can customize your navigation system by clicking the “Appearance” tab on the left-hand column followed by “Menus.“ After you’ve created the menu, you can start adding and organizing the pages there.
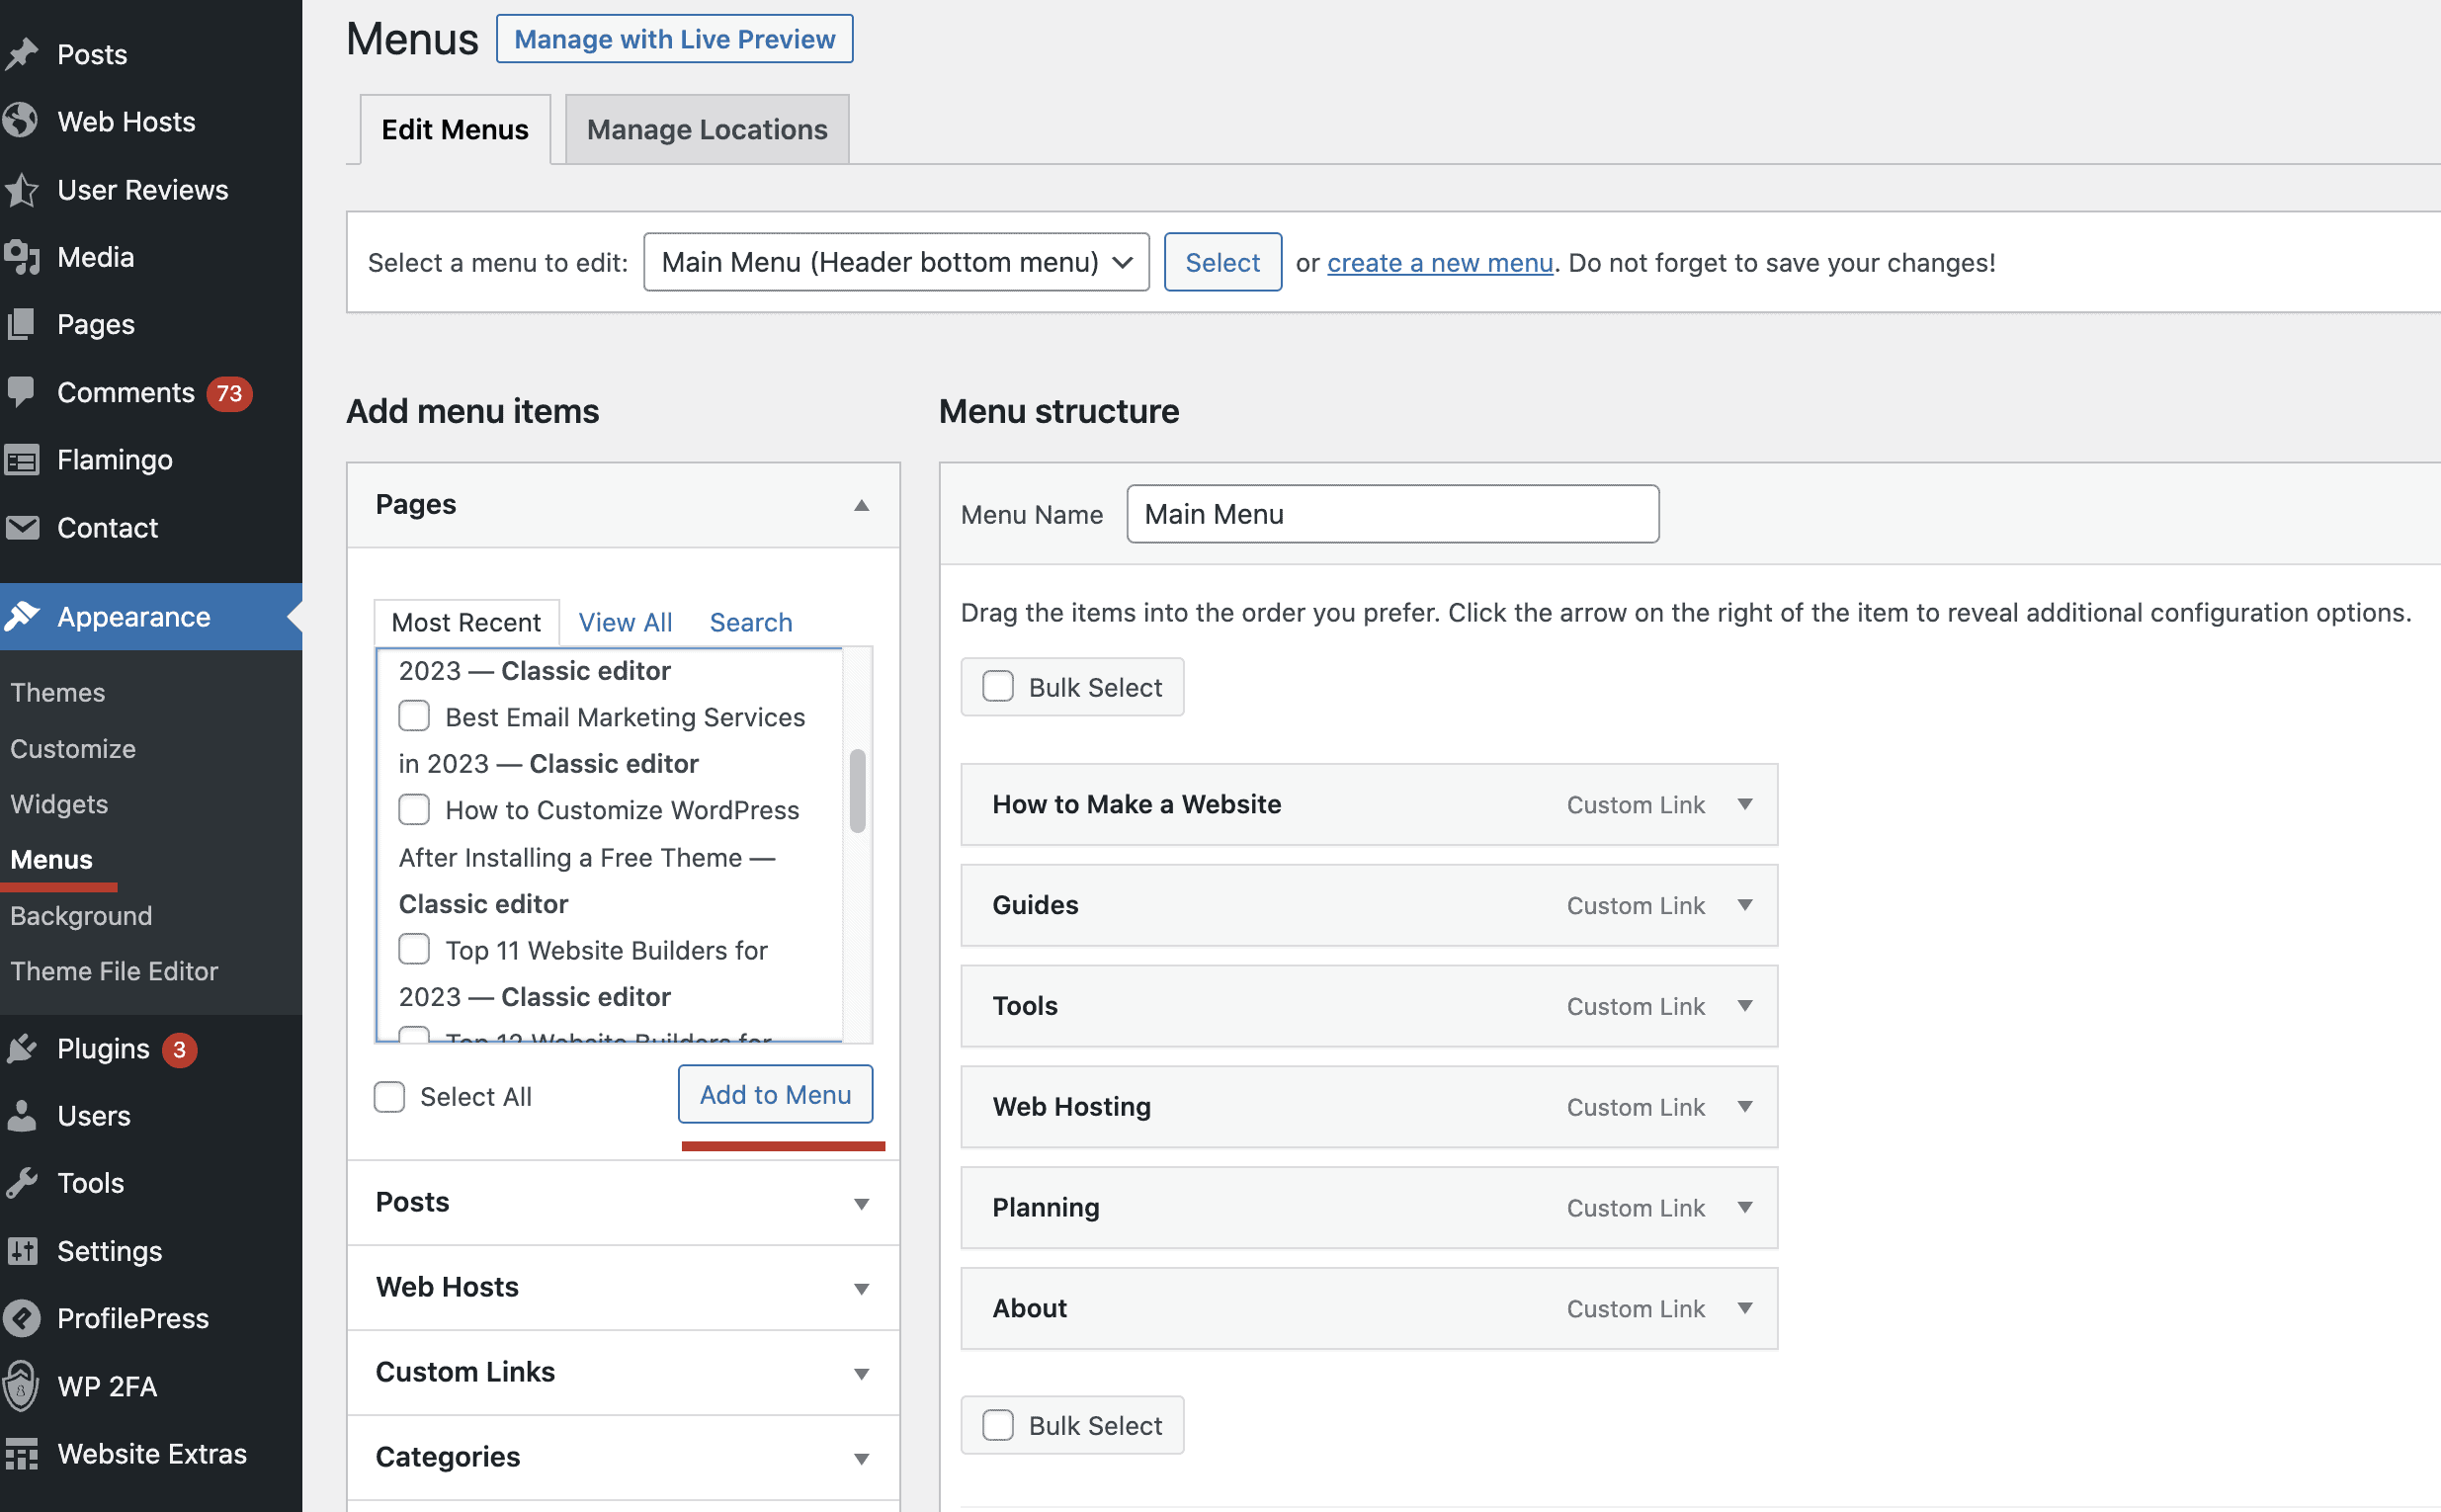
You can also create sub-items, meaning that pages will be revealed when users hover their mouse over them.
Step 6: Add a logo and a favicon
At this point, your website has content and structure, meaning you’re almost across the finish line. To wrap things up, you need to include a logo and favicon. Both of these can be added through the “Site Identity” menu.
To access it, go to “Appearance” on the left-hand menu and click “Customize,” followed by the “Site Identity” option. Under the “Logo” section, click “Select Logo” and choose your logo file from your images or upload it. Once you’ve done that, your logo will automatically appear on your website.
If you want your logo to appear next to your website’s name in the URL bar, you do that by adding a favicon. You can upload your favicon in the “Site Identity” menu under the “Site Icon” section.
You can create a favicon by using any of these free favicon generators. They can convert your logo into the right shape and size image for a favicon.
Your website is ready!
Well done! At this stage, your website should be up and running smoothly.
If you encounter any difficulties or need assistance with your website setup, please don’t hesitate to get in touch.
Additionally, it’s important to link your website with Google Search Console. This valuable tool, also known as GSC, helps you monitor traffic from search engines and identify which content resonates most with your audience. Google Search Console provides a comprehensive view of your website’s performance, offering insights that are essential for its upkeep. The configuration process for this tool is straightforward and should take roughly 10 minutes. Here you’ll find a detailed guide to help you through each step.