Why should you learn how to add custom fonts to WordPress?
Well, choosing the right typography for your website is a central part of web design and branding. Like colors, images, and other elements, fonts play a big part in how your visitors perceive your site.
Thankfully, this is also one of those aspects that WordPress lets you customize freely. The platform pretty much allows you to use any custom font you want. In order to help you do that, in this post we will cover everything you need to know about working with fonts on WordPress:
- Why Use Custom Fonts on Your WordPress Website?
- Where Do I Find Custom Fonts for WordPress?
- 7 Ways to Add Custom Fonts to WordPress
- In a Nutshell: Custom Fonts and WordPress
Let’s get started.
Why Use Custom Fonts on Your WordPress Website?
Typography is a science in itself and we won’t be able to give you a full course on the use of fonts in web design here. After all, it’s not just about the font itself but also its size, slant, thickness, and a lot of other factors. However, we can cover why using custom fonts on your WordPress site is a good idea, which is exactly what we will do now.
1. Typography is Part of the First Impression
The font you choose has a lot of impact on how people perceive your site. Is it fun and playful? Professional and informative? Visitors decide this with one glance and your typography plays a big role in their perception.
Consequently, you might want to pick a font the reinforces what you would like them to think about you. Otherwise, why use it in the first place?
2. Fonts Play a Bigger Role Than You Think
The print type can affect your ability to learn, memorize texts, and even affect your mood. Among other things, studies have found that:
- Readers better recall information displayed in bold or larger font sizes.
- Harder-to-read fonts lead to better information recall and a stronger focus.
- On the flipside, typefaces that are easier on the eyes increase reading speed.
- Perception of content changes depending on the font it appears in.
Moreover, typography can affect our judgment.
In one study, people were questioned about their feelings of security in a catastrophic event. Readers were asked if they agreed with a certain statement and to what degree. However, the real agenda behind the study was to test whether the subjects would find the statement more believable depending on the choice of font. The fonts used were Georgia, Comic Sans, Computer Modern, Baskerville, Helvetica, and Trebuchet.
The result? Baskerville had a 1.5% increase in people agreeing with the “we live in an era of unprecedented safety” statement.

In short: The design of the typeface on your site has a huge impact on your readers. Reason enough to learn how to add custom fonts to WordPress, don’t you think?
Where Do I Find Custom Fonts for WordPress?
Alright, now that you know why customizing your website’s typeface might be a good idea, let’s move on to the second step: Where do you find tailored fonts?
There are several services available. One of the most well-known is Google Fonts. As the name suggests, this is a service by Google that offers almost 1,000 different fonts. Completely free. For everyone. Here’s how to use it.
1. Go to Google Fonts and Start Filtering
When you first go to the Google Fonts page, this is what you will see:

If you already have a font in mind, simply type its name into the search field in the upper left corner. If not, you can filter what’s available in many different ways, for example, by category:
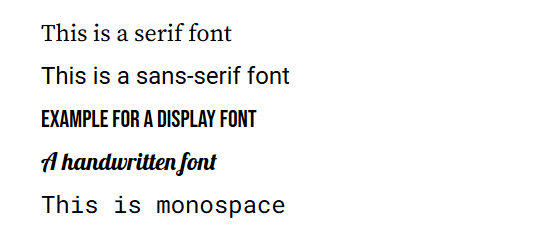
- Serif — Meaning fonts with squiggly lines at the end.
- Sans-Serif — Simple fonts without the squiggles. What we use here on websitesetup.org is an example of that.
- Display — Typefaces that are suitable for larger sizes such as headlines.
- Handwriting — Do you want your typography to look like it was written by hand? Then this is your setting.
- Monospace — Typography where all characters occupy the same space,
like this.
If you are still unsure, here are some examples:
Other filters include:
- Languages — Limit your font choice to certain languages including those not in the Latin alphabet such as Arabic, Thai, or Vietnamese.
- Font properties — Filter fonts by a number of styles (meaning whether they are available in italic, bold, and more), thickness, slant, and letter width.
- Show only variable fonts — Limit your choices to only variable fonts. These contain all styles in a single file and are a pretty new and exciting development in web design.
You can also switch the font list between grid and list view as well as sort fonts by trending, most popular, newest, or alphabetically.
When you apply any filters, your search results adjust in real-time. You will see available fonts in your category and example sentences. Use the top bar to switch between seeing a sentence, the alphabet, a paragraph, or numerals. You can even input your own custom text and change the font size with the slider.

A click on the reset button on the right reverses all your customizations and filter choices.
2. Check the Font Details
Once you find a font to your liking, simply click it to get to its individual page.

Here, you’ll see all available styles and examples (again, with the possibility to change the preview text and font size). Further down is a list of all available glyphs (meaning letters) in this custom font.

Then, you will find information about the typeface like its author and license. However, most importantly, at the bottom, Google Fonts displays popular pairings with this particular font.

This is super practical if you are not a designer and aren’t too sure about how to combine print types with one another.
3. Add Preferred Fonts to Your Collection
If you have found the right font for yourself, use the Select this style button to add it to your collection. Doing so will open a menu at the right where you will see all your picks.
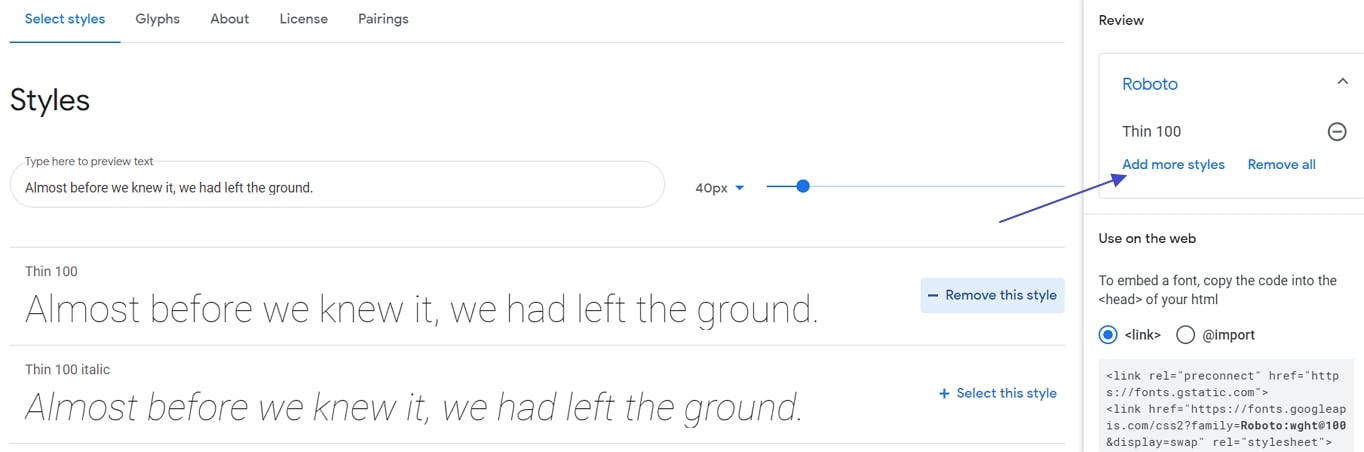
Note that you can add more than one font family. This makes sense, for example, when you are choosing one for your body copy and another for headings.
Same for different styles of the same font. There is even a link in each font family that easily lets you add more. This is useful if you want to use fonts in different levels of thickness.
However, be careful: the more fonts and styles you load, it can start to hinder your WordPress site speed. So keep that in mind when choosing your fonts.
Under Embed, you can find some pieces of code to use the fonts on your site. This will become important later on.
In normal view, you also get a Download families button at the bottom allowing you to transfer the font files of the selected fonts and styles to your computer. That way, you are able to use them locally, for example, in Photoshop or other web design tools. Later, we will also show you a way to upload these files to your server and host fonts directly on your site.
Additional Sources for Finding Customs Fonts for WordPress:
Google Fonts is not the only service of its kind. Here are some additional places where you can find custom fonts for your WordPress site:
- Font Squirrel — This site collects free and premium web fonts that you can filter in many different ways to find the right one for your project. Yet, they are all for download, not remote integration like Google Fonts.
- Dafont — One of the oldest font libraries on the Internet with more than 60,000 typefaces available. Use the myriad filtering options to hone in on your desired choice and download it to your computer.
- Urbanfonts — Similar to Dafont with fewer fonts but better site design.
- Adobe Fonts — Under the name Typekit, this used to be the second big player in free web font libraries next to Google Fonts. By now, their free account still offers access to 200+ web fonts. However, for the full 1,900+, you need an Adobe Cloud subscription starting at $4.99/month.
- Fontstand — A place to rent fonts hosted off-site on a subscription model basis. Their business model is a bit convoluted but probably good for big business projects. Close to 2,000 typefaces are available.
- Type Network — Similar to Fontstand, this site offers hosted and self-hosted fonts to buy. The price increases by the number of page views and they have almost 400 font families in stock.
Using the above resources, you should be able to find a font that suits you. In addition, you may also want to read our post on web-safe fonts. Finally, if you are having trouble properly combining fonts, use Font Pair where designers have done the legwork for you.
Alright, now it’s time to talk about how to add any of the custom fonts you found to your WordPress site. There are several ways to do so.
7 Ways to Add Custom Fonts to WordPress
When it comes to adding custom fonts to WordPress by hand, they usually involve one of these three options: HTML + CSS, PHP, or Plugin. There are pros and cons to each method and which one is the right one for you depends on your setup. Don’t worry, we will go through each of them in detail.
1. Using “Fonts Plugin”
The WordPress sphere wouldn’t be what it is if there weren’t several plugin solutions for adding custom fonts to the platform. The one we will be looking at right now is simply called Fonts Plugin. It makes using Google fonts on your site really easy. Below we will also discuss if there are better choices.
Install the Plugin
The first step is installing the plugin. To do that, head on over to Plugins > Install New. Then, search for the plugin’s name. In the search results, click on Install Now and activate the plugin once it’s on your site.

Add/Change Fonts on Your WordPress Site
Changing fonts on your site is extremely easy. Simply go to Appearance > Customize > Google Fonts.

Note that the plugin also creates a menu item under Appearance > Google Fonts. However, here you will only find an opt-in form for their newsletter (in exchange for a quick-start guide for the plugin). You do not have to fill this in to be using the plugin!
In the Customizer under Google Fonts you find the following options:
- Basic Settings
- Advanced Settings
- Debugging
Let’s go over them step by step.
Basic Settings gets you to this menu:

As you can see from the labeling, this lets you change the typeface for your content, headings, and buttons/inputs. To do so, simply click the drop-down list to access the list of available systems and Google fonts.

Type in the name of a font or scroll down to find it. After a click, you can instantly see the change in the preview window on the right.

For additional settings, click the blue icon to the right of the drop-down menu. Here, you can pick different font weights (like bold or slim) and styles (like italic) depending on what’s available.

Once you are happy with your choices, click Publish at the top to make them permanent.
That’s pretty much it. Simple, right? All of your changes also automatically translate to the WordPress editor.
Use Advanced Settings
Under Advanced Settings you find pretty much the same options as above. However, here they are broken down into more detailed options.

Here’s what you can change under the different menu items:
- Branding — Change the font of your site title and description.
- Navigation — Configure the typography of navigation menus.
- Content — Make changes to your content typography as well as each of the heading tags (H1-H6) individually.
- Sidebar — Font controls for sidebar headings and content.
- Footer — Same as above but for the site footer.
In addition, you have the Load Fonts Only option. Here, you are able to load Google Fonts onto your site without assigning them to any type of content yet. This can be useful, for example, if you are planning to call the font manually via CSS. That way, you don’t have to load it onto your site manually.
It’s Not Working, What Do I Do?
If you are having problems getting your custom fonts to work on your WordPress site, you can find solutions for it under Debugging.

Here, you can do two things: force styles and reset all fonts. When you hit the checkmark for the first option, the plugin will overwrite any existing fonts on your site. This is useful if you are having trouble with some of your text not taking on the changed fonts.
The button Reset All Fonts, on the other hand, reverses all the changes you have made and returns all typography on your site to the default. For more info, there’s also the documentation.
That’s all there is to this plugin. Be aware that it also comes with a Pro version. The paid edition allows you to change font size and color, optimize the font loading process to increase site speed, host the font files locally, and more. Licenses start at $29.
Alternative Custom Fonts WordPress Plugins
There are also other WordPress plugins available for adding custom fonts. Unless you are planning to purchase the Pro version above, we advise you to have a good look.
As mentioned, due to GDPR concerns importing fonts from Google’s servers might not be a good idea. Thus, you would do well checking out the alternatives for options that allow you to locally store the font files.
- OMGF – Can automatically download any Google fonts included in your theme to your local server, create a style sheet to use them, and remove any external requests. Easy to use, too!
- Use Any Font – Helps you use uploaded fonts without any CSS. The plugin houses fonts on your own server and also offers tools to convert them to the right format.
- Custom Font Uploader – Upload local font files and Google fonts to your site with an easy-to-use interface.
- Custom Fonts – Embed font files in different formats in WordPress. Works similar to Fonts Plugin and supports many page builders.
- Custom Adobe Fonts (Typekit) – If you are using Adobe Fonts, this plugin makes it easier to call your chosen typefaces to your WordPress site. All you need is your project ID. Easy peasy.
2. Using CSS and @import
Let’s start with the least recommended method. If you plan to install custom typefaces from Google Fonts, you might have noticed that it has a tab labeled @import under Embed. Here, you find a piece of CSS code like below.
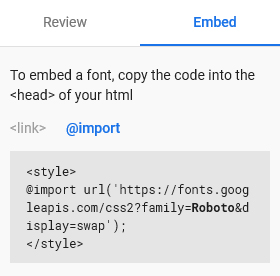
You can either take it as it is and insert it into your header (more on that below) or copy it without the <style> brackets to the beginning of your theme’s (or better yet, child theme’s) style.css file.
/*
Theme Name: Twenty Twenty Child
Theme URI: https://wordpress.org/themes/twentytwenty/
Template: twentytwenty
Author: the WordPress team
Author URI: https://wordpress.org/ Version: 1.0*/

@import url('https://fonts.googleapis.com/css2?family=Roboto:wght@700&display=swap');

/* additional CSS goes here */
Doing so will load the font into your site from the style sheet. It seems like a simple solution, right? Then why is it the least recommended?
The reason is performance issues. Using @import prevents browsers from downloading several style sheets at once.
The consequence: slower page loading times.
3. Using a WordPress Template File
Another method to get the fonts on your site is to take the code provided by the font libraries and copy them into your header.php template file. Most standard WordPress themes have it.
Make sure to place it somewhere between the <head> and </head> brackets. That way, your font will load whenever any page is loaded.

If you are using a child theme, be sure to copy the parent theme’s header.php file into the child theme directory and make the changes in there.
Some themes come with settings that allow you to add custom code to your header and footer via the back end. This is also a viable option as well as a plugin like Insert Headers and Footers.

4. Using @font-face
So far, we have only talked about how to use custom fonts in WordPress that are hosted somewhere else, namely the servers of Google. However, it’s also possible (and often recommended) to host fonts on your own site and make them available to visitors’ browsers from there.
To do this, you first need to acquire the font in question. Remember the download button in Google Fonts? That one will become handy now. Other providers also let you download fonts.
When you do, make sure you get it in a web font format. That means TTF, OTF, WOFF, or WOFF2. If you don’t have the right web font format, you can also use this service to convert your font into a supported one.
Once you have your font files ready, you need to upload them to your WordPress site via FTP. A good place to store them is in a subdirectory of your child theme named fonts (creative, right?).
After that, you need to load the font in your style sheet via @font-face. Here’s what it looks like:
@font-face {
	font-family: Roboto;
	src: url(https://localhost/wordpress/wp-content/themes/twentytwenty-child/fonts/Roboto-Regular.ttf);
	font-weight: normal;
}
Remember to replace the name of the font and path to its location with that on your own site. After that, your new custom font will be usable. Further below, we will also mention some plugins that can do this for you.
5. Enqueueing Fonts – The “WordPress Way”
If you want to add custom fonts to WordPress in the correct way, you will do so via your theme’s functions.php file and the functions wp_enqueue_script or wp_enqueue_style.
With their help, you can use the code snippets provided by Google Fonts. However, instead of copying them into a file, we will add them to the header via a function.
What’s the difference between wp_enqueue_script and wp_enqueue_style? As their names suggest, one is for adding scripts, one for style sheets. Which one is right to use depends on how your custom fonts are provided from their source.
For example, Google Fonts gives you fonts as style sheets. In that case, you would add them to your WordPress site this way:
function add_google_fonts() {
	wp_enqueue_style( 'google_web_fonts', 'https://fonts.googleapis.com/css2?family=Open+Sans&display=swap' );
}

add_action( 'enqueue_block_assets', 'add_google_fonts' );
In contrast to that, if your provider offers their fonts as JavaScript, you would use wp_enqueue_script instead. Here’s an example of what that may look like:
function add_custom_fonts() {
	wp_enqueue_script( 'my_custom_fonts', '//fonts.myprovider.com/open-sans.js' );
}

add_action( 'enqueue_block_assets', 'add_custom_fonts' );
This also works with local fonts if you move the @font-face rule mentioned above into its own style sheet (e.g. fonts.css), save it in your theme folder and then call it in functions.php like so:
function add_local_fonts() {
	wp_enqueue_style( 'local_web_fonts', get_stylesheet_directory_uri() . '/fonts.css' );
}

add_action( 'enqueue_block_assets', 'add_local_fonts' );
Wasn’t so difficult, was it? Plus, you get extra points for doing it the WordPress way.
Enqueueing Multiple Google Fonts
A quick warning: Google Fonts recently changed the syntax they provide for linking to fonts on their service. As a consequence, there are some problems when trying to enqueue several fonts in WordPress in the same function.
wp_enqueue_style( 'google_web_fonts', 'https://fonts.googleapis.com/css2?family=Open+Sans&family=Roboto&display=swap' );
Because of the repetition of the &family= parameter, WordPress ignores the first and, consequently, only enqueues the last font family in the link. Hopefully, there will be an official solution either by WordPress or Google soon.
For the moment you have two ways to work around that. The first is to set the version of the enqueued style to null like so:
wp_enqueue_style( 'google_web_fonts', 'https://fonts.googleapis.com/css2?family=Open+Sans&family=Roboto&display=swap', [], null );
The second is to revert the link you get from Google Fonts back to the old format. You can do that by changing css2 to just css and replacing all but the first ?family= with | (which means “and” in PHP, more information in this cheat sheet). Here’s what that looks like:
wp_enqueue_style( 'google_web_fonts', 'https://fonts.googleapis.com/css?family=Open+Sans|Roboto&display=swap' );
As mentioned, this is not ideal but it is what we are stuck with at the moment.
Google Fonts and GDPR
If you own and run a website, you are probably aware of GDPR or the European General Data Protection Regulation that went into effect in 2018. The goal of these rules is to limit the sharing of consumer data in order to protect personal information.
Unfortunately, when implementing fonts from Google on your website, the IP of any visitor who downloads them to see your site will automatically be shared with Google and, most likely, sent to servers in the US. This is problematic under the new rules.
So, if you are subject to GDPR rules (and anyone who operates within the European online market is), this means you have to find a solution. So far, there are three ways you can deal with this predicament:
- Keep using Google Fonts and hope it’s fine (not recommended).
- Set up a mechanism that allows you to get consent from your users before they load Google Fonts (and share their IP with the Google servers). There is software for that out there.
- Download and host the fonts locally. This is often the easiest solution and we have already provided steps on how to do that further above.
6. Calling Custom Fonts in Your Style Sheet
Now that the fonts are present on your site, you can officially use them. To do so, all that’s left is to add a declaration for the new font in your style sheet. For example, to change the font for your heading tags, you would use something like this:
h1,
h2,
h3,
h4,
h5,
h6 {
	font-family: 'Roboto';
}
open-sans as opposed to 'Open Sans' in Google Fonts.
7. Using Custom Fonts in Gutenberg
With the above code, you can modify the look of your typography on the front end of your site. However, it will not change the way your content looks when you create it in the WordPress editor.
Since one of the main points of the WordPress Gutenberg editor is to make the transition between the editing process and the end result more seamless, this is a big no-no. Therefore, it’s important to mention how to deal with this.
We have already done the first step above by hooking the enqueued fonts into enqueue_block_assets instead of wp_enqueue_scripts, which used to be the normal procedure.
This makes the font available both on the front end of your site and inside the Gutenberg editor. You already know how to modify the typeface of the visitor-facing side of your website. However, to make similar changes inside the editor takes an additional step.
Create an Editor Style Sheet
That additional step is setting up a style sheet for the editor. Here’s the code for that, which belongs in your theme’s functions.php file:
add_theme_support( 'editor-styles' );
add_editor_style( 'style-editor.css' );
The first line adds support for an editor style sheet in WordPress, the second line tells WordPress what it’s called and where to look for it. In this case, that’s style-editor.css and it is located in the root directory of your active theme’s folder.
However, you can call the file whatever you want and also put it in some other location in your theme folder if you want like so:
add_editor_style( 'assets/css/make-gutenberg-prettier.css' );
The important part is that you actually create a file of that same name and place it in the specified location. When you have done so, you can open it and add your custom fonts to Gutenberg like so:
h1,
h2,
h3,
h4,
h5,
h6 {
	font-family: 'Roboto';
}

p {
	font-family: "Open Sans";
}
That’s it. You now know how to add custom fonts to WordPress manually.
Congratulate yourself, this is some next-level knowledge!
In a Nutshell: Custom Fonts and WordPress
Adding custom fonts to your WordPress site is a great idea to improve the design, branding, and user experience on your website. These days anyone can choose from a wide range of fonts to use on their site.
Above, we have shown you how to find custom typography on Google Fonts and alternative sources. We have also gone over how to call custom fonts in WordPress in different ways (remote and local) and assign them both to the front end and back end. Moreover, we looked at how to achieve the same with a plugin solution.
By now, there’s no reason why you would be using any old font on your website. From now on, customizing your WordPress typography is totally in your hands.
How do you add custom fonts to WordPress? Any additional tools you can recommend? Let us know in the comments section below!