Surveys consistently show that a large majority of internet users read blogs at least occasionally – often around 8 in 10 – so starting a blog can help you reach a broad audience.
In 2026, it’s easier than ever to start a blog – even if you’re a complete beginner and don’t understand coding or web design.
However, blogging is a competitive industry. If you want to succeed, you need expert tips and the right tools.
In this step-by-step guide we’ll walk you through every part of the process while helping you avoid the common mistakes new bloggers tend to make. By the end, you’ll have your very own personal or professional blog up and running in less than 30 minutes.
How to Start a Blog in 5 Easy Steps
- Step 1: Choose your blog topic and name
- Step 2: Find the right blogging platform
- Step 3: Set up web hosting
- Step 4: Configure your blog
- Step 5: Design and customize it
Time to set up a blog: 30–40 minutes
Time to customize a blog: 1–2 hours
Guide difficulty: Beginners
Beginner’s Guide to Starting a Blog: Video Tutorial
If you’re more of a visual learner, check out our step-by-step video tutorial on how to create a WordPress blog. Otherwise, read on.
STEP 1 – Choose Your Blog Topic and Name
The very first thing you need to do is choose a topic and a name for your blog.
Most successful blogs focus on one thing, whether it’s food, travel, fitness, fashion, or simply about your business.
Follow these three easy steps to choose a blog topic and find your niche.
1. Pick a Topic
We recommend choosing a blog topic that you feel passionate about or interested in. It’s even better when you’re an expert at something, as this helps you to grow your blog through writing quality content to help others.
Ask yourself the questions below and try listing at least 10 topic ideas.
- What do I want to learn more about?
- Do I have a hobby or passion that I can share?
- What do I enjoy writing about?
- Am I an expert in something?
- Am I passionate about something?
Here’s an example: If you’re interested in fitness and you like to train, it’s wise to share your knowledge in a blog that’s related to fitness or cover topics on training and nutrition. Through the blog, you’ll be able to get new clients.
Popular blog niche ideas to consider:
- Personal finance (budgeting, saving, investing)
- Health and wellness (fitness routines, nutrition, mental health)
- Food and recipes (meal prep, specific diets, cultural cuisine)
- Travel (destination guides, budget travel, local experiences)
- Parenting and family life
- Lifestyle (home decor, fashion, minimalism)
- Tech and gadgets (reviews, tutorials)
- Career and personal development
- Education and learning
2. Determine Your Niche
Since there are an estimated 600 million blogs on the web, it’s important your niche is as specific as possible. This will help you stand out from the crowd.
Your niche could be a very specific target audience (e.g., high school students in New York City), a specific type of content you’ll share (e.g., step-by-step guides), a subcategory of your topic (e.g., hiking), or a combination of these (e.g., guides for New York City students who like hiking).
Don’t worry about getting your niche perfect from the start. Many successful bloggers refine their focus over time as they learn what resonates with their audience and what they enjoy creating. The key is to start with something specific enough to attract a defined audience, but broad enough that you won’t run out of things to write about.
3. Confirm Market Demand
Once you have a few topic ideas, it’s important to understand whether you’ll be able to monetize your content. Will enough people be interested in what you want to share?
Think of a few keywords related to your topic. You can use tools like Google Keyword Planner and Google Trends to see how popular they are. Alternatively, you can look for online forums in your niche or run surveys to understand the size of your potential audience.
A quick way to validate demand is to search your topic on Google, Pinterest, and YouTube. If you find active blogs, videos, and products related to your niche, that’s a strong signal that people are interested. Forums and Facebook groups are also useful – look at what questions people are asking and what problems they need solved. Those are your future content ideas.
4. Choose a Name
Now that you have some topic ideas, you can start brainstorming names for your blog. To make your blog name stand out, keep in mind the following:
- Think about your goals: Understanding why you’re creating this blog will help you choose the right name. For example, do you want to share formal, detailed guides, or more informal and short blog posts? Make sure your blog name is not misleading about the type of content you plan on sharing.
- Think about your audience: Think about the people you want to read your blog. What name will appeal to them?
- Think about your industry: What are the names of the most successful blogs in your niche? Use these for inspiration, but make sure you come up with something original.
There are three main routes you can take with your blog’s name: your first and last name, the name of your business (if you have one), or a creative new name that reflects your topic or brand personality.
If you’re stuck with ideas or don’t know where to start, just use our blog name generator to get ideas – you can then personalize your name even further by using our tips.
STEP 2 – Find the Right Blogging Platform
Now, let’s get into the more technical details. What’s the best place to start a blog?
Free Blog vs. Self-Hosted Blog
If you’re just getting started and you have limited resources, you might want to consider a free blogging platform. But it’s important that you understand the difference between a free blog and a self-hosted blog.
What Is a Free Blog?
A free blog is a blog that you can create for free using a blogging platform like Blogger.com, WordPress.com, or Tumblr.com.
What Is a Self-Hosted Blog?
A self-hosted blog lives on your own server. Most people pay third-party companies to rent out storage space to you (we’ll cover this in step three).
What Are The Main Differences?
There are many cons and downsides of a free blogging service (limited monetization, customization, and traffic) but most importantly, you’ll have little control over your blog. And if you want to upgrade, you’ll need to pay more than you would if you hosted the blog yourself.
If you host the blog yourself, you’ll have no limitations related to your blog content (such as images and videos). Your blog will look more professional and can be improved as needed. Plus, you actually own your blog. Here are the main differences:
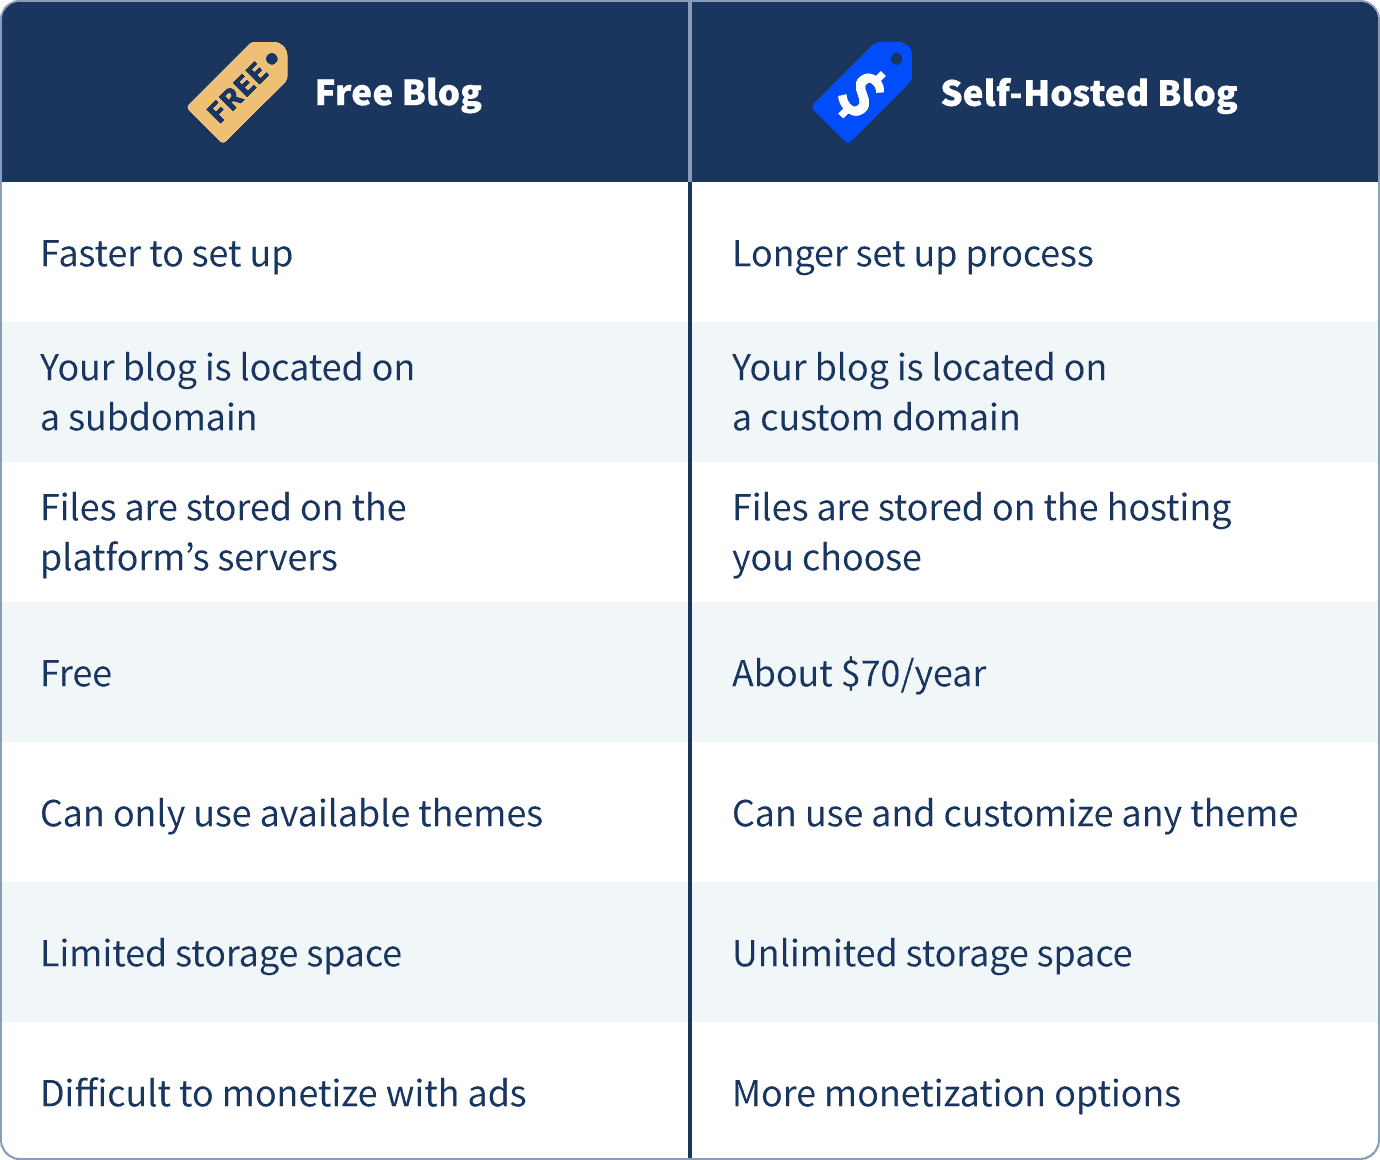
If you’re just blogging for fun or you’re not planning to do it for long, then a free blog might make sense. However, if you’re serious about blogging, the self-hosted option is the way to go. A self-hosted blog gives you the foundation to eventually turn your blog into a business with multiple income streams.
Which Blogging Platform Should I Choose?
There are many different blogging platforms that you can choose from. Some are more flexible and easy to use, while some are more limited and come with a higher learning curve. Here’s what you need to consider:
- Costs: Can you afford to pay for the costs of this blogging platform?
- Beginner-friendliness: Is this blogging platform easy to set up and manage? Does it offer support and troubleshooting?
- Features: Does the platform allow you to customize your blog with themes, plugins, and extensions?
- Maintenance: How much manual work does the platform require?
- Monetization options: Will this platform allow you to monetize your blog easily?
Most recent statistics show that WordPress, which is a free (open-source) blog platform, is the most commonly used blogging platform in 2026. We’ve also compiled a list of the top 10 blogging platforms in 2026.

WordPress is followed by Blogger, Tumblr, Ghost, and Medium.
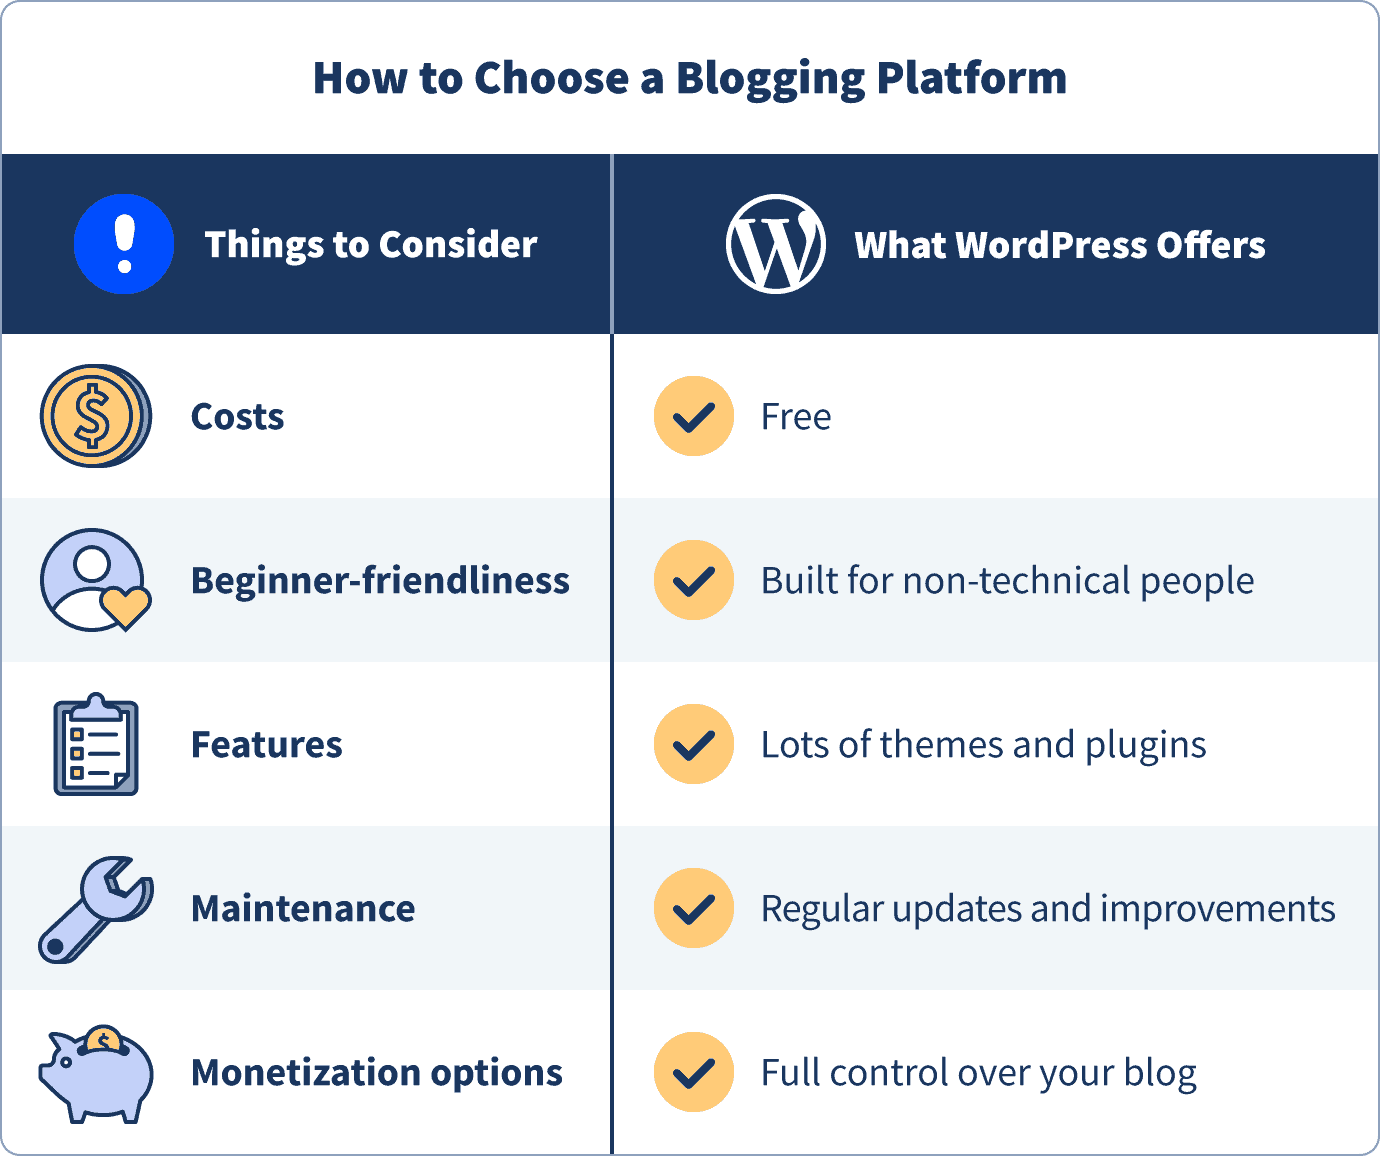
We’ve tried dozens of different blogging platforms, but none of them match WordPress. Here’s why self-hosted WordPress is likely your best option:
- It’s free to use (open-source)
- It’s very flexible with hundreds of free (and premium) blog themes
- It has a large developer community updated and improved regularly
- You will have full control over your blog
- It offers virtually unlimited monetization options (ads, affiliate links, products, memberships)
STEP 3 – Set Up Your Blog Through Web Hosting (and Register Domain Name)
To get started with a self-hosted WordPress blog, you’ll need to buy a domain name and choose WordPress web hosting.
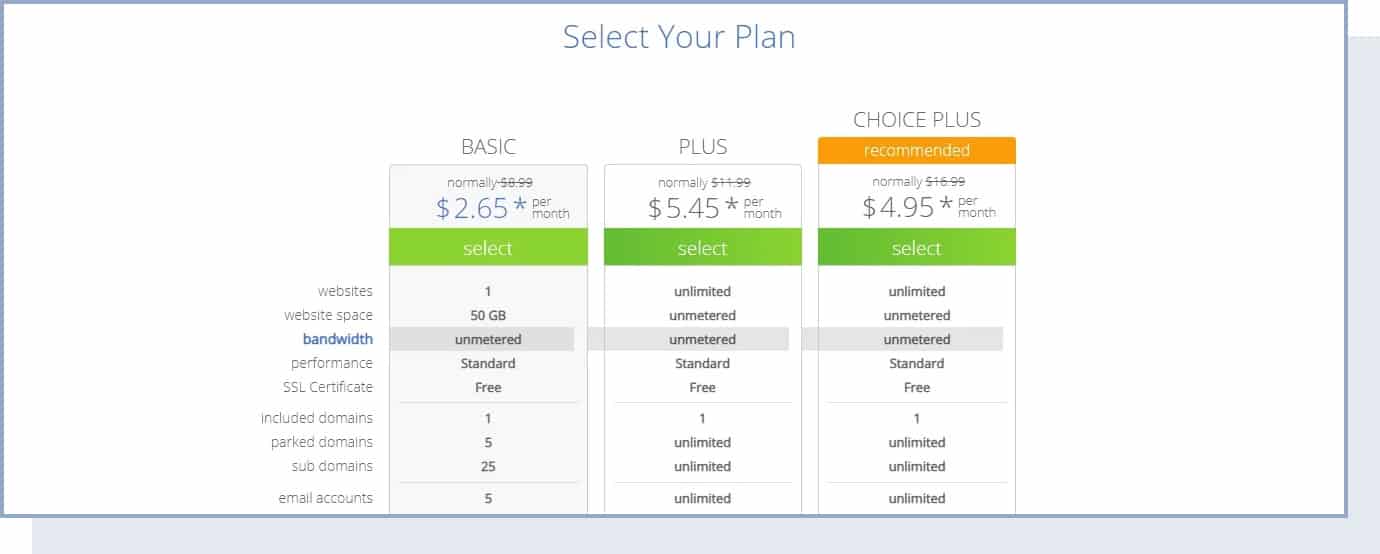
We’ve tested all major web hosting platforms by looking at price, reliability, performance, features, and security and Bluehost is the best choice for new websites.
From Bluehost, you will get:
- Your custom domain name (free for the first year) with an SSL certificate (for security).
- Website hosting (from $3.79/month)
- Simple, one-click install for WordPress
- Free email accounts (e.g., yourname@yourblogname.com)
![]()
Tips for picking your domain name:
- Keep it short and simple so it’s easy to remember and type.
- Avoid numbers and hyphens – they can be confusing when shared verbally.
- Stick with .com, .net, or .org extensions. They’re the most intuitive and professional.
- Try to include a keyword related to your niche if it fits naturally.
- Make sure it aligns with your blog name for consistency.
If you get stuck registering a domain name and signing up for Bluehost, follow this quick step-by-step guide.
Registering a domain name and choosing a web hosting plan on Bluehost (EXPANDS)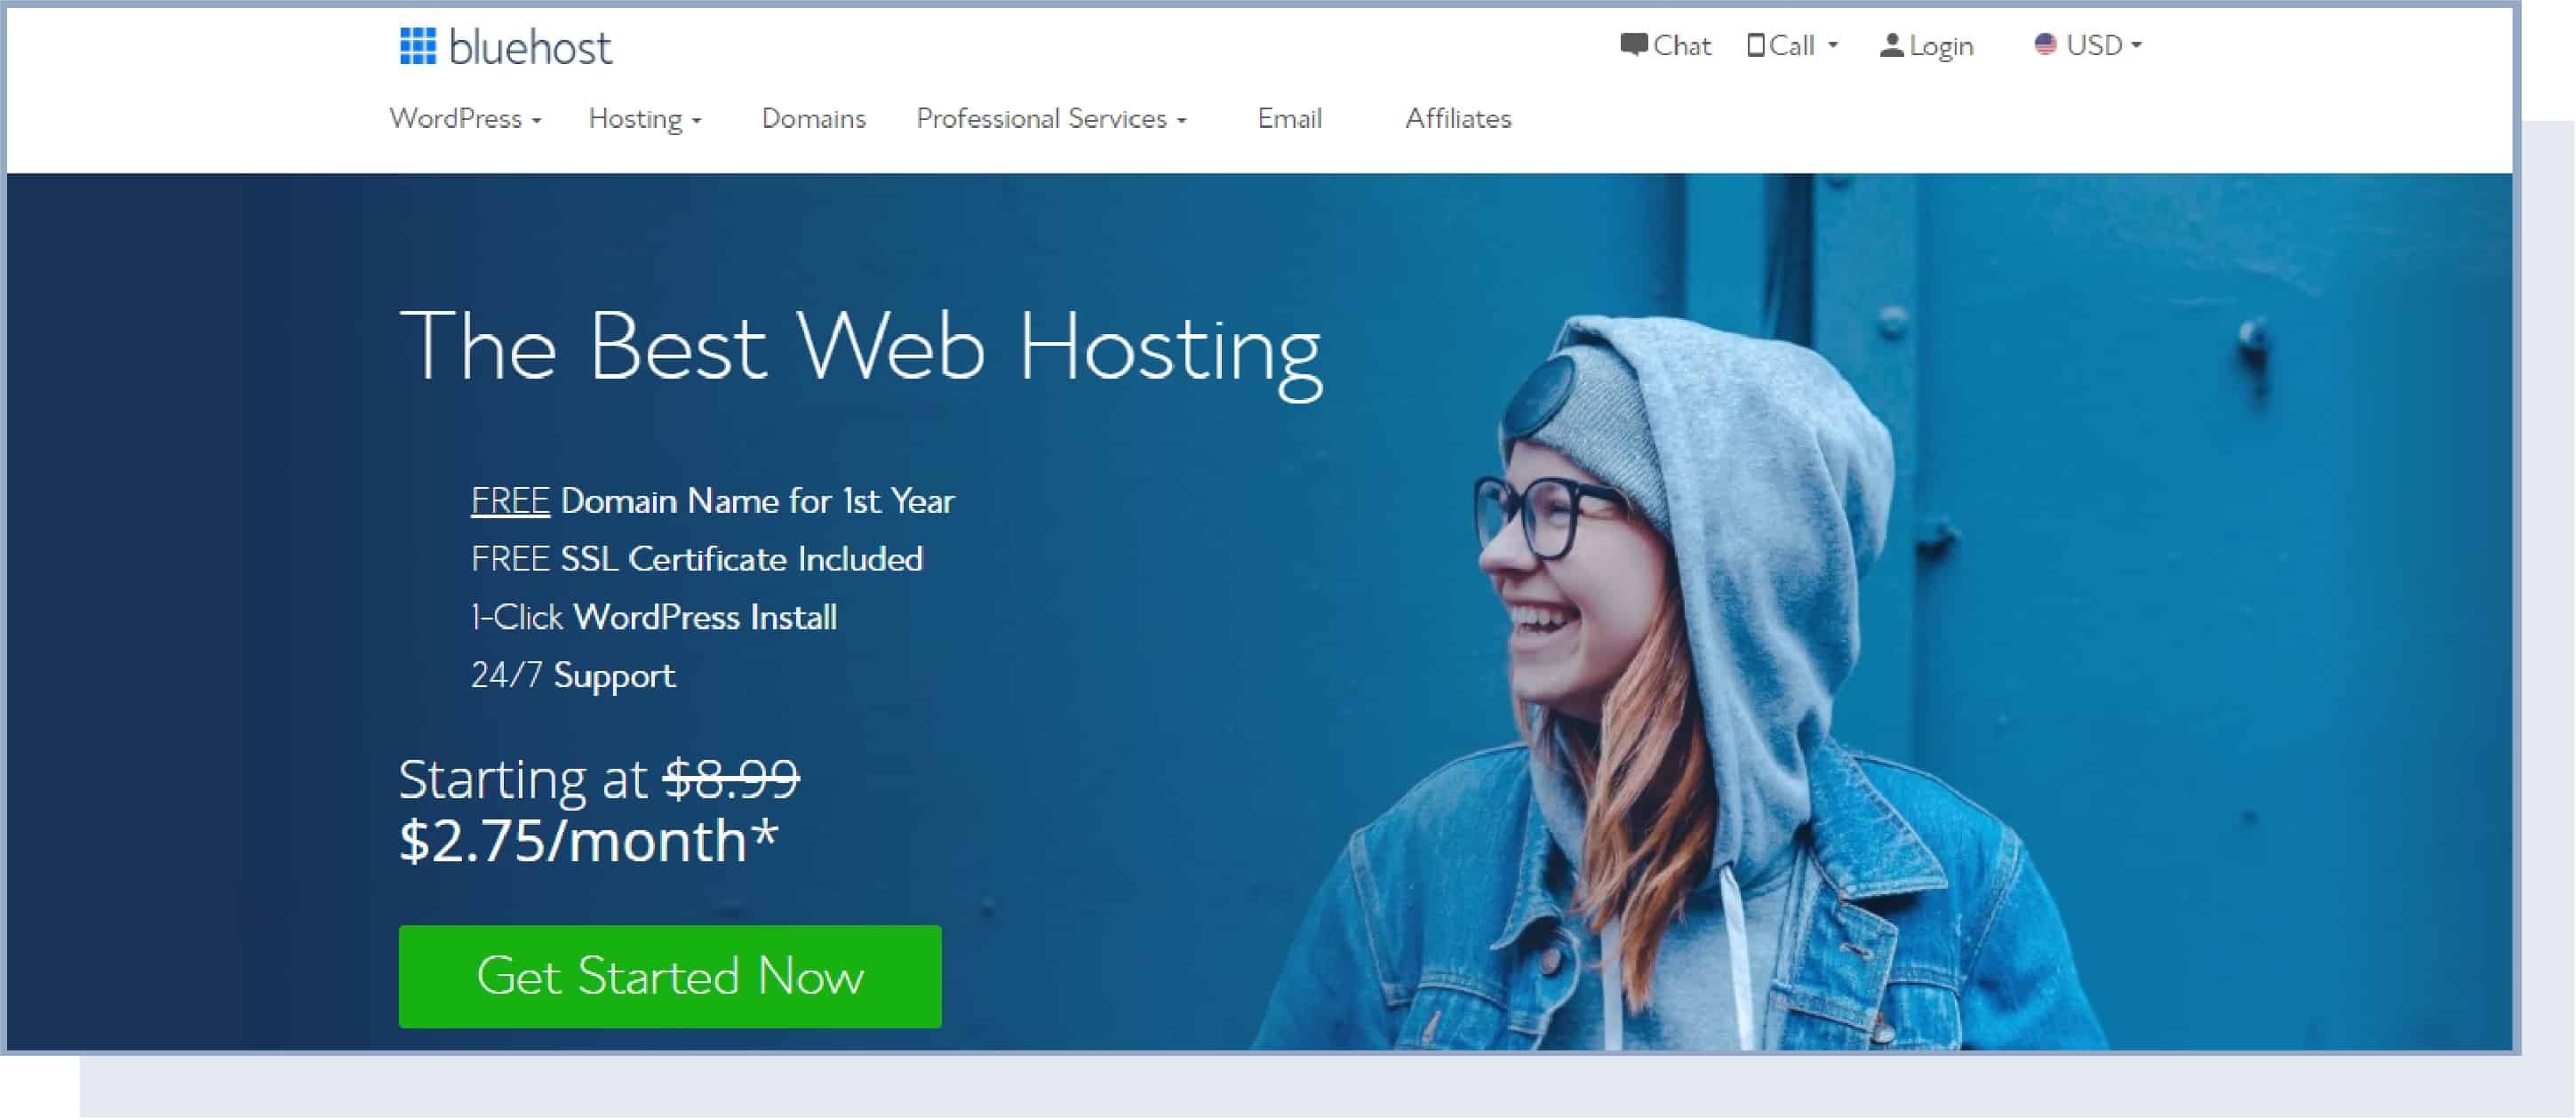


STEP 4 – Configure Your WordPress Blog
Once you have your admin account for WordPress all set up, you can proceed to your new dashboard.
Just go to the admin page (e.g., yourblogname.com/wp-admin) and input the access details for your admin account. Once you log in, you’ll see this:
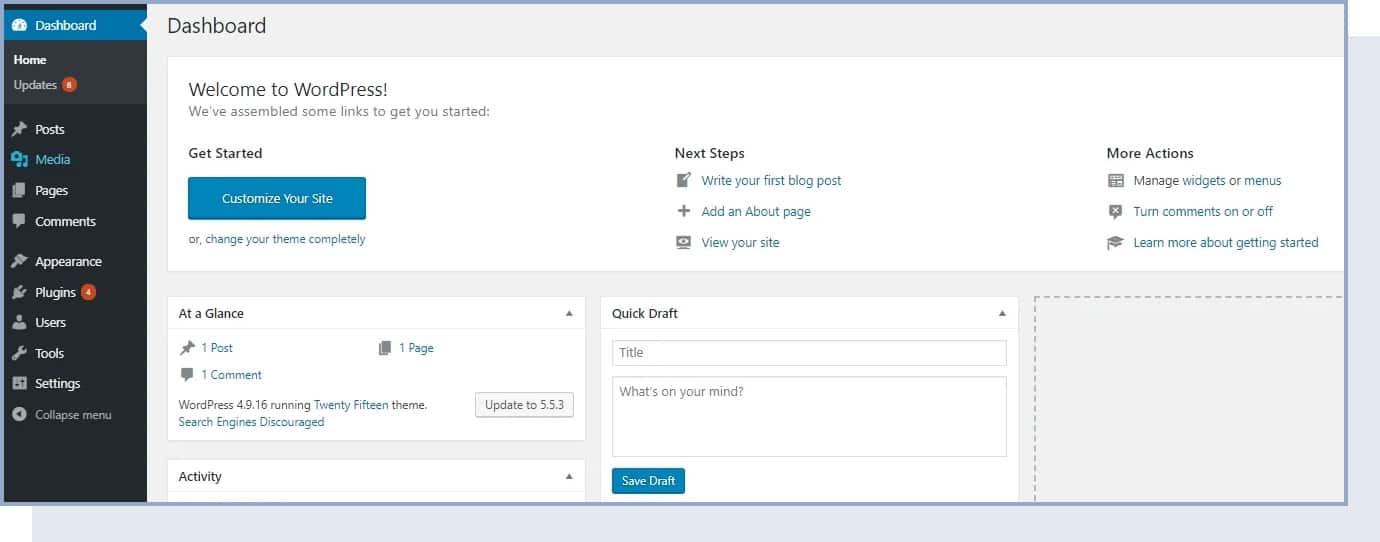
Even though WordPress is already 100% operational, there are still some settings that you should go through in order to customize your WordPress blog.
Before you begin, remember to hit the “Save Changes” blue button every time you change the settings.
1. General Settings
Start by going to the left sidebar and clicking on Settings → General.
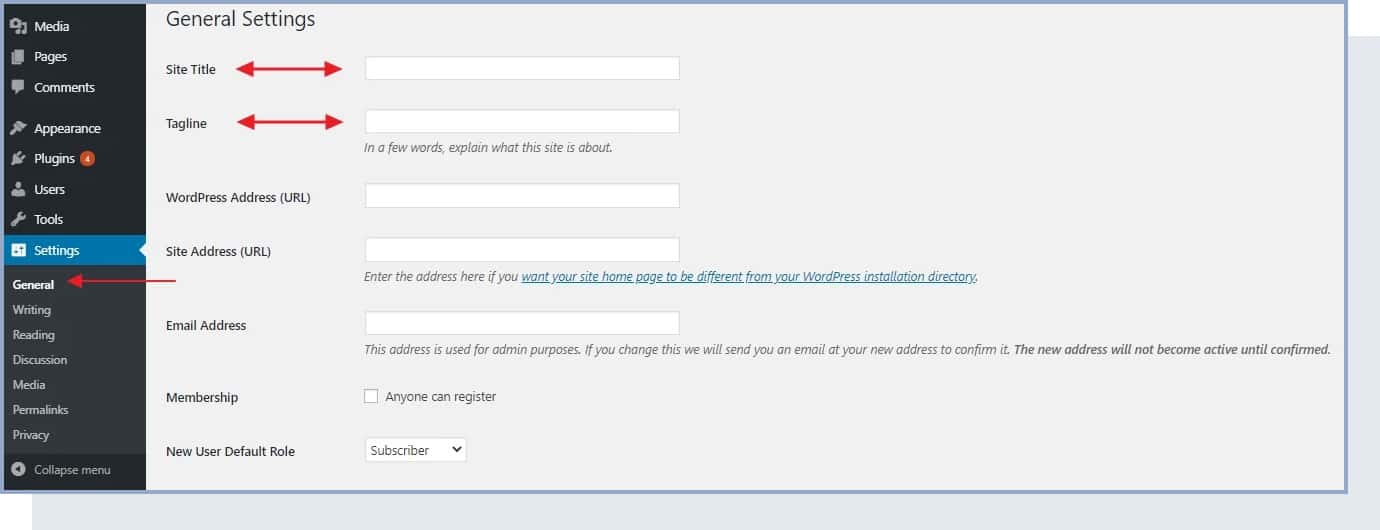
This is where you can set:
- “Site Title” – This is the title you chose for your blog and/or your business blog. Make sure you have the right one since this is the first thing users see, and it will help you appear in search results.
- “Tagline” – This is a short description (typically a sentence) of what your blog is about. For example: “Recipes that even a beginner cook can handle.”
Keep in mind that you can come back and change these at any time.
In the General Settings section, you can also check if your URL (e.g., yourblogname) is correct, set your timezone, and choose your preferred language.
Another important thing to note is that Bluehost has a Coming Soon feature in the last section of General Settings. Once you’re ready to go live with your blog, make sure to turn this feature off.
2. Reading and Visibility in Google
In the reading settings, you can choose what visitors will see when they land on your homepage. You can either choose a static page for your homepage and blog, or you can choose to show the latest articles you publish.
On the same page, you need to make sure that search engines like Google can find (or, in technical terms, index) your new blog.
To do that, go to Settings → Reading (again, from the main sidebar) and make sure that the field labeled “Discourage search engines from indexing this site” remains unchecked. Like so:
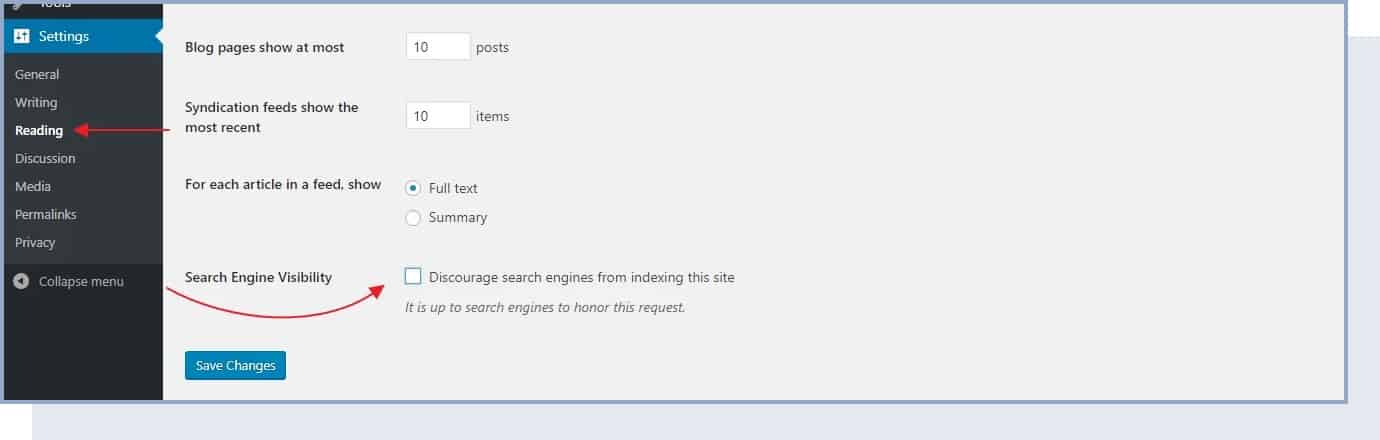
If you don’t do that, your blog will not show up on Google results.
3. Discussion
In the discussion section, you can customize the settings related to the comment section of your blog. For now, you can just choose if you want to allow readers to leave comments and if comments should be manually approved by you.
The comment section can be a great tool to allow readers to interact with you and also for you to gain valuable feedback. But if you choose to enable it, make sure you have some time dedicated to answering comments.
4. Media
In the media section, you can choose cropping settings for your visual assets. You can leave these to default sizes, or you can choose to set specific width and height if you prefer.
Just know that when you upload an image to WordPress, it will automatically create medium- and large-size files. Medium images will typically be used if you have grid mode as the page view or for featured images in a post. Large will be used as featured images in some WordPress themes (for example, the ones designed to show photos).
5. Permalinks
The “permalinks” settings define how WordPress will go about creating individual URLs – web page addresses – for each of your blog posts or sub-pages.
While it can sound complicated, setting permalinks is very simple.
Just go to Settings → Permalinks. Once there, set your permalinks to the “Post name” variant, like so:
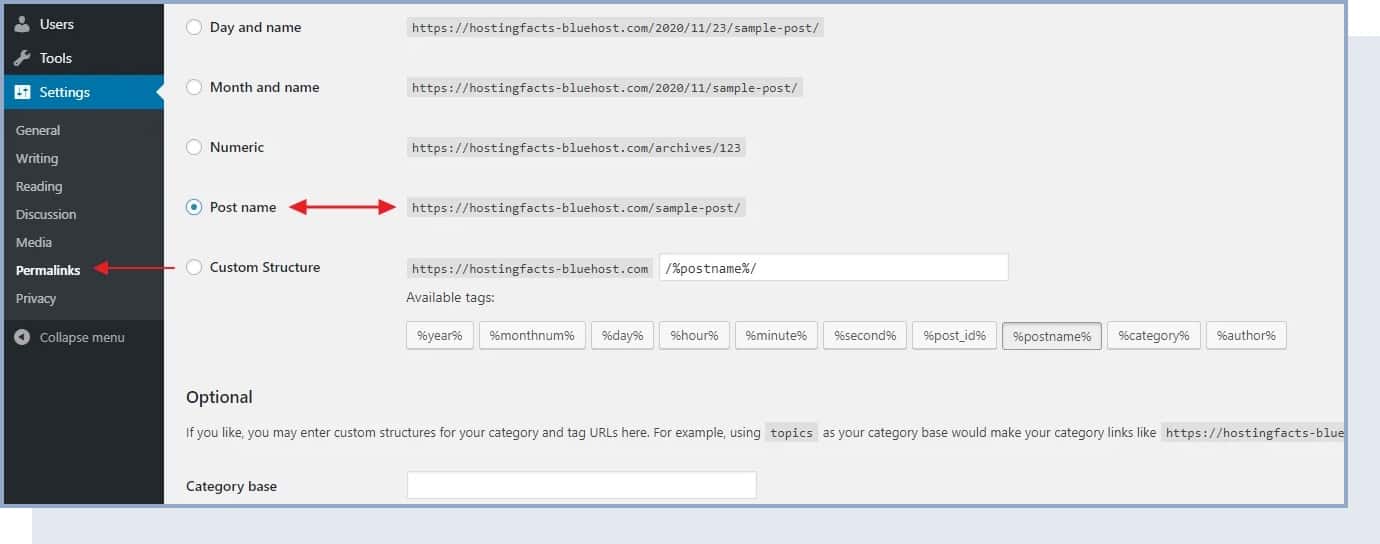
This is the most optimal setting of the ones available and also the one preferred by Google and other search engines.
STEP 5 – Design and Customize Your Blog
Once you’re done with your blog’s settings, you can now customize based on your needs and goals.
The great thing about WordPress is that even if you’re not a skilled designer, you can still get a top-notch look for your blog.
How? Thanks to thousands of WordPress themes that are available on the web – many of them are free, and you can customize them easily (without any coding knowledge).
Go back to your WordPress dashboard and navigate to Appearance → Themes. Once there, click on “Add New”:
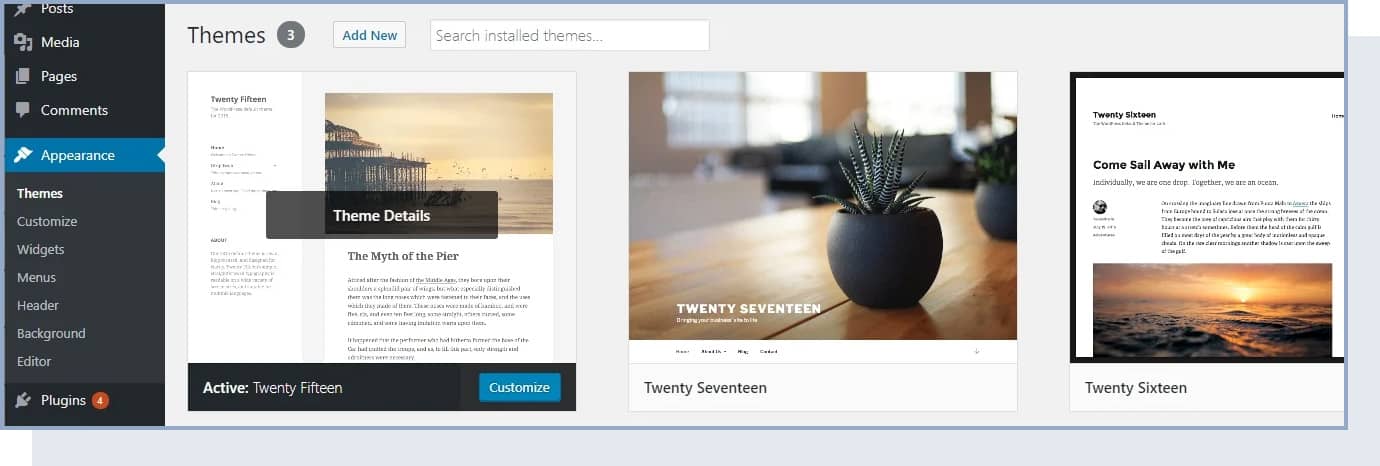
Then, switch the tab to “Popular”:
Here, you’ll see the most popular free WordPress themes in the market. And the best part is that you can install any of them with just one click.
Go ahead and spend a while browsing this list to find something that suits your business and the main purpose behind your new blog.
Once you do see a theme you like, you can install it with just one click: Install → Activate.
How to Customize Your Theme (Logo, Colors, and Structure)
Even though the WordPress theme that you chose comes with a pre-configured design, you can change parts of it to your liking if you have a good design idea.
For classic themes, this is done by going to Appearance → Customize. What you’ll see is the WordPress Customizer:
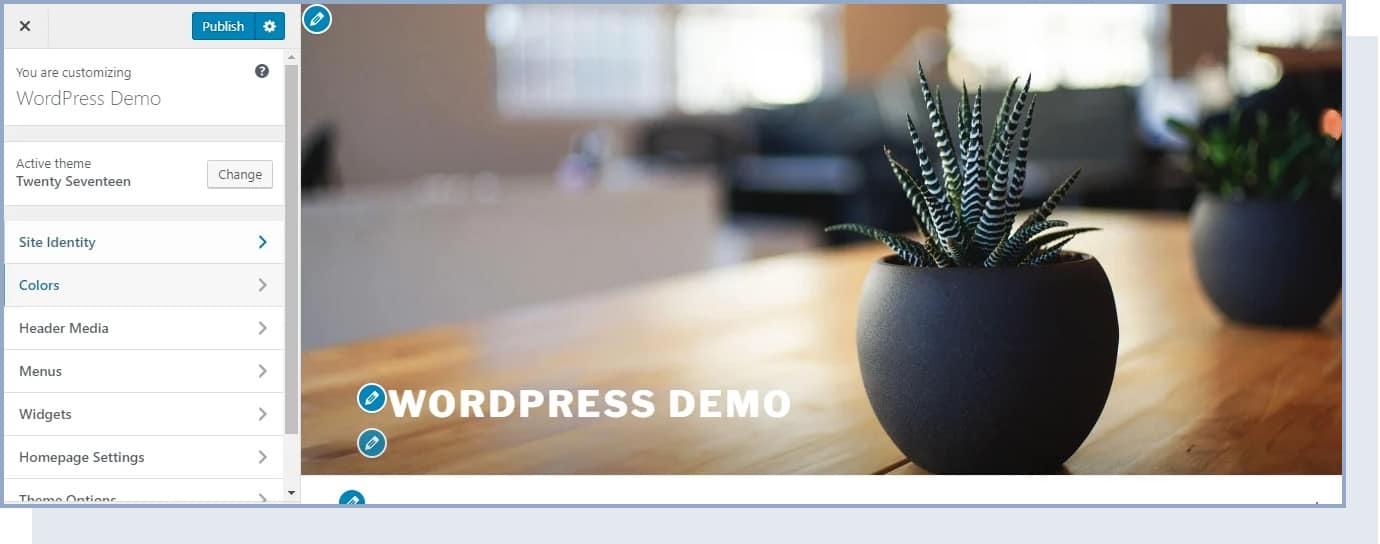
Depending on your current theme, you’ll get a different set of options in the sidebar menu, but the most common ones will include:
- Site Identity: Here, you can set your blog title again, and add a logo image and site icon (AKA favicon).
- Colors: Here, you can adjust the basic colors you want to use in your blog.
- Header: Set your header graphic or image.
- Background: Set your background graphic, image, or color.
- Menus: More on this later.
- Widgets: More on this later as well.
1. Add Logo And Favicon
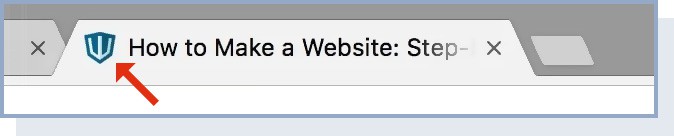
You probably know what a logo is – a graphic mark or symbol used to identify your blog.
But what is a favicon? It’s the small icon representing your blog that will appear in your users’ main top bar of the web browser, next to the blog title. This is what the favicon looks like on our site:
If you don’t have a logo yet, you can use these free tools or follow our guide to creating one yourself.
If you don’t have a favicon yet, you can use these favicon generators.
To add your logo, just click on the “Select logo” button. On the next screen, WordPress will let you know what sort of graphics are acceptable for logos.
After uploading your logo, you should see it inside the live preview window.
To add your favicon, click on the button labeled “Select image” under the “Site Icon” section. Once you add your favicon, it won’t be displayed anywhere in the preview but you’ll be able to see it on the top bar of your browser.
2. Change Blog Colors
Depending on the theme you’re using, you’ll see a different set of options in this section of Customizer.
If you already have a logo, you should probably use the same colors for your blog.
Keep in mind that color plays an important role in web design and affects the way visitors will perceive your blog. Blue, for instance, tends to evoke dependability and trust, while yellow evokes energy and joy.
If you don’t know where to start or you need some help, start by looking at examples for inspiration and follow our beginner step-by-step guide to choosing your color scheme.
3. Add Custom Header Graphic
A website header is the top section of the web page – the whole space above the fold of the homepage.
In this section, you’ll be able to add a graphic/image, and for some themes, even a video, to your header. The specific options you have will change depending on the theme you choose.
To set your header image, just click on “Add new image”:
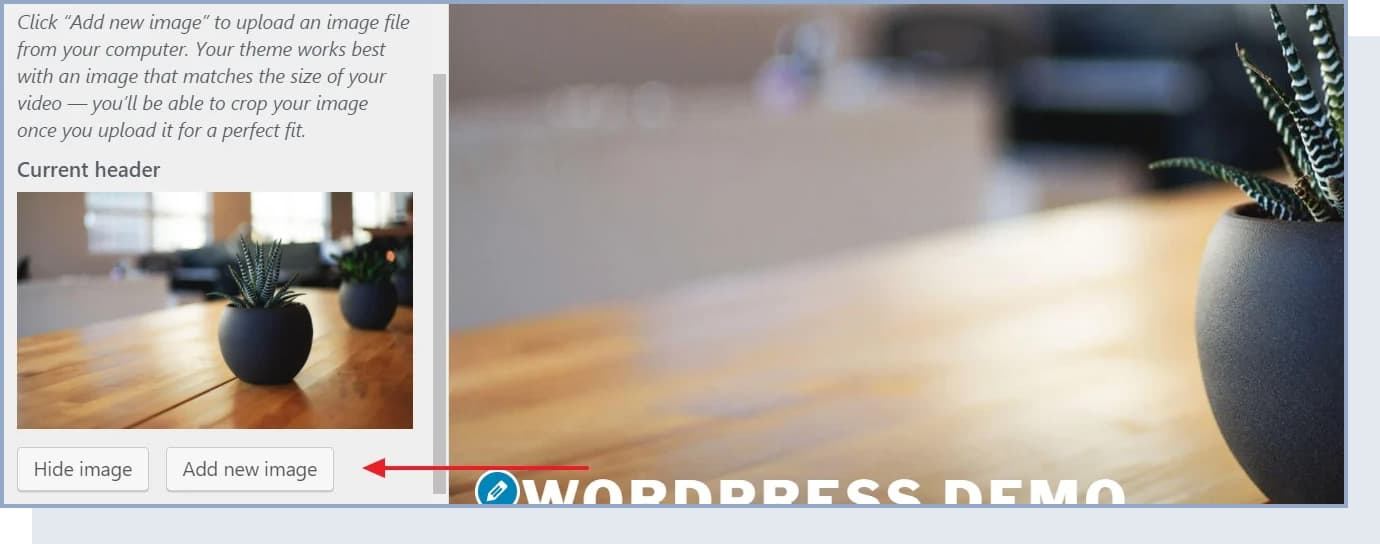
You can pick whatever image you wish for your site header, but make sure it’s high quality. WordPress will let you know about the minimal requirements for your header image right on the upload screen.
4. Change Background
For some themes, you’ll have the option to set the main background for your whole website.
Usually, you’ll be able to set a custom image or a solid color to be in the background. Either way, you can get quite interesting effects if you experiment with this long enough.
5. Create New Pages and Blog Posts
With all of the above already done, you’re ready to start creating content for your new blog.
In the beginning, make sure your blog includes at least the following pages:
- Blog: WordPress will create this section for you automatically. By default, all your latest blog posts are going to be listed right on the homepage.
- About: Tell your visitors what the blog is about and who’s behind it. This humanizes your content and helps readers connect with you.
- Contact: You can add your contact information or a contact form here. This makes you reachable to readers and potential business partners.
You can also add a Services / Products page to list your products and/or services and tell people why they should buy them.
How to Create New Pages
Now that you have an idea of what sorts of pages you might need, let’s talk about how to actually go about creating them in WordPress. Luckily, the process is the same no matter what sort of page that is.
Before adding pages, you can also set your blog to a maintenance mode, which will prevent others from seeing your unfinished website.
Now, go to your WordPress dashboard and then to Pages → Add New. What you’ll see is the WordPress block editor screen:
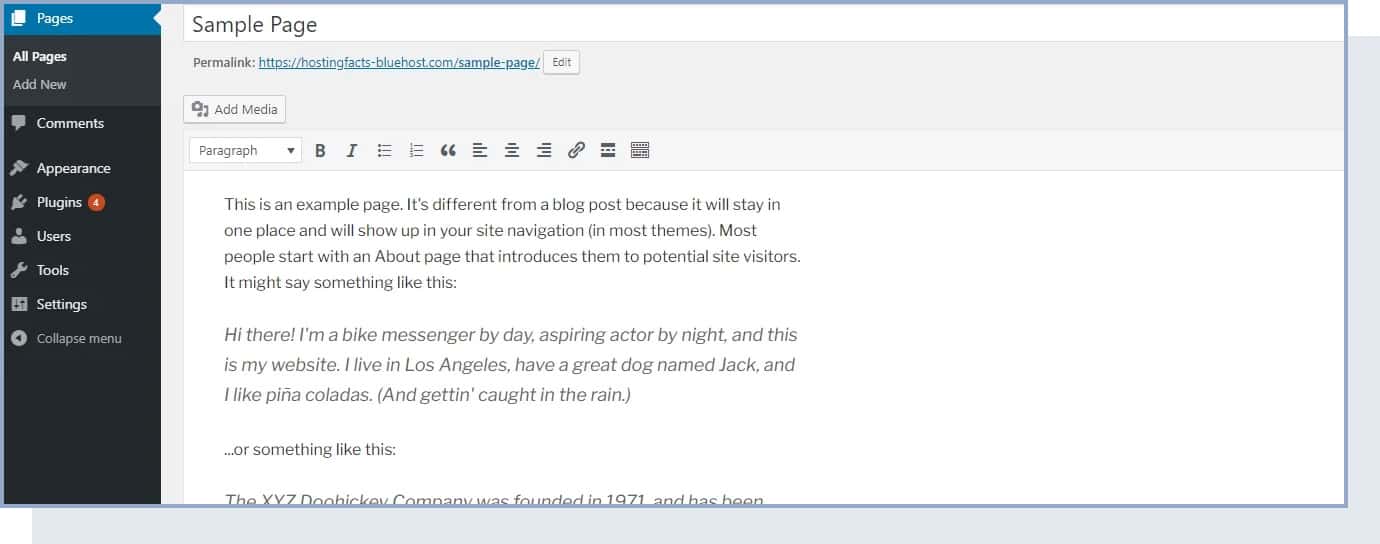
The block editor uses a block-based system where each element (paragraph, image, heading, list) is its own block. You can add new blocks by clicking the “+” icon and choosing from available block types. As you would imagine, once you click the “Publish” button, your page becomes visible to the public.
How to Add Blog Posts
Creating blog posts works the same as creating new pages. The only difference is that your posts are going to be displayed automatically on your blog homepage, while your pages need to be added to a menu if you want users to find them (we’ll show you how to do that in the next section).
Since the blog functionality is one of the core elements of WordPress, you’ll find a whole separate section devoted to creating and publishing blog posts.
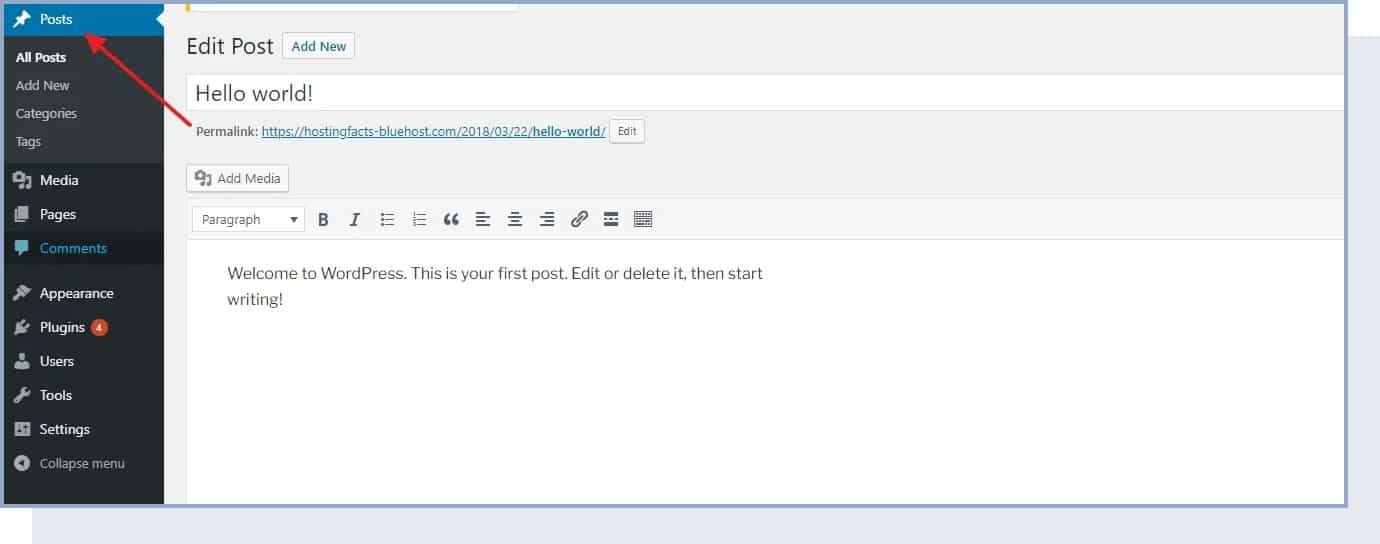
From the main WordPress dashboard sidebar, click on “Posts.”
6. Add a Navigation Menu
Your menu is extremely important for your blog – it allows your readers to easily find the information and content they’re looking for.
Typically, your blog should have one main menu that’s placed in the main navigation bar.
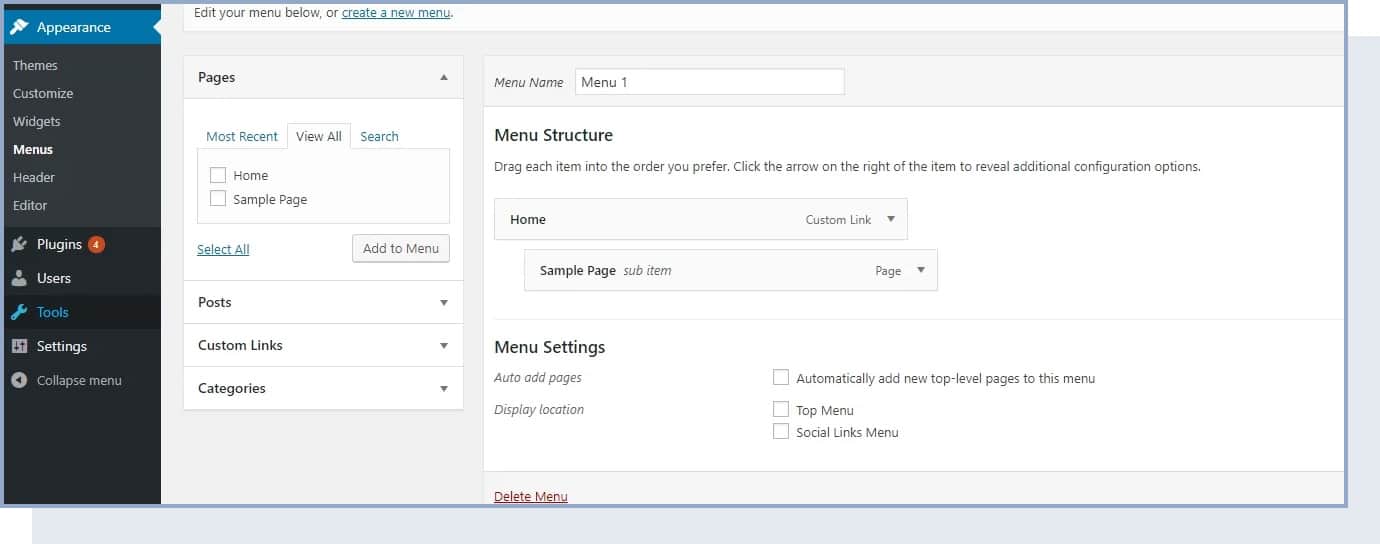
To create a new menu in a classic theme, go to Appearance → Menus. Once there, look through the list of the available pages you’ve created so far and click the checkboxes next to the ones that you want to have in your new menu. Then, click on “Add to Menu.” You’ll see your pages listed in the section on the right. At this stage, you can also drag and drop those pages to realign them.
7. Change Your Blog Sidebar and Footer
Depending on the theme that you’re using, you might have anywhere from zero to a handful of sidebars available and maybe a customizable footer as well.
To tune up what’s displayed in all those areas, we’re going to use WordPress widgets.
In simple terms, widgets are small blocks of content that can be displayed in various places throughout a WordPress blog.
To see what this is all about, just go to Appearance → Widgets.
What you see here are all the different widgets that WordPress gives you. Just to name a few:
- Archives – a list of all your past blog posts
- Image – an image of your choice
- Categories – a list of all your blog categories
- Recent Posts – a list of your most recent articles
- Search – a search bar
- Text – a piece of custom text
You can place all those widgets in one of the predefined widget areas – usually within the sidebar or the footer.
For example, we can add the “Recent Posts” widget to our “Footer 1” widget area.
You can do the same with any of the other available widgets. Just select them and add them to any of the widget areas that your theme gives you.
How to Write Your First Blog Post
Your blog is set up, configured, and designed. Now comes the most important part – actually writing content. Here’s how to create a blog post that readers will want to read and share.
1. Start With Keyword Research
Before you write, figure out what your audience is searching for. By targeting specific keywords, you increase the chances of your blog appearing in search results. You can use free tools like Google Keyword Planner, Google Trends, or Ahrefs Keyword Generator (free version) to find keywords with decent search volume and low competition.
2. Write an Engaging Title
Your title is often the difference between someone clicking on your post or scrolling past it. Try these approaches:
- Be clear and specific about what the reader will learn
- Promise value (e.g., “7 Easy Ways to…” or “A Beginner’s Guide to…”)
- Use numbers when writing list-style posts
- Appeal to curiosity or solve a specific problem
3. Outline Before You Write
Use headers and subheaders to break your content into organized, scannable sections. Under each heading, note the main points you’ll cover. This keeps your writing focused and helps readers find what they need quickly.
4. Write the Post
Start with a compelling introduction – grab your reader’s attention with a relevant statistic, question, or short anecdote. Then write the body using your outline, keeping paragraphs short and avoiding filler content. Here are some formatting best practices:
- Use short paragraphs (2-4 sentences) for better readability
- Use headers and subheaders to organize content
- Use bulleted and numbered lists for important information
- Bold key points and italicize for emphasis
- Add images, screenshots, or infographics to break up text
- End with a clear conclusion or call to action
5. Optimize for SEO
Before hitting publish, run through this quick checklist:
- Keywords: Make sure your target keyword appears naturally in the title, first paragraph, at least one subheading, and throughout the post.
- Internal links: Link to other relevant posts or pages on your blog.
- Alt text: Add a short, descriptive alt text (with your keyword when relevant) to each image.
- Meta description: Write a compelling meta description (150-160 characters) that includes your keyword and entices clicks.
- URL slug: Edit the slug (the end portion of the URL) to be short, clear, and include your keyword.
6. Edit and Publish
Read through your post at least twice. Check for typos, grammatical errors, and unclear sentences. If possible, ask a friend or family member to review it. When your post is ready, hit “Publish.”
How to Use AI as a Blogging Assistant
AI writing tools like ChatGPT have become widely available, and they can be helpful when used correctly. However, it’s important to use AI as an assistant – not a replacement for your own voice and expertise.
Good ways to use AI for your blog:
- Brainstorming content ideas and blog post titles
- Creating outlines for your articles
- Writing meta descriptions and social media captions
- Proofreading for grammar and spelling
- Repurposing blog content into different formats
What to avoid: Don’t publish AI-generated content without thorough editing. Google’s algorithms prioritize authentic, experience-based content. Always fact-check AI output, inject your personal perspective and expertise, and make sure the writing sounds like you – not like a robot.
How to Start Blogging: 6 Things Every Blogger Should Know
Now you know all the technical details you need to start a blog.
In this section, we share our best tips and things you should keep in mind once you begin blogging.
1. Choose The Right Topics
The first thing you should focus on is the topics you’ll talk about. If you followed our suggestion from Step 1, you probably already know your topic and niche.
When choosing the topics, make sure you keep your niche and audience in mind.
We’ll explain how to find content ideas in the next section.
2. Build a Backlink Profile
Backlinks, also known as inbound or incoming links, are links to your blog coming from another website. They represent one of the main elements that will help you rank in search engine results.
There are many backlink-building techniques you can use, such as resource page link building, broken link building, and more.
For example, after you publish a new article, you can reach out to other blogs in your niche (make sure they’re not your competitors), and ask them to include a link to your page. You can also try writing guest posts for other blogs and ask to add a link to your piece.
But to gain backlinks, high-quality content is a requirement. This brings us to the next point.
3. Focus On Quality
Although there are many strategies you can use to improve your blog and drive traffic to it, keep in mind that, when it comes to a blog, quality always beats quantity.
There are two reasons why quality is important for blogging. First, users are interested in high-quality, useful information. Second, it’s a huge factor that influences ranking in search engines like Google, which reward quality content – especially content that demonstrates real experience, expertise, authoritativeness, and trustworthiness (often called E-E-A-T).
To create high-quality content, follow these best practices:
- Use short paragraphs for better readability
- Use headers and subheaders to organize content
- Use bulleted and numbered lists to make important information stand out
- Bold and italicize key information
- Add visual assets like images, screenshots, and infographics to break up text
- Include original insights, personal experiences, or unique data when possible
4. Use Internal Linking
Internal links go from one of your blog posts to another page on your blog.
Internal links are important for three reasons. First, they pass authority from one page to another, helping you rank on search engines. Second, they guide users to high-value, relevant content on your website. Third, they prompt users to take action as calls to action.
When you’re writing a new blog post, try to find a place where it makes sense to link to another article you published.
5. Use Social Media to Gain Traffic
When you first start writing blog posts, you’ll notice that they won’t get much traffic right away.
This is normal. Search engines are competitive and it can be difficult to outrank established blogs.
A good way to start getting traffic to your blog is to use social media. With social media, you can network with other bloggers and people in your industry or niche.
When you’re writing your blog posts, try mentioning other bloggers and influencers in your niche. Then, when the article is live, you can share it on social media and tag them. If your content is high-quality, interesting, and relevant to them, you’ll see traffic and engagement go up (from their follower base), and these influencers might even share it on their profile.
Another social media strategy you can try is to find online forums and discussion sites (e.g., Reddit and Facebook groups) and share your content there.
By using social media to network with people in your industry, you’ll be able to build relationships with people that have the same interests and that will likely be interested in the topics you write about.
6. Plan Your Content
One of the main reasons why new blogs fail is irregular posting.
In the beginning, the secret to efficient content posting is to have a plan.
First, ask yourself this question: “How many high-quality blog posts can I fit into my schedule?“.
When you first start, we recommend publishing a minimum of one blog post per week. Consistency matters more than volume – a few well-crafted posts each week will serve you better than daily posts that feel rushed. Create an editorial calendar (a simple spreadsheet works) with columns for publish date, post title, target keyword, and status. This helps you stay accountable and plan ahead.

How to Promote Your Blog
Writing great content is only half the battle. If you want people to find and read your blog, you need to actively promote it – especially in the early days when search engines haven’t yet ranked your content.
1. Share on Social Media
Create profiles on the platforms where your audience is most active – Facebook, Instagram, X (formerly Twitter), LinkedIn, or Pinterest. Share each new post with a brief, engaging caption. Don’t just post links; add context, ask questions, or share a key takeaway to encourage clicks.
2. Build an Email List
An email list is one of the most valuable assets a blogger can have. Unlike social media followers, your email subscribers are a direct audience you own. Start collecting emails from day one by offering something valuable in exchange – a free checklist, template, or mini-guide related to your niche.
You can use email marketing tools like Mailchimp (free for up to 500 subscribers), Kit (formerly ConvertKit), or MailerLite to manage your list and send newsletters when you publish new content.
3. Write Guest Posts
Contributing articles to other established blogs in your niche is one of the most effective ways to build backlinks and get your name in front of a new audience. Reach out to blog owners with a personalized pitch and a topic idea that would be valuable to their readers.
4. Engage in Online Communities
Participate in Reddit threads, Facebook groups, Quora discussions, and niche-specific forums. Answer questions, share your expertise, and link to your blog posts when they’re genuinely helpful. Focus on providing value first – blatant self-promotion is usually not welcome and can get you banned.
5. Optimize for Search Engines (SEO)
Search engine optimization is a long-term strategy, but it’s one of the most sustainable ways to get traffic. Beyond the on-page SEO tips we covered in the writing section, make sure to:
- Submit your sitemap to Google Search Console and Bing Webmaster Tools
- Use proper heading hierarchy (H1, H2, H3) in every post
- Categorize your posts into clear, relevant categories
- Build backlinks through guest posting and outreach
- Be patient – SEO results typically take 3-6 months to materialize
6. Repurpose Your Content
Get more mileage from every blog post by repurposing it into other formats. Turn a how-to article into a short YouTube video. Pull key quotes for social media graphics. Summarize a long post into an infographic. This expands your reach across multiple platforms without requiring entirely new content each time.
How to Make Money Blogging
One of the most common questions new bloggers have is whether they can actually earn money from a blog. The answer is yes – but it takes time, consistency, and the right strategies.
Set realistic expectations: Most bloggers don’t earn significant income in their first few months. Focus the first 6 months on creating high-quality content, building traffic, and growing your audience. Monetization becomes much easier once you have a steady stream of readers.
1. Display Advertising
Once your blog gets consistent traffic, you can earn money by displaying ads. Google AdSense is the easiest way to get started – you place their ad code on your blog and earn revenue from impressions and clicks. As your traffic grows, you can apply to premium ad networks for higher payouts, such as Mediavine (50,000 sessions in the last 30 days) or Raptive, formerly AdThrive (25,000 monthly pageviews).
2. Affiliate Marketing
Affiliate marketing means recommending products or services and earning a commission when someone purchases through your link. Sign up for affiliate programs relevant to your niche – Amazon Associates is a popular starting point, but many individual companies and niche-specific networks offer higher commissions.
Create content that naturally incorporates affiliate links, such as product reviews, comparison posts, and “best of” lists. Always disclose your affiliate relationships to comply with FTC guidelines.
3. Sell Digital Products
Once you understand what your audience needs, you can create and sell digital products like ebooks, templates, printables, or online courses. Digital products have low overhead and can generate passive income over time.
4. Offer Services
Your blog establishes you as an expert in your niche, which makes it a natural platform for offering services like consulting, coaching, freelance writing, or design work.
5. Sponsored Content
As your blog grows in authority and readership, brands may pay you to write posts featuring their products or services. Always be transparent with your readers about sponsored content and only promote products you genuinely believe in.
6. Sell Memberships or Subscriptions
Create exclusive content – private articles, a community forum, downloadable resources, or personalized advice – and offer it through a paid membership. This model works well for blogs that have built a loyal and engaged audience.
How to Brainstorm Content That Will Drive Traffic
Now that you have everything you need to set up and launch a blog, you’re ready to start blogging.
But what will you actually write about?
In this section, we provide brainstorming advice and tips to find new content ideas.
1. Get Inspired
The first thing you can do to find content ideas is head over to other popular blogs in your niche and look at their top articles.
That can be a good source of inspiration, but avoid just copying content. Just use this to find ideas and understand what the main topics are in your industry.
If you find inspiration, consider using the same topic but making it into a different content format to make it different from what already exists. For example, you might find that your competitor posted a YouTube video that went viral. In that case, you could take the same or a tangentially related topic and create a long-form article or a listicle blog post.
2. Just Google It
There are a few ways you can use Google to find content ideas.
First, you can try typing your niche or broad topic in Google Image Search and see if you find any ideas. At the top, you’ll see some tags with related topics.

Next, you can do a simple Google search of a broad topic and look at the related searches.
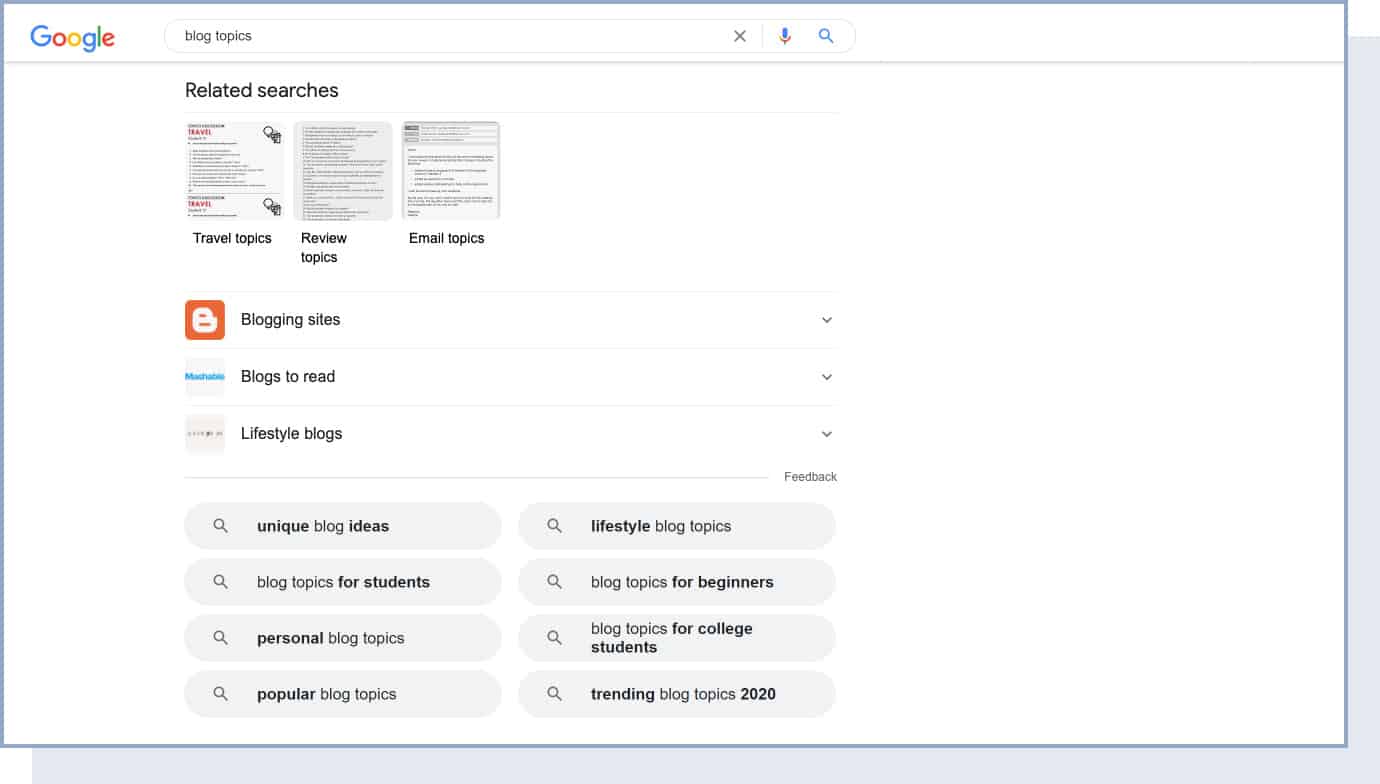
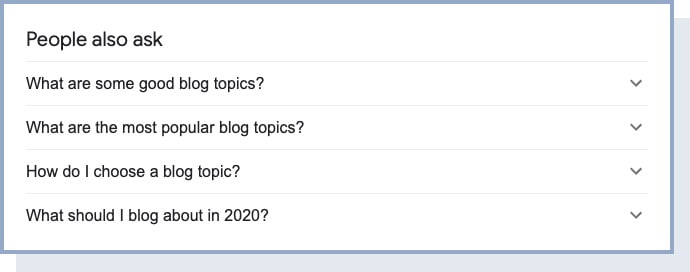
Finally, on the same results page, take a look at the “People also ask” box. Here you’ll find the most asked questions related to this topic.
3. Use Keyword Research Tools
The most popular keyword research tools are Ahrefs, Moz, and SEMrush. But since most of these are paid, consider using free tools when first starting.
The best free keyword research tools are:
- Google Keyword Planner
- Google Trends
- Google Search Console
- Ahrefs Keyword Generator
- Keyword Sheeter (Chrome extension)
- Answer the Public, Keyword Surfer
- Keyworddit, Questiondb
- Reddit Keyword Research Tool
- Bulk Keyword Generator
There are many ways you can use these tools to uncover keywords to create blog posts. However, we recommend starting off by targeting relevant keywords with low keyword difficulty. This will give you a better shot at ranking in search results.
Here’s how to do that: Insert your keyword into Ahrefs Keyword Generator and filter by keyword difficulty (KD) score. These, typically shown in green, are the keywords you’ll be able to rank for because they’re less competitive.

To get your keywords to rank better, and to create an intuitive blog structure for both users and search engines, you can create content clusters.
Content clusters are content pieces on your blog that are linked to a common subject – called “pillar content.”
Your pillar content can be a broad keyword with high search volume (e.g., “marketing”) or a product page you want to point users to. The topic clusters, on the other hand, should be more long-tail keywords with less search volume, but that you can rank for (e.g., “content marketing strategies for beginners”).
You will then use internal links to properly connect the pillar pages with the individual topic clusters.
4. Blog and Social Media Comments
One of the easiest ways to find content ideas is to see what your readers think and talk about, and what questions they have about your content. Once you’ve published a few blog posts, scroll through the comments and see what your audience has to say.
5. Ask Your Audience
Listening to your audience is the perfect brainstorming method because you’re getting ideas from the people who will read your content.
Reading comments can help with that, but an even more direct way to hear from your audience is by asking them. You can do this through social media or email.
6. Podcast Episodes
Podcasts are some of the most successful types of content, so they’re a good opportunity to repurpose a successful podcast into a new and fresh format – a blog post.
Just find a popular podcast in your niche and scroll through the episode titles and descriptions. You’ll start getting ideas for blog posts you can write about. Again, make sure you don’t just copy these and try to find very specific topics that none has written about before.
7. Pinterest
Pinterest is a great resource for uncovering unique content ideas. Just type a keyword in the search box and you’ll get a list of suggestions, along with existing content that is related to the keyword.
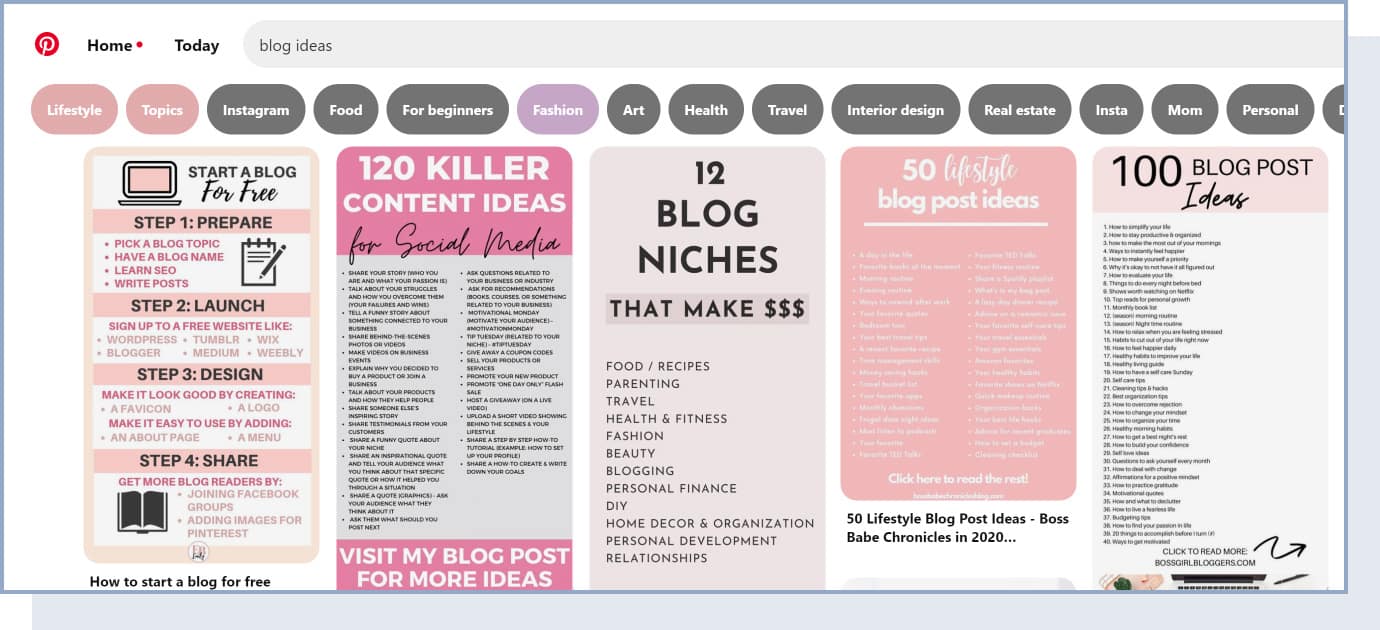
You can also use Pinterest to find ideas for visual content that you can add to your blog posts. For example, if you search for “content marketing ideas,” you’ll find many different visual assets other websites have created, like “reasons to do content marketing,” “social media content calendar,” “content marketing checklist,” etc.
8. Buzzsumo
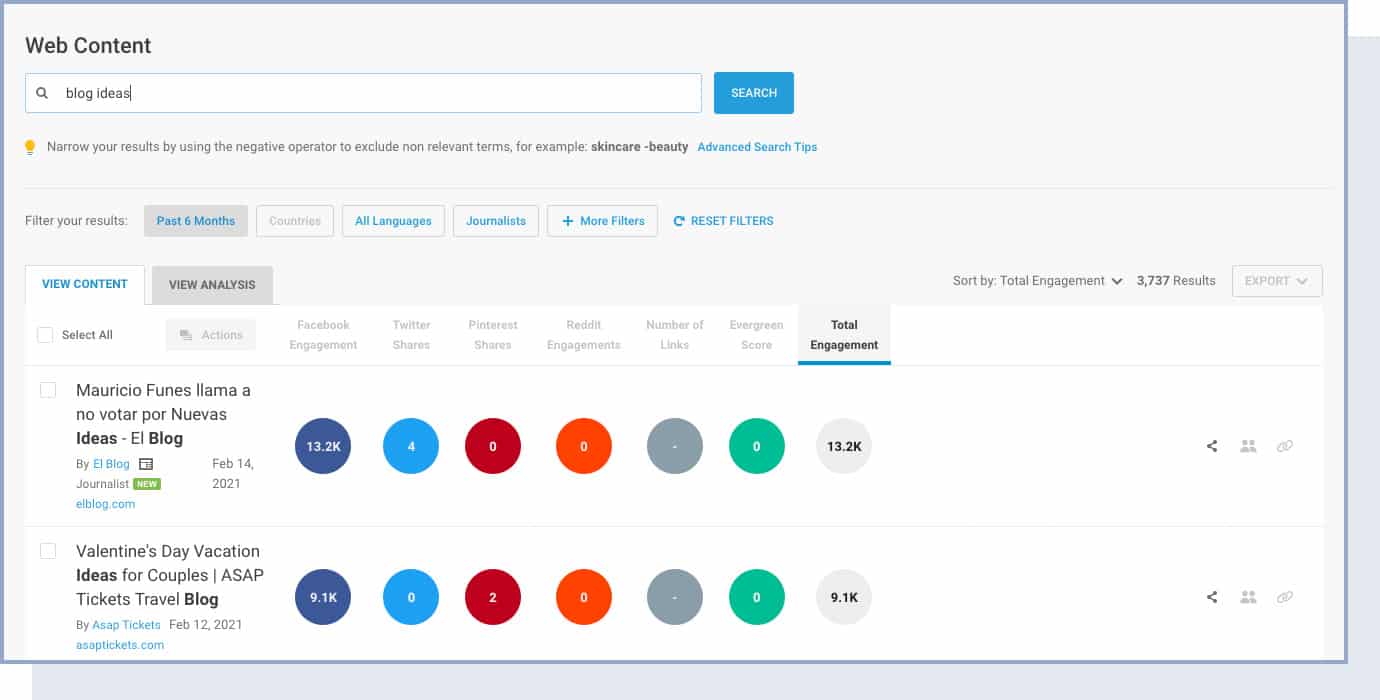
Finally, you can use Buzzsumo to find keywords, stories, common questions, and more around your topic.
Buzzsumo is a paid tool, but it offers a free version that you can use to find content ideas.
Enter your broad topic keyword in the search box, and you’ll get a list of the most popular pieces of content related to it. What makes it different from other tools is that you can easily find content that has the most engagement on social media platforms.
You can also find common questions in online forums, write an article about it, and then go to the forum and link to your article.
If you choose to get the paid version, you can also monitor trends and comments, and find influencers in your niche, along with other features for content research and discovery.
Try playing our two content brainstorming games with some friends, colleagues, or even by yourself to come up with the best article titles for your blog.

How to Start a Blog: Frequently Asked Questions
Now let’s take a look at the most frequently asked questions.
How much does it cost to start a blog?
Luckily, not much! To self-host your WordPress blog, all you need is:
- Domain name: Your custom web address (e.g., www.yourblogname.com) will be around $10-$20/year, but we’ll show you how to get one for free later in this guide.
- Web hosting: Simple and reliable web hosting is usually around $3–5/month. In total, it’s around $36–60/year, but it’s an important investment to your blog success.
If you change your mind and think that blogging is not for you, you can always cancel the hosting service. Many providers offer a 30-day money-back guarantee. Domain names can’t be refunded, but they will simply expire and become available once you stop paying for them.
Can I create a blog without WordPress?
Yes. There are many different blogging platforms that you can choose from, like Wix, Joomla, and Blogger.com. However, WordPress remains the most popular and flexible choice for bloggers who want full control over their site and monetization options.
How can I create a blog and be anonymous?
To blog anonymously, avoid using your real name, photo, and email address. We suggest you create an anonymous email account, along with a blogger identity.
In WordPress, go to Users → Your Profile, and enter your blogger name in the “nickname” field. Then click on the drop-down menu Display name publicly as and choose your nickname. Remember to click on the “Update Profile” button.
Apart from this, there are more advanced precautions you should take to be completely anonymous.
When setting up your web hosting with Bluehost, you have the option to add domain privacy and protection (starting at $1.25/month). This will protect you from spam and other unsolicited emails, phone calls, and mail, as well as identity theft, fraudulent domain transfers, users (including competitors) being able to look up your domains, malware, and SEO blacklists.
If you want to go a step further, you can use a Virtual Private Network (VPN), which will encrypt all your data and send it to a random server that could be in any part of the world.
Can I design a blog with no coding skills?
Yes. If you choose WordPress as your blogging platform, you’ll be able to design a professional and fully customized website using themes and the built-in block editor – no coding required.
Is blogging still profitable in 2026?
Yes. In 2026, blogging remains a profitable online venture with bloggers earning income through advertising, affiliate marketing, digital products, services, and sponsored content. However, it’s important to set realistic expectations – most bloggers take 6-12 months of consistent effort before seeing meaningful income. The bloggers who succeed treat it as a long-term business, not a get-rich-quick scheme.
How often should I publish blog posts?
We recommend publishing at least one high-quality blog post per week when starting out. Consistency is more important than volume. As you build momentum, you can increase to 2-3 posts per week. The key is to create a publishing schedule you can realistically stick to without sacrificing quality.
How long does it take to make money blogging?
Most new bloggers start seeing some income within 6-12 months, but it varies widely depending on your niche, traffic, and monetization strategy. The first few months should be focused on building quality content and growing your audience. Income typically grows gradually as your traffic increases and you diversify your revenue streams.
Can I create a blog all by myself?
Yes. By following our step-by-step guide, you’ll be able to create a blog all by yourself, without any coding or web design knowledge.
Can I customize a WordPress blog with code?
Yes. Although you don’t need to, you can easily add code snippets to your WordPress blog by using the Code Snippets plugin. Go to your WordPress admin bar and click on “Add New.” This will bring you to a new page where you can add a title and copy and paste your code snippet.
Should I start with a free blog?
If you want to test the waters before committing to pay regular fees, you can start blogging for free on WordPress.com. If you change your mind, you’ll be able to transfer your content to WordPress.org at any time. However, if you’re serious about building a blog that can eventually earn money, starting with self-hosted WordPress from the beginning will save you time and hassle in the long run.
What legal pages does my blog need?
At minimum, your blog should have a Privacy Policy (required by law in most regions if you collect any visitor data), a Disclaimer (especially if you use affiliate links or provide advice), and optionally a Terms of Service page. WordPress includes a Privacy Policy template under Settings → Privacy to help you get started.
Create Content, Launch Your Blog, and Keep Improving
Congratulations. You can now launch your new blog!
Wasn’t so difficult, was it?
Remember that it’s important to be consistent with blogging. Results will come if you post new, high-quality articles regularly. Don’t be discouraged if growth is slow in the first few months – that’s completely normal. The bloggers who succeed are the ones who keep showing up.
As a final tip, make sure you look at your blog’s analytics to track results, see which types of content work and which don’t, and make improvements accordingly. Google Analytics (free) and Google Search Console (also free) are the two essential tools every blogger should set up from day one.